

Introduction
React is one of the best libraries for creating stateful interfaces, and is an essential part of the internet as we know it.
Many web apps including Twitter, Facebook, Instagram, and Airbnb depend on this library to deliver stateful, cross-platform applications to billions of users. It continues to be one the most popular libraries of its kind.
React Hooks – Game Changer
React 16.8 introduced a new development pattern called hooks. This new feature brought the library to a whole new place and made it easier than ever to write and understand components in the context of functions, rather than classes.
Look at this Gif to see just how much more efficient these functional components can be from the perspective of the developer:
There are various types of hooks in React, and there's a reason for that. Different tasks require different hooks, from storing variables to memoizing functions.
Many of these hooks feature what is known as a dependency array. The hook watches for changes of the variables in the array, and the it re-runs if any changes are observed.
Take the useEffect hook for example. This hook runs when a component first mounts and whenever the stateful variables in this dependency array change:
const [count, setCount] = useState(0);

useEffect(() => {
  console.log(count);
}, [count]);
In the code snippet above, count will be logged in two situations:
- When the component first mounts
- When you use
setCountto change the value ofcount
Although there is a lot more to dive into regarding hooks, understanding the concept above is essential for the rest of this article. That's because in it, we're going to demonstrate how you can use this dependency array to automatically re-fetch your central data, similar to how it re-runs the useEffect hook.
Database Setup
Almost every production instance of a React application uses a database at some point, whether it be for storing user information, business information, or API data.
There are many ways to implement a database in your React or React Native applications, but there are a few specific methods that integrate excellently with React programming patterns, and specifically hooks.
Of the various hosted solutions for your React apps, you'll find the most benefit in using serverless architecture. I could write about all of the benefits of serverless architecture, but that may as well be a standalone piece. Just to list a few:
- Automatically scales on-demand
- Super easy to deploy
- Forget about server management and maintenance
- More time for UI/UX
- Cost overhead goes to 0
The method demonstrated below combines all of the benefits of serverless app development with a custom hook that works flawlessly with the React programming ecosystem.
For those wondering, yes the library featured below also works with React Native for mobile-first developers.
We will end up with have a hook called useReturn that will always return a fresh instance of a given query. It will look something like the following:
const [minRating, setMinRating] = useState(0);
const { frame } = useReturn(() => /* Your query */, [minRating])

return <div>{frame.map(ele => <Card {...ele} />)}</div>
Don't worry if this incoherent right now. You'll be able to fit your use case perfectly in a few minutes.
Note that in the example, the frame instance, which is an array of records from your database, will be updated in two situations:
minRating(or anything in the dependency array) changes- Another instance of the database (
db) creates, updates, or deletes data
React Setup
This section will briefly demonstrate how to create a React project. If you're already familiar, feel free to skip to the next part.
The dev team at React created an easy-to-use script called create-react-app. The only prerequisite is that your machine has node and npm installed, which you will need anyways.
So, follow the instructions here to quickly install those packages if you don't already have them.
Open up the command prompt or terminal in the directory you want your new project to be placed. Run the following command:
# npx create-react-app serverless-appAfter that process completes, go into the serverless-app directory and start the project like so:
# cd serverless-app
# npm run start
This will create a local instance of your application that will automatically reload (known as hot loading) when your files located in the src/ folder are edited. A browser window should automatically pop up. If it doesn't, open your web browser and head to http://localhost:3000.
Easybase Setup
Let's install a library called easybase-react by heading into our project directory and executing npm install easybase-react. That's the only dependency we'll need for this demonstration.
Next, create an account at easybase.io (you can use the free tier).
Once you're logged in, use the '+ Create' button to create a new table. Let's name it MY TABLE and give it three columns: rating (number), poster (image), and title (string).
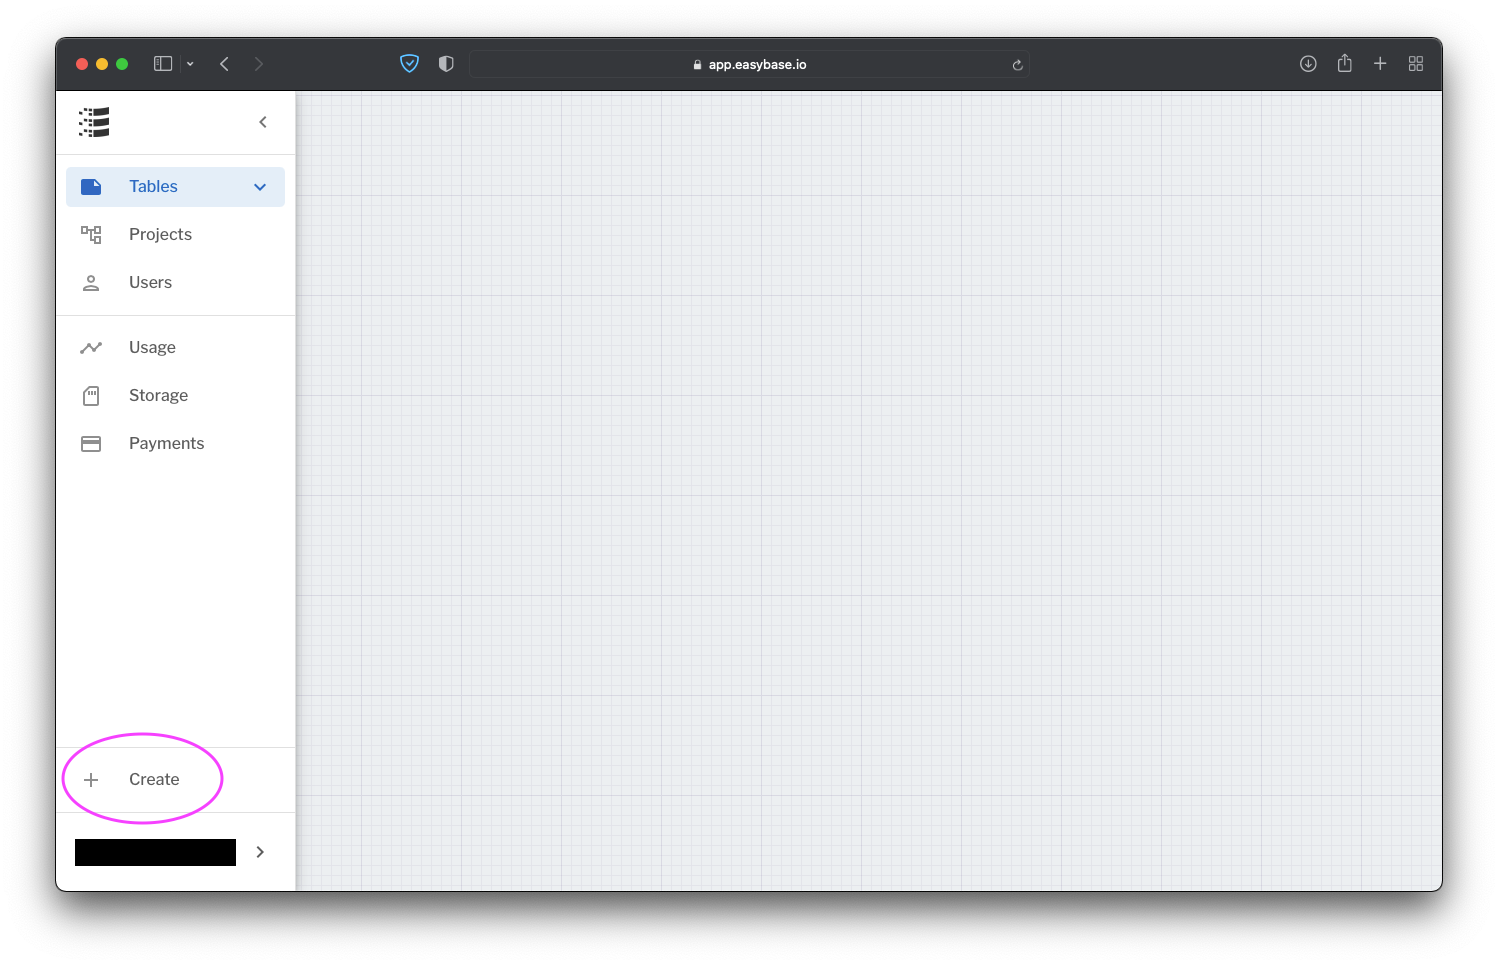
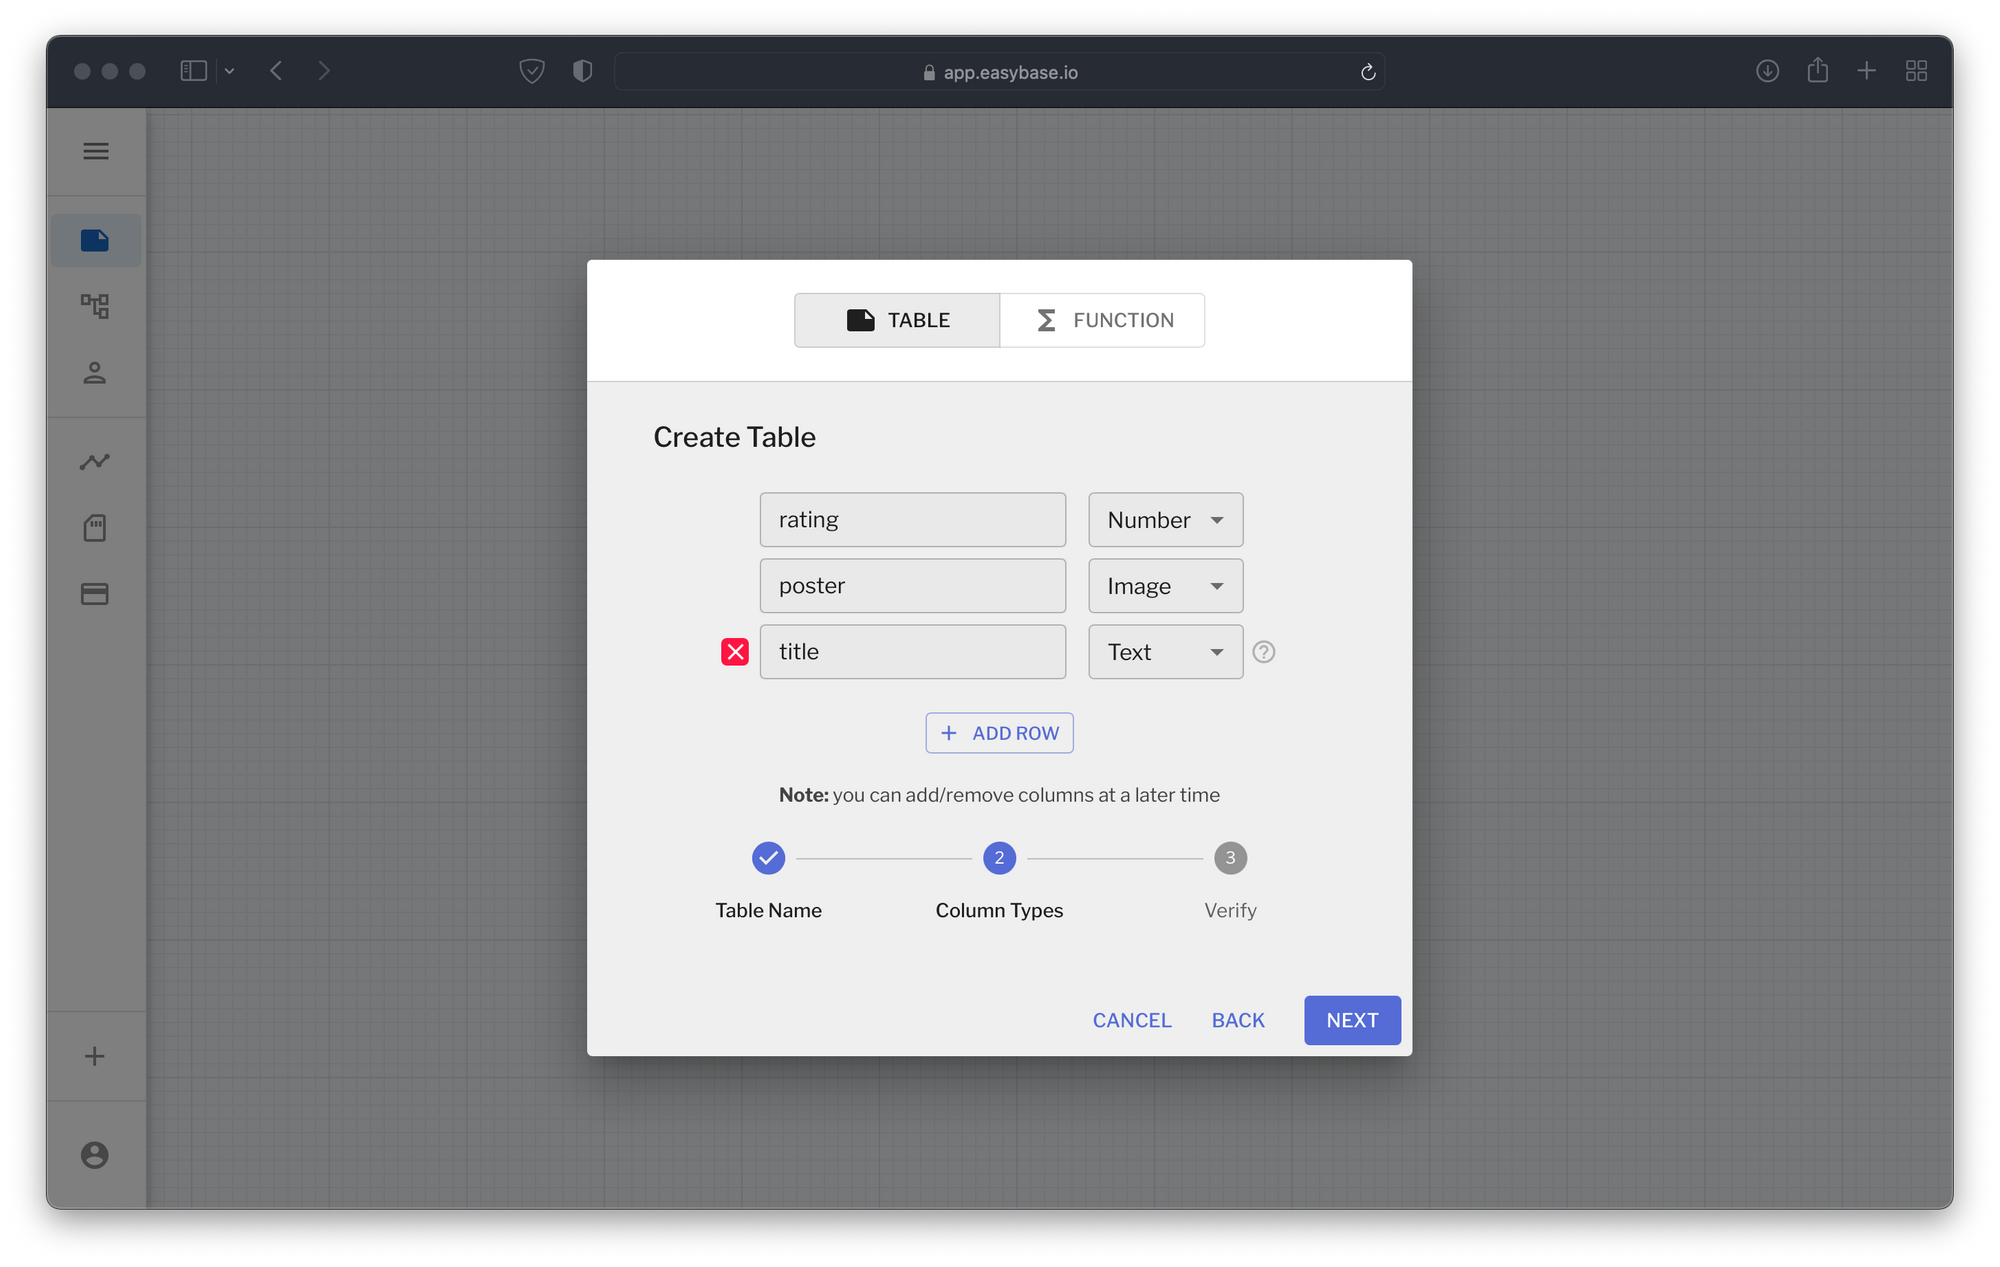
Click next and finish your next table creation. It will automatically pop up, but you can expand the Tables button in the left-hand drawer to select it there as well.
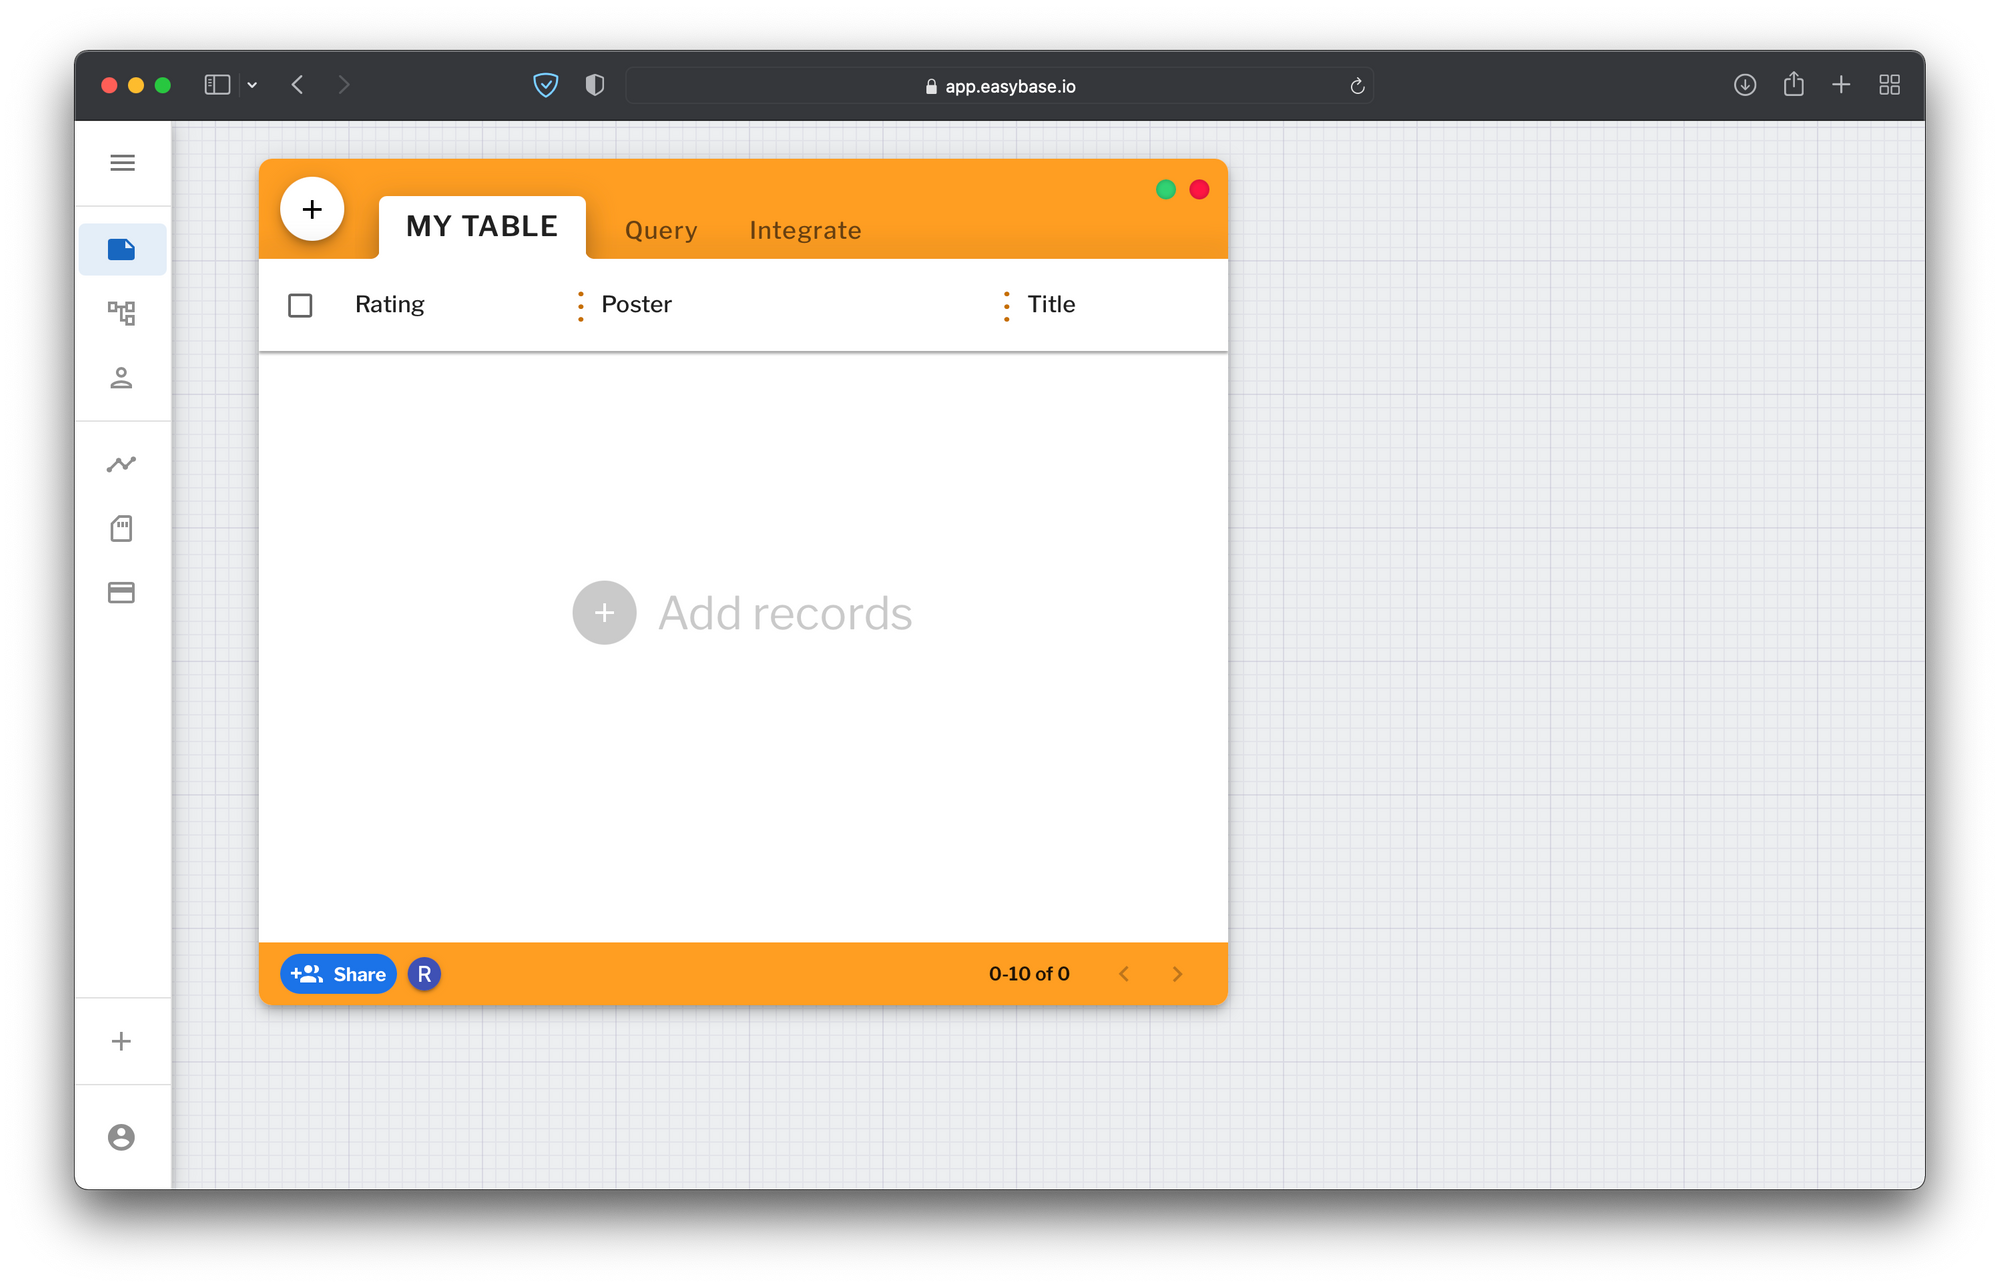
For demonstration purposes, let's add an example row so we can display it in our React app. Use the '+' button in the top-left of the table to add a new row.
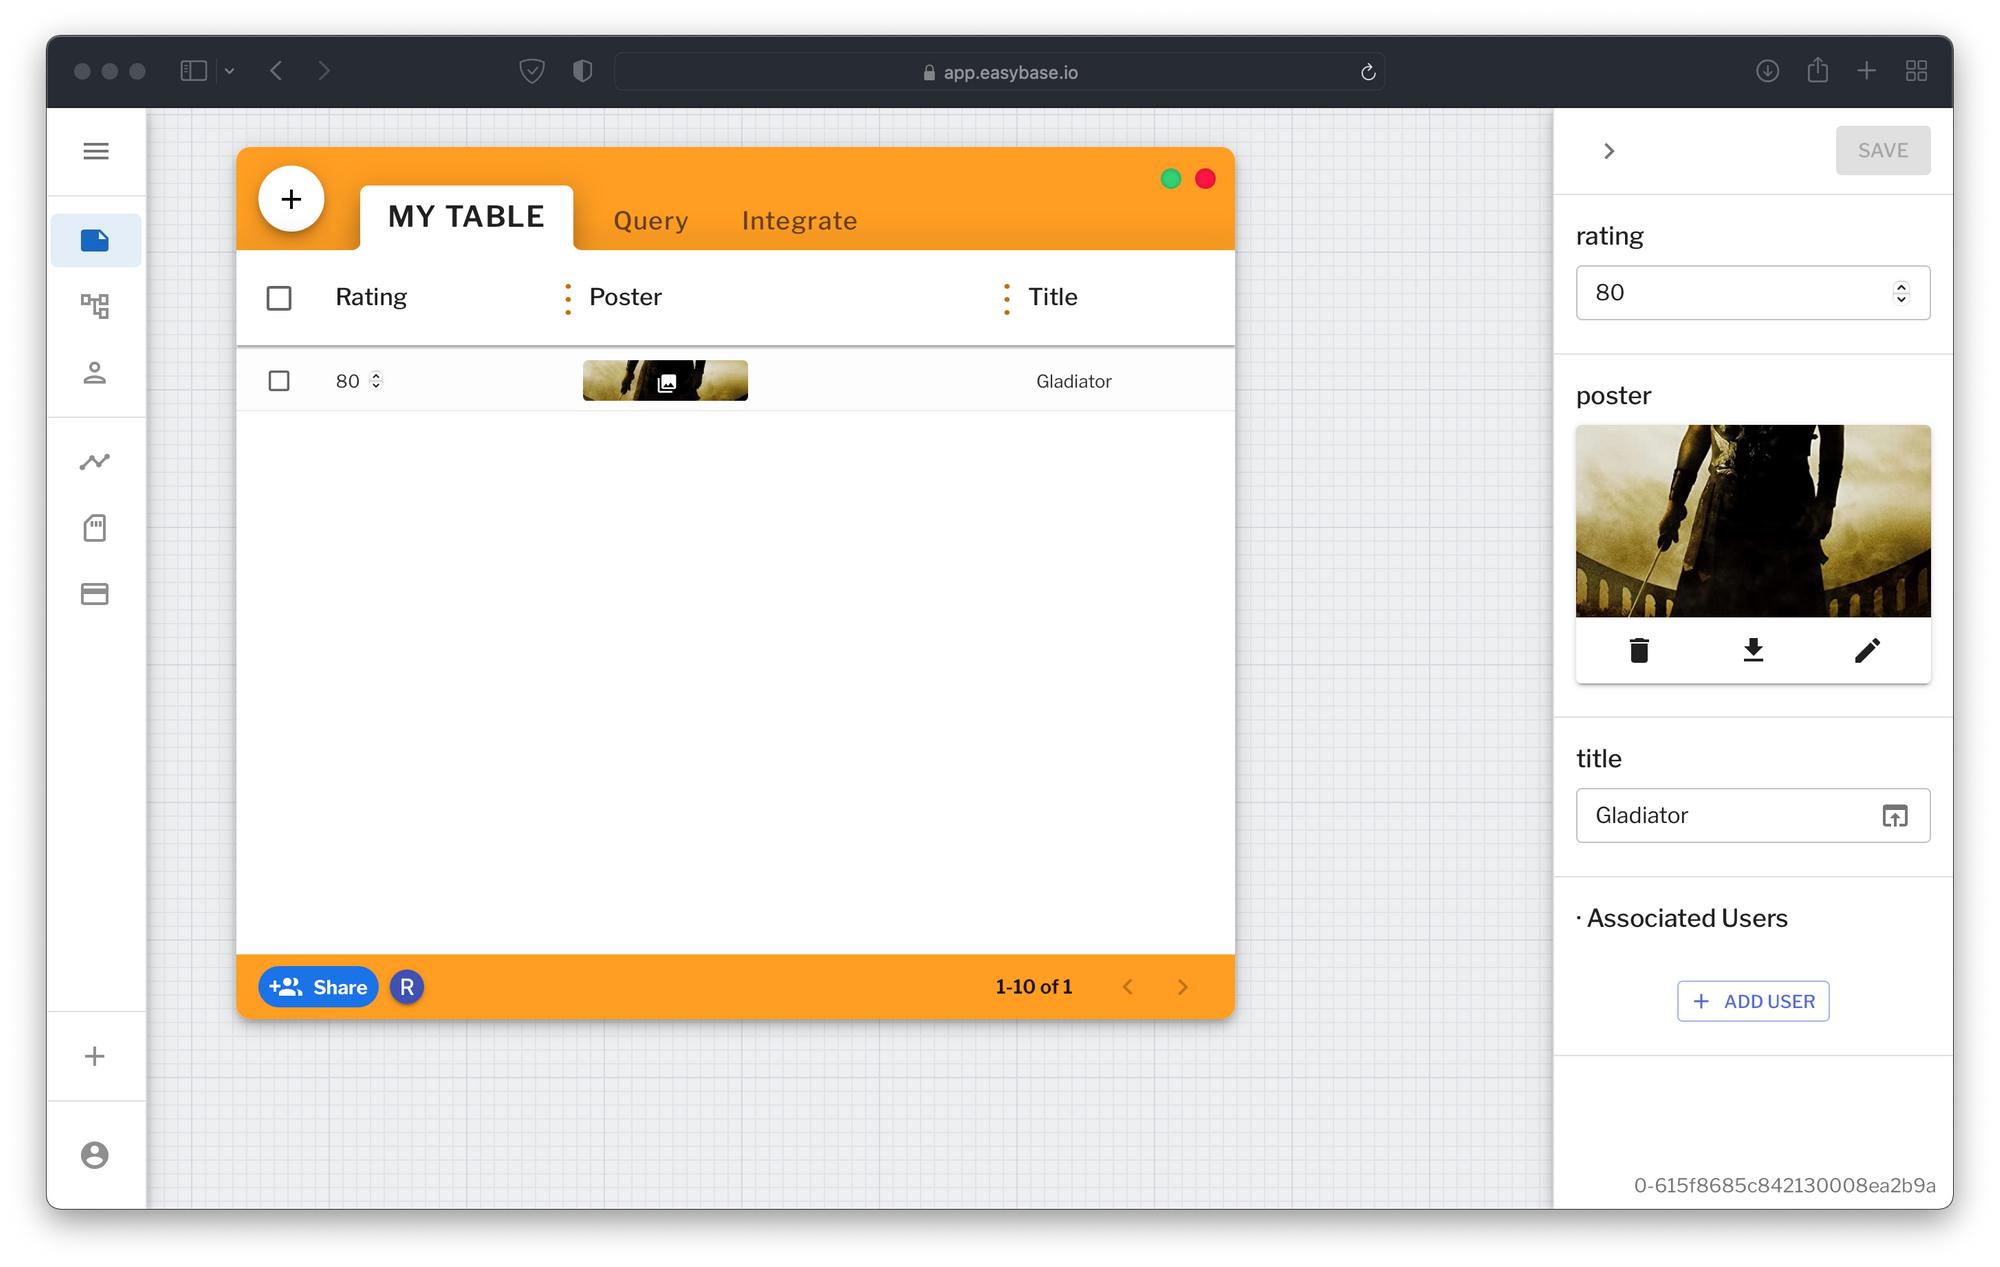
My example will feature movie data, but feel free to use whatever type of data best fits your application.
The last step before we head back to the code is to create a new Project in the Easybase interface. This will give us a configuration file that will give our app secure access to the database. Keep this configuration file private, as it contains credentials that can be used to access your data.
In the left-hand drawer head to 'Projects > Create Project'.
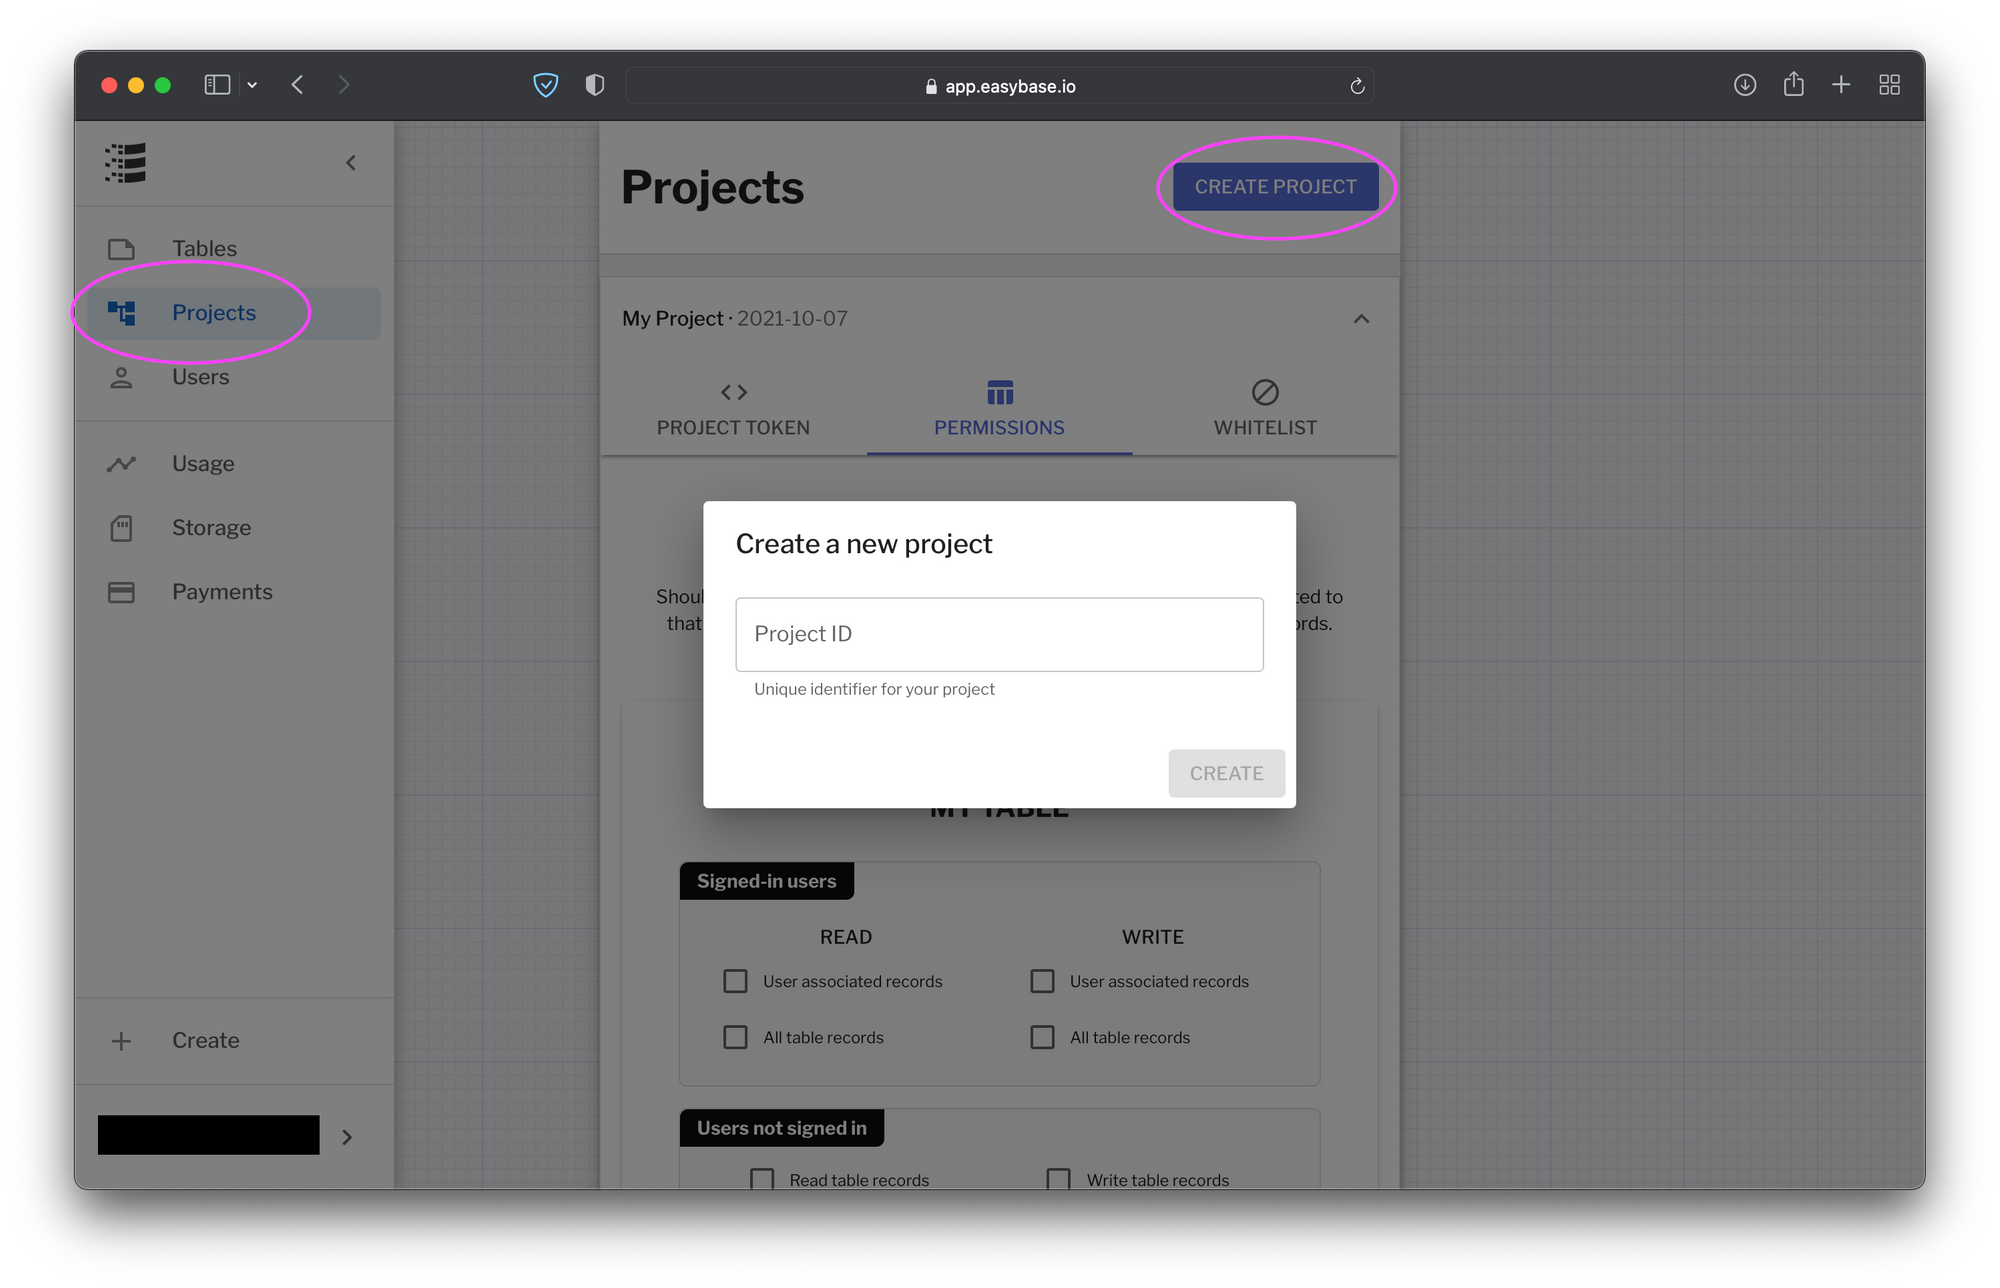
Go to permissions. Click your table's name and enable 'Users not signed in > Read, Write'.
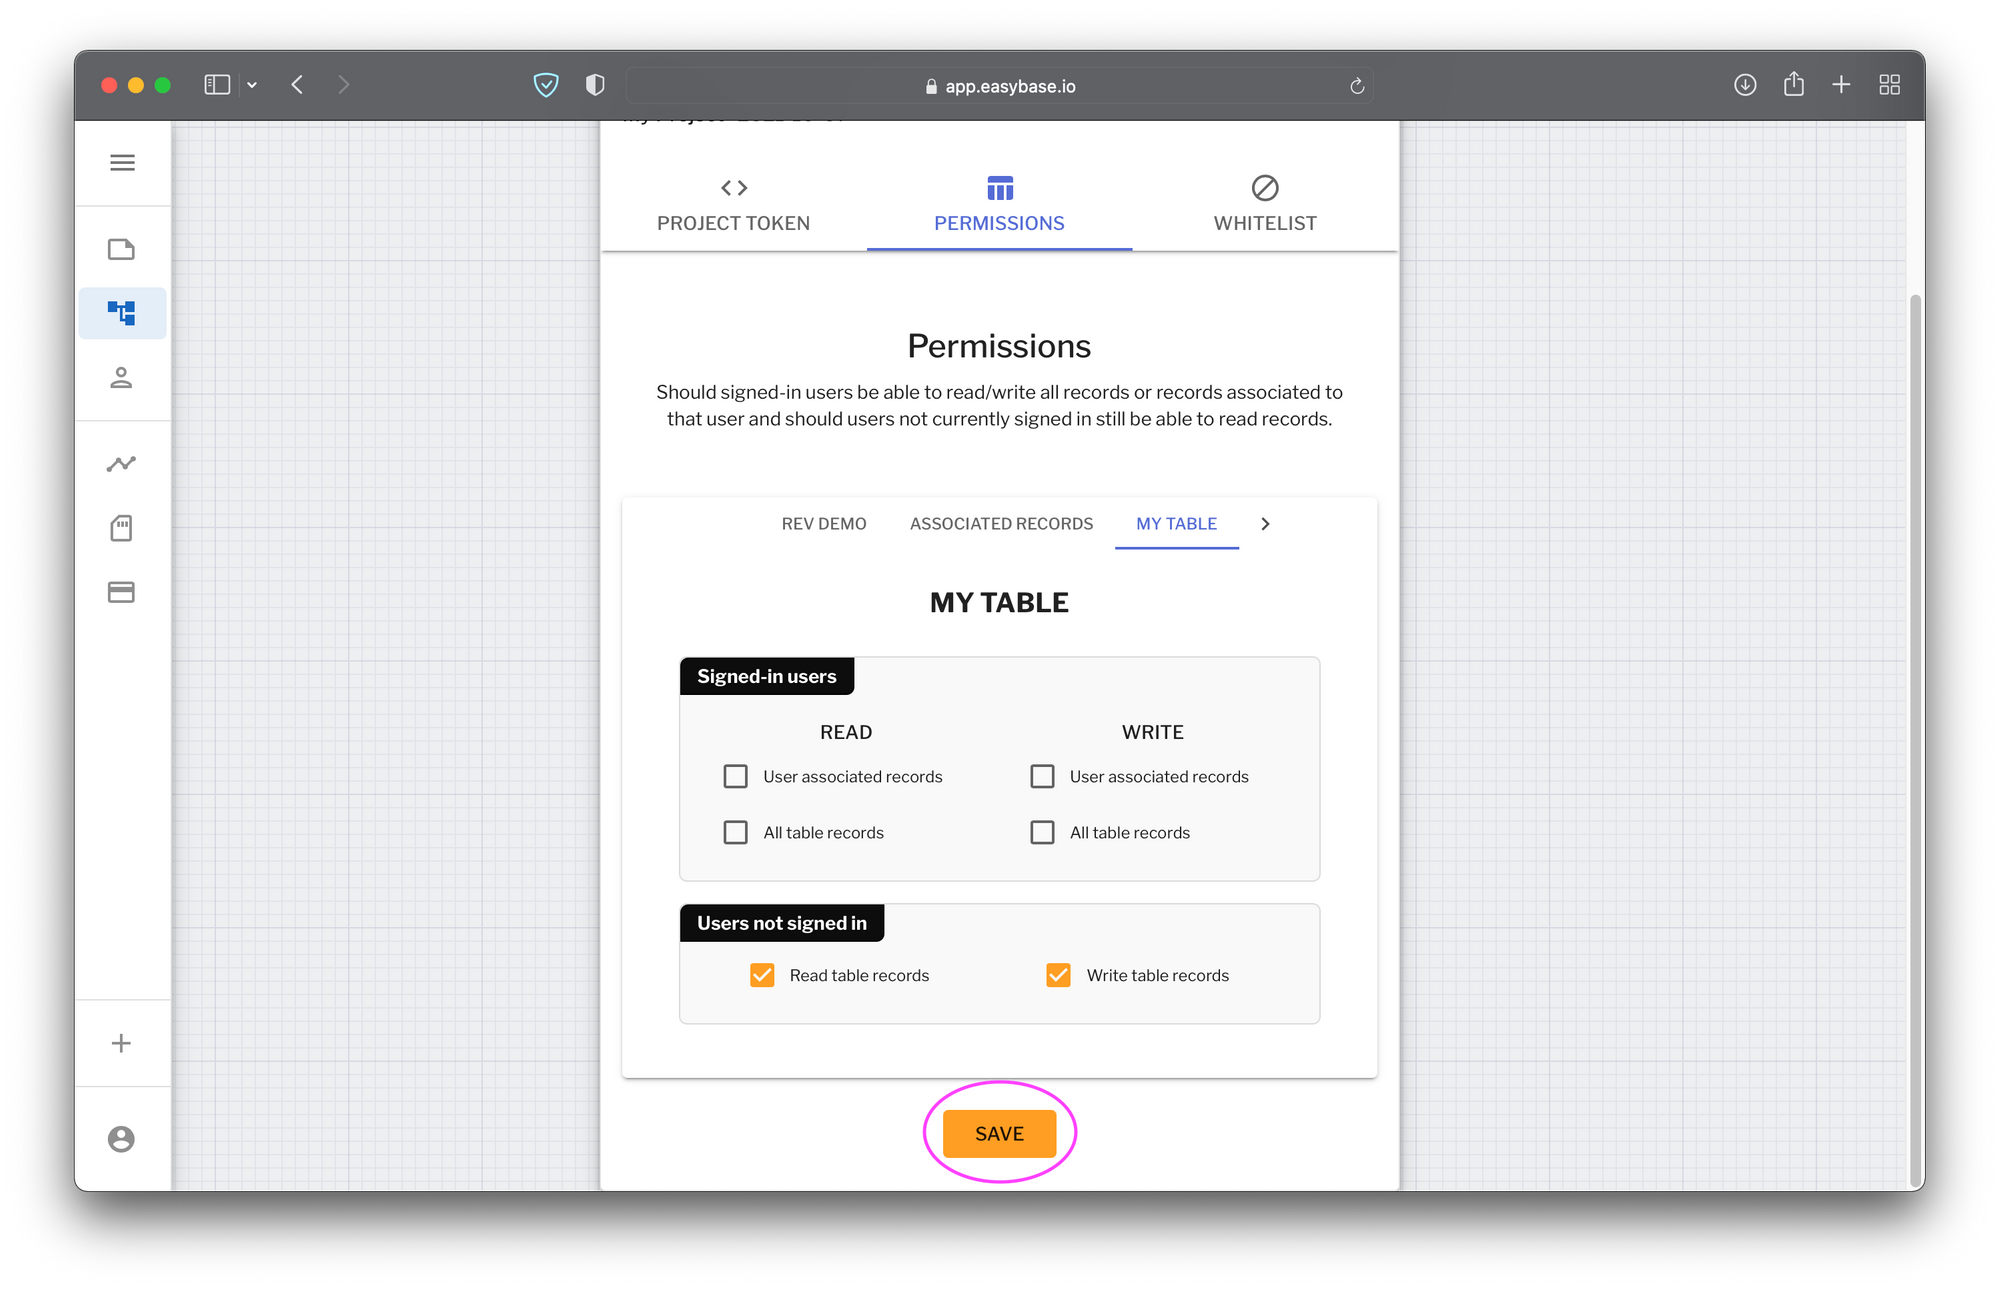
Don't forget to click 'Save'.
Finally, go to the Project Token tab and download your custom configuration token.
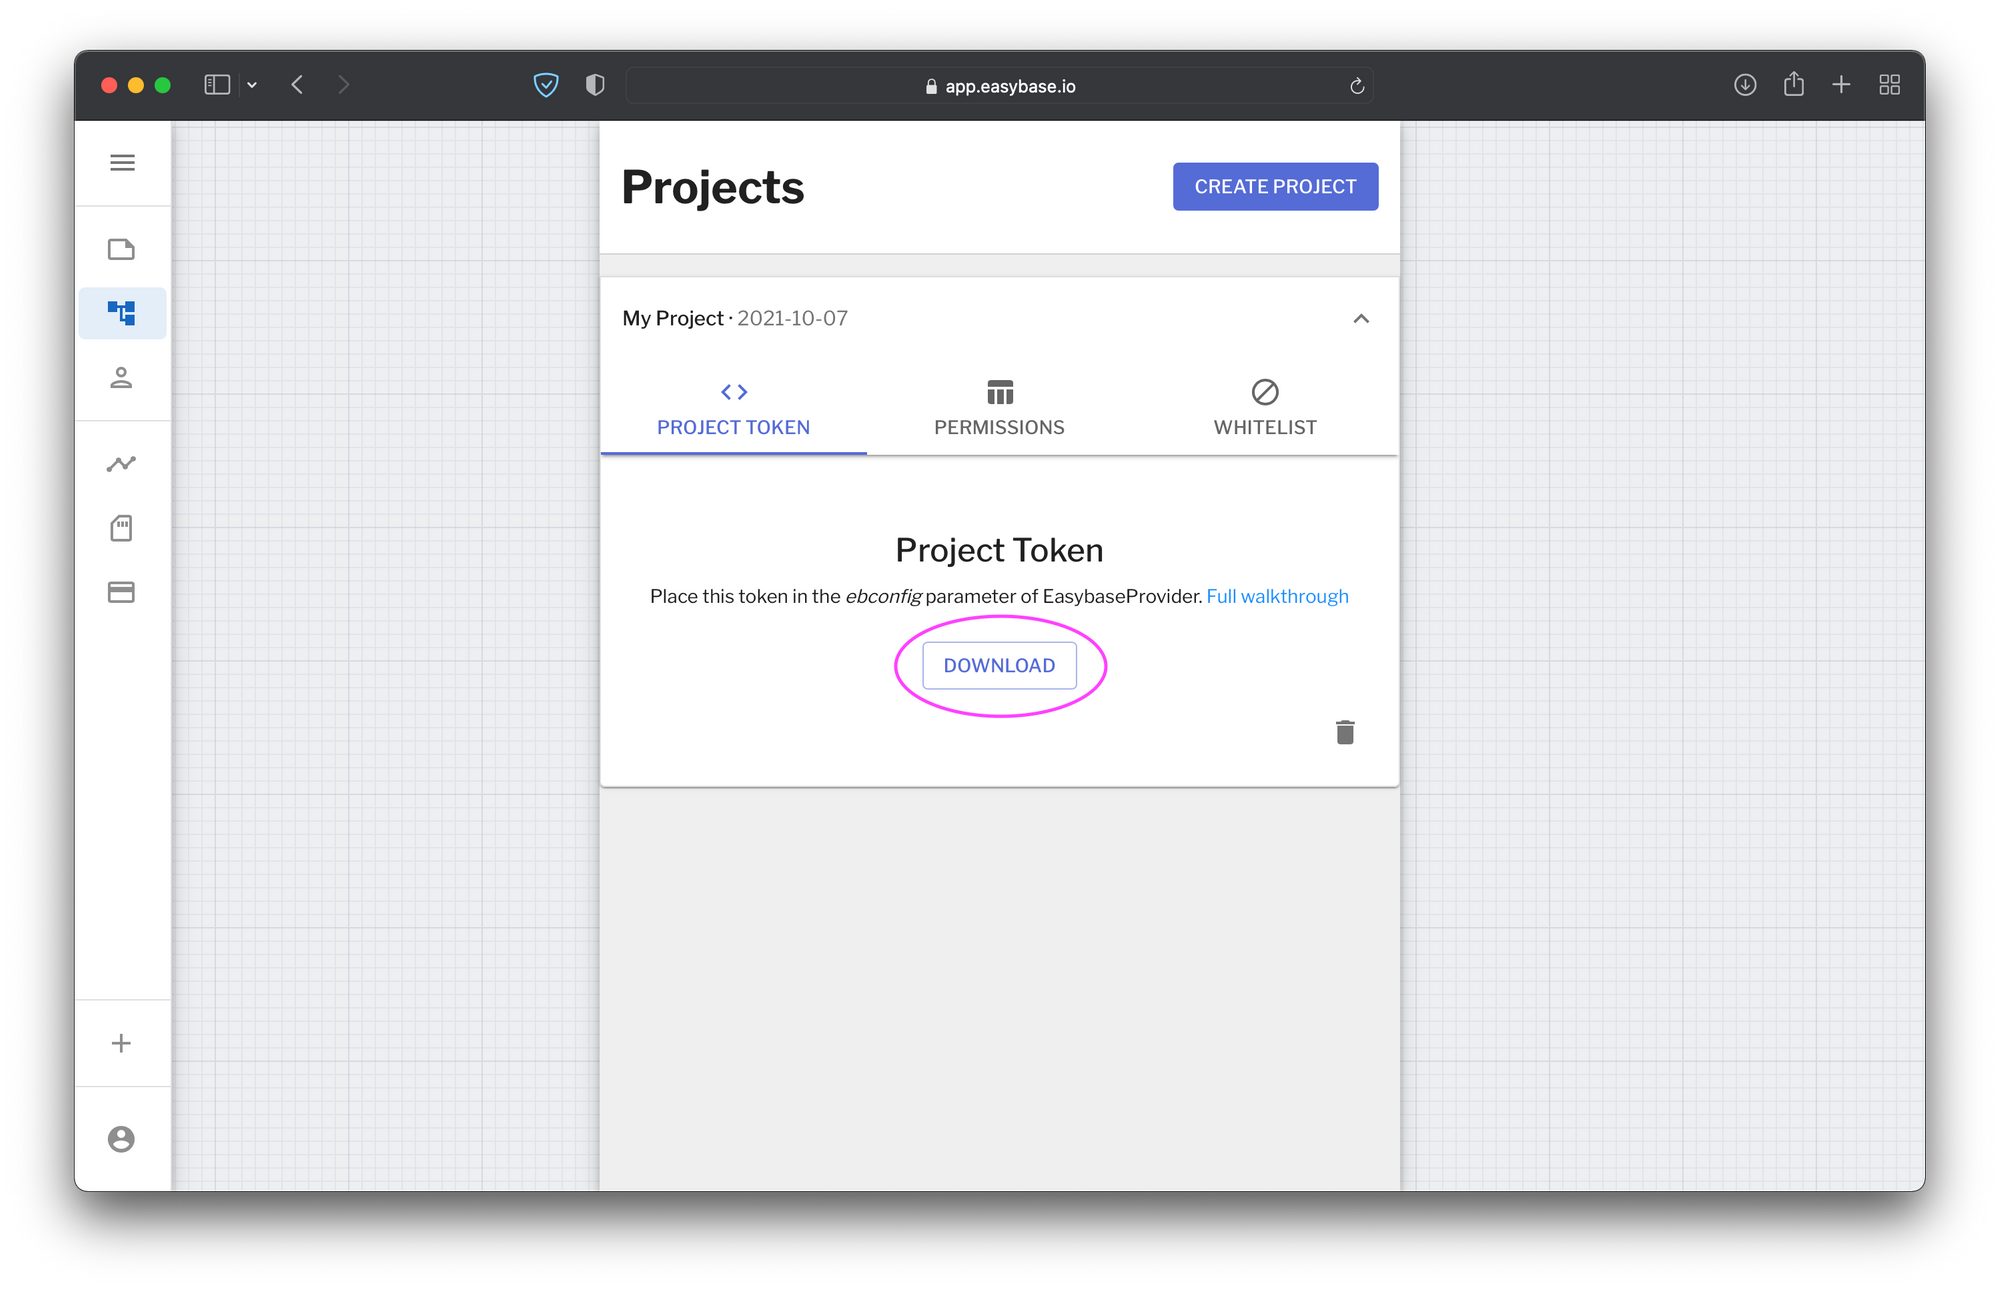
Place this token in your React project next to App.js, such that the structure looks something like the following:
├ ...
├ ebconfig.js
├ App.css
├ App.js
├ index.js
└ ...
Now let's get back to the code. Open the src/index.js file in your React project. First, import EasybaseProvider from that easybase-react package we installed earlier and our custom ebconfig.js token. Then, wrap <App /> with <EasybaseProvider ebconfig={ebconfig} >:
import React from 'react';
import ReactDOM from 'react-dom';
import './index.css';
import App from './App';
import reportWebVitals from './reportWebVitals';
import ebconfig from './ebconfig'; // Add this
import { EasybaseProvider } from 'easybase-react'; // Add this

ReactDOM.render(
  <React.StrictMode>
    <EasybaseProvider ebconfig={ebconfig}> {/* <-- */}
      <App />
    </EasybaseProvider> {/* <-- */}
  </React.StrictMode>,
  document.getElementById('root')
);
Don't forget to pass your config file in the ebconfig prop.
This setup, known as the provider pattern, gives all components in our React project valid access to the context of that provider and it is the best way to organize state across your components (plus it's natively supported). In our case, that's a hook called useEasybase.
useEasybase hook
At this point, the project configuration is complete. Head to src/App.js, delete the imports and everything within the App function.
Now, let's set up our first component with the easybase-react package. This process can be replicated across your project for any of the properties of useEasybase (P.S. there's a lot of them).
First, import useEasybase from that easybase-react package. Let's grab useReturn, db, and e like so:
import { useEasybase } from 'easybase-react';

function App() {
  const { useReturn, db, e } = useEasybase();
  return (

  );
}

export default App;
You're probably wondering – what are these functions?
db – As the name states, this function gives us access to our database. It works like so:
let records = await db('MY TABLE').return().all()That's a very simple example, but the db function is quite powerful. Read more about it here.
e – This stands for expressions. Use it in the db function to build queries in the .where function of db. Use functions such as eq (equals), neq (not equals), lt (less than), or (OR statement), and many more in the form of e.eq("column_name", value). That would query for records where column_name equals whatever value is.
Now we can use expressions to do a compound query:
let records = await db('MY TABLE').return(e.avg('rating')).where(e.or(e.like('title', 'T%'), e.lt('rating', 80))).all();

// e.avg = Return the average of 'rating' where:
//   e.or = OR statement on:
//     e.like = string matching pattern [title starts with 'T']
//     e.lt = less than [rating < 80]
There are plenty more operations available to you, including powerful aggregators.
useReturn – Finally, here's that hook that was mentioned earlier. It works by wrapping the db function. The hook automatically subscribes to changes in the db. Most importantly, it will give us access to a stateful data array, called frame.
const { useReturn, db, e } = useEasybase();
const { frame } = useReturn(() => db().return()
  .where(e.gt('rating', minRating)) // Where rating > minRating
  .limit(limit),                    // Limit query length
[minRating, limit]); // Also returns some helpers:
                     //   'error' - any
                     //   'loading' - boolean
                     //   'manualFetch' - async function
                     //   'unsubscribe' - function
Don't use .all or .one in the useReturn hook, this is automatically handled. For more information, take a look at the documentation here.
The First Component
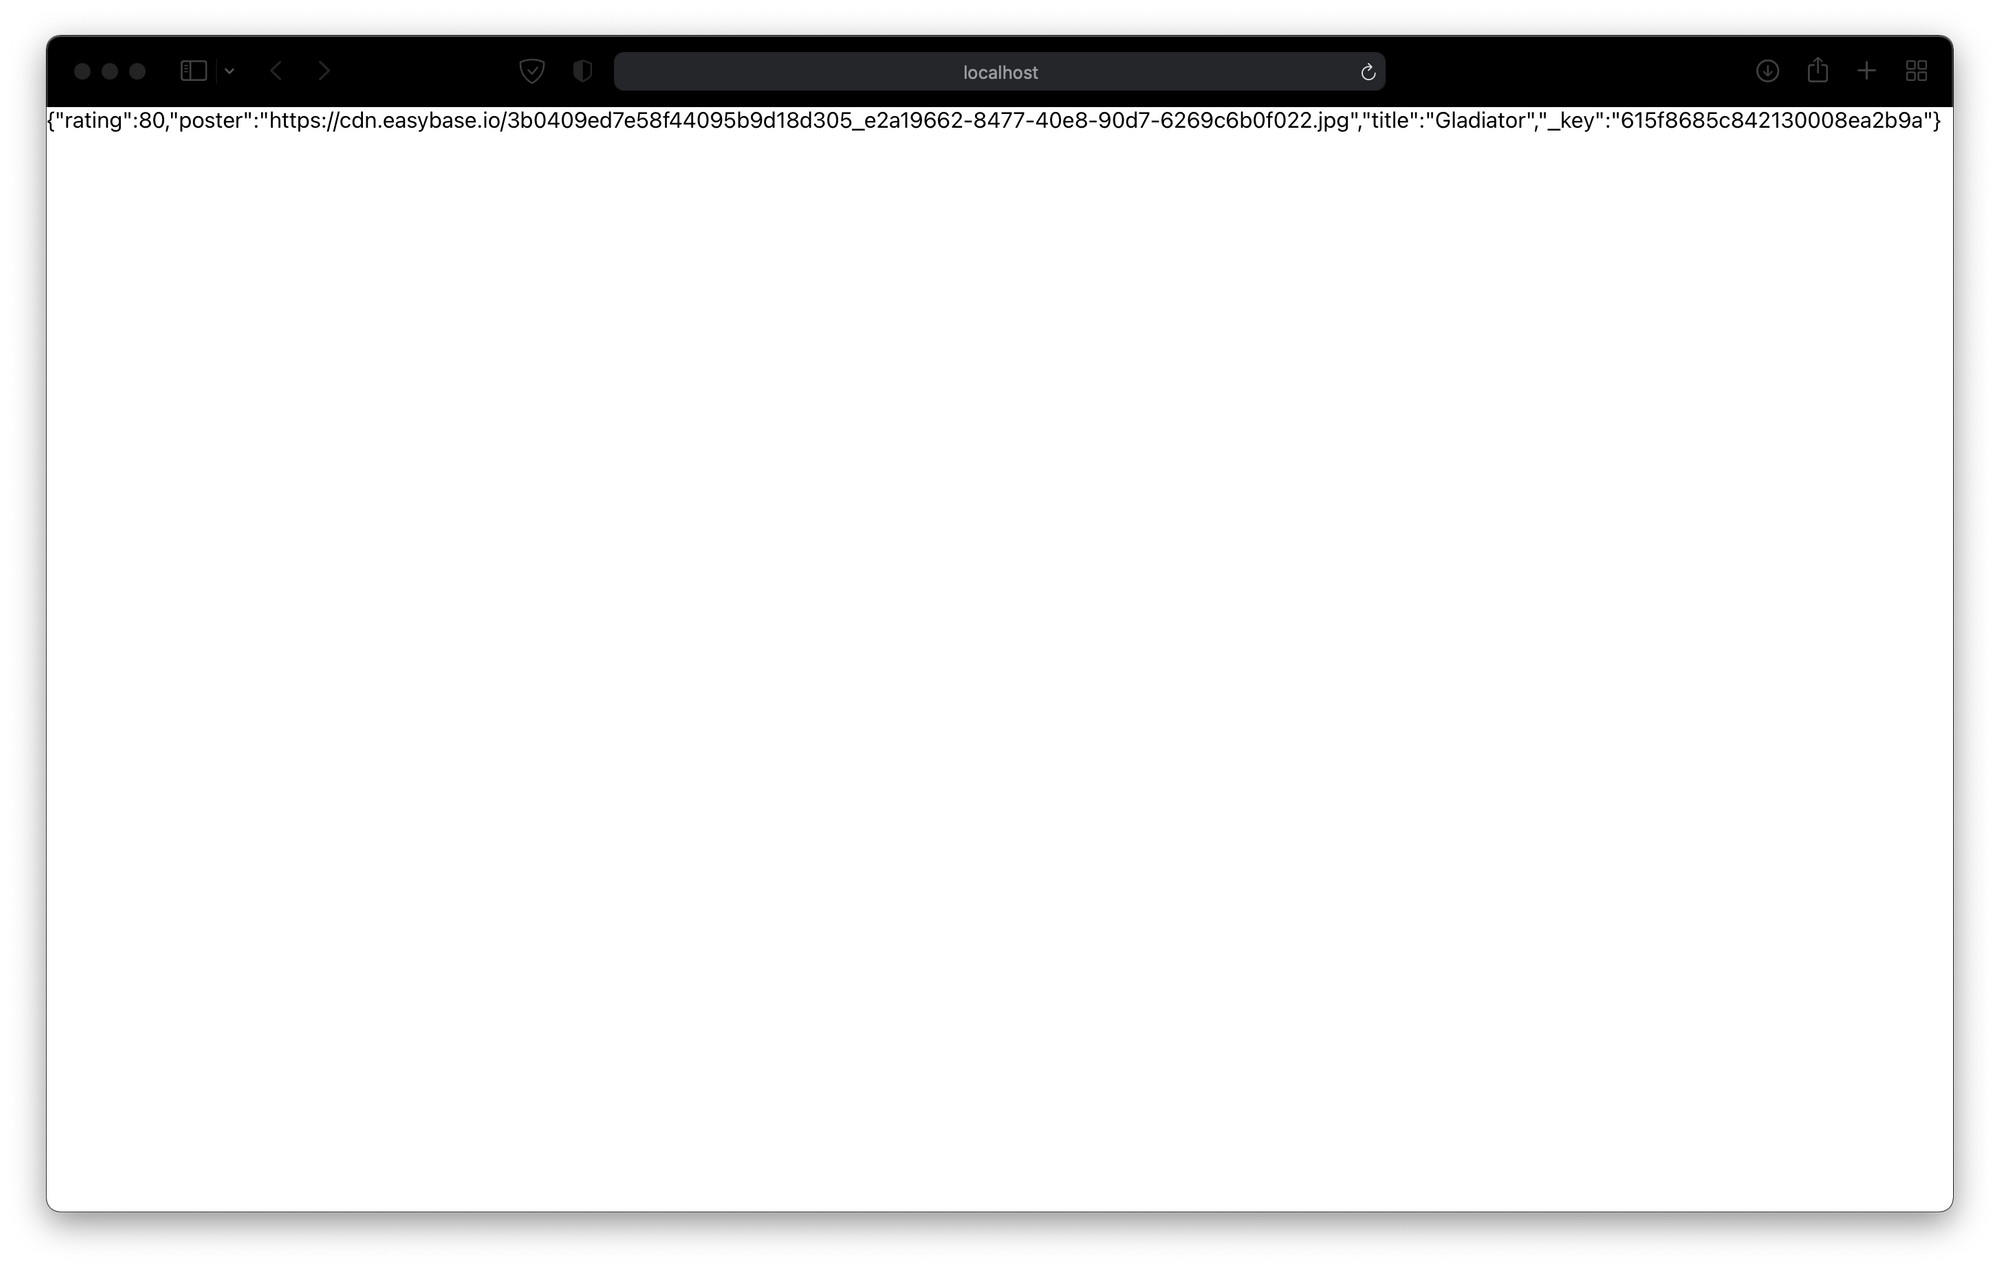
Let's use these functions in our empty src/App.js as follows:
import { useEasybase } from "easybase-react";

function App() {
  const { useReturn, db, e } = useEasybase();
  const { frame } = useReturn(() => db("MY TABLE").return(), []);

  return (
    <div>{frame.map(ele => JSON.stringify(ele))}</div>
  );
}

export default App;
As a demonstration, this will simply display a string representation of the single record that's currently in the table:
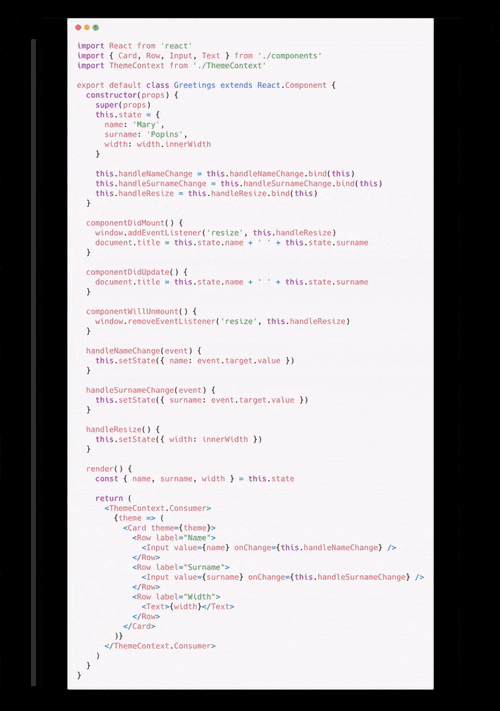
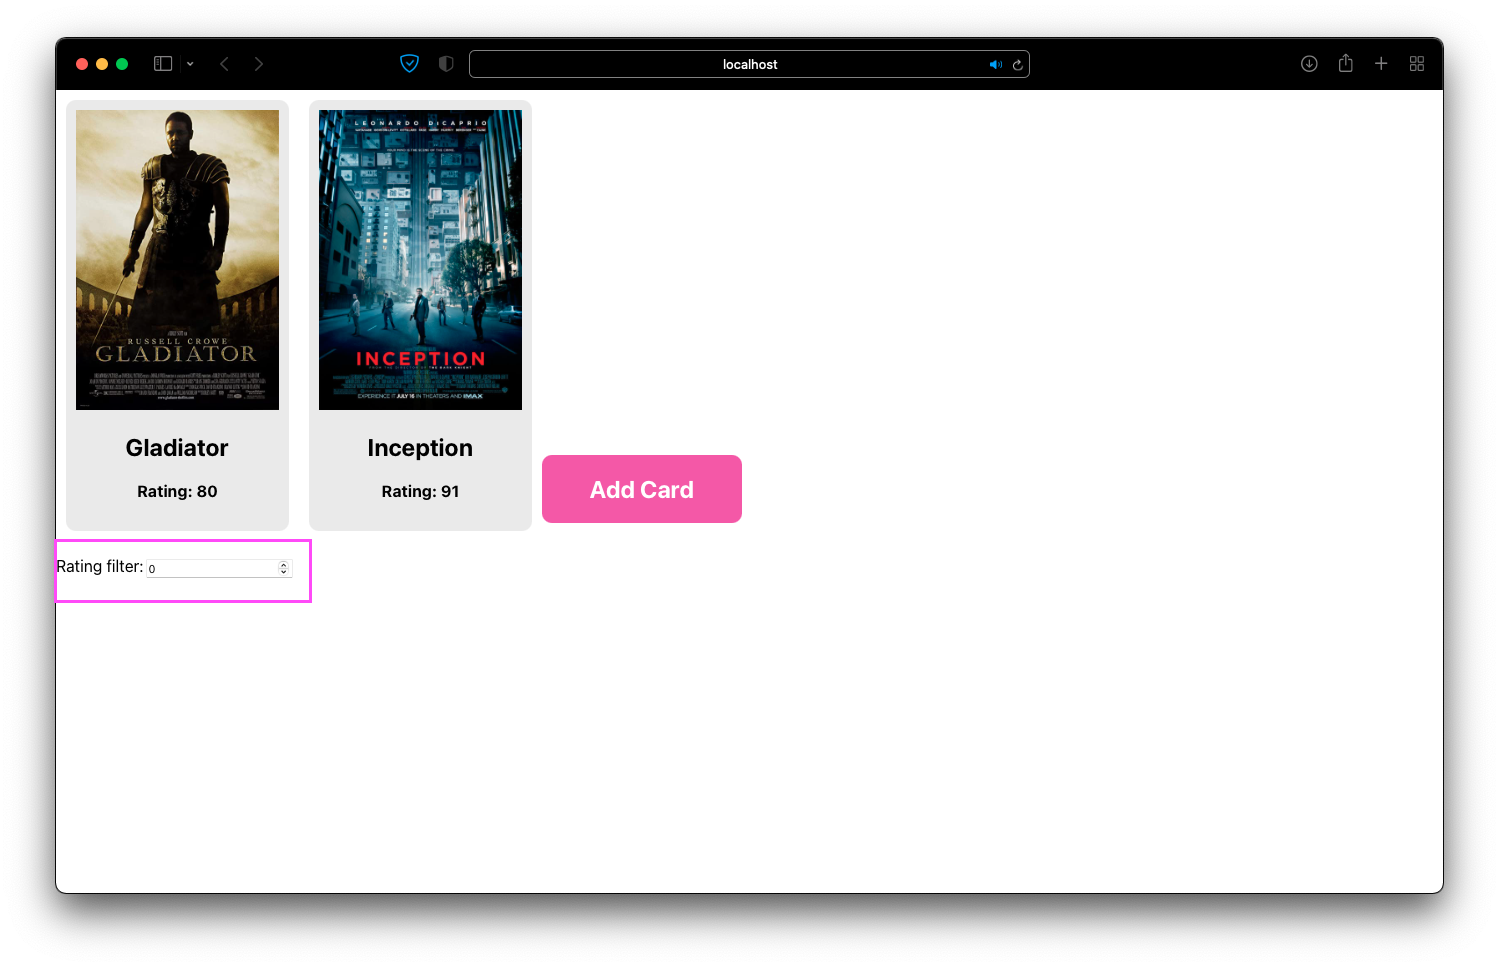
Congrats, your database is live and working. Now, let's implement a custom component, called <Card />, which will give our records some structure in the UI (feel free to put these components in separate files for organization):
function Card({ rating, poster, title, _key }) {
  const cardStyle = {
    display: "inline-block",
    margin: 10,
    padding: 10,
    borderRadius: 10,
    background: "#eaeaea",
    minWidth: 200,
  };

  return (
    <div style={cardStyle}>
      <img
        src={poster}
        style={{ height: 300, minWidth: 200 }}
      />
      <h2>{title}</h2>
      <h4>Rating: {rating}</h4>
    </div>
  );
}

function App() {
  const { useReturn, db, e } = useEasybase();
  const { frame } = useReturn(() => db("MY TABLE").return(), []);

  return (
    <div style={{ textAlign: "center", display: "inline-block" }}>
      {frame.map(ele => <Card {...ele} />)}
    </div>
  );
}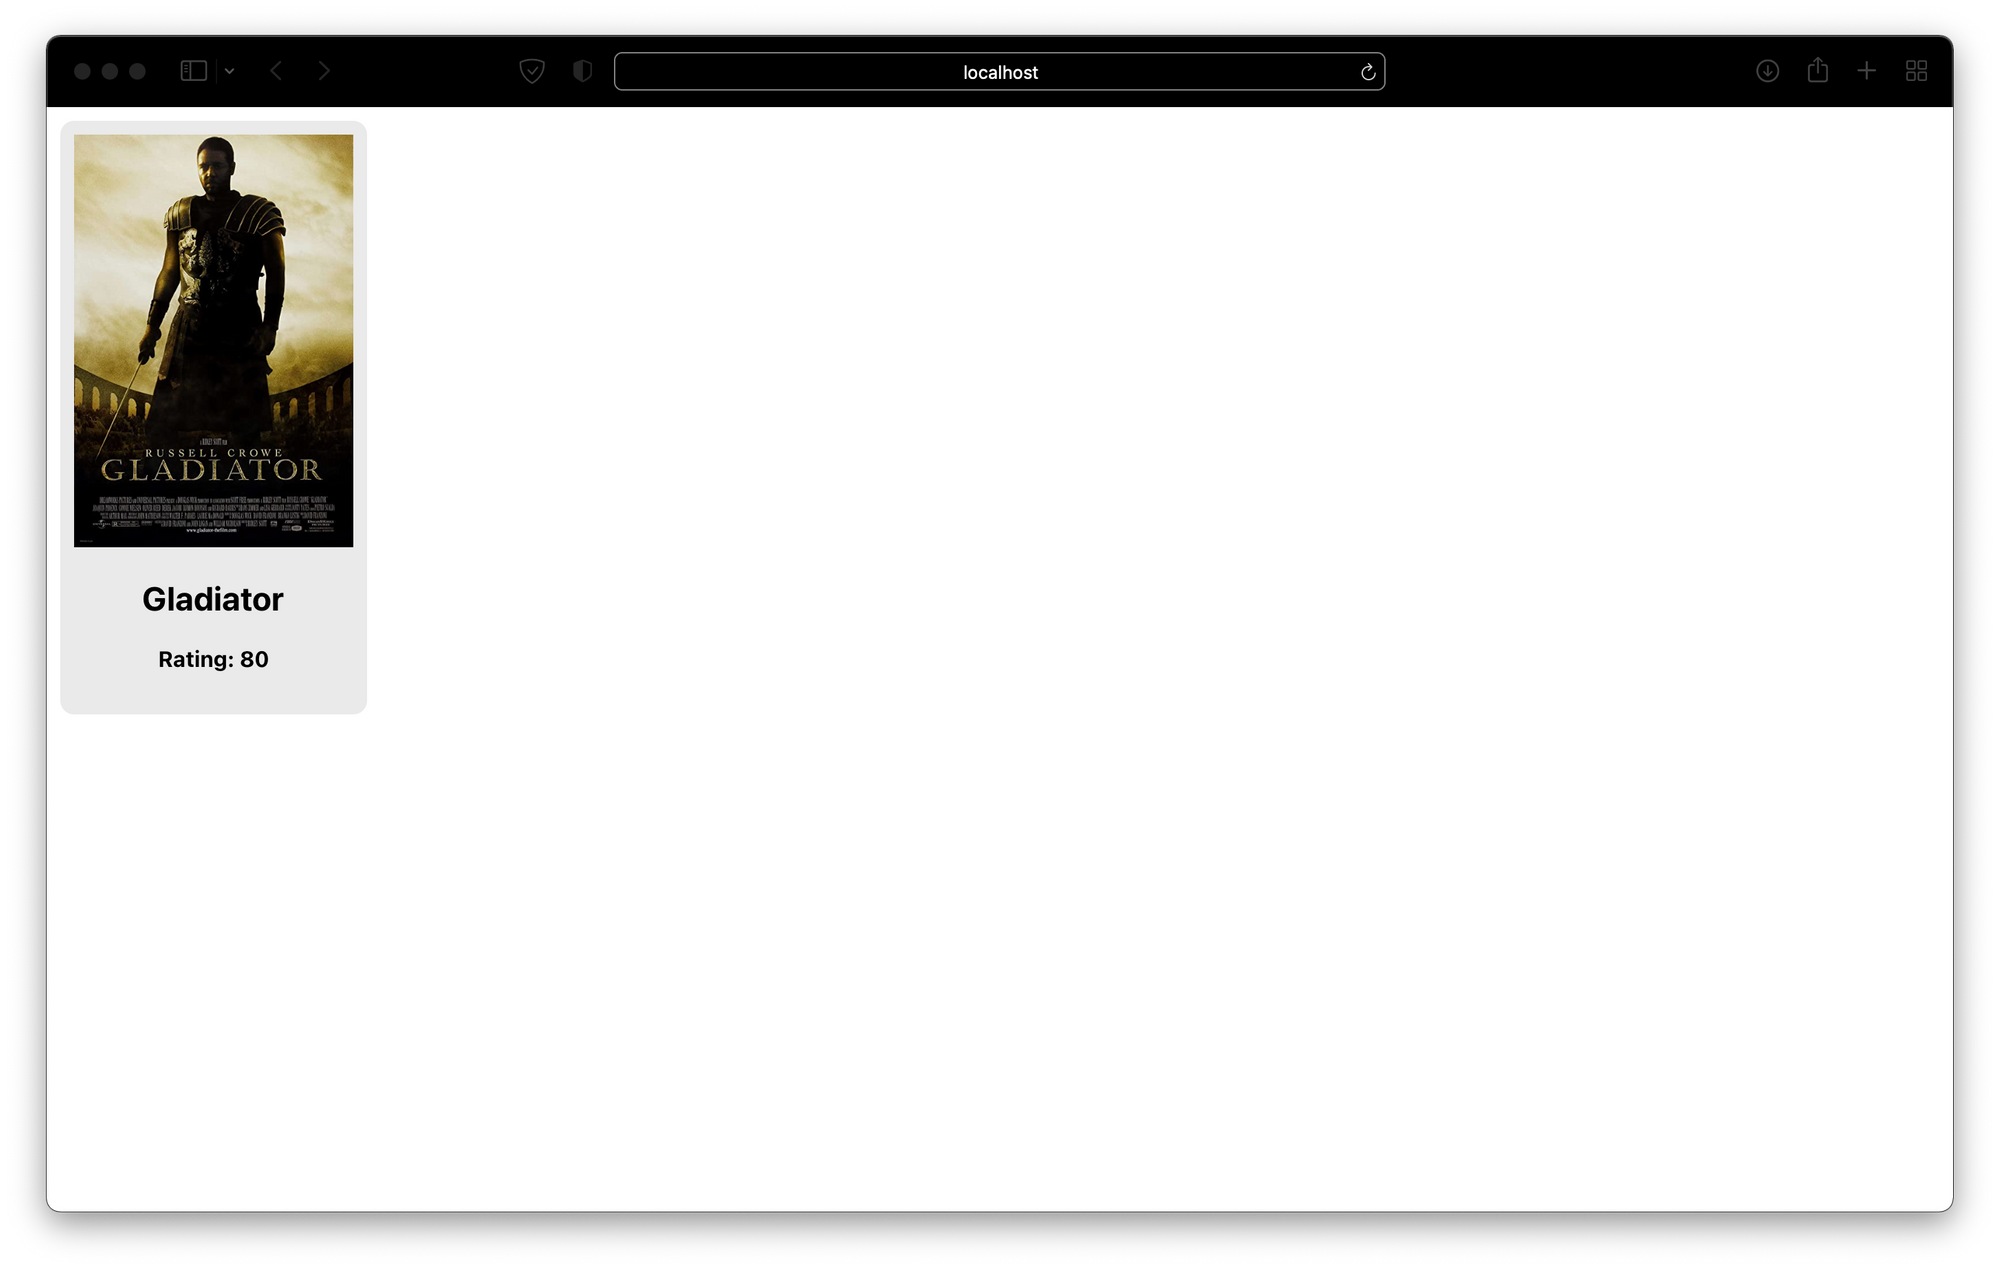
That looks much better. For the sake of brevity, I'm going to keep my styling simple. Feel free to give the project your own look!
You can see that the <Card /> uses all the properties from the original record as its props, plus a prop called _key. _key is a unique identifier for each record that is returned with the other properties. This will be very useful for querying and updating specific records. More on that later.
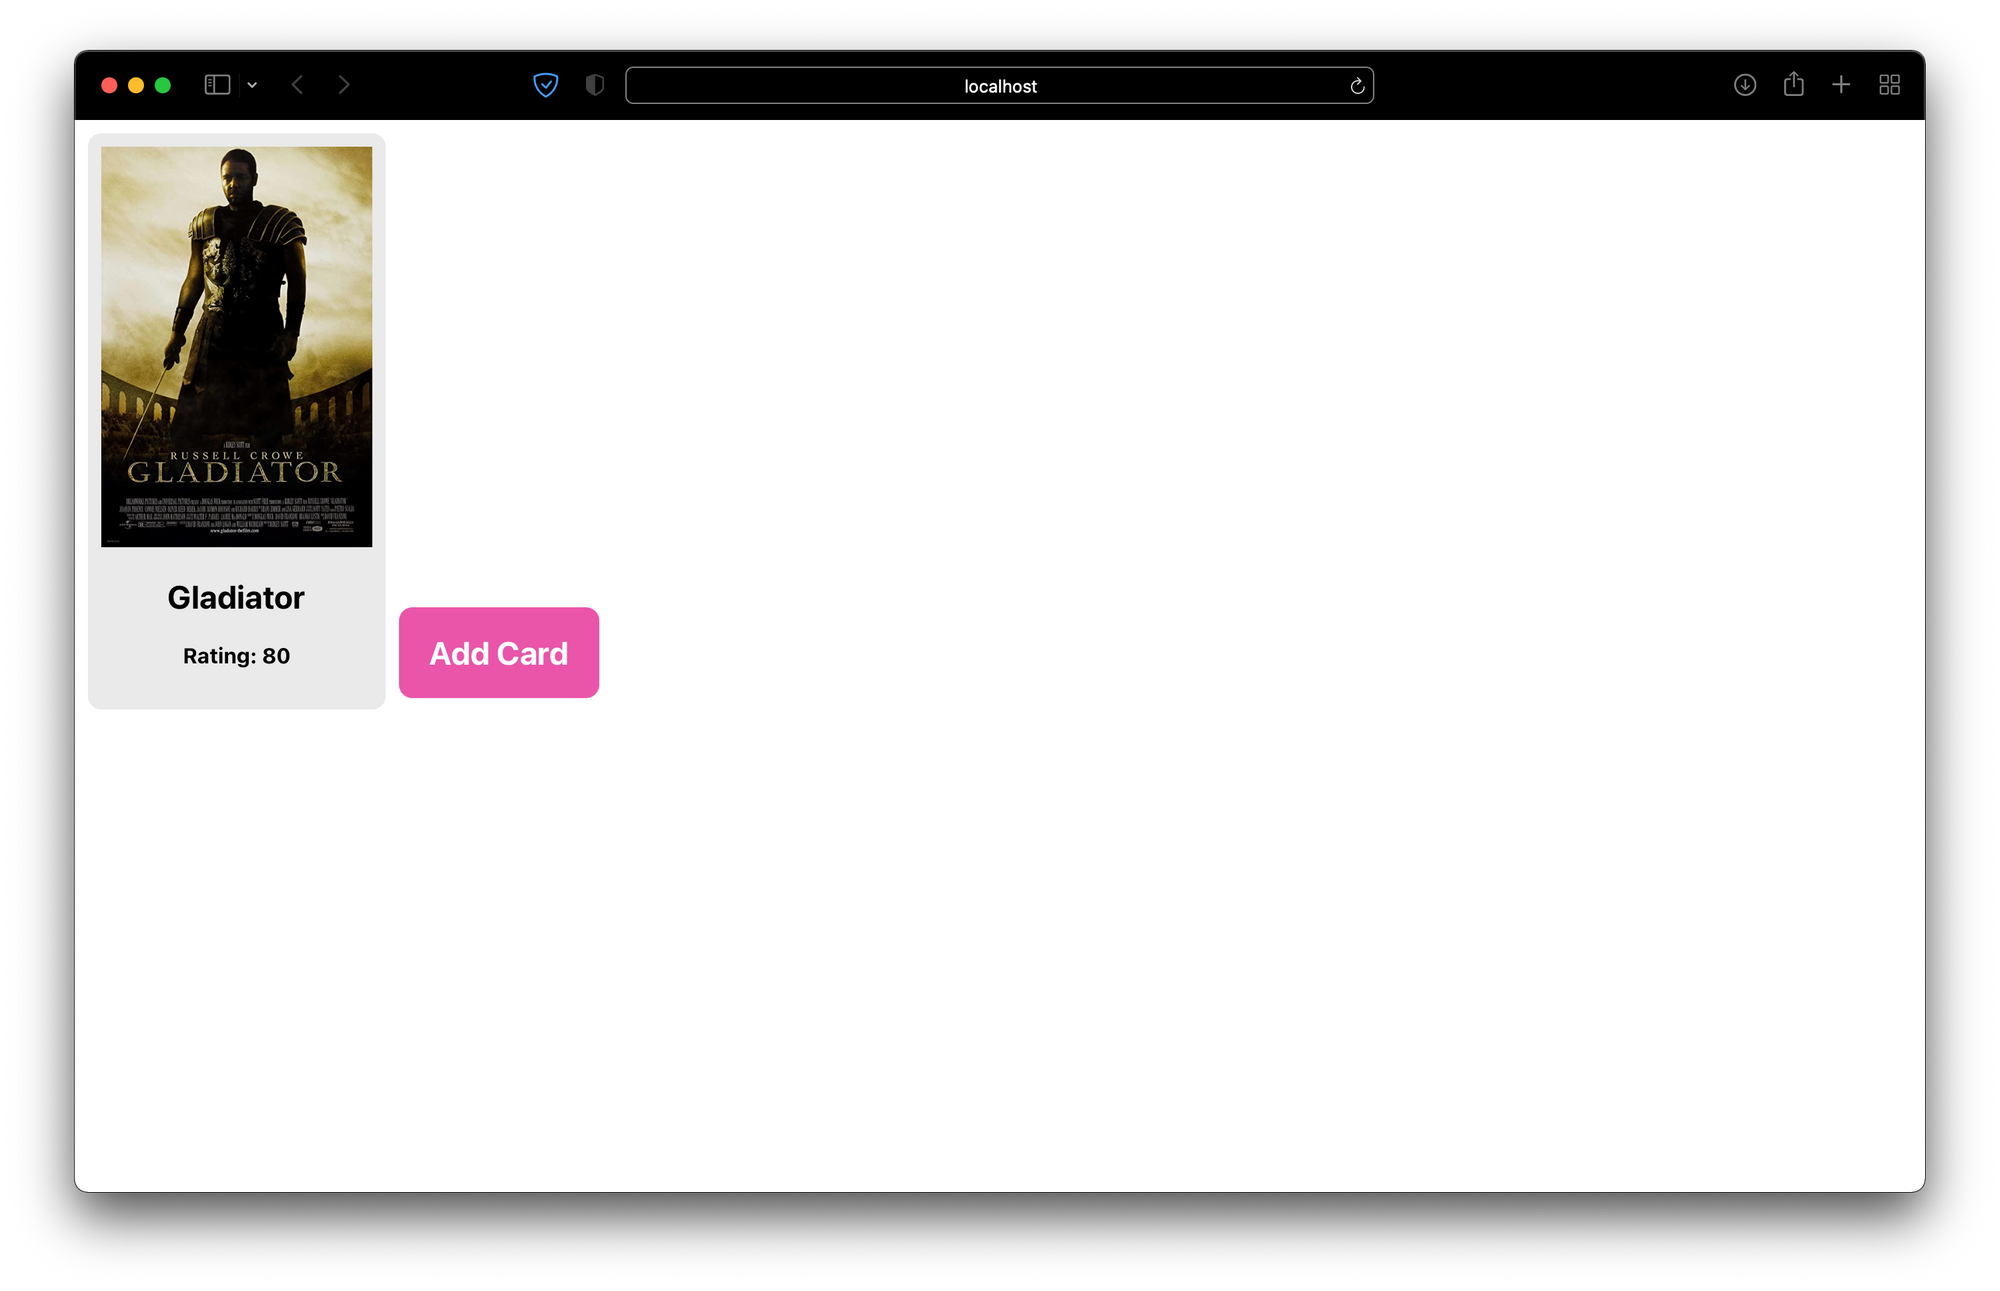
Insert Record
Now, let's quickly implement a way to add a new card to our database. This will also demonstrate how the useReturn hook automatically refreshes when we add a record with different components.
After we map the frame array, display a new button:
// ...

function AddCardButton() {
  const addCardStyle = {
    background: "#ea55aa",
    display: "inline-block",
    width: 200,
    borderRadius: 10,
    cursor: "pointer",
  };

  return (
    <div style={addCardStyle}>
      <h2 style={{ color: "#fff" }}>Add Card</h2>
    </div>
  );
}

function App() {
  const { useReturn, db, e } = useEasybase();
  const { frame } = useReturn(() => db("MY TABLE").return(), []);

  return (
    <div style={{ textAlign: "center", display: "inline-block" }}>
      {frame.map(ele => <Card {...ele} />)}
      <AddCardButton /> {/* <- New button */}
    </div>
  );
}
There are many different ways to collect user input in a React or React Native application. In this case, I'll use the built-in prompt function, but you can use forms, dialogs, and so on.
Once we collect the new record details, upload them using the db function. So, let's bring in that useEasybase hook again. Instead of .return, we will use .insert (we'll explore uploading images later).
In code, the implementation for that could look something like the following:
function AddCardButton() {
// ...
const { db } = useEasybase();
async function addCardClick() {
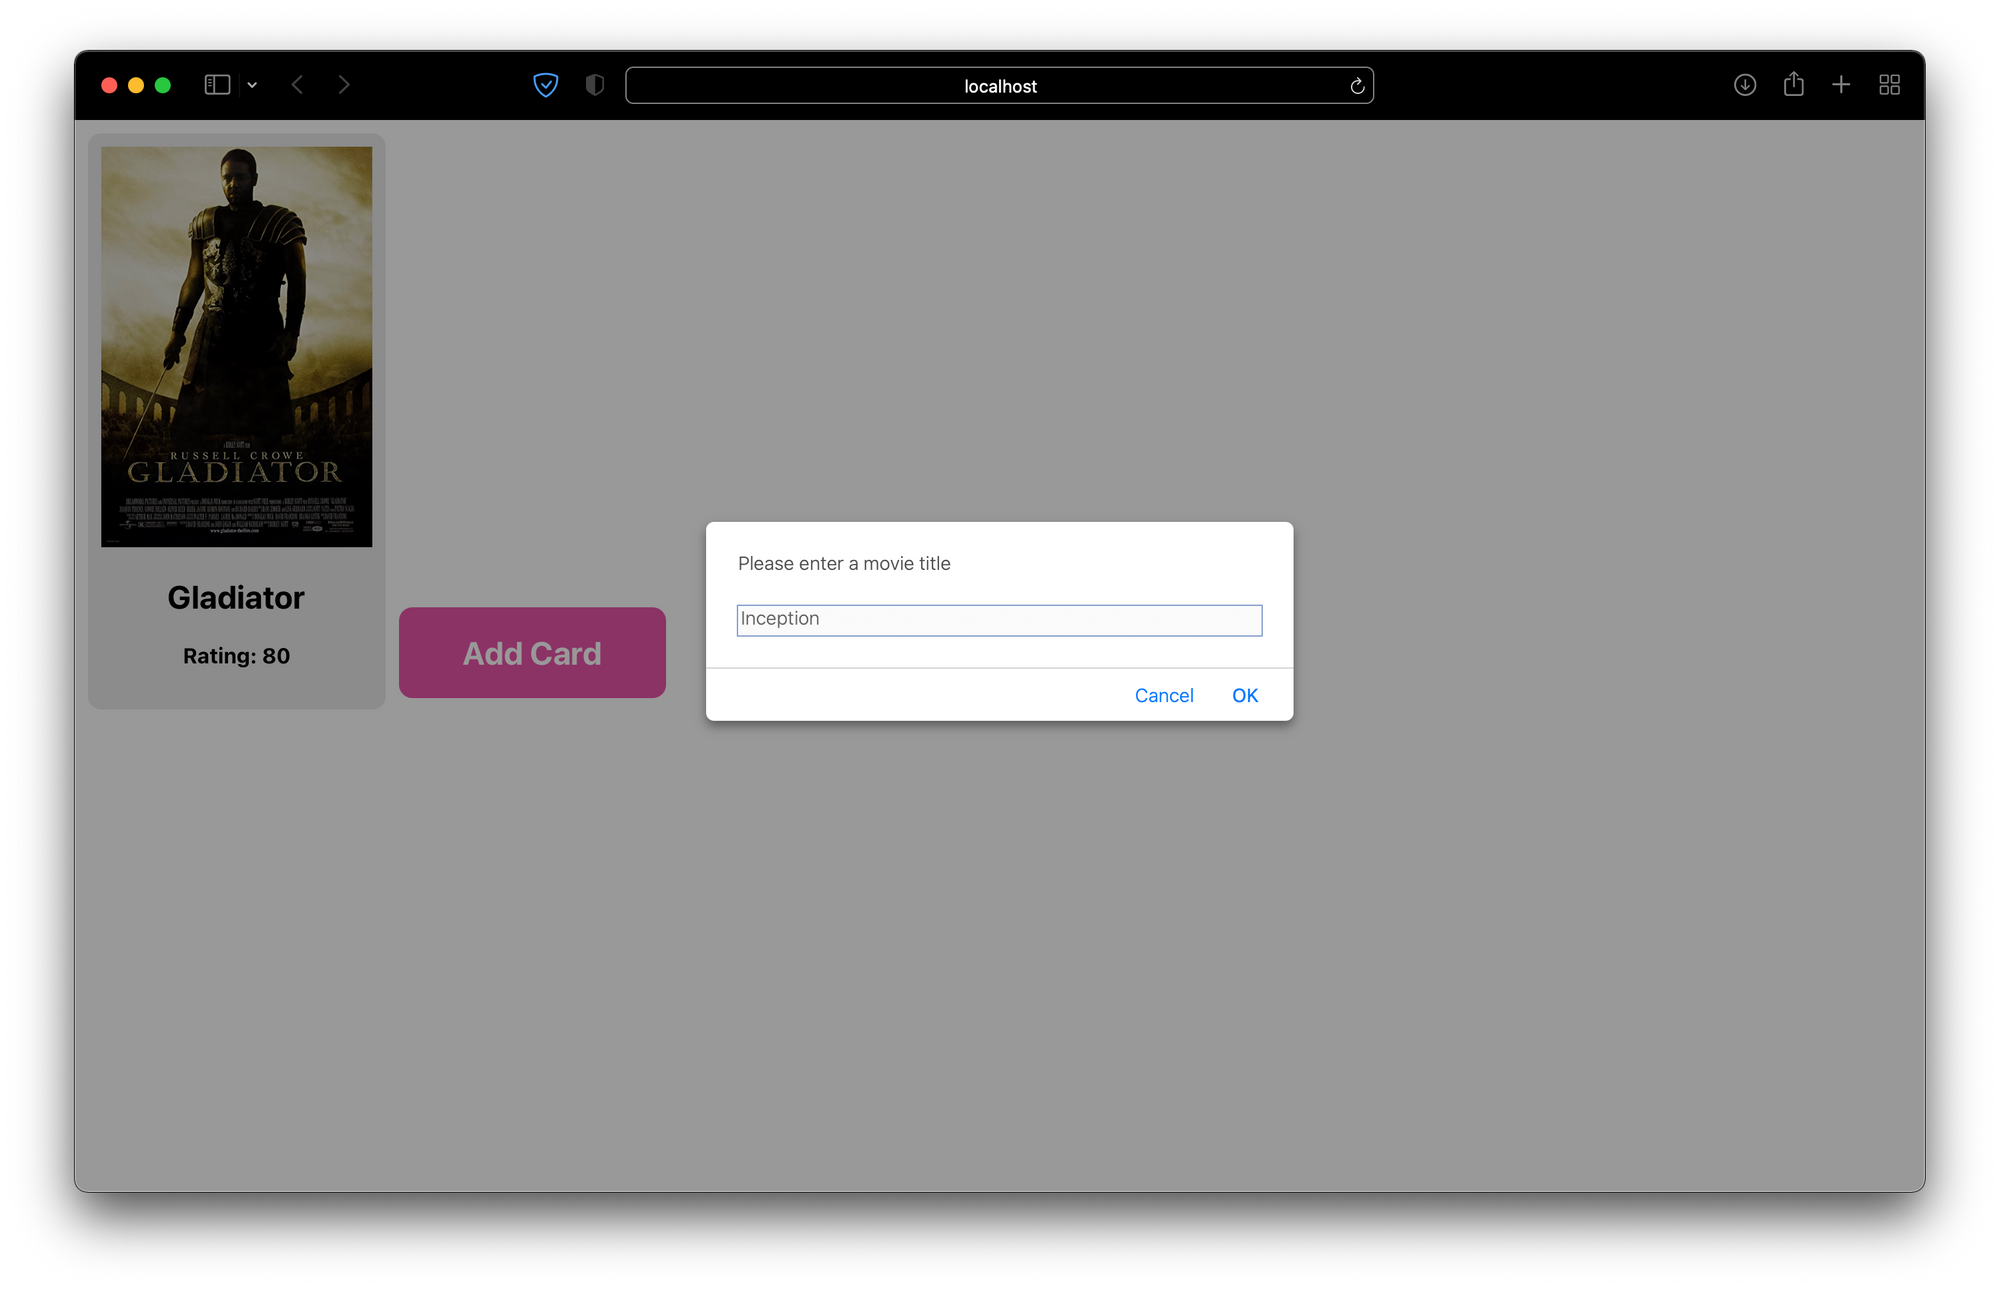
let title = prompt("Please enter a movie title");
let rating = prompt("Please enter the rating for this movie");
if (!rating || !title) {
return;
}
db("MY TABLE")
.insert({ title, rating: Number(rating) })
.one();
}
return (
<div style={addCardStyle} onClick={addCardClick}> {/* <- onClick */}
<h2 style={{ color: "#fff" }}>Add Card</h2>
</div>
);
}Click that new button and enter some values.
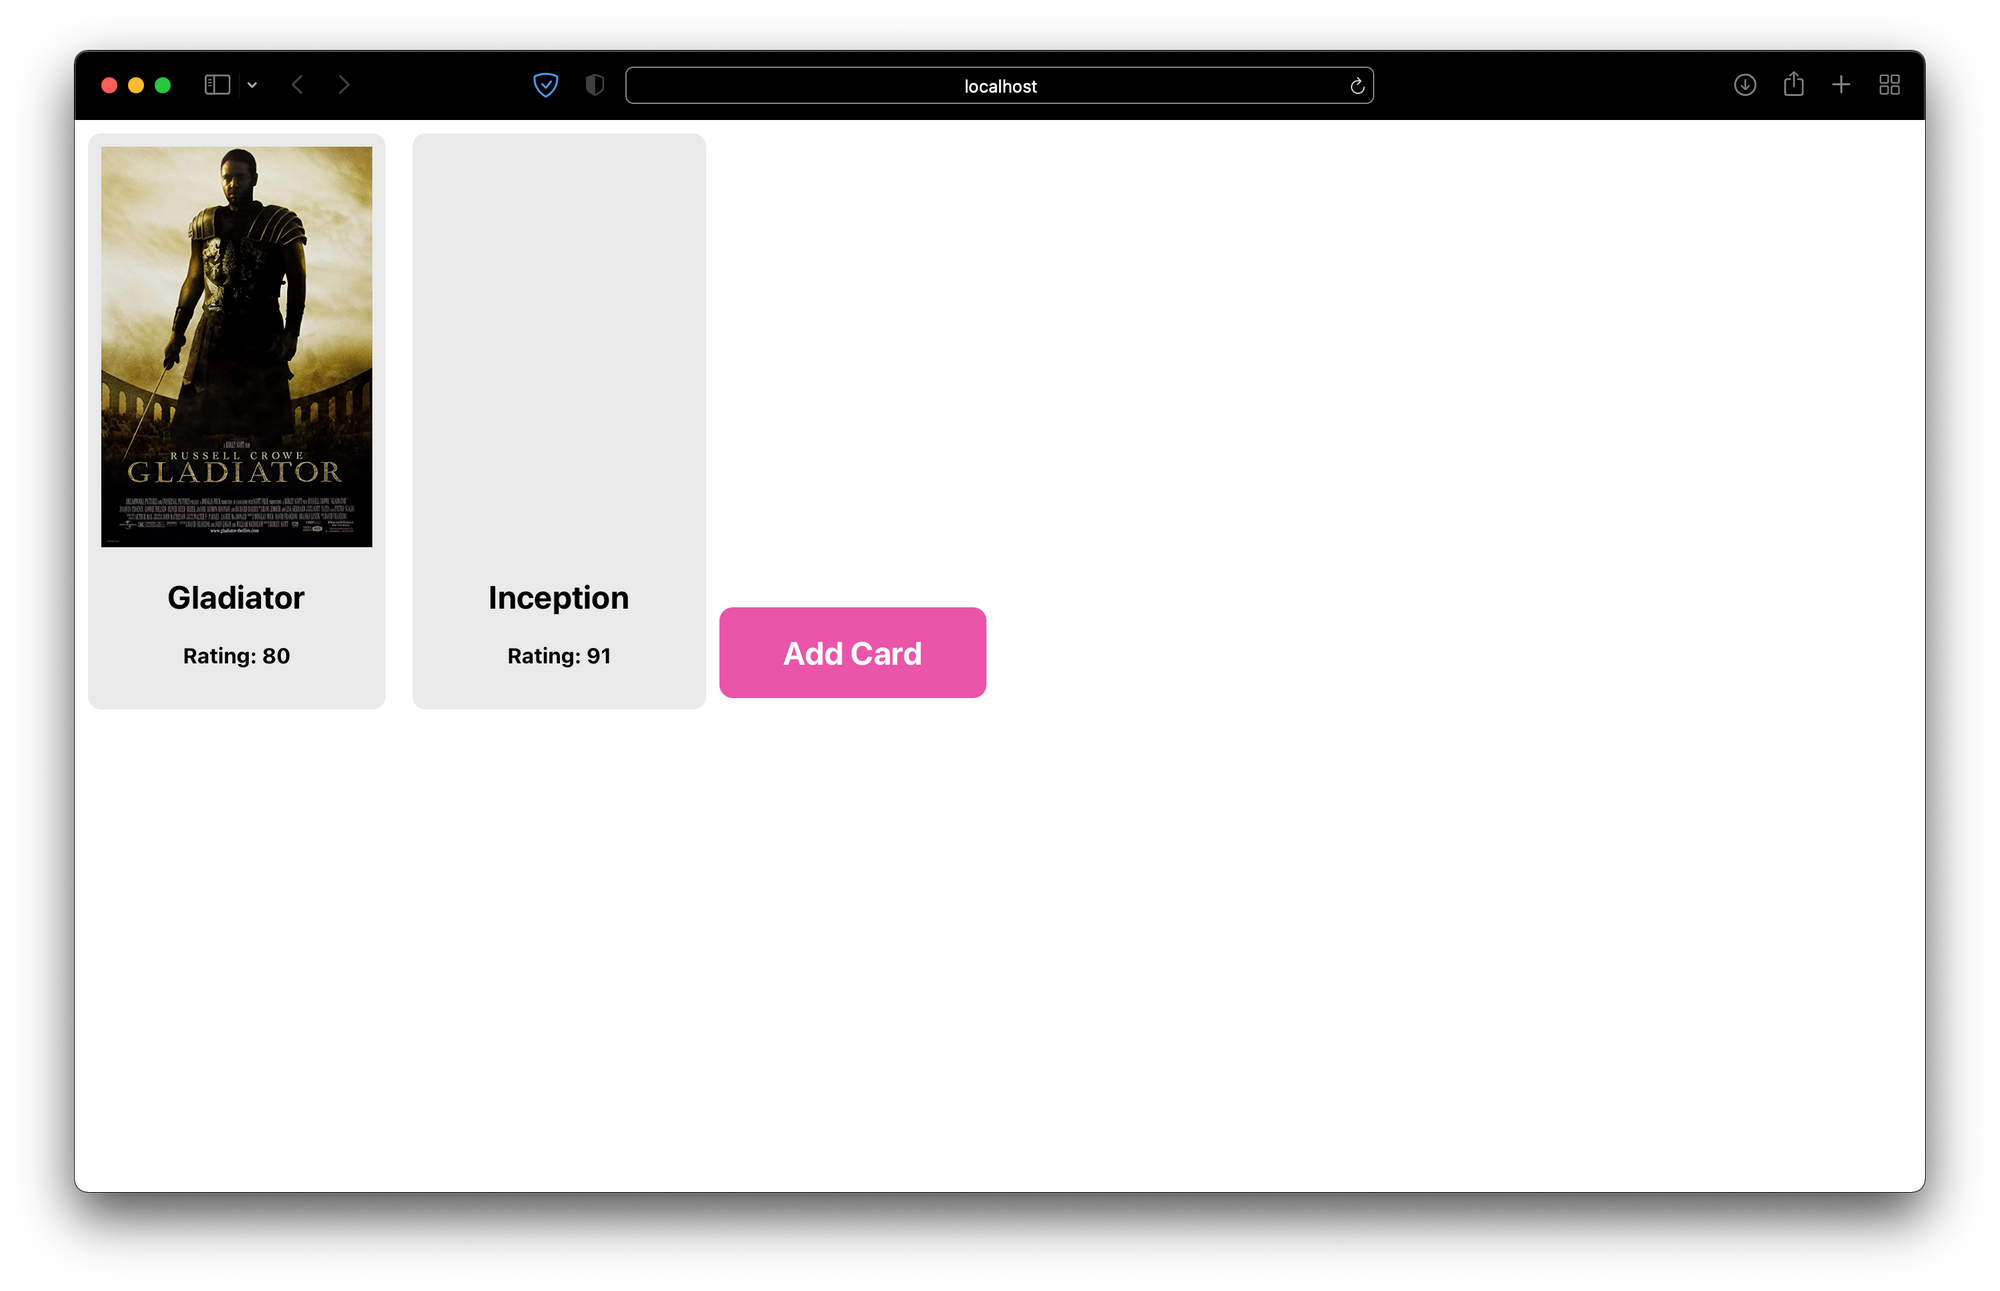
There it is, the new record!
Finally, let's add the corresponding image with the setImage function, from useEasybase. Media (image, video, file) is treated differently than other values and needs to be uploaded, as opposed to inserted.
Here's where we can finally use that _key property to uniquely identify the current record. That property is also commonly used with db.set, db.delete, and so on.
When a user clicks on an image (or the empty image space), they'll be able to upload a new one. useReturn will once again demonstrate that it automatically refreshes the new data.
Head back to the <Card /> component and bring in that useEasybase hook. Using a hidden input is a common trick to make an image appear as a file input too:
function Card({ rating, poster, title, _key }) {
  // ...

  const { setImage } = useEasybase();
  async function onFileChange(e) {
    if (e.target.files[0]) {
      await setImage(_key, "poster", e.target.files[0], "MY TABLE");
    }
  }

  return (
    <div style={cardStyle}>
      <input id={"fileInput" + _key} hidden type="file" onChange={onFileChange} />
      <img
        src={poster}
        style={{ height: 300, minWidth: 200 }}
        onClick={_ => document.getElementById("fileInput" + _key).click()}
      />
      <h2>{title}</h2>
      <h4>Rating: {rating}</h4>
    </div>
  );
}
Now, clicking a <Card /> image will bring up a file selector. Use that selector to upload an image from your machine.
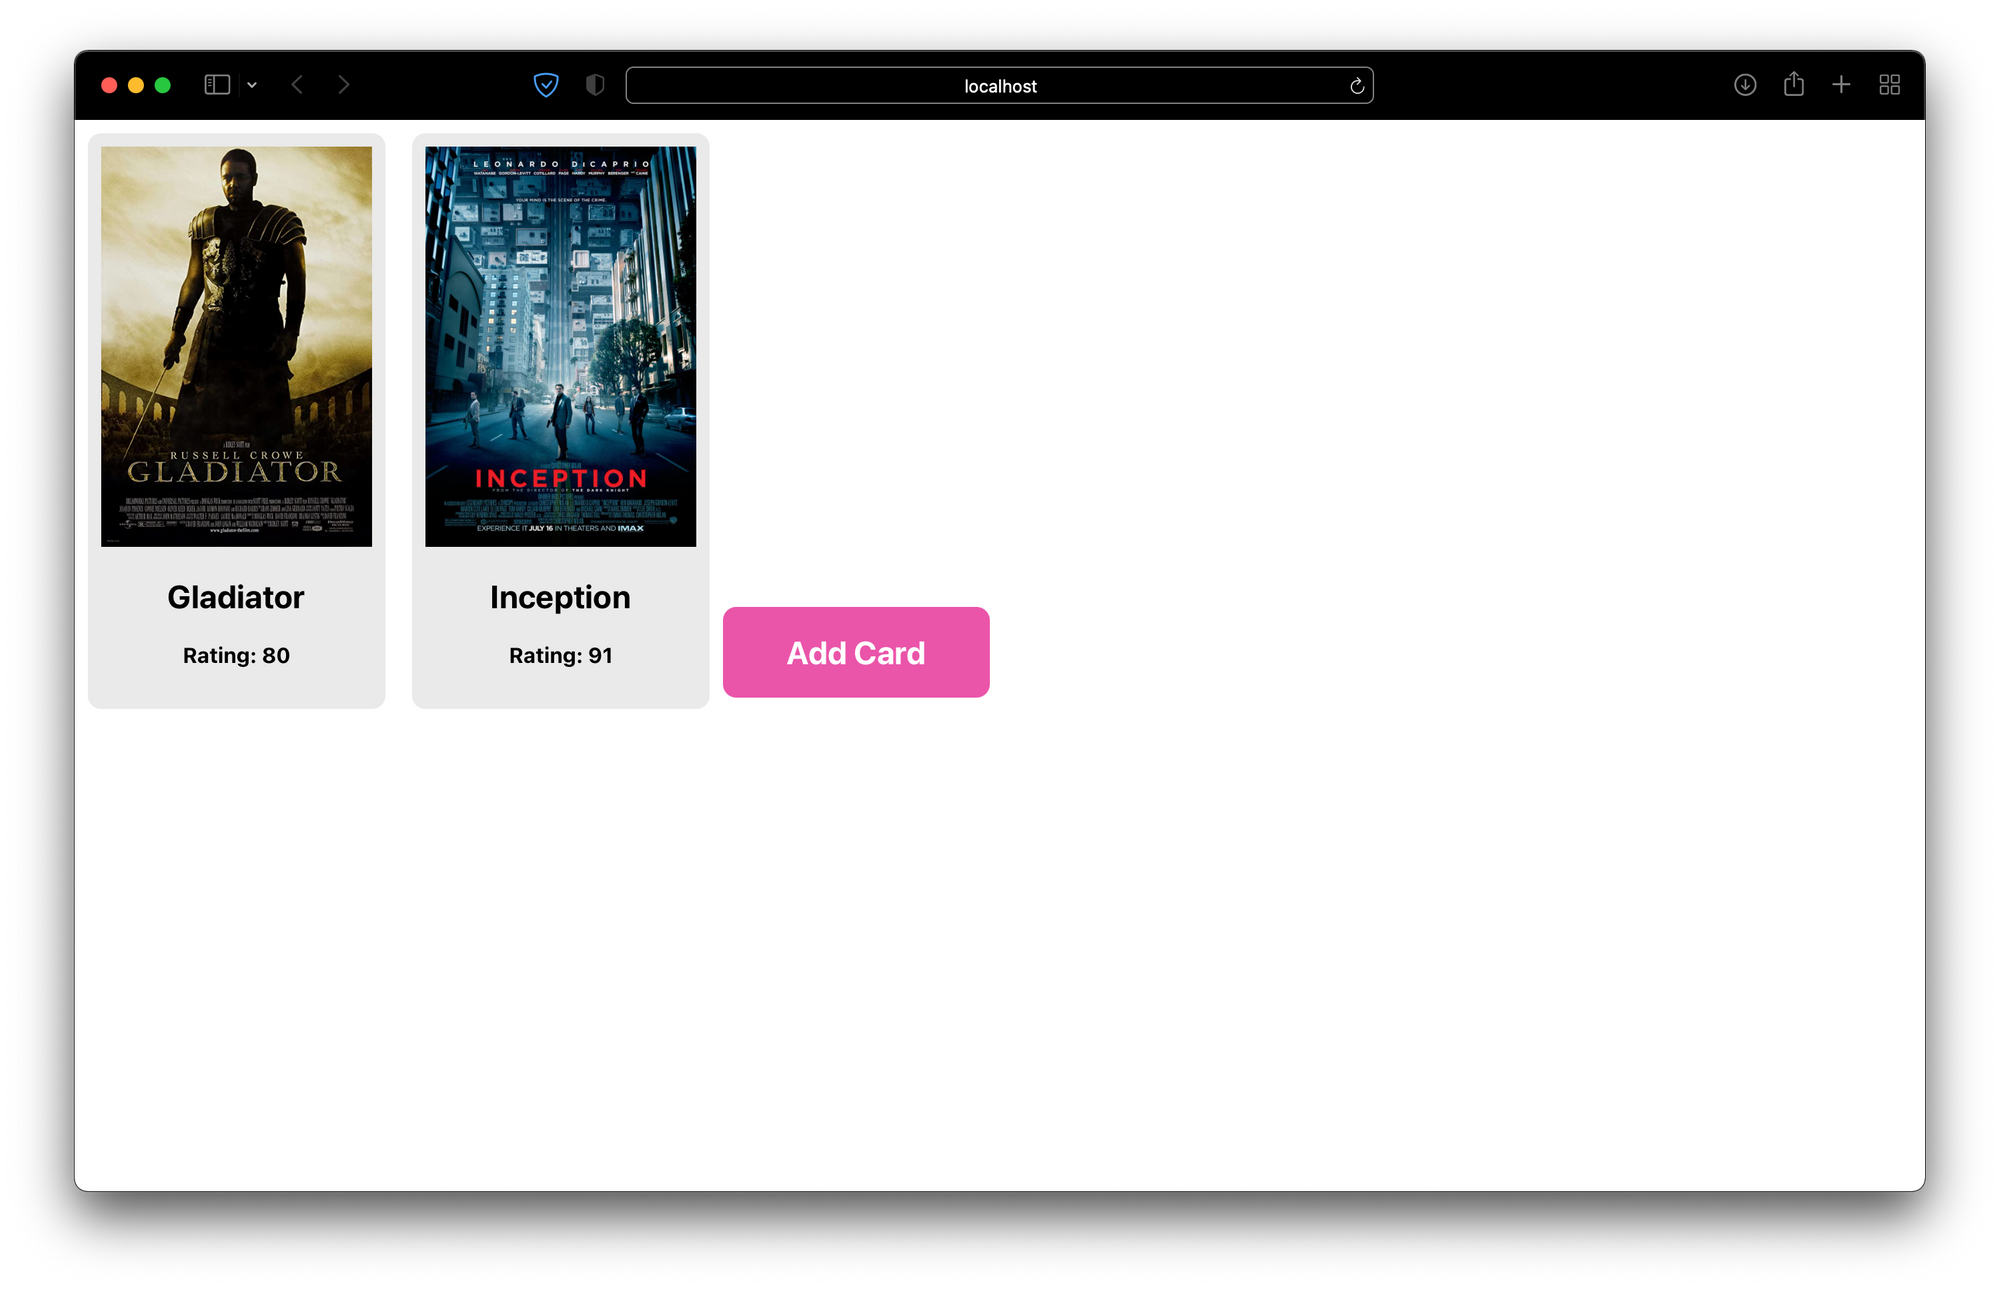
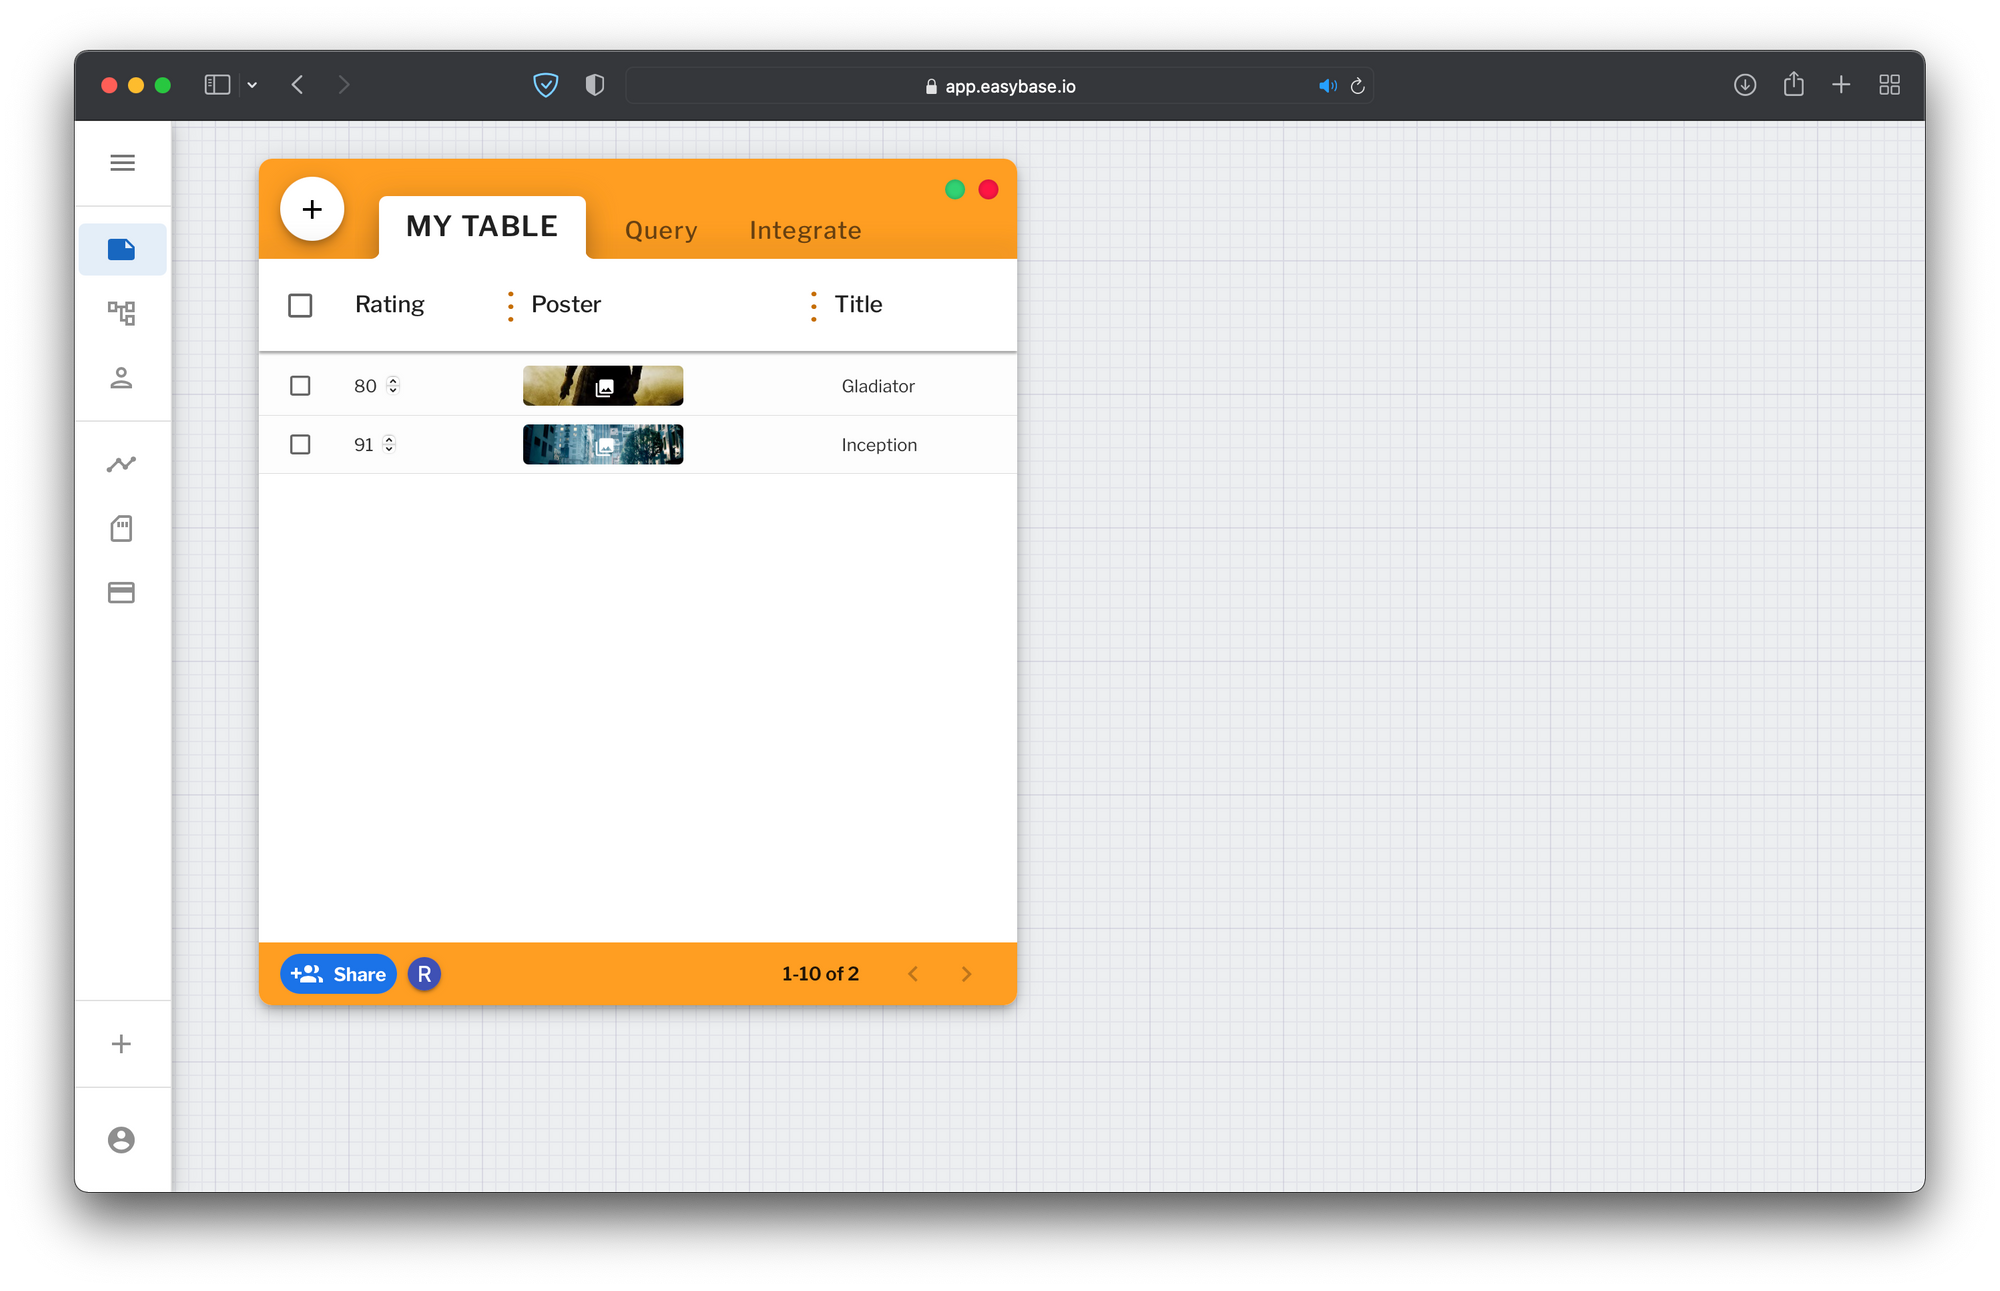
It works! Uploaded images will be available via the Easybase CDN and attached to your record. The frame should automatically display it.
Notice that these changes are reflected in the Easybase web app too:
Query
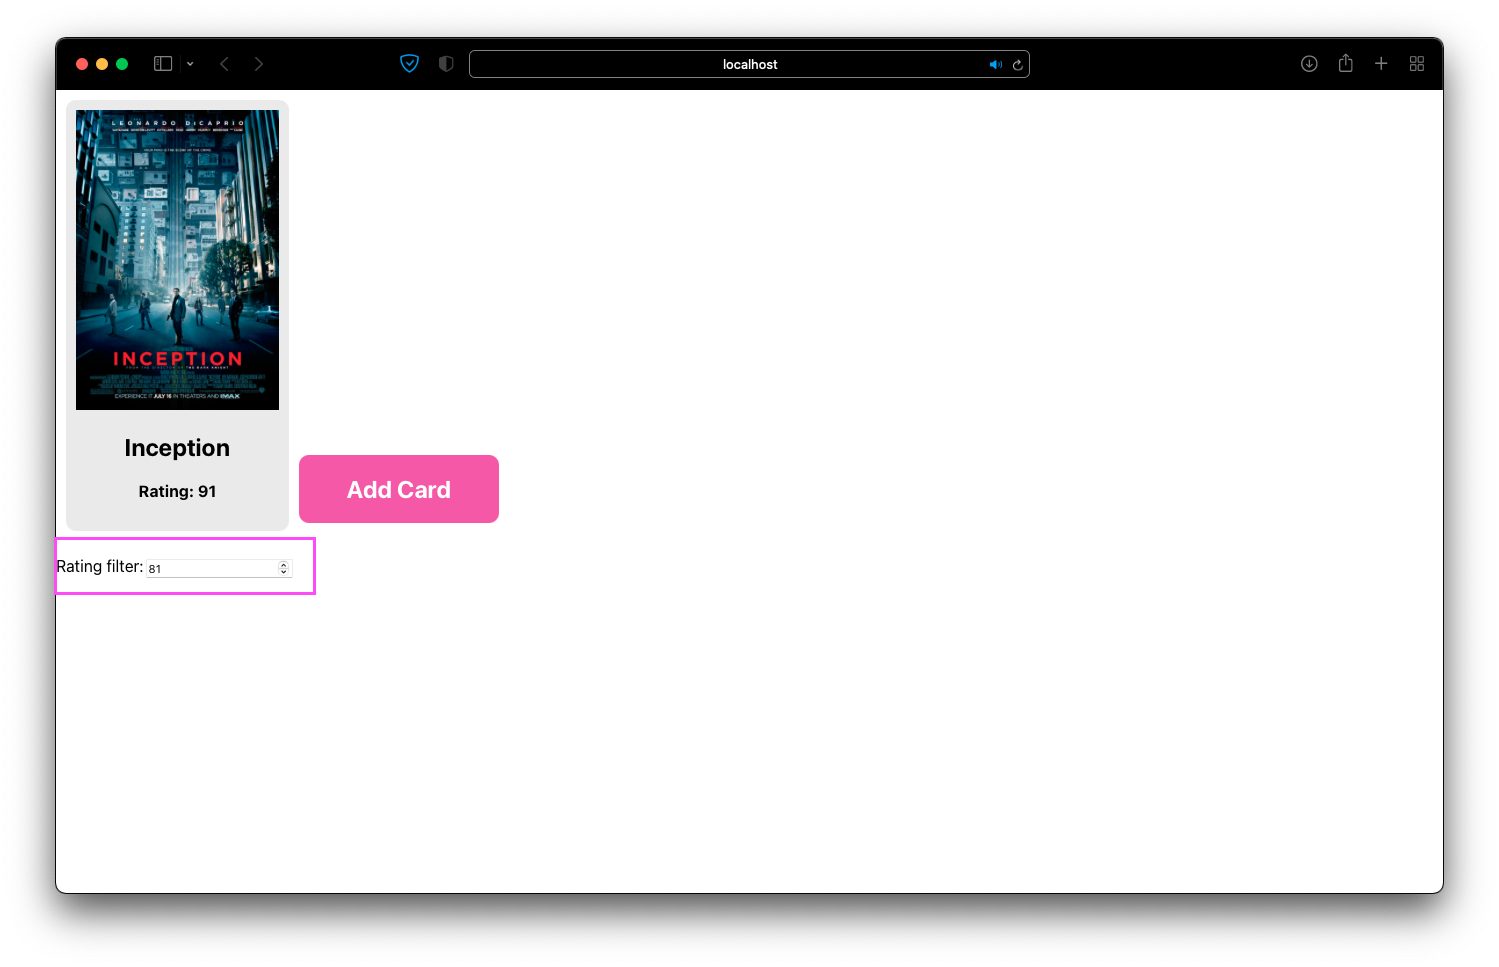
Let's add one more component to demonstrate how to use the dependency array of the useReturn hook.
As a demonstration, I will implement a numerical input that, when changed, updates the query used in the useReturn hook.
Typically, you will use an expression in the db.where function for these stateful queries. Here's a simple example, wrapping the root <App /> and adding a controlled input. Notice the new ratingMin variable:
import { useEasybase } from "easybase-react";

// ...

function App() {
  const [ratingMin, setRatingMin] = useState(0); // <- for new input
  const { useReturn, db, e } = useEasybase();
  const { frame } = useReturn(() => db("MY TABLE").return(), []);

  return (
    <div>
      <div style={{ textAlign: "center", display: "inline-block" }}>
        {frame.map(ele => <Card {...ele} />)}
        <AddCardButton />
      </div>
      <p>
        Rating filter:
        <input
          type="number"
          value={ratingMin} // controlled input
          onChange={e => setRatingMin(Number(e.target.value))}
        />
      </p>
    </div>
  );
}
All that's left to do is use ratingMin in the db function and place it in the dependency array. We'll use e.gte('rating', ratingMin) to query for records with a 'rating' (column name) greater than or equal to ratingMin:
function App() {
  const [ratingMin, setRatingMin] = useState(0); // <- for new input
  const { useReturn, db, e } = useEasybase();
  const { frame } = useReturn(
    () => db("MY TABLE").return().where(e.gte("rating", ratingMin)),
    [ratingMin]
  );
  // ...
}
Just like that, your frame responds to the state changes and updates the query accordingly:
You can add as many records as you would like.
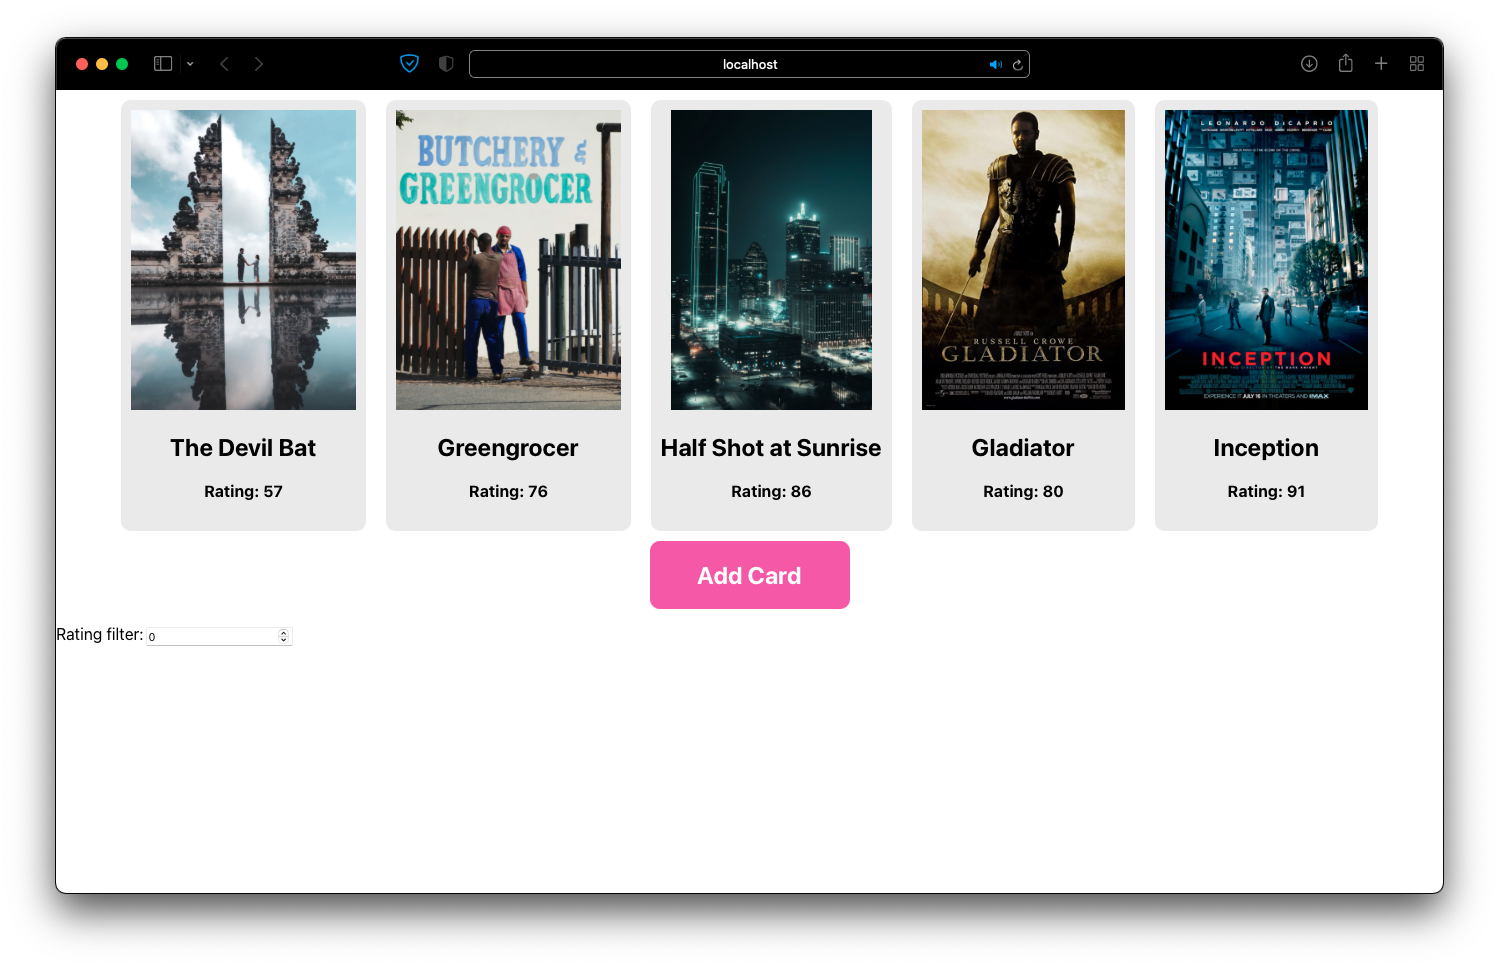
All of these changes will be synchronized with your remote database. Pro tip: use .limit and .offset to implement pagination if you have thousands or even tens-of-thousands of records.
Conclusion
The easybase-react package features a lot of useful functions that you will likely fund helpful, especially with regards to user authentication and database.
If you would like to see all the functionality of this library with React and React Native, take a look at this walkthrough.
The query builder featured in this piece functions similarly to the syntax used in Firebase's database and is quite flexible. For example, an advanced use case would be to select columns with aggregators, such as e.min and e.max.
Furthermore, if you have some more complex business logic in your application, try out the dbEventListener handler. This will run a callback function whenever a db instance runs any query. It's returned from the useEasybase hook, too.
Thanks for reading! This is a brief and simple introduction to a React-friendly, stateful database hook and serverless programming which is a popular programming architecture amongst individual and small teams.
This popularity comes from the absence of a traditional backend setup, which has lots of cost, time, and management overhead.
I hope that this walkthrough helped familiarize those who are interested in deploying production-ready React/React Native apps with Easybase's useReturn hook.