

In this article I am going to walk you through building a prototype with Spring Boot. Think of it like building a project for a hackathon or a prototype for your startup in limited time.
In other words, we are not trying to build something perfect – but rather something that works.
If you get stuck in any part of this tutorial or if I have forgotten to mention something, you can check out the GitHub repository I have included in the Conclusion.
Prerequisites
- Foundations of Java and OOP
- Basic knowledge of relational databases (one-to-many, many-to-many, and so on)
- Fundamentals of Spring would be helpful
- Basic level HTML
Also make sure you have the following:
- JDK (Java Development Kit) latest
- IntelliJ IDEA or some other Java IDE
What are we building?
We will build an amenity reservation system where users will log in and reserve a time to use a service such as fitness center, pool, or sauna.
Each amenity will have a certain capacity (number of people that can use the service at the same time) so that people can make use of the amenities safely during the Covid-19 pandemic.
List of Features for the App
We can think of our app as the reservation system for an apartment complex.
- Users should be able to log in.
- We will assume that the accounts of residents are pre-created and there will be no sign-up feature.
- Users should be able to view their reservations.
- Users should be able to create new reservations by selecting the amenity type, date, and time.
- Only logged-in users should be able to see the reservations page and create reservations.
- We should check the capacity and only create new reservations if the current number of reservations does not exceed the capacity.
Technologies We'll Use
We will learn about a lot of useful technologies that will make you more efficient as a Spring Boot developer. I will briefly mention what they are and what they are good for and then we will see them in action.
- Bootify
- Hibernate
- Spring Boot
- Maven
- JPA
- Swagger
- H2 In-Memory Database
- Thymeleaf
- Bootstrap
- Spring Security
Why Spring Boot?
The Spring framework is generally used for enterprise level/large scale jobs. It is not usually the first option that comes to mind for smaller projects – but I will argue that it can be quite fast for prototyping.
It has the following advantages:
- Annotation-based development generates a lot of code for you behind the scenes. And especially with the availability of libraries like Lombok, it has became a lot easier to focus on the business logic.
- It has nice in-memory database support, so that we don't need to create a real database and connect to it. (H2)
- It has a mature ecosystem so you can readily find answers to most questions.
- Almost "no configuration" is required. With the help of Spring Boot, we get rid of ugly XML configurations on the Spring side of things and configuring your application is really easy.
- There's a lot happening behind the scenes. Spring provides so much magic and does so many things to get things going. So you don't usually need to care about that stuff and can just let the framework handle things.
- We have Spring Security. Having one of the most comprehensive, battle-tested security frameworks on your side gives you more confidence in the security of your application. It also takes care of a good share of the hard work for you.
How to Create the Project with Bootify
To create the project, you will use Bootify. It's a freemium service that makes Spring Boot development faster by generating a lot of boilerplate code for you and letting you focus on business logic instead.
Bootify allows us to specify our preferences and automatically imports the dependencies similar to Spring Initializr.
But there is more than that. You can also specify your entities and it will generate the corresponding model and DTO classes. It can even generate the service and controller level code for common CRUD operations.
I believe it is a more convenient tool for API development than it is for MVC apps since it generates REST API code by default. But it will still make our lives easier even with a Spring Boot MVC application that contains views. We will just need to make some adjustments to the generated code.
Let's open the Bootify website and click the "Start Project" button at the top right corner.
You should select:
- Maven as the build type
- Java version: 14
- Tick enable Lombok
- DBMS: H2 database
- Tick add dateCreated/lastUpdated to entities
- Packages: Technical
- Enable OpenAPI/Swagger UI
- Add org.springframework.boot:spring-boot-devtools to further dependencies
After you are done, you should see this:

Now let's specify our entities. Start by clicking the Entities tab on the left menu.
We will have the following entities and relations:
- Reservation that contains the data related to each reservation such as reservation date, reservation starting time, ending time, and the user who owns this reservation.
- The User entity that contains our user model and will have relations with Reservation.
- The Amenity entity to hold the type of Amenity and its capacity (maximum number of reservations for a certain time, for example 2 people can use and reserve the Sauna for the same time).
Let's define our Reservation entity as follows and keep "Add REST endpoints" checked (even though we will modify the output). Then click the Save button.

We will specify the relations later, so the only field that our user entity has is the id field.

We could create an entity for Amenities to store the data of the amenity name and its capacity and then we could reference it from the Reservation. But the relationship between Amenity and Reservation would be one-to-one.
So instead, for the sake of simplicity, we will create an enum called AmenityType and store the AmenityType inside Reservation.
Now let's create a relationship between the User and Reservation entities by clicking the + button next to the Relations menu.

It will be a Many-to-one relationship since a user can have many reservations but a reservation must have one and only one user. We will make sure this is the case by checking the required box.

We click "Save Changes" and we are done. Your final model should look like this:

Now click the download button on the left menu to download the generated project code so we can start working on it. You can see the first commit on the project repository to compare with yours if you have any problems.
After you download the project, open it in an IDE – I'll use IntelliJ IDEA. Your file structure should look like this:
├── amenity-reservation-system.iml
├── mvnw
├── mvnw.cmd
├── pom.xml
├── src
│   └── main
│       ├── java
│       │   └── com
│       │       └── amenity_reservation_system
│       │           ├── AmenityReservationSystemApplication.java
│       │           ├── HomeController.java
│       │           ├── config
│       │           │   ├── DomainConfig.java
│       │           │   ├── JacksonConfig.java
│       │           │   └── RestExceptionHandler.java
│       │           ├── domain
│       │           │   ├── Reservation.java
│       │           │   └── User.java
│       │           ├── model
│       │           │   ├── ErrorResponse.java
│       │           │   ├── FieldError.java
│       │           │   ├── ReservationDTO.java
│       │           │   └── UserDTO.java
│       │           ├── repos
│       │           │   ├── ReservationRepository.java
│       │           │   └── UserRepository.java
│       │           ├── rest
│       │           │   ├── ReservationController.java
│       │           │   └── UserController.java
│       │           └── service
│       │               ├── ReservationService.java
│       │               └── UserService.java
│       └── resources
│           └── application.yml
└── target
    ├── classes
    │   ├── application.yml
    │   └── com
    │       └── amenity_reservation_system
    │           ├── AmenityReservationSystemApplication.class
    │           ├── HomeController.class
    │           ├── config
    │           │   ├── DomainConfig.class
    │           │   ├── JacksonConfig.class
    │           │   └── RestExceptionHandler.class
    │           ├── domain
    │           │   ├── Reservation.class
    │           │   └── User.class
    │           ├── model
    │           │   ├── ErrorResponse.class
    │           │   ├── FieldError.class
    │           │   ├── ReservationDTO.class
    │           │   └── UserDTO.class
    │           ├── repos
    │           │   ├── ReservationRepository.class
    │           │   └── UserRepository.class
    │           ├── rest
    │           │   ├── ReservationController.class
    │           │   └── UserController.class
    │           └── service
    │               ├── ReservationService.class
    │               └── UserService.class
    └── generated-sources
        └── annotations
How to Test and Explore the Generated Code
Let's take our time to experiment with the generated code and understand it layer by layer.
The Repos folder contains the code for the data access layer, namely our repositories. We will use JPA methods to retrieve our data, which are pre-made query methods you can use by defining them inside the repository interface.
Notice that our repository classes extend the JpaRepository interface. This is the interface that allows us to use the mentioned methods.
JPA queries follow a certain convention, and when we create the method that obeys the conventions, it will automatically know what data you want to retrieve, behind the scenes. If you don't yet get it, do not worry, we will see examples.

The Model classes present our data model, and which classes will have which fields.
Each model class corresponds to a database table with the same name and the fields in the model class will be columns in the corresponding table.
Notice the annotation @Entity on top of our model classes. This annotation is handled by Hibernate and whenever Hibernate sees @Entity, it will create a table using the name of our class as table name.
If you are wondering, "What is Hibernate anyways?", it is an object-relational-mapping (ORM) tool for Java that allows us to map the POJOs (Plain Old Java Object) to database tables. It can also provide features such as data validation constraints, but we will not go deep into Hibernate in this post since it is a vast topic on its own.
An awesome feature of Hibernate is that it handles all table creation and deletion operations so you don't have to use additional SQL scripts.
We also represent the relationships between objects in model classes. To see an example, take a look at our User class:
    @OneToMany(mappedBy = "user")
    private Set<Reservation> userReservations;
It has a userReservations object that holds a set of references that resembles the reservations of this particular user. In the Reservation class we have the reverse-relation as:
@ManyToOne(fetch = FetchType.LAZY)
@JoinColumn(name = "user_id", nullable = false)
private User user;
Having references on both sides makes it possible to access the other side of the relationship (user object to reservation and vice versa).
Controllers will handle the requests that are passed to this controller by the request handler and return the corresponding views, in this case.
The controllers that were generated by Bootify are configured to return JSON responses, and we will modify them in the next section to return our views.
Services will hold the logic of our application. The best practice is to keep controllers thin by keeping the business logic in a separate place, the service classes.
Controllers should not interact with the repositories directly, but instead call the service which will interact with the repository, perform any additional operation, and return the result to the controller.
Let's Try Out the API
Now, let's get to the fun part and try our API to see it on action. Run the Spring application on your favorite IDE. Open your browser and go to this address:
http://localhost:8080/swagger-ui/index.html?configUrl=/v3/api-docs/swagger-config#/Swagger automatically documents our code and allows you to send requests easily. You should be seeing this:

Let's first create a user by sending a POST request to UserController. We will do that by clicking the last box (the green one) under user-controller list.

Swagger shows us the parameters that this endpoint expects – only the id for now – and also the responses that the API returns.
Click the "Try it out" button at the top right corner. It asks you to enter an id. I know it is nonsense and the code will not even use this id you enter, but we will fix that in the next section (it is just a problem with the generated code).
For the sake of experimenting, enter any number, like 1 for the id, and click the execute button.

The response body contains the id of the created object. We can confirm that it is created on the database by checking the H2 console.
But before doing that, we need to make a minor adjustment to the application.yml file which contains the application settings and configuration. Open your application.yml file and paste in the following code:
spring:
  datasource:
    url: ${JDBC_DATABASE_URL:jdbc:h2:mem:amenity-reservation-system}
    username: ${JDBC_DATABASE_USERNAME:sa}
    password: ${JDBC_DATABASE_PASSWORD:}
  dbcp2:
    max-wait-millis: 30000
    validation-query: "SELECT 1"
    validation-query-timeout: 30
  jpa:
    hibernate:
      ddl-auto: update
    open-in-view: false
    properties:
      hibernate:
        jdbc:
          lob:
            non_contextual_creation: true
        id:
          new_generator_mappings: true
springdoc:
  pathsToMatch: /api/**
Then we should be able to access the H2 console by going to this address:
http://localhost:8080/h2-console/
Here you need to check that the username is "sa" and click the Connect button.
Click the USER table on the left menu and the console will write the select all query for you.

Let's click the Run button that is above the query.

We can see that the User object is indeed created – great!
We already have a working API at this point and we have not written a single line of code.
How to Adjust the Code for our Use Case
As I mentioned earlier, the generated code does not fully suit our use case and we need to make some adjustments to it.
Let's remove the model folder which contains DTOs and stuff that we will not use. We will show the data inside views instead.
cd src/main/java/com/amenity_reservation_system/
rm -rf model
We will have a lot of errors now since the code uses the DTO classes, but we will get rid of most of it after removing the controller classes.
We will delete the controllers because we do not want to expose the functionality of modifying our data anymore. Our users should be able to do that by interacting with our UI, and we will create new controllers to return the view components in the next section.
rm -rf restFinally, we need to do some refactoring to our service classes since the DTO classes are not present anymore:
package com.amenity_reservation_system.service;

import com.amenity_reservation_system.domain.User;
import com.amenity_reservation_system.repos.UserRepository;
import java.util.List;
import java.util.stream.Collectors;
import org.springframework.http.HttpStatus;
import org.springframework.stereotype.Service;
import org.springframework.web.server.ResponseStatusException;


@Service
public class UserService {

    private final UserRepository userRepository;

    public UserService(final UserRepository userRepository) {
        this.userRepository = userRepository;
    }

    public List<User> findAll() {
        return userRepository.findAll();
    }

    public User get(final Long id) {
        return userRepository.findById(id)
                .orElseThrow(() -> new ResponseStatusException(HttpStatus.NOT_FOUND));
    }

    public Long create(final User user) {
        return userRepository.save(user).getId();
    }

    public void update(final Long id, final User user) {
        final User existingUser = userRepository.findById(id)
                .orElseThrow(() -> new ResponseStatusException(HttpStatus.NOT_FOUND));

        userRepository.save(user);
    }

    public void delete(final Long id) {
        userRepository.deleteById(id);
    }
}
We basically removed the DTO-related code from the UserService class and replaced the return types with User. Let's do the same for ReservationService.
package com.amenity_reservation_system.service;

import com.amenity_reservation_system.domain.Reservation;
import com.amenity_reservation_system.domain.User;
import com.amenity_reservation_system.repos.ReservationRepository;
import com.amenity_reservation_system.repos.UserRepository;
import java.util.List;
import java.util.stream.Collectors;
import org.springframework.http.HttpStatus;
import org.springframework.stereotype.Service;
import org.springframework.web.server.ResponseStatusException;


@Service
public class ReservationService {

    private final ReservationRepository reservationRepository;
    private final UserRepository userRepository;

    public ReservationService(final ReservationRepository reservationRepository,
            final UserRepository userRepository) {
        this.reservationRepository = reservationRepository;
        this.userRepository = userRepository;
    }

    public List<Reservation> findAll() {
        return reservationRepository.findAll();
    }

    public Reservation get(final Long id) {
        return reservationRepository.findById(id)
                .orElseThrow(() -> new ResponseStatusException(HttpStatus.NOT_FOUND));
    }

    public Long create(final Reservation reservation) {
        return reservationRepository.save(reservation).getId();
    }

    public void update(final Long id, final Reservation reservation) {
        final Reservation existingReservation = reservationRepository.findById(id)
                .orElseThrow(() -> new ResponseStatusException(HttpStatus.NOT_FOUND));
        reservationRepository.save(reservation);
    }

    public void delete(final Long id) {
        reservationRepository.deleteById(id);
    }

}
Let's also remove the config classes:
rm -rf configAnd rename the domain folder to model. If you are using an IDE, I strongly advise that you use your IDE's rename functionality to rename this folder since it will automatically rename the imports to match the new package name.
mv domain modelAlso, make sure that your model classes (User and Reservation) have the right package name after this operation. The first line of these two files should be:
package com.amenity_reservation_system.model;If it stays as domain package, you may have errors.
At this point, you should be able to compile and run the project without any problems.
How to Create the Controllers and View Files to Show Data
Thymeleaf is a template engine for Spring that allows us to create UIs and display our model data to the users.
We can access the Java objects inside the Thymeleaf template, and we can also use plain old HTML, CSS and JavaScript. If you know about JSPs, this is JSP on steroids.
Let's create some Thymeleaf templates that will not do anything but show the data for now. We will style them in the next section. We will also create the controllers that will return these views.
Before getting started with the Thymeleaf templates, we need to add a Maven dependency for Spring Boot Thymeleaf. Your dependencies should look like this in your pom.xml file:
<?xml version="1.0" encoding="UTF-8"?>
<project xmlns="http://maven.apache.org/POM/4.0.0" xmlns:xsi="http://www.w3.org/2001/XMLSchema-instance"
        xsi:schemaLocation="http://maven.apache.org/POM/4.0.0 https://maven.apache.org/xsd/maven-4.0.0.xsd">
    <modelVersion>4.0.0</modelVersion>
    <parent>
        <groupId>org.springframework.boot</groupId>
        <artifactId>spring-boot-starter-parent</artifactId>
        <version>2.4.4</version>
        <relativePath /><!-- lookup parent from repository -->
    </parent>
    <groupId>com</groupId>
    <artifactId>amenity-reservation-system</artifactId>
    <version>0.0.1-SNAPSHOT</version>
    <name>amenity-reservation-system</name>

    <properties>
        <java.version>14</java.version>
    </properties>

    <dependencies>
        <dependency>
            <groupId>org.springframework.boot</groupId>
            <artifactId>spring-boot-starter-web</artifactId>
        </dependency>
        <dependency>
            <groupId>org.springframework.boot</groupId>
            <artifactId>spring-boot-starter-validation</artifactId>
        </dependency>
        <dependency>
            <groupId>org.springframework.boot</groupId>
            <artifactId>spring-boot-starter-data-jpa</artifactId>
        </dependency>
        <dependency>
            <groupId>com.h2database</groupId>
            <artifactId>h2</artifactId>
            <scope>runtime</scope>
        </dependency>
        <dependency>
            <groupId>org.springdoc</groupId>
            <artifactId>springdoc-openapi-ui</artifactId>
            <version>1.5.2</version>
        </dependency>
        <dependency>
            <groupId>org.springframework.boot</groupId>
            <artifactId>spring-boot-devtools</artifactId>
        </dependency>
        <dependency>
            <groupId>org.projectlombok</groupId>
            <artifactId>lombok</artifactId>
            <version>1.18.20</version>
            <scope>provided</scope>
        </dependency>
        <dependency>
            <groupId>org.springframework.boot</groupId>
            <artifactId>spring-boot-starter-test</artifactId>
            <scope>test</scope>
        </dependency>
        <dependency>
            <groupId>org.springframework.boot</groupId>
            <artifactId>spring-boot-starter-thymeleaf</artifactId>
        </dependency>

    </dependencies>

    <build>
        <plugins>
            <plugin>
                <groupId>org.springframework.boot</groupId>
                <artifactId>spring-boot-maven-plugin</artifactId>
            </plugin>
        </plugins>
    </build>
</project>
You can just copy and paste the inner content of the dependencies tag. Now let's tell Maven to install the dependencies:
mvn clean installWe are now ready to create our views. Let's create a directory under resources to hold our view template files like this:
cd ../../../resources
mkdir templates
And create a view file:
cd templates
touch index.html
Copy and paste the following snippet into it. This file will be our home page in the future.
<!DOCTYPE HTML>
<html lang="en" xmlns:th="http://www.thymeleaf.org">
<head>
    <meta charset="UTF-8"/>
    <title>Amenities Reservation App</title>

    <link th:rel="stylesheet" th:href="@{/webjars/bootstrap/4.0.0-2/css/bootstrap.min.css} "/>
</head>
<body>

<div>
hello world!
</div>

<script th:src="@{/webjars/jquery/3.0.0/jquery.min.js}"></script>
<script th:src="@{/webjars/popper.js/1.12.9-1/umd/popper.min.js}"></script>
<script th:src="@{/webjars/bootstrap/4.0.0-2/js/bootstrap.min.js}"></script>

</body>
</html>
We also need to create a controller that will return us this view so we can see it in the browser.
cd ../java/com/amenity_reservation_system
mkdir controller && cd controller
touch HomeController
Paste this code into the HomeController:
package com.amenity_reservation_system.controller;

import org.springframework.stereotype.Controller;
import org.springframework.ui.Model;
import org.springframework.web.bind.annotation.GetMapping;
import org.springframework.web.bind.annotation.ResponseBody;


@Controller
public class HomeController {

    @GetMapping("/")
    public String index(Model model) {

        return "index";
    }
}
Notice how we annotate our method with @Controller instead of @RestController this time. The @RestController annotation implies that the controller will return a REST response whereas a @Controller can return pre-rendered (SSR) views/HTML.
When a request arrives in our application, Spring will automatically run this controller method. Then it will find the index.html file we previously created under the resources and send that file to the client.
Let's confirm that it is working by sending a request to our application. Do not forget to restart first, then send this request:
GET localhost:8080You should be able to see the Hello World message on the browser.
How to Define Different Types of Amenities
We have the Reservation class but we have not created a way to specify which type of amenity is getting reserved (the pool, sauna, or gym).
There are multiple ways to do this. One of them would be to create an entity called Amenity to store shared data among entities. Then we'd create PoolAmenity, SaunaAmenity, and GymAmenity classes which would then extend the Amenity class.
This is a nice and extendable solution but it feels a bit like overkill for our simple application, since we do not have much data specific to the amenity type. We are only going to have a capacity for each amenity type.
To keep things simple and not to bother ourselves with table inheritance and other complicated stuff, let's just create an enum to indicate the amenity type as a String and let each reservation have one of these.
Let's switch to the model directory from the controller directory and create the enum for AmenityType:
cd ../model
touch AmenityType.java
public enum AmenityType {
POOL("POOL"), SAUNA("SAUNA"), GYM("GYM");
private final String name;
private AmenityType(String value) {
name = value;
}
@Override
public String toString() {
return name;
}
}In this enum, we define a name variable to hold the name of the enum and create a private constructor to only allow a limited set of types. Notice that the type declarations call the constructor from within the class with their name values.
Now we need to modify the Reservation class to hold a reference to AmenityType:
@Enumerated(EnumType.STRING)
@Column(nullable = false)
private AmenityType amenityType;
We use the @Enumerated annotation to describe how we want to store the enum in our database. We'll also make it not nullable because every Reservation must have an AmenityType.
How to Show a User's Reservations
What is the most crucial feature for our app? Creating reservations and showing a user's reservations.
We do not have a way to authenticate users yet, so we can't really ask the user to login and then show their reservations. But we still want to implement and test the functionality to reserve an amenity and show reservations.
For that purpose, we can ask Spring to put some initial data into our database whenever the application runs. Then we can query that data to test if our queries actually work. We can then proceed to call these services from our Views and add authentication to our application in the next sections.
We will use a CommandLineRunner bean to run the initial code. Whenever Spring Container finds a bean of type CommandLineRunner it will run the code inside it. Before that step, let's add a few methods to our model classes to make object creation easier and less verbose.
Take a look at the model classes' annotations and you should see annotations like @Getter and @Setter. These are Lombok annotations.
Lombok is an annotation processor we can use to make our coding experience better by letting it generate code for us. When we annotate a class with @Getter and @Setter, it generates the getters and setters for each field of this class.
Spring uses getter and setter methods for many trivial operations behind the scenes so these are almost always required. And creating them for every entity easily becomes a hassle without the help of Lombok.
Lombok can do more than that though. We will also add the following annotations to our Reservation and User classes:
@Builder
@NoArgsConstructor
@AllArgsConstructor
With these annotations, Lombok implements the builder creational pattern for this class and also creates 2 constructors: One with no arguments (default constructor) and another one with all arguments. I think it is awesome that we can do so much by adding just a few annotations.
We are now ready to add some initial data. Go to your main class (AmenityReservationSystemApplication.java) and add this method:
package com.amenity_reservation_system;

import com.amenity_reservation_system.model.AmenityType;
import com.amenity_reservation_system.model.Reservation;
import com.amenity_reservation_system.model.User;
import com.amenity_reservation_system.repos.ReservationRepository;
import com.amenity_reservation_system.repos.UserRepository;
import org.springframework.boot.CommandLineRunner;
import org.springframework.boot.SpringApplication;
import org.springframework.boot.autoconfigure.SpringBootApplication;
import org.springframework.context.annotation.Bean;

import java.text.DateFormat;
import java.text.SimpleDateFormat;
import java.time.LocalDate;
import java.time.LocalTime;
import java.time.ZoneId;
import java.util.Date;


@SpringBootApplication
public class AmenityReservationSystemApplication {

    public static void main(String[] args) {
        SpringApplication.run(AmenityReservationSystemApplication.class, args);
    }

    @Bean
    public CommandLineRunner loadData(UserRepository userRepository,
                                      ReservationRepository reservationRepository) {
        return (args) -> {
            User user = userRepository.save(new User());
            DateFormat dateFormat = new SimpleDateFormat("dd/MM/yyyy HH:mm:ss");
            Date date = new Date();
            LocalDate localDate = date.toInstant().atZone(ZoneId.systemDefault()).toLocalDate();
            Reservation reservation = Reservation.builder()
                    .reservationDate(localDate)
                    .startTime(LocalTime.of(12, 00))
                    .endTime(LocalTime.of(13, 00))
                    .user(user)
                    .amenityType(AmenityType.POOL)
                    .build();

            reservationRepository.save(reservation);
        };
    }
}
If you get an error about saving operations such as "Inferred type 'S' for parameter ... does not match", it's because we renamed the domain directory to model. Go to the repository classes and fix the paths of imports to model.User and model.Reservation.
Notice how we used the builder pattern to create the reservation object easily. When the object creation gets complex and a constructor requires so many parameters, it's easy to forget the order of parameters or just mess up the order.
Without the builder pattern, we would either need to call a constructor with so many parameters or call the default constructor and write #properties code to call the setters.
After you are done, run your application again to insert the initial data and connect to H2 console as we learned before to confirm that our date is indeed inserted. If you do not have any errors, you should be able to see that the user and the reservation are inserted successfully.

We have inserted a reservation to be able to test the functionality to list the reservations but our views currently do not have a way to show the reservations and add reservations. We need to create the UI for that.
We do not have an authentication or sign-up mechanism yet, so act like the user with ID 10001 is logged in. Later we will improve on that by dynamically checking who is logged in and showing a different page if the user is not logged in.
How to Create Views with Thymeleaf
Let's get started by creating a simple home page and a navbar for ourselves. We will use Thymeleaf fragments for the navbar code.
Thymeleaf fragments allow us to create reusable component-like structures similar to React/Vue components if you are familiar with them. Let's create a folder for our fragments under templates and call it fragments.
mkdir fragments
touch nav.html
We will put our navbar inside nav.html file. Copy and paste the following code:
<!DOCTYPE html>
<html lang="en" xmlns:th="http://www.thymeleaf.org">
<body>
<nav th:fragment="nav" class="navbar navbar-expand navbar-dark bg-primary">
    <div class="navbar-nav w-100">
        <a class="navbar-brand text-color" href="/">Amenities Reservation System</a>
    </div>
</nav>
</body>
</html>
It is not doing much in its current state, but we may add a login button or some links in the future.
Now let's create a simple home page that will serve the users that are not logged in. We will have our navbar fragment on top and have a login button to ask the user to log in before using the app.
<!DOCTYPE HTML>
<html lang="en" xmlns:th="http://www.thymeleaf.org">
<head>
    <meta charset="UTF-8"/>
    <title>Amenities Reservation App</title>

    <link th:rel="stylesheet" th:href="@{/webjars/bootstrap/4.0.0-2/css/bootstrap.min.css} "/>
</head>
<body>

<div>
    <div th:insert="fragments/nav :: nav"></div>
    <div class="text-light" style="background-image: url('https://source.unsplash.com/1920x1080/?nature');
                                   position: absolute;
                                   left: 0;
                                   top: 0;
                                   opacity: 0.6;
                                   z-index: -1;
                                   min-height: 100vh;
                                   min-width: 100vw;">
    </div>

    <div class="container" style="padding-top: 20vh; display: flex; flex-direction: column; align-items: center;">
        <h1 class="display-3">Reservation management made easy.</h1>
        <p class="lead">Lorem, ipsum dolor sit amet consectetur adipisicing elit.
            Numquam in quia natus magnam ducimus quas molestias velit vero maiores.
            Eaque sunt laudantium voluptas. Fugiat molestiae ipsa delectus iusto vel quod.</p>
        <a href="/reservations" class="btn btn-success btn-lg my-2">Reserve an Amenity</a>
    </div>
</div>

<script th:src="@{/webjars/jquery/3.0.0/jquery.min.js}"></script>
<script th:src="@{/webjars/popper.js/1.12.9-1/umd/popper.min.js}"></script>
<script th:src="@{/webjars/bootstrap/4.0.0-2/js/bootstrap.min.js}"></script>

</body>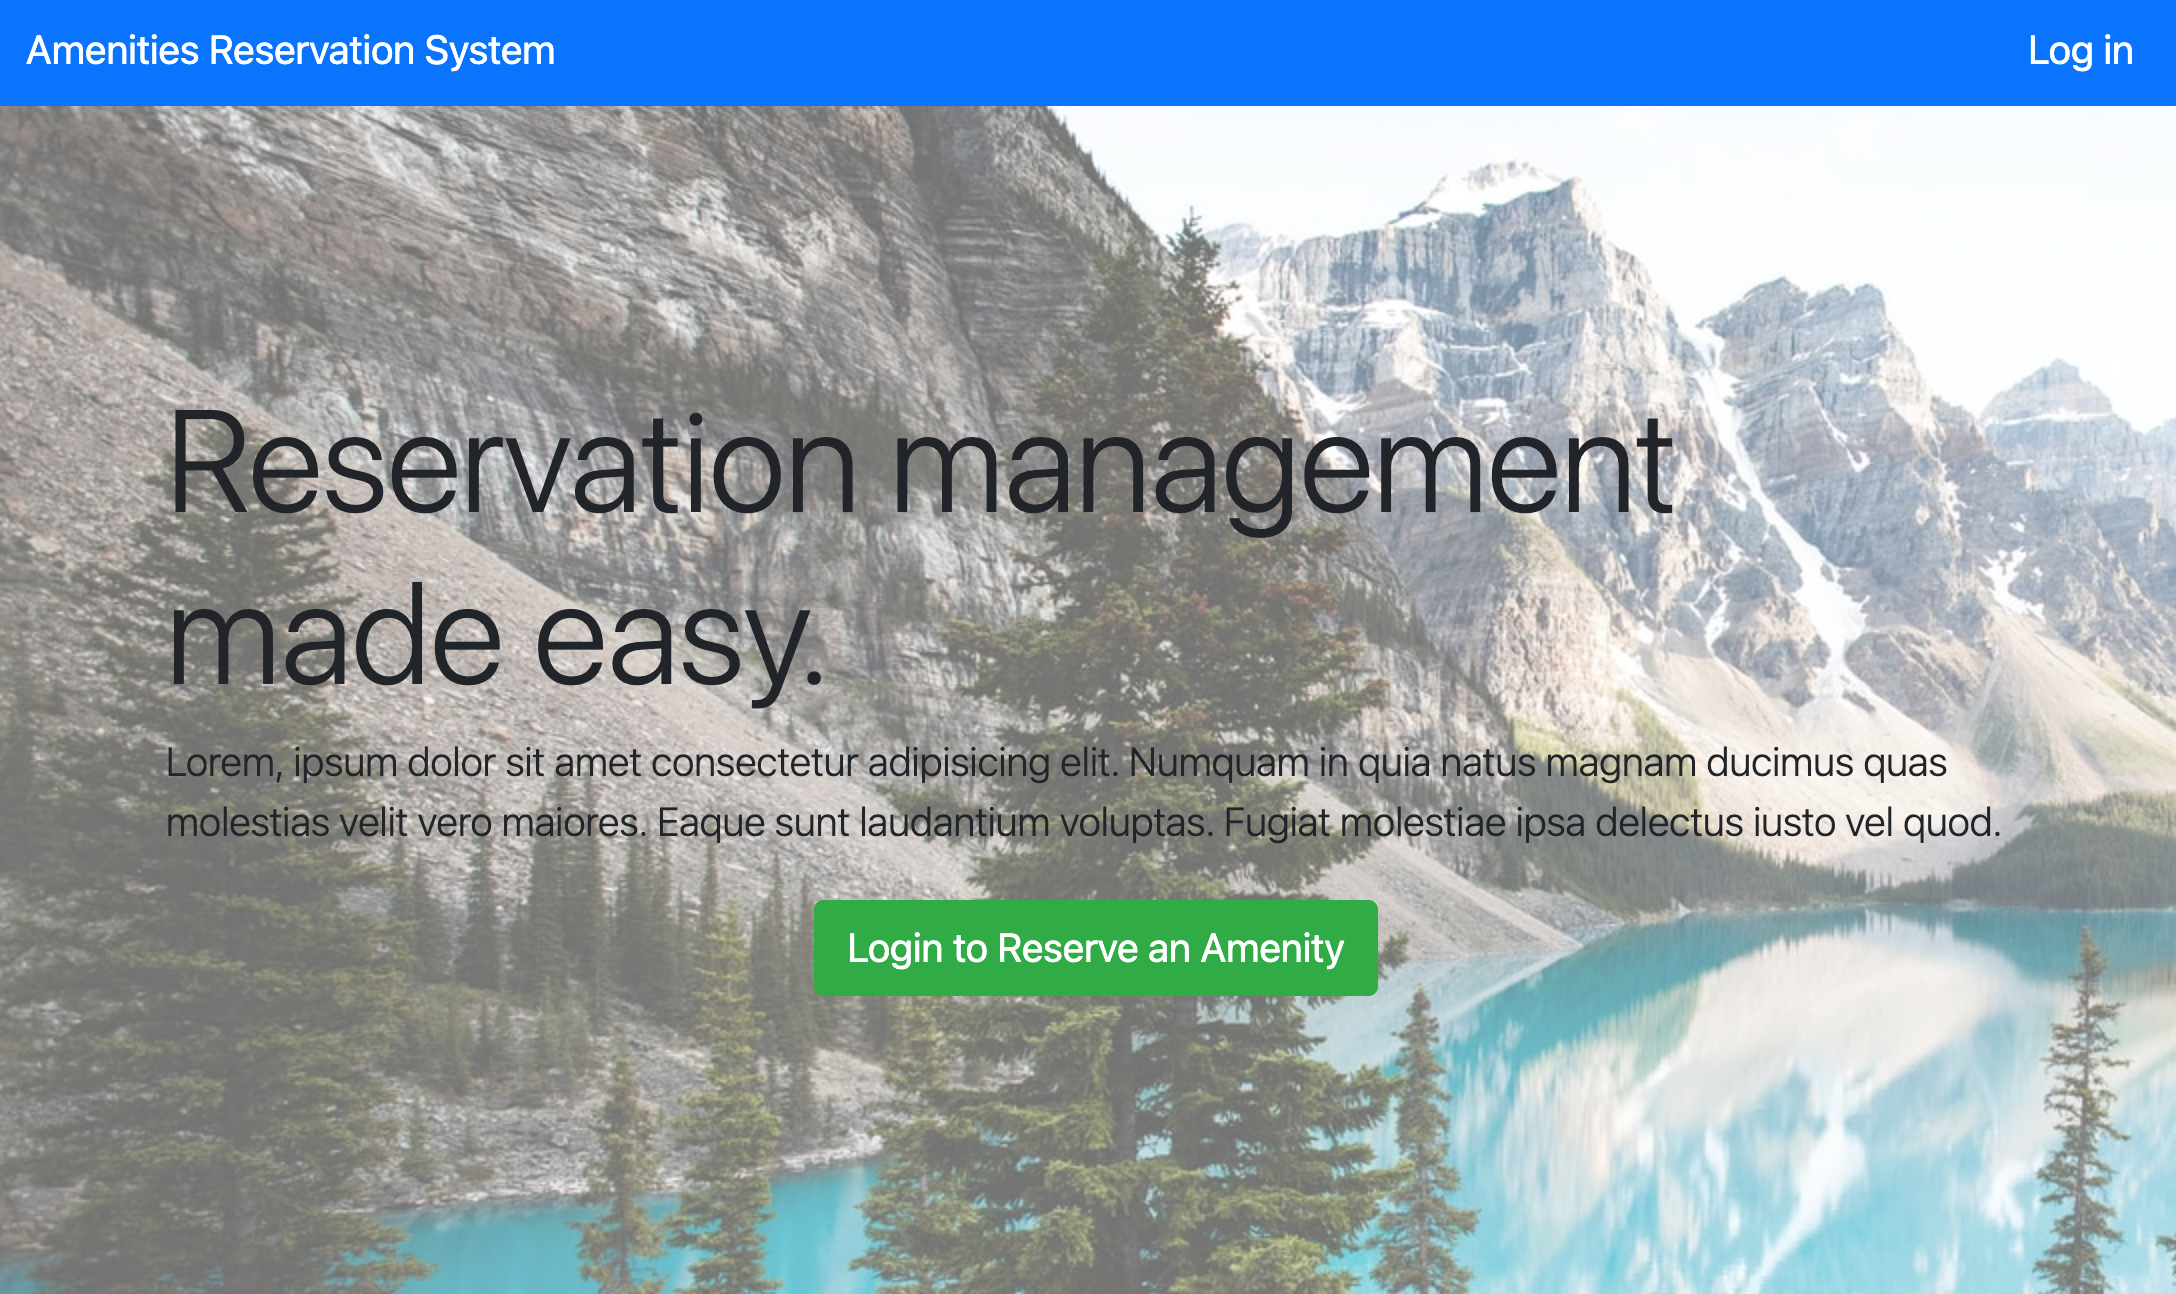
</html>It should look like this:

We will create another page to show if the user is already logged in. To keep it simple we will also treat it as a home page, and if the user is logged in, they will be able to see their reservations on the home page.
It is also good in terms of practicality for the user since it decreases the steps they need to take to view their reservations.
We will now create this page as another endpoint. But after adding the login to our application we will show this previous page if the user is not logged in and the next page if they are logged in, dynamically.
Before we start working on our new page, let's add another mapping to HomeController that will return our new page. We will later merge these two controllers:
package com.amenity_reservation_system;

import com.amenity_reservation_system.domain.User;
import com.amenity_reservation_system.service.UserService;
import org.springframework.beans.factory.annotation.Autowired;
import org.springframework.stereotype.Controller;
import org.springframework.ui.Model;
import org.springframework.web.bind.annotation.GetMapping;
import org.springframework.web.bind.annotation.ResponseBody;


@Controller
public class HomeController {

    final UserService userService;

    public HomeController(UserService userService) {
        this.userService = userService;
    }

    @GetMapping("/")
    public String index(Model model) {
        return "index";
    }

    @GetMapping("/reservations")
    public String reservations(Model model) {
        User user = userService.get(10000L);
        model.addAttribute("user", user);

        return "reservations";
    }
}If a request is received at "/reservations", this code will call our userService and ask for the user with id 10000L. Then it will add this user to the Model.
View will access this model and present the information about this user's reservations. We have also autowired the user service to use it.
Navigate to the templates folder if you are not already there and create another file called "reservations.html":
touch reservations.htmlCopy and paste the following code:
<!DOCTYPE HTML>
<html lang="en" xmlns:th="http://www.thymeleaf.org">
<head>
    <meta charset="UTF-8"/>
    <title>Reservations</title>

    <link th:rel="stylesheet" th:href="@{/webjars/bootstrap/4.0.0-2/css/bootstrap.min.css} "/>
</head>
<body>

<div>
    <div th:insert="fragments/nav :: nav"></div>
    <div class="container" style="padding-top: 10vh; display: flex; flex-direction: column; align-items: center;">
        <h3>Welcome <span th:text=" ${user.getFullName()}"></span></h3>
        <br>
        <table class="table">
            <thead>
                <tr>
                    <th scope="col">Amenity</th>
                    <th scope="col">Date</th>
                    <th scope="col">Start Time</th>
                    <th scope="col">End Time</th>
                </tr>
            </thead>
            <tbody>
                <tr th:each="reservation : ${user.getReservations()}">
                    <td th:text="${reservation.getAmenityType()}"></td>
                    <td th:text="${reservation.getReservationDate()}"></td>
                    <td th:text="${reservation.getStartTime()}"></td>
                    <td th:text="${reservation.getEndTime()}"></td>
                </tr>
            </tbody>
        </table>
    </div>
</div>

<script th:src="@{/webjars/jquery/3.0.0/jquery.min.js}"></script>
<script th:src="@{/webjars/popper.js/1.12.9-1/umd/popper.min.js}"></script>
<script th:src="@{/webjars/bootstrap/4.0.0-2/js/bootstrap.min.js}"></script>

</body>
</html>
In this Thymeleaf template, we import Bootstrap and Thymeleaf as before and we access the user variable that was added to the model in our controller by using the ${} syntax.
To access data, Thymeleaf uses the getter methods of the object and we can print that information by using the th:text attribute. Thymeleaf also supports loops. In the tbody we have a th:each loop, which we can think of as a foreach loop over a user's reservations. So we loop over the reservations and display them in a table.
You may have an error that says something like "Could not initialize proxy, ... lazy loading". This is caused by the view trying to access the reservations object while it does not yet exist. To get rid of that we can modify the following lines in User.java:
    @OneToMany(mappedBy = "user", fetch = FetchType.EAGER)
    private Set<Reservation> reservations = new HashSet<>();
We add a statement to tell Java to fetch this object eagerly.
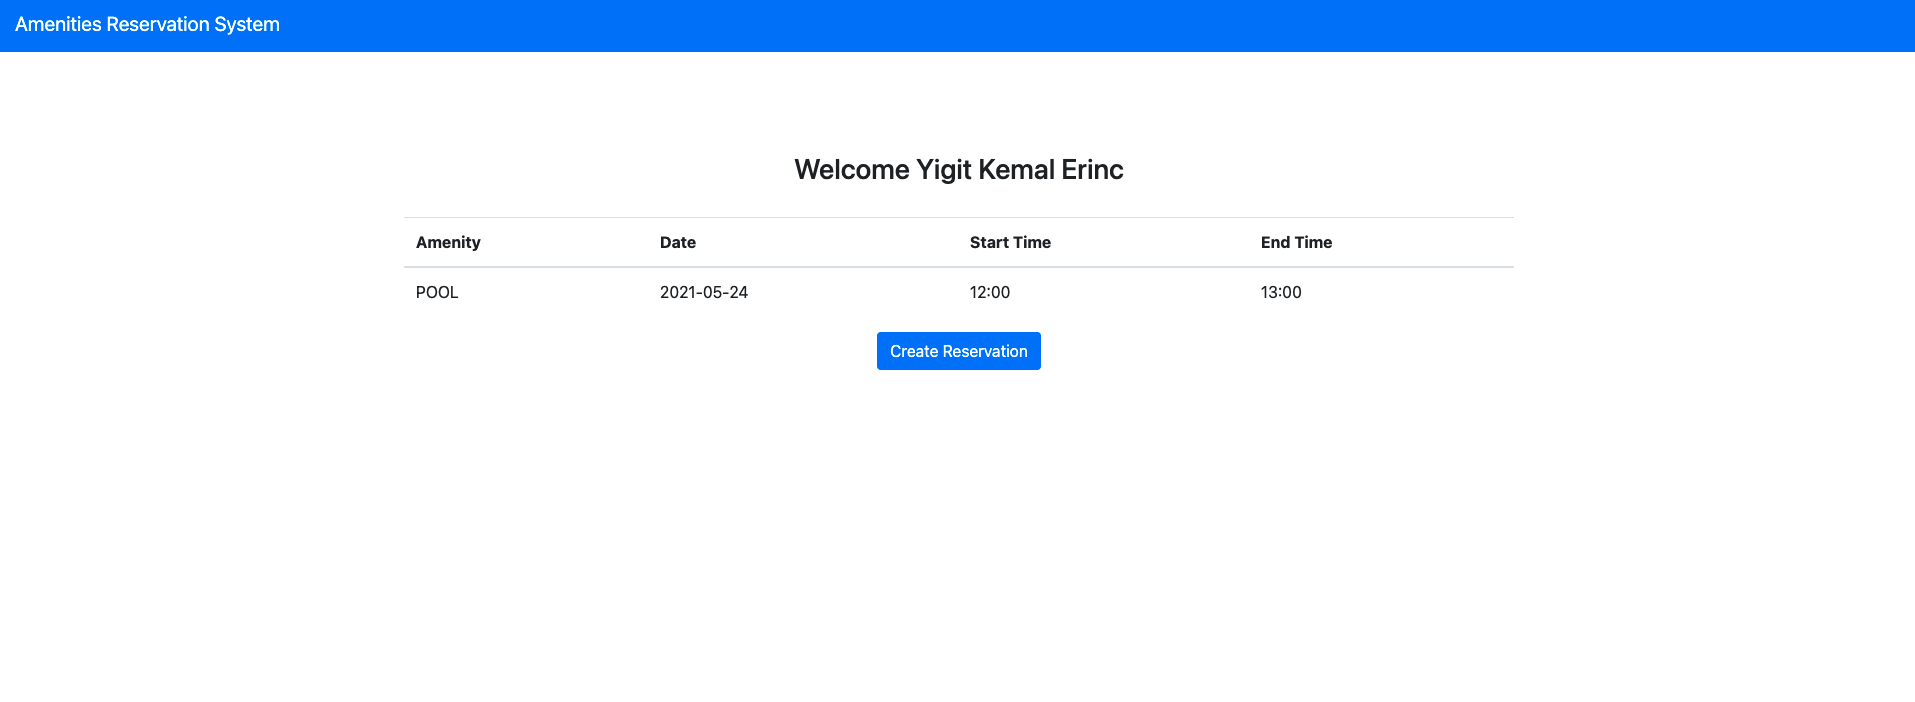
Now you should be able to view the reservations page:

How to Create a Reservation
We also need a way to create new reservations, so let's build that mechanism for our pre-created user like we did with showing the reservations. Then we can alter it to show the reservations of the currently logged-in user.
Before going forward, we need to update the date formats in our Reservation.java file to avoid any format mismatch problems. Make sure your formats for these variables are the same:
    @DateTimeFormat(pattern = "yyyy-MM-dd")
    @Column(nullable = false)
    private LocalDate reservationDate;

    @DateTimeFormat(pattern = "HH:mm")
    @Column
    private LocalTime startTime;

    @DateTimeFormat(pattern = "HH:mm")
    @Column
    private LocalTime endTime;
In the previous section, we created our reservations controller. Now we need to modify it a little bit to add another attribute to the model.
We learned how we can access the objects that are added to the model by using the ${} syntax. Now we are going to do something similar:
@GetMapping("/reservations")
    public String reservations(Model model, HttpSession session) {
        User user = userService.get(10000L);
        session.setAttribute("user", user);
        Reservation reservation = new Reservation();
        model.addAttribute("reservation", reservation);

        return "reservations";
    }
We are updating our reservations controller to move the user object to the session because we want that to be accessible from another controller method and not only from a template.
Think of it like this: once a user is logged in, this user's account will be responsible for every action that's taken after that point. You can think of Session as a global variable that is accessible from everywhere.
We also create a Reservation object and add it to the model. Thymeleaf will access this newly created object in our view template using this model and it will call the setters to set its fields.
Now let's create the view for creating the reservation. We are going to use Bootstrap Modal to display a form modal after a button is clicked.
We can first handle the code to call the modal we are going to create in the next step, move to the reservations.html file, and add this snippet after the table tag we added before:
<button
  type="button"
  class="btn btn-primary"
  data-toggle="modal"
  data-target="#createReservationModal"
>
  Create Reservation
</button>

<!-- Modal -->
<div
  th:insert="fragments/modal :: modal"
  th:with="reservation=${reservation}"
></div>
This button will trigger our modal. In the div, we insert this modal that we are going to create and we use the th:with tag to pass the reservation object that was put in the model in our controller. If we do not do this, the fragment will not know about the reservation object.
We also need to change how we access the user to print their name because we no longer store it in the modal but in session:
<h3>Welcome <span th:text=" ${session.user.getFullName()}"></span></h3>
So your final reservations.html file should be looking like this:
<!DOCTYPE html>
<html lang="en" xmlns:th="http://www.thymeleaf.org">
  <head>
    <meta charset="UTF-8" />
    <title>Reservations</title>

    <link
      th:rel="stylesheet"
      th:href="@{/webjars/bootstrap/4.0.0-2/css/bootstrap.min.css} "
    />
  </head>
  <body>
    <div>
      <div th:insert="fragments/nav :: nav"></div>
      <div
        class="container"
        style="padding-top: 10vh; display: flex; flex-direction: column; align-items: center;"
      >
        <h3>Welcome <span th:text=" ${session.user.getFullName()}"></span></h3>
        <br />
        <table class="table">
          <thead>
            <tr>
              <th scope="col">Amenity</th>
              <th scope="col">Date</th>
              <th scope="col">Start Time</th>
              <th scope="col">End Time</th>
            </tr>
          </thead>
          <tbody>
            <tr th:each="reservation : ${session.user.getReservations()}">
              <td th:text="${reservation.getAmenityType()}"></td>
              <td th:text="${reservation.getReservationDate()}"></td>
              <td th:text="${reservation.getStartTime()}"></td>
              <td th:text="${reservation.getEndTime()}"></td>
            </tr>
          </tbody>
        </table>

        <button
          type="button"
          class="btn btn-primary"
          data-toggle="modal"
          data-target="#createReservationModal"
        >
          Create Reservation
        </button>

        <!-- Modal -->
        <div
          th:insert="fragments/modal :: modal"
          th:with="reservation=${reservation}"
        ></div>
      </div>
    </div>

    <script th:src="@{/webjars/jquery/3.0.0/jquery.min.js}"></script>
    <script th:src="@{/webjars/popper.js/1.12.9-1/umd/popper.min.js}"></script>
    <script th:src="@{/webjars/bootstrap/4.0.0-2/js/bootstrap.min.js}"></script>
  </body>
</html>
We are now ready to create the modal fragment. We can create a fragment for the modal just like we did with the nav:
pwd
/src/main/resources
cd templates/fragments
touch modal.html
And paste in the following template code:
<html lang="en" xmlns:th="http://www.thymeleaf.org">
<body>
<div
class="modal fade"
th:fragment="modal"
id="createReservationModal"
tabindex="-1"
role="dialog"
aria-labelledby="createReservationModalTitle"
aria-hidden="true"
>
<div class="modal-dialog" role="document">
<div class="modal-content">
<div class="modal-header">
<h5 class="modal-title" id="createReservationModalTitle">
Create Reservation
</h5>
<button
type="button"
class="close"
data-dismiss="modal"
aria-label="Close"
>
<span aria-hidden="true">×</span>
</button>
</div>
<div class="modal-body">
<form
action="#"
th:action="@{/reservations-submit}"
th:object="${reservation}"
method="post"
>
<div class="form-group row">
<label for="type-select" class="col-2 col-form-label"
>Amenity</label
>
<div class="col-10">
<select
class="form-control"
id="type-select"
th:field="*{amenityType}"
>
<option value="POOL">POOL</option>
<option value="SAUNA">SAUNA</option>
<option value="GYM">GYM</option>
</select>
</div>
</div>
<div class="form-group row">
<label for="start-date" class="col-2 col-form-label"
>Date</label
>
<div class="col-10">
<input
class="form-control"
type="date"
id="start-date"
name="trip-start"
th:field="*{reservationDate}"
value="2018-07-22"
min="2021-05-01"
max="2021-12-31"
/>
</div>
</div>
<div class="form-group row">
<label for="start-time" class="col-2 col-form-label"
>From</label
>
<div class="col-10">
<input
class="form-control"
type="time"
id="start-time"
name="time"
th:field="*{startTime}"
min="08:00"
max="19:30"
required
/>
</div>
</div>
<div class="form-group row">
<label for="end-time" class="col-2 col-form-label">To</label>
<div class="col-10">
<input
class="form-control"
type="time"
id="end-time"
name="time"
th:field="*{endTime}"
min="08:30"
max="20:00"
required
/>
<small>Amenities are available from 8 am to 8 pm</small>
</div>
</div>
<div class="modal-footer">
<button
type="button"
class="btn btn-secondary"
data-dismiss="modal"
>
Close
</button>
<button type="submit" class="btn btn-primary" value="Submit">
Save changes
</button>
</div>
</form>
</div>
</div>
</div>
</div>
</body>
</html>There are a few important points that you need to take note of here.
Notice how we access the reservation object in the form tag:
<form
  action="#"
  th:action="@{/reservations-submit}"
  th:object="${reservation}"
  method="post"
></form>
The th:object tag associates this form with the reservation object that we have created before. th:action determines where this object will be sent when the form is submitted, and our submission method will be POST. We will create this controller with the mapping to /reservations-submit after this step.
We use the th:field tag to bind the inputs to our reservation object's fields. Thymeleaf calls the setters of the reservation object whenever that input field's value changes.
Now let's create the controller that will receive this form. Go to HomeController and add the following method:
@PostMapping("/reservations-submit")
    public String reservationsSubmit(@ModelAttribute Reservation reservation,
                                     @SessionAttribute("user") User user) {

        // Save to DB after updating
        assert user != null;
        reservation.setUser(user);
        reservationService.create(reservation);
        Set<Reservation> userReservations = user.getReservations();
        userReservations.add(reservation);
        user.setReservations(userReservations);
        userService.update(user.getId(), user);
        return "redirect:/reservations";
    }
And also add the ReservationService to our dependencies:
    final UserService userService;
    final ReservationService reservationService;

    public HomeController(UserService userService, ReservationService reservationService) {
        this.userService = userService;
        this.reservationService = reservationService;
    }
After our modal fragment posts the reservation object to this controller, that object will be bound with the @ModelAttribute annotation. We also need the user so we use @SessionAttribute to get a reference to it.
The fields of the reservation object should be all set by the form. Now we just need to save it to the database.
We do that by calling the create method. Then we add the new Reservation to the user's list of reservations and update the user to reflect these changes. We then redirect the user to the reservations page to show the updated reservations list.
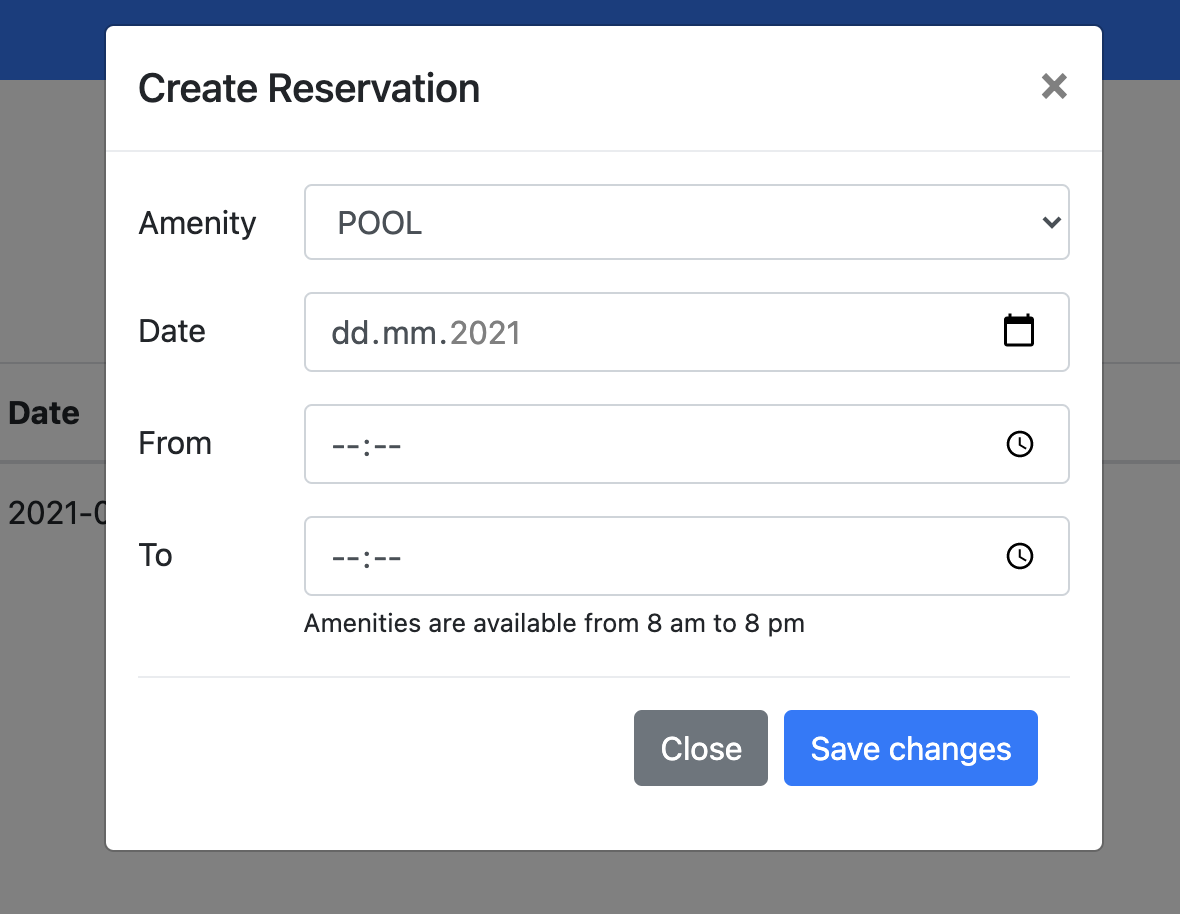
Your reservations page should look like this:
And when you click the button, the create reservation modal should pop up.
How to Add Authentication and Authorization to the App
We will use Spring Security to add authentication and authorization to our application. We want to make sure that nobody can see each other's reservations and that the users must be logged in to create reservations.
If you want to learn more about it, I wrote an article that provides an overview of Spring Security.
We will keep it simple and mostly use the defaults because this is a difficult topic on its own. If you want to learn how to properly set up Spring Security Auth, you can check out my article on that.
We need to add "Spring Security" and "Thymeleaf Spring Security" to our dependencies, so open your pom.xml and add the following to your list of dependencies:
<dependency>
    <groupId>org.springframework.boot</groupId>
    <artifactId>spring-boot-starter-security</artifactId>
</dependency>

<dependency>
    <groupId>org.thymeleaf.extras</groupId>
    <artifactId>thymeleaf-extras-springsecurity5</artifactId>
    <version>3.0.4.RELEASE</version>
</dependency>
Now, by default, Spring Security makes all the endpoints protected, so we need to configure it to allow viewing the home page.
Let's create a config folder to contain our WebSecurityConfig file. Assuming you are on the root folder:
cd /src/main/java/com/amenity_reservation_system
mkdir config && cd config
touch WebSecurityConfig.java
This should be the content of your config file:
package com.amenity_reservation_system.config;

import com.amenity_reservation_system.service.UserDetailsServiceImpl;
import org.springframework.context.annotation.Configuration;
import org.springframework.security.config.annotation.authentication.builders.AuthenticationManagerBuilder;
import org.springframework.security.config.annotation.web.builders.HttpSecurity;
import org.springframework.security.config.annotation.web.configuration.EnableWebSecurity;
import org.springframework.security.config.annotation.web.configuration.WebSecurityConfigurerAdapter;
import org.springframework.security.crypto.bcrypt.BCryptPasswordEncoder;

@Configuration
@EnableWebSecurity
public class WebSecurityConfig extends WebSecurityConfigurerAdapter {

    private final UserDetailsServiceImpl userDetailsService;

    private final BCryptPasswordEncoder bCryptPasswordEncoder;

    public WebSecurityConfig(UserDetailsServiceImpl userDetailsService, BCryptPasswordEncoder bCryptPasswordEncoder) {
        this.userDetailsService = userDetailsService;
        this.bCryptPasswordEncoder = bCryptPasswordEncoder;
    }

    @Override
    protected void configure(HttpSecurity http) throws Exception {
        http
                .authorizeRequests()
                .antMatchers("/", "/webjars/**").permitAll()
                .anyRequest().authenticated()
                .and()
                .formLogin()
                .permitAll()
                .and()
                .logout()
                .permitAll()
                .logoutSuccessUrl("/");
    }

    public void configure(AuthenticationManagerBuilder auth) throws Exception {
        auth.userDetailsService(userDetailsService).passwordEncoder(bCryptPasswordEncoder);
    }

}I will not go into the details, but here's a summary of what happened here:
- we configured Spring Security to permit all requests made to the home page ("/")
- we configured our styles ("/webjars/**")
- we asked it to provide us with login and logout forms
- and we asked it to permit the requests to them as well and redirect to the home page after logout is successful
Isn't it amazing what you can achieve with just a few statements?
We also configured our AuthenticationManagerBuilder to use bCryptPasswordEncoder and userDetailsService. But wait, we don't have neither of them yet, and your IDE may already be complaining about that. So let's create them.
Before we go on, it may be a good idea to add username and passwordHash fields to our User class. We'll use them to authenticate the user instead of using their full name. Then we'll add it to the constructor.
package com.amenity_reservation_system.model;

import java.time.OffsetDateTime;
import java.util.HashSet;
import java.util.Set;
import javax.persistence.*;

import lombok.AllArgsConstructor;
import lombok.Getter;
import lombok.NoArgsConstructor;
import lombok.Setter;


@Entity
@Getter
@Setter
@AllArgsConstructor
@NoArgsConstructor
public class User {

    @Id
    @Column(nullable = false, updatable = false)
    @SequenceGenerator(
            name = "primary_sequence",
            sequenceName = "primary_sequence",
            allocationSize = 1,
            initialValue = 10000
    )
    @GeneratedValue(
            strategy = GenerationType.SEQUENCE,
            generator = "primary_sequence"
    )
    private Long id;

    @Column(nullable = false, unique = true)
    private String fullName;

    @Column(nullable = false, unique = true)
    private String username;

    @Column
    private String passwordHash;

    @OneToMany(mappedBy = "user", fetch = FetchType.EAGER)
    private Set<Reservation> reservations = new HashSet<>();

    @Column(nullable = false, updatable = false)
    private OffsetDateTime dateCreated;

    @Column(nullable = false)
    private OffsetDateTime lastUpdated;

    @PrePersist
    public void prePersist() {
        dateCreated = OffsetDateTime.now();
        lastUpdated = dateCreated;
    }

    @PreUpdate
    public void preUpdate() {
        lastUpdated = OffsetDateTime.now();
    }

    public User(String fullName, String username, String passwordHash) {
        this.fullName = fullName;
        this.username = username;
        this.passwordHash = passwordHash;
    }
}Create a file called UserDetailsServiceImpl under the services folder:
cd service
touch UserDetailsServiceImpl.java
package com.amenity_reservation_system.service;
import com.amenity_reservation_system.model.User;
import com.amenity_reservation_system.repos.UserRepository;
import org.springframework.security.core.userdetails.UserDetails;
import org.springframework.security.core.userdetails.UserDetailsService;
import org.springframework.security.core.userdetails.UsernameNotFoundException;
import org.springframework.stereotype.Service;
@Service
public class UserDetailsServiceImpl implements UserDetailsService {
private UserRepository userRepository;
public UserDetailsServiceImpl(UserRepository userRepository) {
this.userRepository = userRepository;
}
public UserDetails loadUserByUsername(String username) throws UsernameNotFoundException {
final User user = userRepository.findUserByUsername(username);
if (user == null) {
throw new UsernameNotFoundException(username);
}
UserDetails userDetails = org.springframework.security.core.userdetails.User.withUsername(
user.getUsername()).password(user.getPwHash()).roles("USER").build();
return userDetails;
}
}
This basically tells Spring Security that we want to use the User entity we created earlier by getting the User object from our database and using the JPA method on our repository. But again, we do not have the findUserByUsername method on our UserRepository. You can try fixing this on your own as a challenge, it is really simple.
Remember, we do not need to write queries. It is sufficient to provide the signature and let JPA do the work.
package com.amenity_reservation_system.repos;

import com.amenity_reservation_system.model.User;
import org.springframework.data.jpa.repository.JpaRepository;


public interface UserRepository extends JpaRepository<User, Long> {

    User findUserByUsername(String username);
}
We also need a BCryptPasswordEncoder bean to satisfy that dependency in WebSecurityConfig and to make it work. Let's modify our main class to add a bean and change the constructor parameters to give our predefined User a username.
package com.amenity_reservation_system;

import com.amenity_reservation_system.model.AmenityType;
import com.amenity_reservation_system.model.Reservation;
import com.amenity_reservation_system.model.User;
import com.amenity_reservation_system.repos.ReservationRepository;
import com.amenity_reservation_system.repos.UserRepository;
import org.springframework.boot.CommandLineRunner;
import org.springframework.boot.SpringApplication;
import org.springframework.boot.autoconfigure.SpringBootApplication;
import org.springframework.context.annotation.Bean;
import org.springframework.security.crypto.bcrypt.BCryptPasswordEncoder;

import java.text.DateFormat;
import java.text.SimpleDateFormat;
import java.time.LocalDate;
import java.time.LocalTime;
import java.time.ZoneId;
import java.util.Date;


@SpringBootApplication
public class AmenityReservationSystemApplication {

    public static void main(String[] args) {
        SpringApplication.run(AmenityReservationSystemApplication.class, args);
    }


    @Bean
    public CommandLineRunner loadData(UserRepository userRepository,
                                      ReservationRepository reservationRepository) {
    return (args) -> {
      User user =
          userRepository.save(
              new User("Yigit Kemal Erinc",
                      "yigiterinc",
                      bCryptPasswordEncoder().encode("12345")));
      DateFormat dateFormat = new SimpleDateFormat("dd/MM/yyyy HH:mm:ss");
      Date date = new Date();
      LocalDate localDate = date.toInstant().atZone(ZoneId.systemDefault()).toLocalDate();
      Reservation reservation =
          Reservation.builder()
              .reservationDate(localDate)
              .startTime(LocalTime.of(12, 00))
              .endTime(LocalTime.of(13, 00))
              .user(user)
              .amenityType(AmenityType.POOL)
              .build();

      reservationRepository.save(reservation);
    };
    }

    @Bean
    public BCryptPasswordEncoder bCryptPasswordEncoder() {
        return new BCryptPasswordEncoder();
    }
}
Your application should be ready to compile now and it should already be redirecting you to the login page if you send a request to "/reservations".
It would be nice to have buttons for log-in and log-out on the navbar, and we want to show login if user is not authenticated and logout otherwise. We can do it this way in nav.html:
<!DOCTYPE html>
<html lang="en" xmlns:th="http://www.thymeleaf.org" xmlns:sec="http://www.w3.org/1999/xhtml">
<body>
<nav th:fragment="nav" class="navbar navbar-expand navbar-dark bg-primary">
    <div class="navbar-nav w-100">
        <a class="navbar-brand text-color" href="/">Amenities Reservation System</a>
    </div>
        <a sec:authorize="isAnonymous()"
           class="navbar-brand text-color" th:href="@{/login}">Log in</a>
        <a sec:authorize="isAuthenticated()"
               class="navbar-brand text-color" th:href="@{/logout}">Log out</a>
</nav>
</body>
</html>The log in link should now be visible on the navbar.
How to Show a Logged-in User's Reservations
Our Reservations page is currently displaying the reservations of one hard-coded user and not the reservations of the logged-in user.
    @GetMapping("/reservations")
    public String reservations(Model model, HttpSession session) {
        User user = userService.get(10000L);
        session.setAttribute("user", user);
        Reservation reservation = new Reservation();
        model.addAttribute("reservation", reservation);

        return "reservations";
    }
We need to show the reservations of the currently logged-in user. To achieve that, we should use some Spring Security.
Go to the HomeController (I know, that name is a bit problematic right now) class and change it with the following code:
@GetMapping("/reservations")
    public String reservations(Model model, HttpSession session) {
        UserDetails principal = (UserDetails) SecurityContextHolder.getContext().getAuthentication().getPrincipal();
        String name = principal.getUsername();
        User user = userService.getUserByUsername(name);

        // This should always be the case
        if (user != null) {
            session.setAttribute("user", user);

            // Empty reservation object in case the user creates a new reservation
            Reservation reservation = new Reservation();
            model.addAttribute("reservation", reservation);

            return "reservations";
        }

        return "index";
}Since we have added Spring Security to the project, it automatically creates the Authentication object behind the scenes – we are getting that from SecurityContextHolder.
We are grabbing the UserDetails object which stores the info related to user. Then we check if the user object is null. This should always be the case since reservations is a protected endpoint and the user must be logged in to see that page – but it is always good to make sure everything is as expected.
Then we call the UserService class to get the User object which has this username – but we have not added the getUserByUsername method yet. So let's move to the UserService and add this simple method.
    public User getUserByUsername(String username) {
        return userRepository.findUserByUsername(username);
    }
Now you should be able to see the logged-in user's reservations. You can try that by adding another user and creating reservations for that user as well.
How to Check the Capacity
We currently don't have a mechanism to store the Capacity of each amenity type. We need to store those somehow and also check that there is enough capacity before we approve a reservation.
For that purpose, let's create a class called Capacity under our model folder.
package com.amenity_reservation_system.model;

import lombok.AllArgsConstructor;
import lombok.Getter;
import lombok.NoArgsConstructor;
import lombok.Setter;

import javax.persistence.*;

@Entity
@Getter
@Setter
@AllArgsConstructor
@NoArgsConstructor
public class Capacity {

    @Id
    @Column(nullable = false, updatable = false)
    @SequenceGenerator(
            name = "primary_sequence",
            sequenceName = "primary_sequence",
            allocationSize = 1,
            initialValue = 10000
    )
    @GeneratedValue(
            strategy = GenerationType.SEQUENCE,
            generator = "primary_sequence"
    )
    private Long id;

    @Column(nullable = false, unique = true)
    @Enumerated(EnumType.STRING)
    private AmenityType amenityType;

    @Column(nullable = false)
    private int capacity;

    public Capacity(AmenityType amenityType, int capacity) {
        this.amenityType = amenityType;
        this.capacity = capacity;
    }
}This is the entity that will represent our logical construct to be stored in our database. It is basically a map entry with an AmenityType and its corresponding capacity.
We also need a repository to store the Capacity entries, so let's create the CapacityRepository under the repos folder.
package com.amenity_reservation_system.repos;

import com.amenity_reservation_system.model.Capacity;
import org.springframework.data.jpa.repository.JpaRepository;

public interface CapacityRepository extends JpaRepository<Capacity, Long> {
}
We need to populate this new table with the initial capacities. We could read the initial capacities from a config file or something, but let's keep it simple and hardcode it using loadData in our main method.
package com.amenity_reservation_system;

import com.amenity_reservation_system.model.AmenityType;
import com.amenity_reservation_system.model.Capacity;
import com.amenity_reservation_system.model.Reservation;
import com.amenity_reservation_system.model.User;
import com.amenity_reservation_system.repos.CapacityRepository;
import com.amenity_reservation_system.repos.ReservationRepository;
import com.amenity_reservation_system.repos.UserRepository;
import org.springframework.boot.CommandLineRunner;
import org.springframework.boot.SpringApplication;
import org.springframework.boot.autoconfigure.SpringBootApplication;
import org.springframework.context.annotation.Bean;
import org.springframework.security.crypto.bcrypt.BCryptPasswordEncoder;

import java.text.DateFormat;
import java.text.SimpleDateFormat;
import java.time.LocalDate;
import java.time.LocalTime;
import java.time.ZoneId;
import java.util.Date;
import java.util.HashMap;
import java.util.Map;

@SpringBootApplication
public class AmenityReservationSystemApplication {

  private Map<AmenityType, Integer> initialCapacities =
      new HashMap<>() {
        {
          put(AmenityType.GYM, 20);
          put(AmenityType.POOL, 4);
          put(AmenityType.SAUNA, 1);
        }
      };

  public static void main(String[] args) {
    SpringApplication.run(AmenityReservationSystemApplication.class, args);
  }

  @Bean
  public CommandLineRunner loadData(
      UserRepository userRepository,
      CapacityRepository capacityRepository) {
    return (args) -> {
      userRepository.save(
          new User("Yigit Kemal Erinc", "yigiterinc", bCryptPasswordEncoder().encode("12345")));

      for (AmenityType amenityType : initialCapacities.keySet()) {
        capacityRepository.save(new Capacity(amenityType, initialCapacities.get(amenityType)));
      }
    };
  }

  @Bean
  public BCryptPasswordEncoder bCryptPasswordEncoder() {
    return new BCryptPasswordEncoder();
  }
}
I just added the capacities inside the initialCapacities map then saved those to the CapacityRepository inside the loadData method.
We can now check if the number of reservations in the requested time exceeds the capacity and reject the reservation request if it does.
So here is the logic: We need to fetch the number of reservations that are on the same day and overlap with this current request. Then we need to fetch the capacity for this amenity type, and if the capacity is exceeded we can throw an exception.
Therefore we need a query to get the number of potentially overlapping reservations. It is not the easiest query to write, but JPA is very convenient and we can access that query inside our ReservationRepository without needing to write any SQL or HQL (Hibernate Query Language).
I encourage you to try it yourself before moving forward, because this is like the sole reason why I have included this concept of capacity in this tutorial (to show an example of a more advanced JPA query).
So this is how the ReservationService's create method looks. You need to replace the 0 with a call to reservationRepository to get the number of overlapping reservations.
If the current number of overlapping reservations is equal to the capacity, it means that the next one will exceed it so we throw the exception.
public Long create(final Reservation reservation) {
        int capacity = capacityRepository.findByAmenityType(reservation.getAmenityType()).getCapacity();
        int overlappingReservations = 0; // TODO

        if (overlappingReservations >= capacity) {
            // Throw a custom exception
        }

        return reservationRepository.save(reservation).getId();
    }
To find the overlapping reservations there are a few conditions we need to check:
First of all, the reservation date should be the same as the date in the request.
- Start time can be before the startTime of a new request. In that case, the end time should be later than our request, in order to overlap. (startTimeBeforeAndEndTimeAfter)
- Or, endTime can be after but the startTime can actually be between the startTime and endTime of the request. (endTimeAfterOrStartTimeBetween)
So our final query should return all reservations which match any of these 2 possibilities.
We can express it like this:
List<Reservation> findReservationsByReservationDateAndStartTimeBeforeAndEndTimeAfterOrStartTimeBetween
            (LocalDate reservationDate, LocalTime startTime, LocalTime endTime, LocalTime betweenStart, LocalTime betweenEnd);
And the final create method looks like this:
 public Long create(final Reservation reservation) {
        int capacity = capacityRepository.findByAmenityType(reservation.getAmenityType()).getCapacity();
        int overlappingReservations = reservationRepository
                .findReservationsByReservationDateAndStartTimeBeforeAndEndTimeAfterOrStartTimeBetween(
                        reservation.getReservationDate(),
                        reservation.getStartTime(), reservation.getEndTime(),
                        reservation.getStartTime(), reservation.getEndTime()).size();

        if (overlappingReservations >= capacity) {
            throw new CapacityFullException("This amenity's capacity is full at desired time");
        }

        return reservationRepository.save(reservation).getId();
    }
You don't need to worry about the custom exception, but if you are interested in that, here is the code:
package com.amenity_reservation_system.exception;

public class CapacityFullException extends RuntimeException {
    public CapacityFullException(String message) {
        super(message);
    }
}
We should normally show an error modal if the capacity is exceeded but I will skip that to avoid repetitive UI stuff. You can try that as a challenge if you wish.
Conclusion
In this tutorial, we have learned about so many technologies that make development with Spring Boot easier and faster.
I believe many people underestimate the framework in terms of development speed and the quality of the resulting work.
Assuming you are fluent with the technology, I would argue that Spring Boot is not any slower (in development) than any other backend framework if you do everything in the modern fashion.
You can find the whole code in this repository:
https://github.com/yigiterinc/amenity-reservation-system.git
If you are interested in reading more content like this, feel free to subscribe to my blog at https://erinc.io to get notified about my new posts.