
by João Henrique
How to create a React frontend and a Node/Express backend and connect them

In this article, I’ll walk you through the process of creating a simple React app and connecting it to a simple Node/Express API that we will also be creating.
I won't go into much detail about how to work with any of the technologies I will mention in this tutorial but I will leave links, in case you want to learn more.
You can find all the code in this repository I made for the tutorial.
The objective here is to give you a practical guide on how to set up and connect the front-end client and the back-end API.
Before we get our hands dirty, make sure you have Node.js running on your machine.
Create the Main Project directory
In your terminal, navigate to a directory where you would like to save your project. Now create a new directory for your project and navigate into it:
mkdir my_awesome_project
cd my_awesome_project
Create a React App
This process is really straightforward.
I will be using Facebook’s create-react-app to… you guessed it, easily create a react app named client:
npx create-react-app client
cd client
npm start
Let’s see what I have done:
- Used npm’s npx to create a react app and named it client.
- cd(change directory) into the client directory.
- Started the app.
In your browser, navigate to http://localhost:3000/.
If all is ok, you will see the react welcome page. Congratulations! That means you now have a basic React application running on your local machine. Easy right?
To stop your react app, just press Ctrl + c in your terminal.
Create an Express App
Ok, this will be as straightforward as the previous example. Don’t forget to navigate to your project top folder.
I will be using the Express Application Generator to quickly create an application skeleton and name it api:
npx express-generator api
cd api
npm install
npm start
Let’s see what I have done:
- Used npm’s npx to install express-generator globally.
- Used express-generator to create an express app and named it api.
- cd into the API directory.
- Installed all dependencies.
- Started the app.
In your browser, navigate to http://localhost:3000/.
If all is ok, you will see the express welcome page. Congratulations! That means you now have a basic Express application running on your local machine. Easy right?
To stop your react app, just press Ctrl + c in your terminal.
Configuring a new route in the Express API
Ok, let’s get our hands dirty. Time to open your favorite code editor (I’m using VS Code) and navigate to your project folder.
If you named the react app as client and the express app as api, you will find two main folders: client and api.
- Inside the API directory, go to bin/www and change the port number on line 15 from 3000 to 9000. We will be running both apps at the same time later on, so doing this will avoid issues. The result should be something like this:

2. On api/routes, create a testAPI.js file and paste this code:
var express = require(“express”);
var router = express.Router();

router.get(“/”, function(req, res, next) {
    res.send(“API is working properly”);
});

module.exports = router;
3. On the api/app.js file, insert a new route on line 24:
app.use("/testAPI", testAPIRouter);4. Ok, you are “telling” express to use this route but, you still have to require it. Let’s do that on line 9:
var testAPIRouter = require("./routes/testAPI");The only changes are in line 9 and line 25. It should end up something like this:
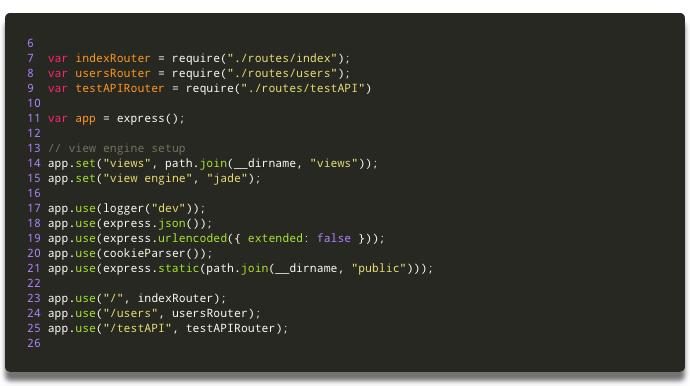
5. Congratulations! You have created a new route.
If you start your API app (in your terminal, navigate to the API directory and “npm start”), and go to http://localhost:9000/testAPI in your browser, you will see the message: API is working properly.
Connecting the React Client to the Express API
- On your code editor, let’s work in the client directory. Open app.js file located in my_awesome_project/client/app.js.
- Here I will use the Fetch API to retrieve data from the API. Just paste this code after the Class declaration and before the render method:
constructor(props) {
    super(props);
    this.state = { apiResponse: "" };
}

callAPI() {
    fetch("http://localhost:9000/testAPI")
        .then(res => res.text())
        .then(res => this.setState({ apiResponse: res }));
}

componentWillMount() {
    this.callAPI();
}
3. Inside the render method, you will find a <;p> tag. Let’s change it so that it renders the apiResponse:
<p className="App-intro">;{this.state.apiResponse}</p>At the end, this file should look something like this:
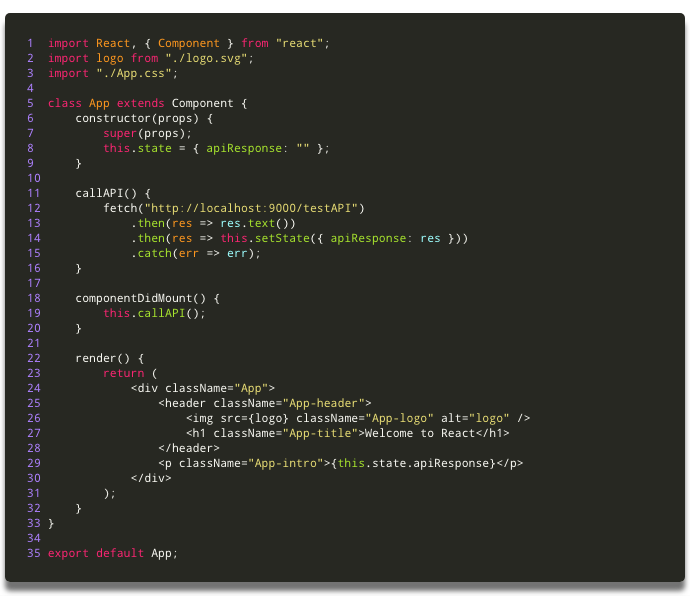
I know!!! This was a bit too much. Copy paste is your friend, but you have to understand what you are doing. Let’s see what I did here:
- On lines 6 to 9, we inserted a constructor, that initializes the default state.
- On lines 11 to 16, we inserted the method callAPI() that will fetch the data from the API and store the response on this.state.apiResponse.
- On lines 18 to 20, we inserted a react lifecycle method called componentDidMount(), that will execute the callAPI() method after the component mounts.
- Last, on line 29, I used the <;p> tag to display a paragraph on our client page, with the text that we retrieved from the API.
What the heck!! CORS ?
Oh yeah, baby! We are almost done. But if we start both our apps (client and API) and navigate to http://localhost:3000/, you still won't find the expected result displayed on the page. If you open chrome developer tools, you will find why. In the console, you will see this error:
Failed to load http://localhost:9000/testAPI: No ‘Access-Control-Allow-Origin’ header is present on the requested resource. Origin ‘http://localhost:3000' is therefore not allowed access. If an opaque response serves your needs, set the request’s mode to ‘no-cors’ to fetch the resource with CORS disabled.
This is simple to solve. We just have to add CORS to our API to allow cross-origin requests. Let’s do just that. You should check here to find out more about CORS.
- In your terminal navigate to the API directory and install the CORS package:
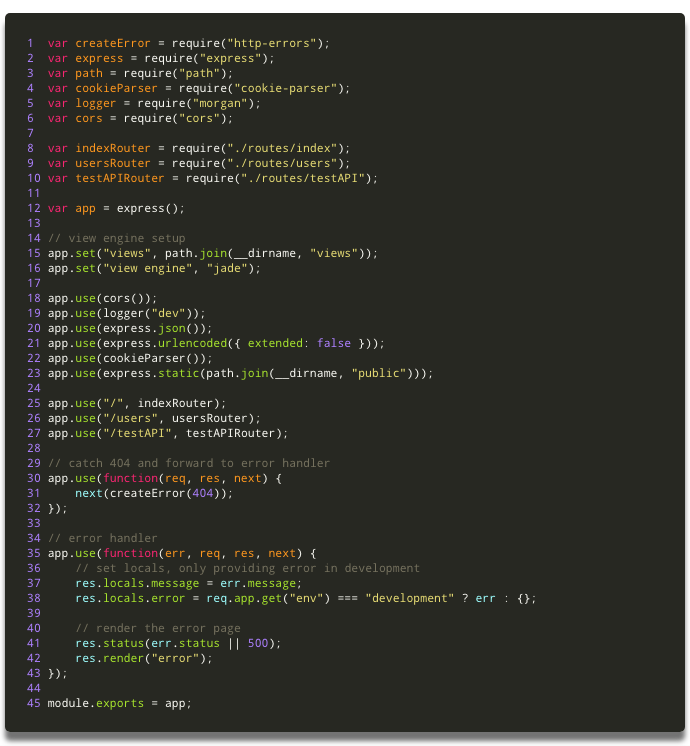
npm install --save cors2. On your code editor go to the API directory and open the my_awesome_project/api/app.js file.
3. On line 6 require CORS:
var cors = require("cors");4. Now on line 18 “tell” express to use CORS:
app.use(cors());The API app.js file should end up something like this:
Great Work. It’s all done!!
Ok! We are all set!
Now start both your apps (client and API), in two different terminals, using the npm start command.
If you navigate to http://localhost:3000/ in your browser you should find something like this:

Of course, this project as it is won’t do much, but is the start of a Full Stack Application. You can find all the code in this repository that I’ve created for the tutorial.
Next, I will work on some complementary tutorials, like how to connect this to a MongoDB database and even, how to run it all inside Docker containers.
As a good friend of mine says:
Be Strong and Code On!!!
…and don't forget to be awesome today ;)