
If you want to dive deep into serverless full-stack apps, you've come to the right place.
This post will guide you through the process of building your own link shortener. We are going to use TypeScript, React, Next.JS, and MongoDB. And to take advantage of serverless processing, we will deploy it to Vercel.
You can find the code and video in the summary at the end.
What You'll Learn in This Article
This isn't yet another article that only shows how to bootstrap a Next.JS application and add two simple pages. I'm going to show you how to build a proper application.
It will be fully-functional link shortener – you can use it on your own, and even share it with your friends, so they can shorten their links as well.
The application will store links in the database, and follow redirects to external websites. This means that you will learn all the pieces required to build other serverless applications in the future.
You will likely need an hour or two to complete this tutorial, depending on your experience and prior knowledge. I recorded a YouTube tutorial (9 videos - 7-10 minutes each), so that's where my estimate comes from.
It is up to you how you approach the process. If you want to make it quick, you can find the code on my Github – just fork it, and deploy it Vercel. That shouldn't take more than 15 minutes.
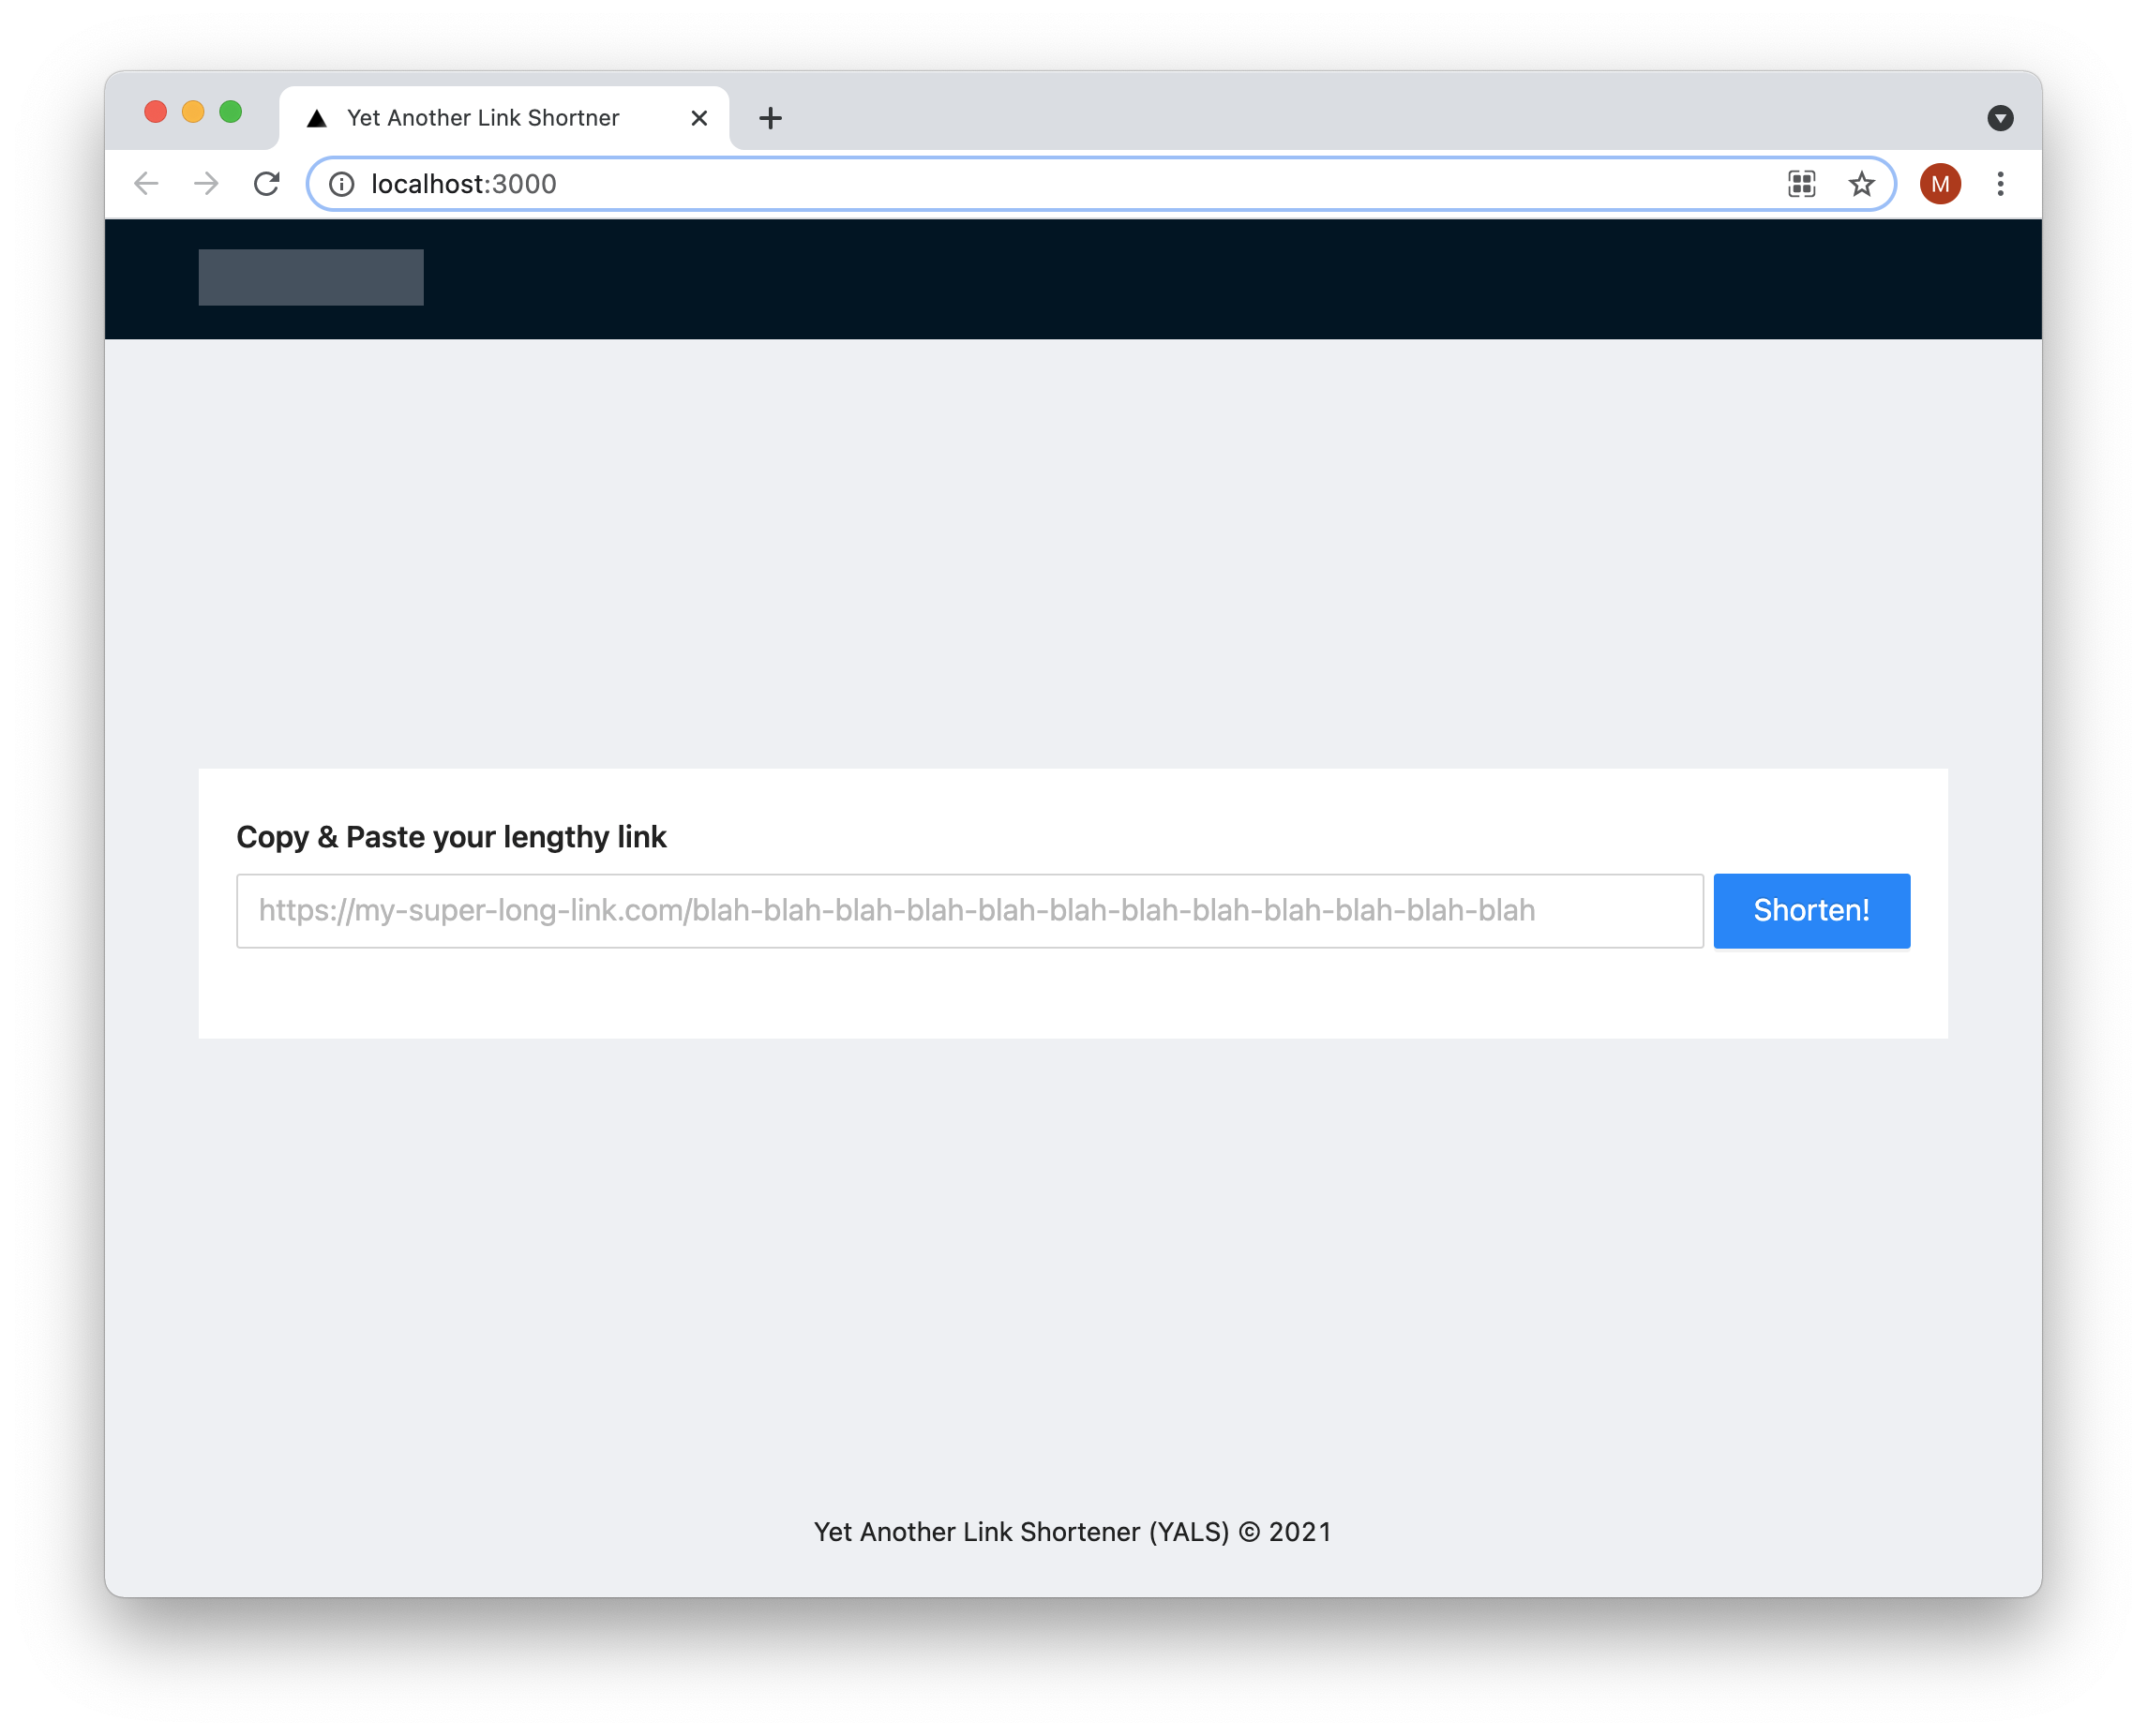
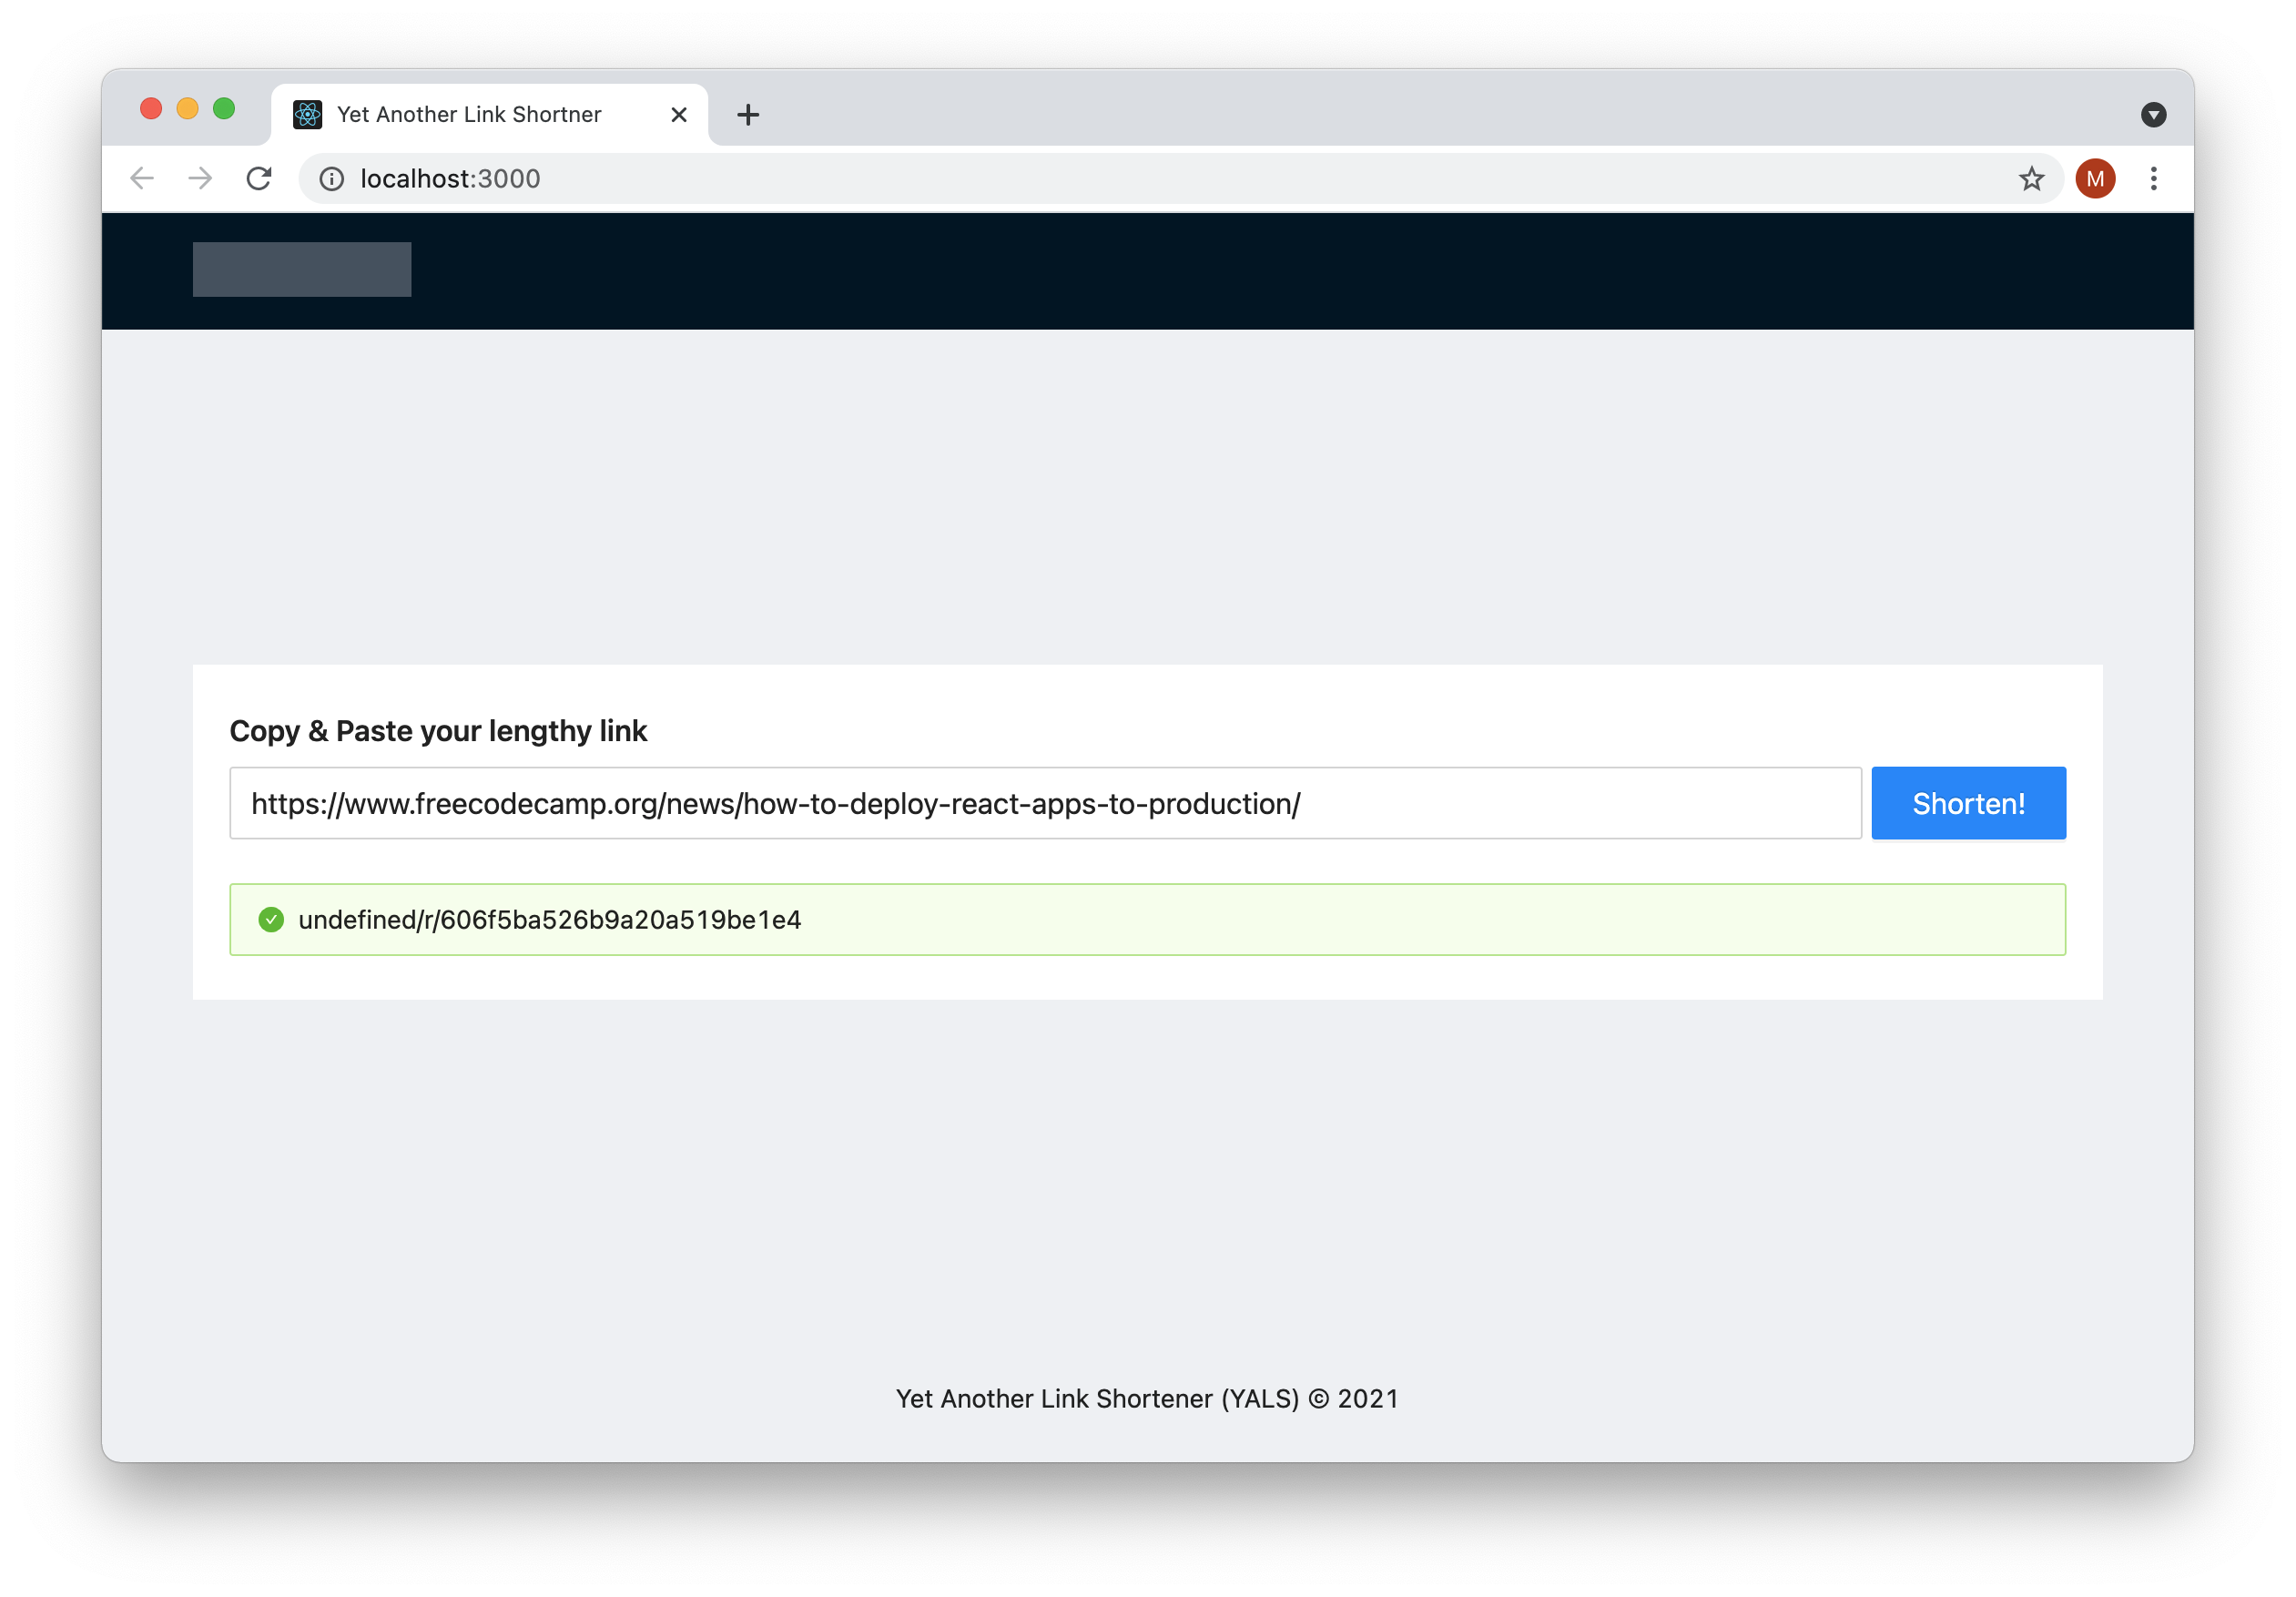
The final result will look like this:
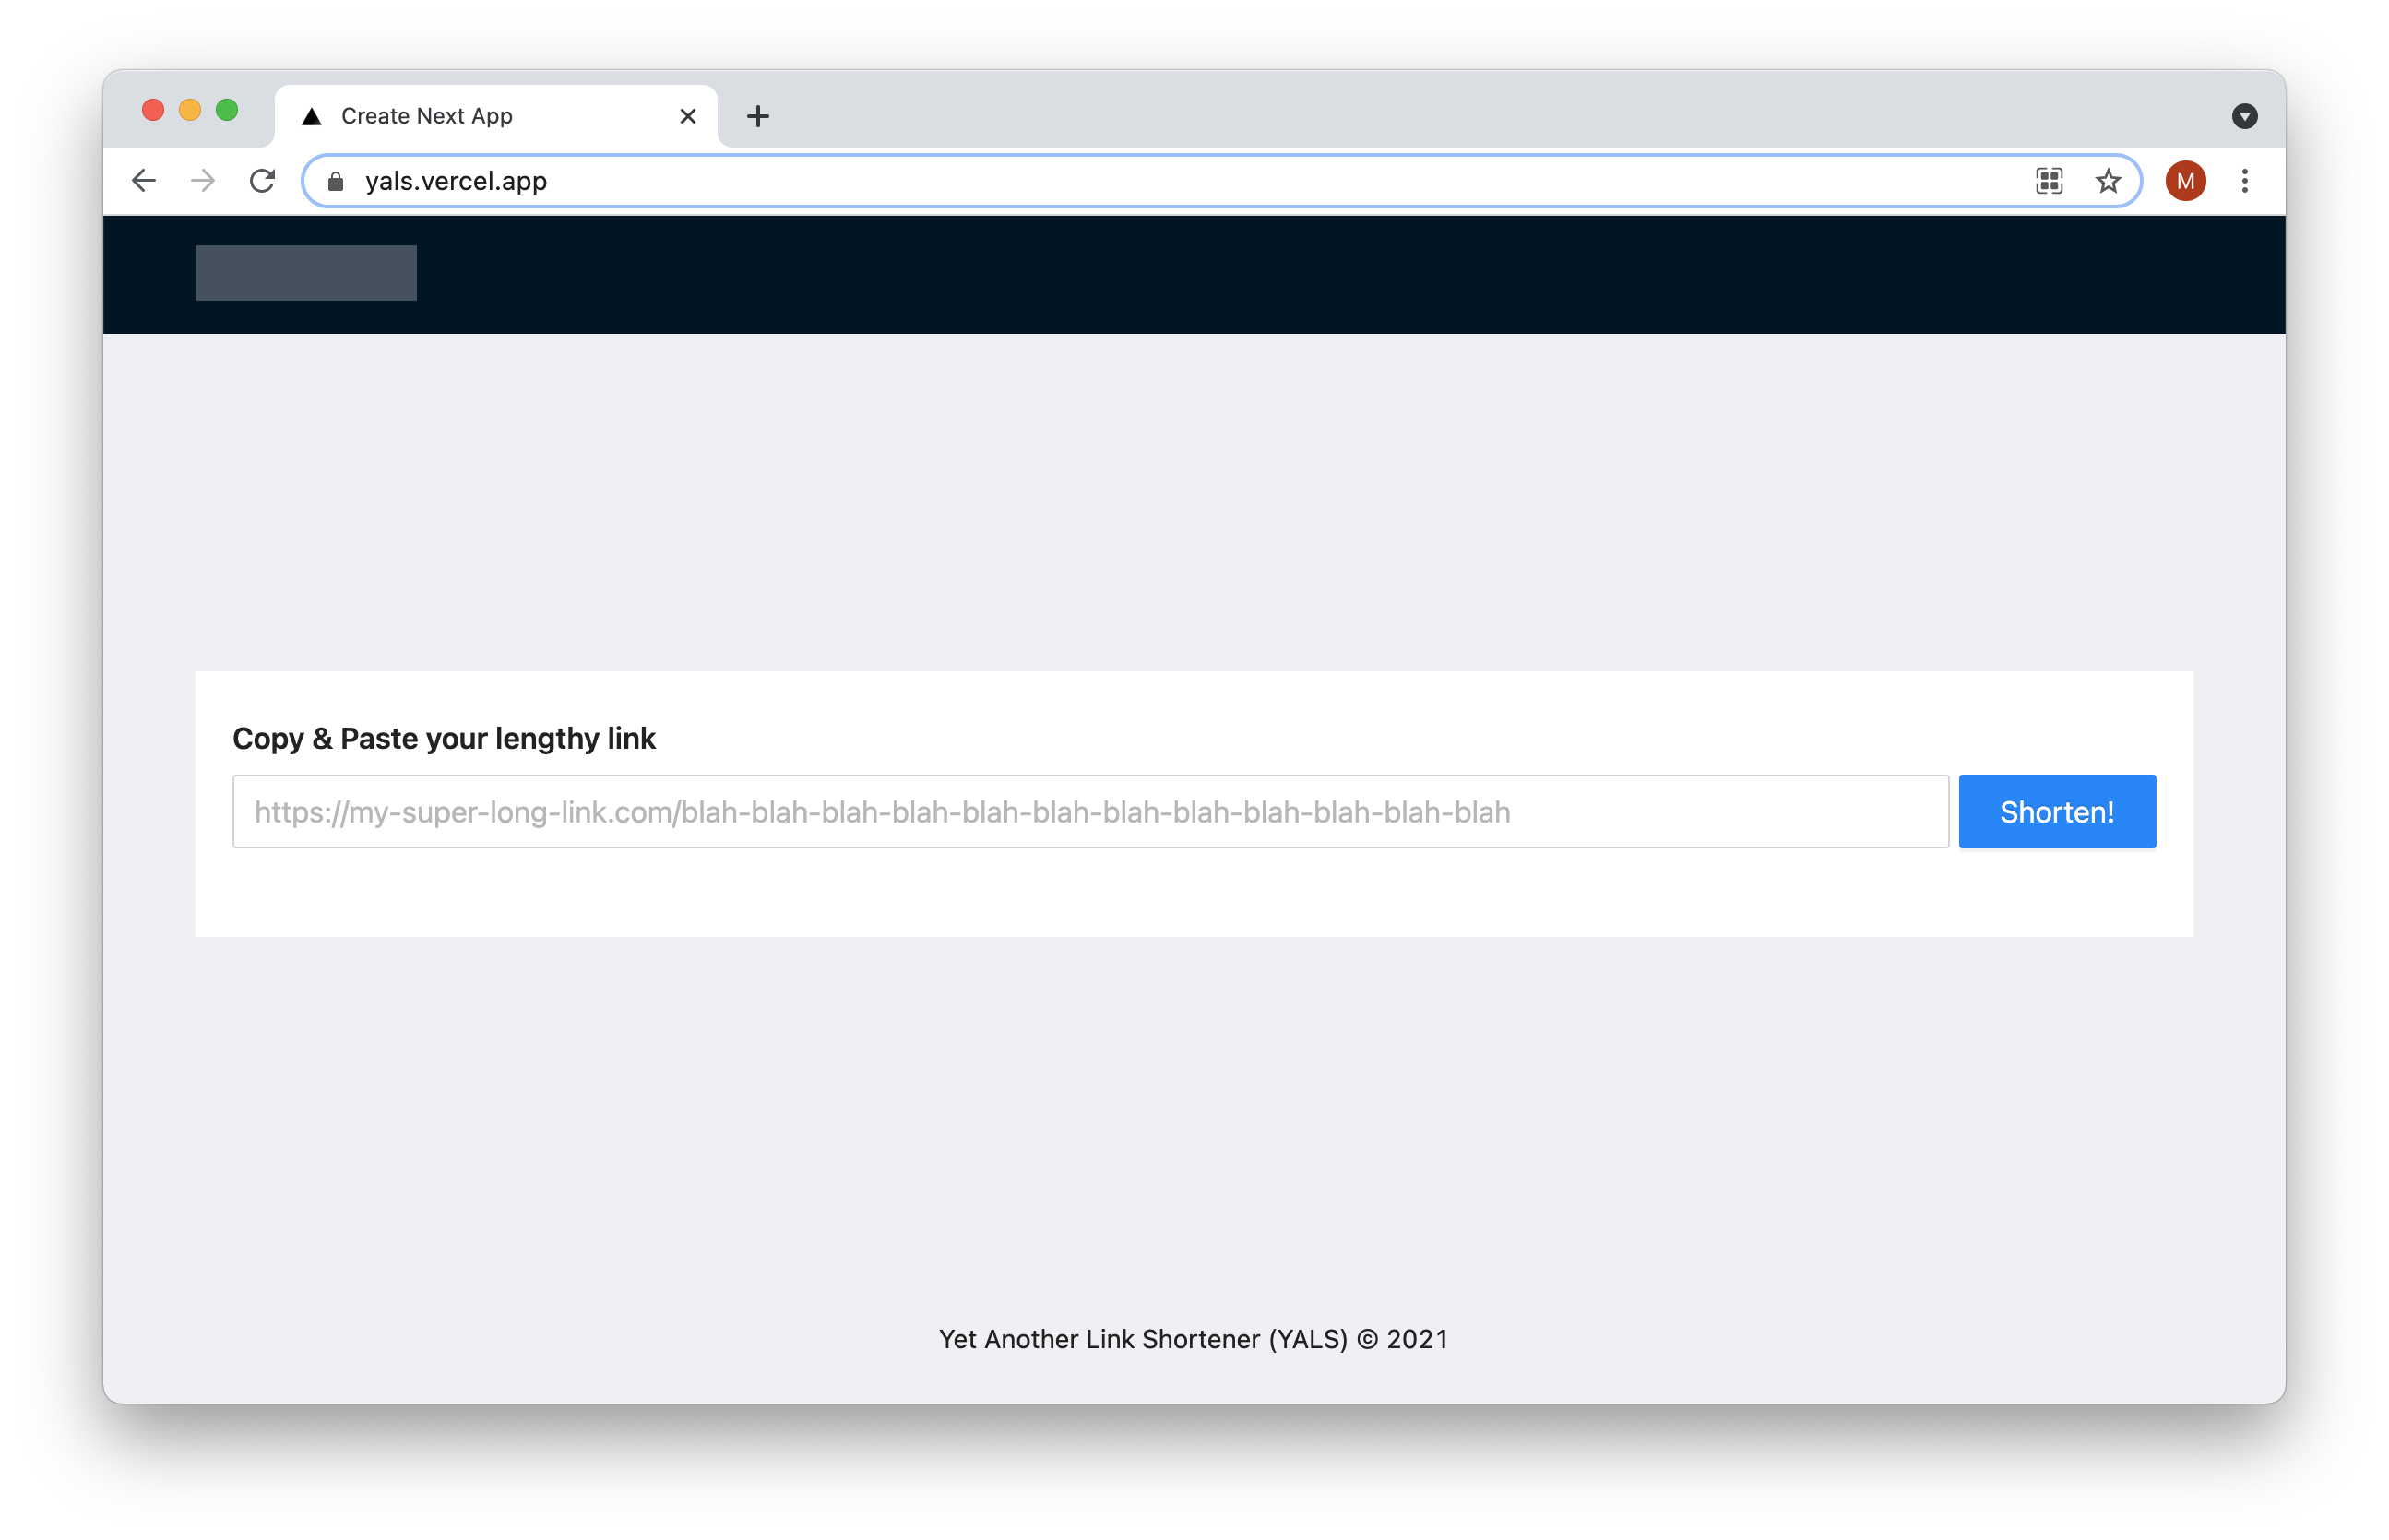
You can try it out here.
Prerequisites
This tutorial requires some Node fundamentals, just the basics. You should also know how to use Git and GitHub before you follow the instructions in this article.
I skipped the part about creating a Git repository and pushing code there, because it is common knowledge. If you don't know how to do that, that's fine – just check out the below tutorials on freeCodeCamp (they're free!) before you start to follow the instructions in this article:
Let's Get Started!
We need to create a new Next.JS project, and we can do that by typing the following command in the terminal:
$ npx create-next-app yals
You can replace the YALS acronym with your own name. I decided to call my project this. The acronym stands for Yet Another Link Shortener.
Now we will configure our project to support TypeScript. Of course, you can use Next.JS without TypeScript but I prefer to use it whenever possible.
TypeScript adds type checking to JavaScript code, and it opened a new world for me. My speed of development increased because I no longer needed to check the types of each variable. I make fewer mistakes and save so much time I'd previously spent on debugging.
The configuration is simple: we need to create a tsconfig.json file, install TypeScript, and run the development server:
$ cd yals
$ touch tsconfig.json
$ npm install --save-dev typescript @types/react @types/node
$ npm run dev
You should see the notification saying that Next.JS detected TypeScript, and it configured it for us:
> yals@0.1.0 dev
> next dev

ready - started server on 0.0.0.0:3000, url: http://localhost:3000
We detected TypeScript in your project and created a tsconfig.json file for you.
Unfortunately, Next.JS will not convert existing JavaScript files into TypeScript, so we need change them on our own.
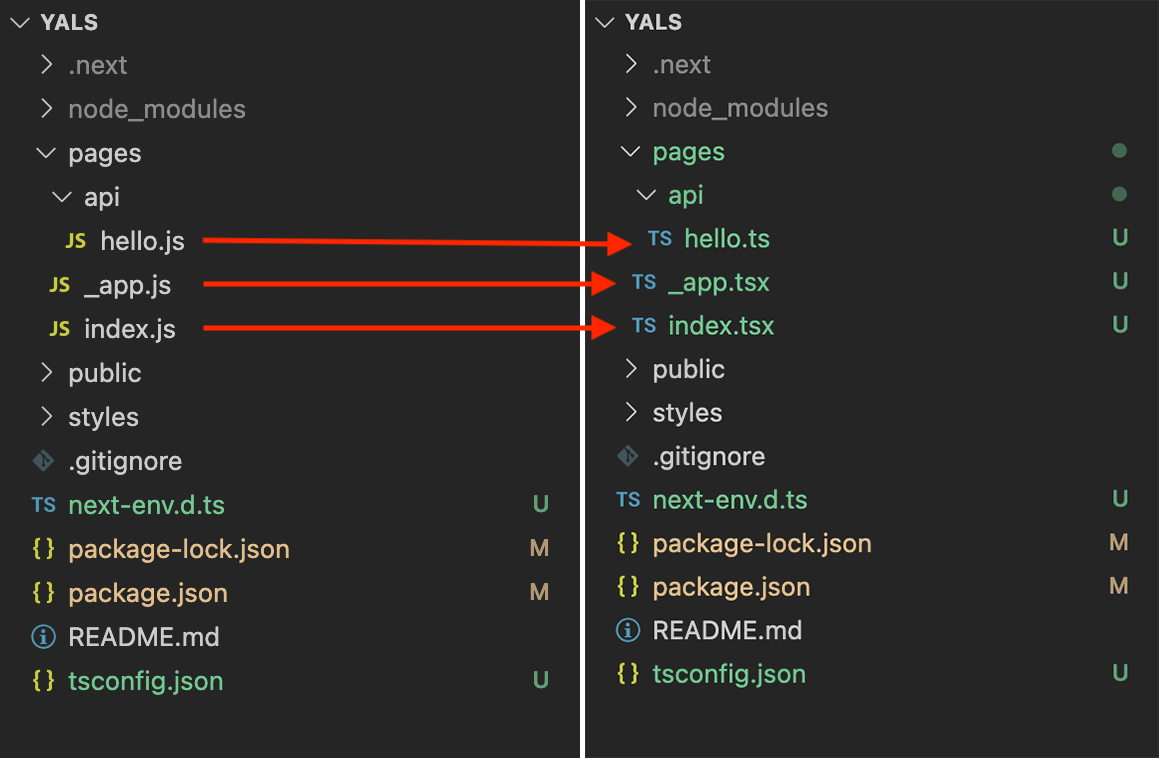
No worries, there are only three files. We will need to change the extensions of all React files to .tsx, and all other files to .ts:
$ mv pages/index.js pages/index.tsx
$ mv pages/_app.js pages/_app.tsx
$ mv pages/api/hello.js pages/api/hello.ts
That's how our project tree looks after the changes:
Install the React UI Library with Design System
One of the biggest advantages of React is its great community. The community creates tons of useful open source libraries.
When I start a new React project I want to move fast, and focus only on building project-specific functionality rather than creating boilerplate. I try to use as many existing libraries as possible rather than reinventing the wheel.
And I always prefer to use an existing component library instead of building my own components from scratch – at least for the prototyping phase.
If your company has many products you might consider hiring a designer to create your own design system. Otherwise you could use an existing one, and customize its theme.
The best libraries allow you to modify the look and fell of their components, such as changing the color palette, icons, fonts, and so on.
In this tutorial, I decided to use a free UI library build by Alibaba called Ant Design. The components are easy to use, and they are flexible, so we can easily fit them into our needs. I also use it for work, so learning it was not a waste of time.
To install Ant Design you can to use npm or yarn. I am using npm in this tutorial:
$ npm install --save antd
Now, we can import a new design system in our main style file by replacing the content with the following code:
# file: https://github.com/mateuszsokola/yals/blob/main/styles/globals.css

@import '~antd/dist/antd.css';
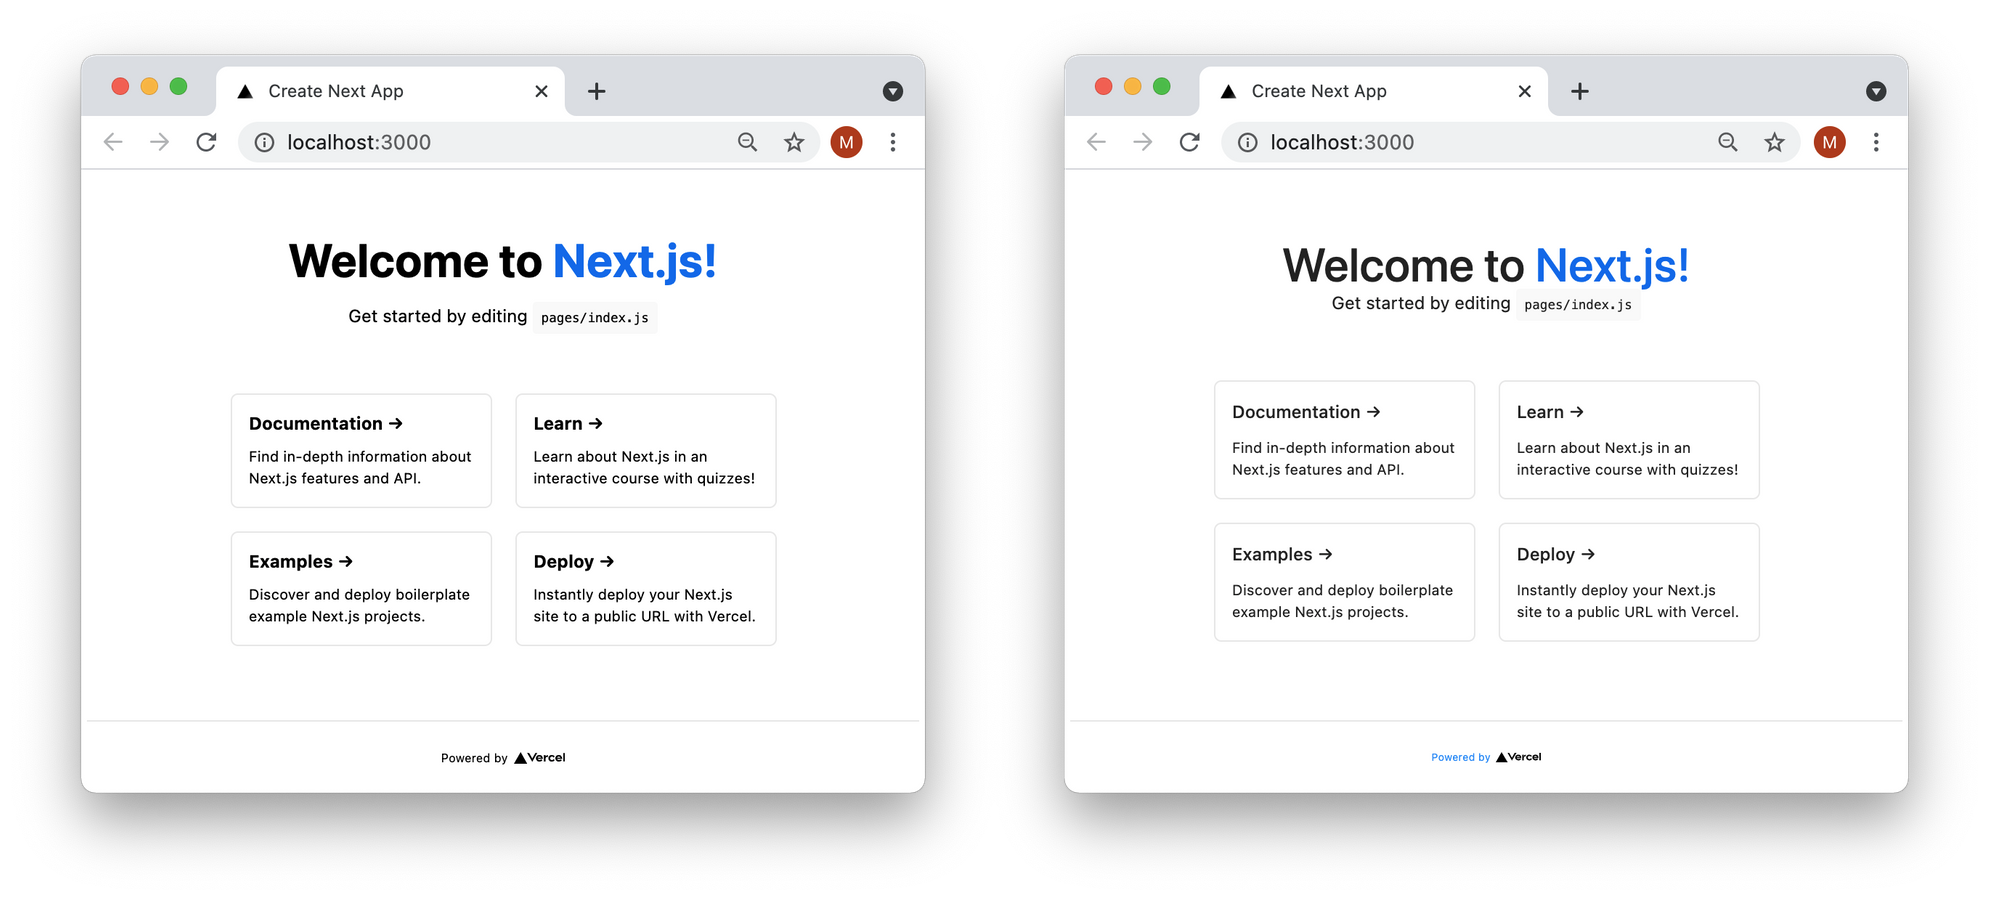
You might notice that your application has changed its styles and uses another font:
We need to also install axios. It is a bit more of an advanced HTTP client compared to fetch. It supports error handling and types out of the box. We don't need to implement it on our own, so we can get straight to business.
$ npm install --save axios
How to Style Our Web App
Our application is ready for development. We're going to start by creating the React front end. I cut some corners here, as I want to focus more on building a serverless backend rather than making yet another React tutorial.
I am going to keep the instructions on the front end part to a bare minimum. In the end, this tutorial isn't about using Ant Design in React.
Let's open the pages/index.tsx file, and paste the following code there:
import Head from 'next/head'
import { useState } from 'react';
import axios, { AxiosError } from 'axios';
import { Alert, Button, Form, Input, Layout, Typography } from 'antd'
import styles from '../styles/Home.module.css'
const { Header, Content, Footer } = Layout;
const { Title } = Typography;
type ShortenLinkResponse = {
short_link: string;
}
type ShortenLinkError = {
error: string;
error_description: string;
}
type FormValues = {
link: string;
}
export default function Home() {
const [status, setStatus] = useState<'initial' | 'error' | 'success'>('initial');
const [message, setMessage] = useState('');
const [form] = Form.useForm();
const onFinish = async ({ link }: FormValues) => {
try {
const response = await axios.post<ShortenLinkResponse>('/api/shorten_link', { link });
setStatus('success');
setMessage(response.data?.short_link);
}
catch(e) {
const error = e as AxiosError<ShortenLinkError>;
setStatus('error');
setMessage(error.response?.data?.error_description || 'Something went wrong!');
}
}
const onFinishedFailed = () => {
setStatus('error');
const error = form.getFieldError('link').join(' ');
setMessage(error);
}
return (
<Layout>
<Head>
<title>Yet Another Link Shortner</title>
<link rel="icon" href="/favicon.ico" />
</Head>
<Header>
<div className={styles.logo} />
</Header>
<Content className={styles.content}>
<div className={styles.shortner}>
<Title level={5}>Copy & Paste your lengthy link</Title>
<Form
form={form}
onFinish={onFinish}
onFinishFailed={onFinishedFailed}
>
<div className={styles.linkField}>
<div className={styles.linkFieldInput}>
<Form.Item name="link" noStyle rules={[{
required: true,
message: 'Please paste a correct link',
type: 'url',
}]}>
<Input placeholder="https://my-super-long-link.com/blah-blah-blah-blah-blah-blah-blah-blah-blah-blah-blah-blah" size="large"/>
</Form.Item>
</div>
<div className={styles.linkFieldButton}>
<Form.Item>
<Button type="primary" htmlType="submit" style={{ width: '100%' }} size="large">
Shorten!
</Button>
</Form.Item>
</div>
</div>
</Form>
{['error', 'success'].includes(status) && (<Alert showIcon message={message} type={status as 'error' | 'success'} />)}
</div>
</Content>
<Footer className={styles.footer}>
Yet Another Link Shortener (YALS) © 2021
</Footer>
</Layout>
)
}
Let's look at what is under the hood of the code. The application has three states:
initial– when the application is loaded, and the user hasn't taken any action yet.success– when the user has copy-pasted the link, clicked "Shorten", and our system has generated a link for them. The application will render a link below the form.error– if something went wrong, the application will display an error below the form. For example, if the user entered an incorrect link.
We exposed two methods that are responsible for dealing with forms. The first one, onFinish, makes a request to our API to generate a link. The second one, onFinishedFailed, is responsible for displaying the form validation errors.
We don't need to implement form validation on our own. Ant Design comes with an advanced Form component that handles it for us.
The look and feel of our web app can still be improved, and let's add some styles to it. We need to create a CSS file in the styles directory. I'm going to call it Home.modules.css. You can create a file on your own in your IDE or by typing this command:
$ touch styles/Home.module.css
Now we need to add some styles:
// @file: https://github.com/mateuszsokola/yals/blob/main/styles/Home.module.css
.logo {
  float: left;
  width: 120px;
  height: 30px;
  margin: 16px 24px 16px 0;
  background: rgba(255,255,255,.3);
}

.content {
  display: flex;
  align-items:  center;
  padding: 0 50px;
  min-height: calc(100vh - 64px - 70px);
}

.shortner {
  width: 100%;
  background: #fff;
  padding: 24px 20px;
}

.linkField {
  display: flex;
  width: 100%;
}

.linkFieldInput {
  flex: 100%;
  margin-right: 5px;
}

.linkFieldButton {
  width: 120px;
}

.footer {
  text-align: center;
}
And this is how your web app should look now:
Alright, the view of our application is done. Now we can focus on the business logic behind it.
How to Create a MongoDB Database
We are ready to start development on our back end, but we need to decide how we are going to store links.
We can't store them in memory because serverless apps are shut down after their execution. This means that our links will be gone immediately after their creation.
One of the options is to use a cloud database service. In this tutorial, we will use MongoDB because it doesn't generate overhead on the developer side. We need to create a database and immediately we can store data there. No need to define table schemas and sophisticated configurations.
I decided to host our database on MongoDB Atlas because they give us our first database for free.
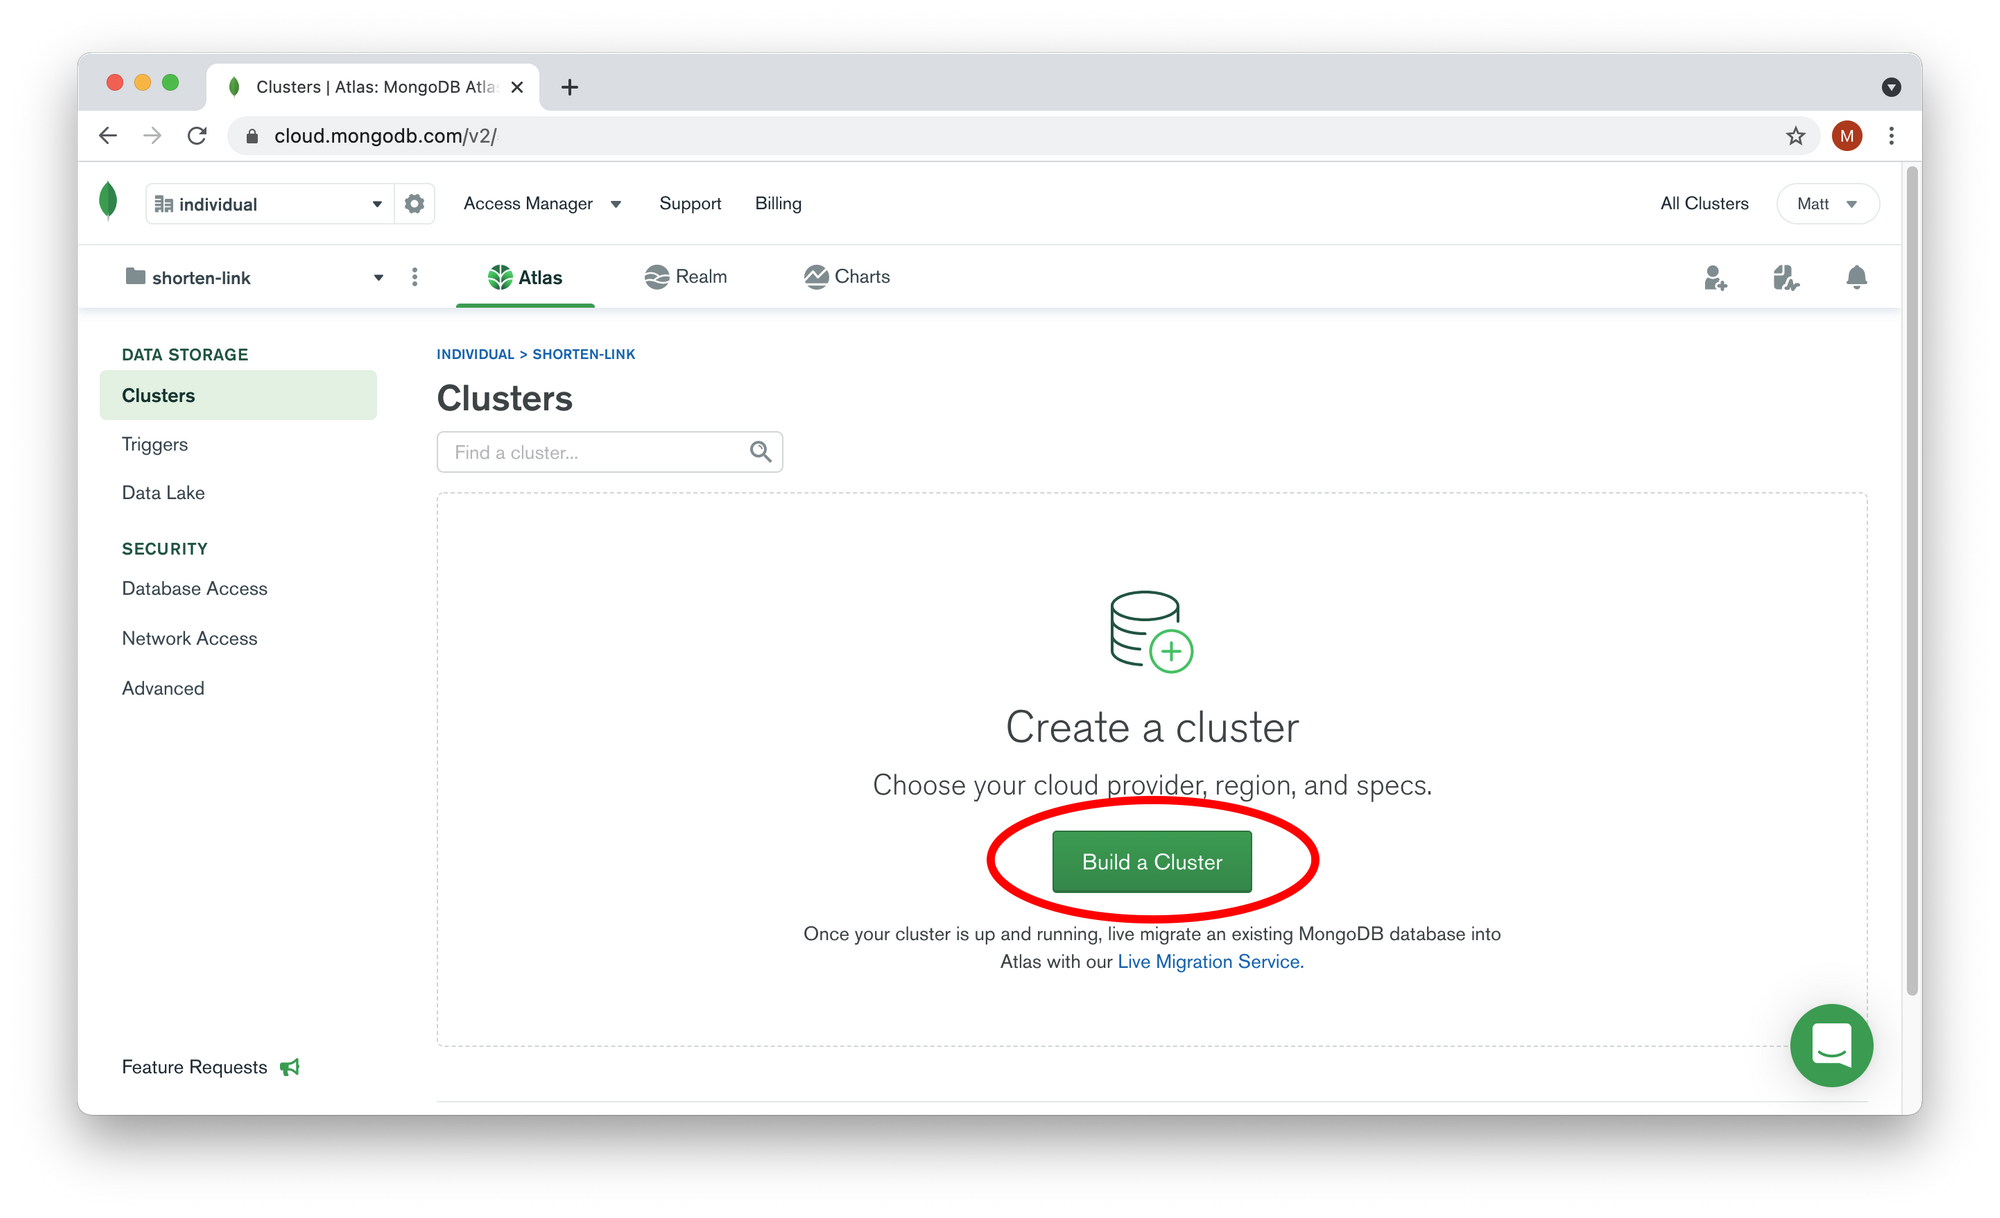
The process of creating your account is very intuitive, so I skipped that part. The instructions start after you login into your account, and you can see an empty database dashboard. It's supposed to look like the below, and you need to click on the "Build a Cluster" button:
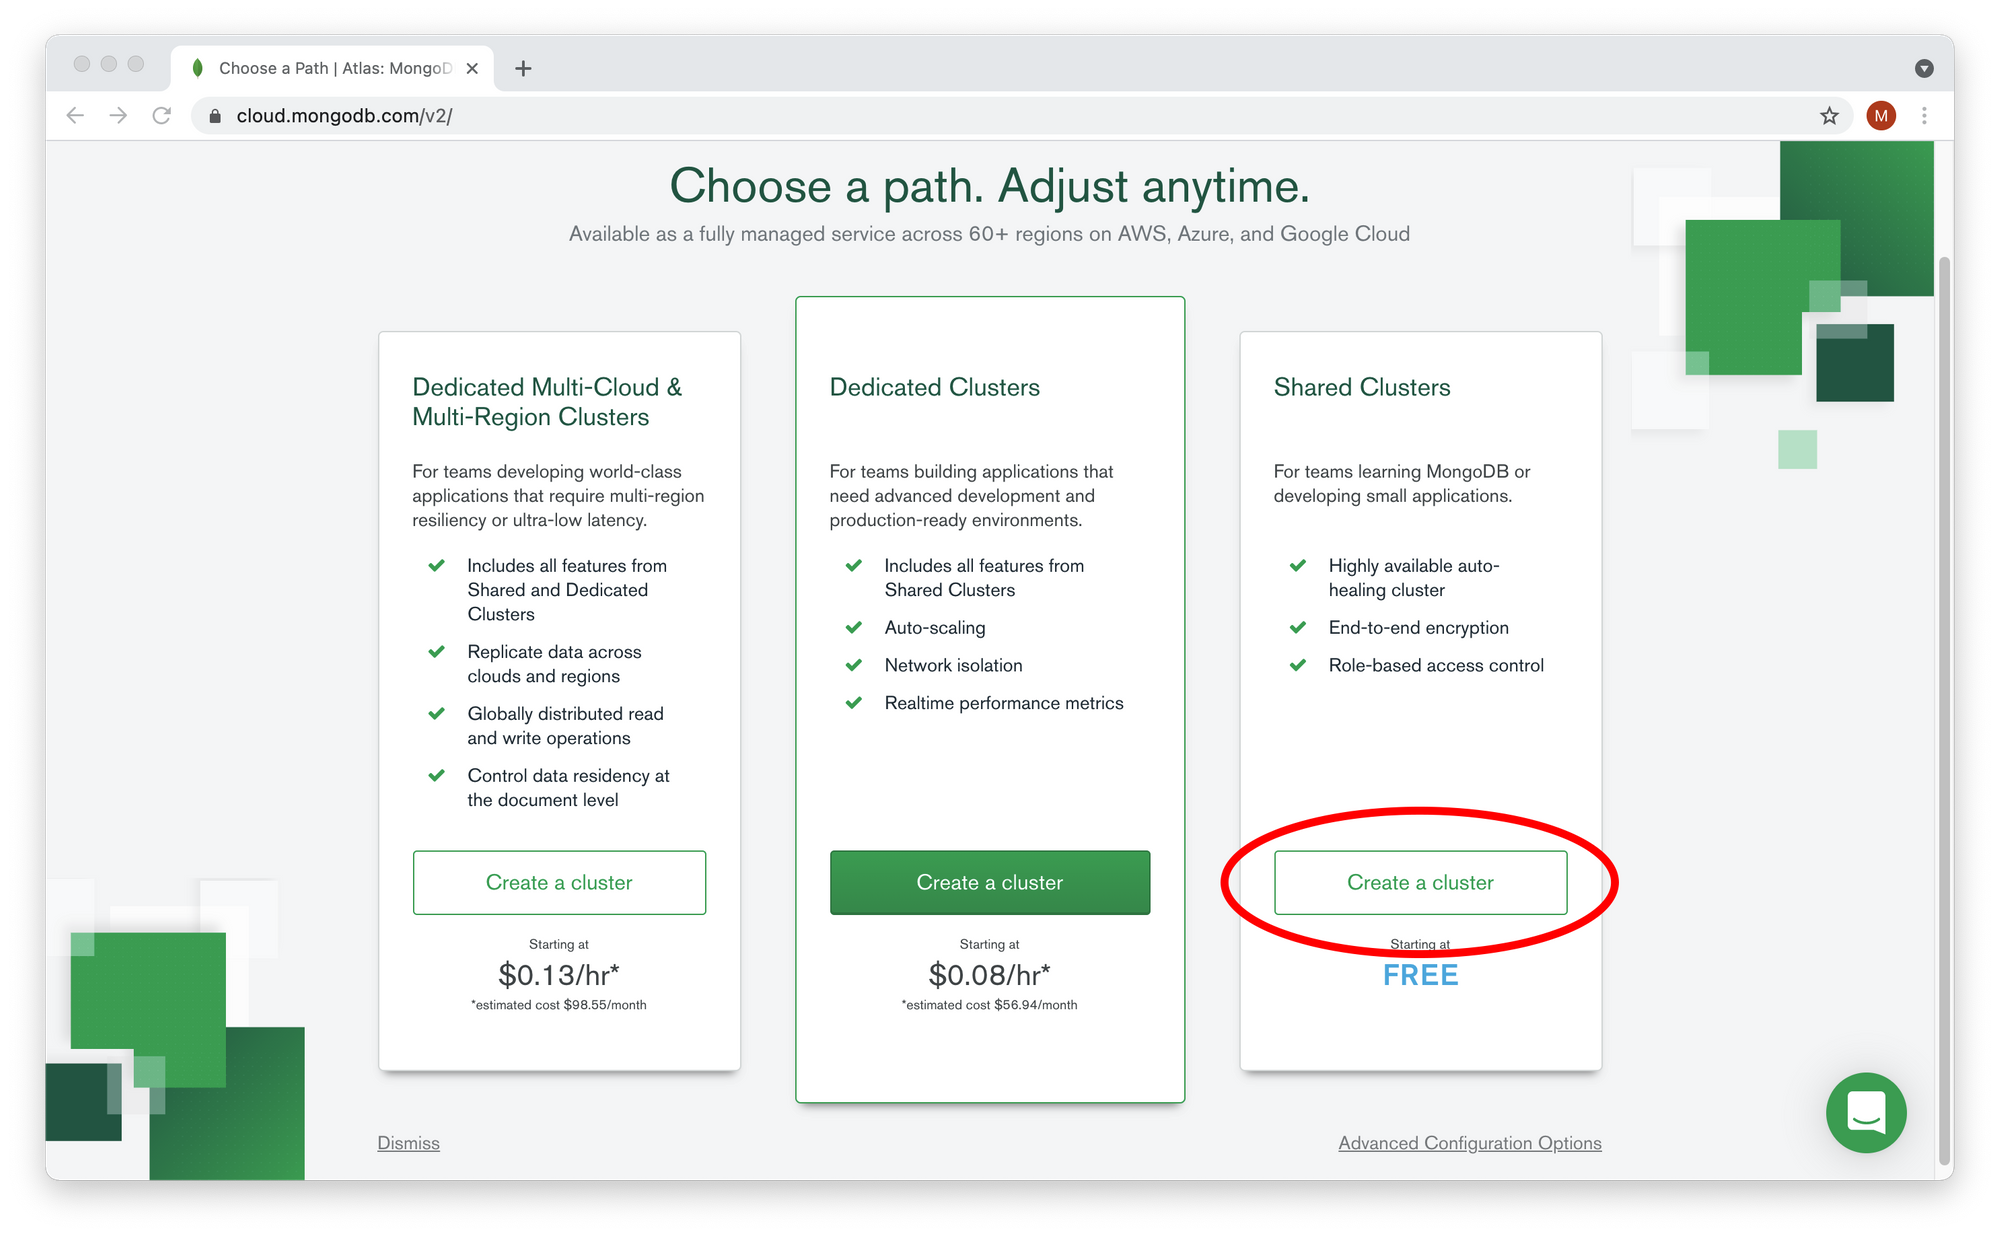
And we will create a free shared cluster:
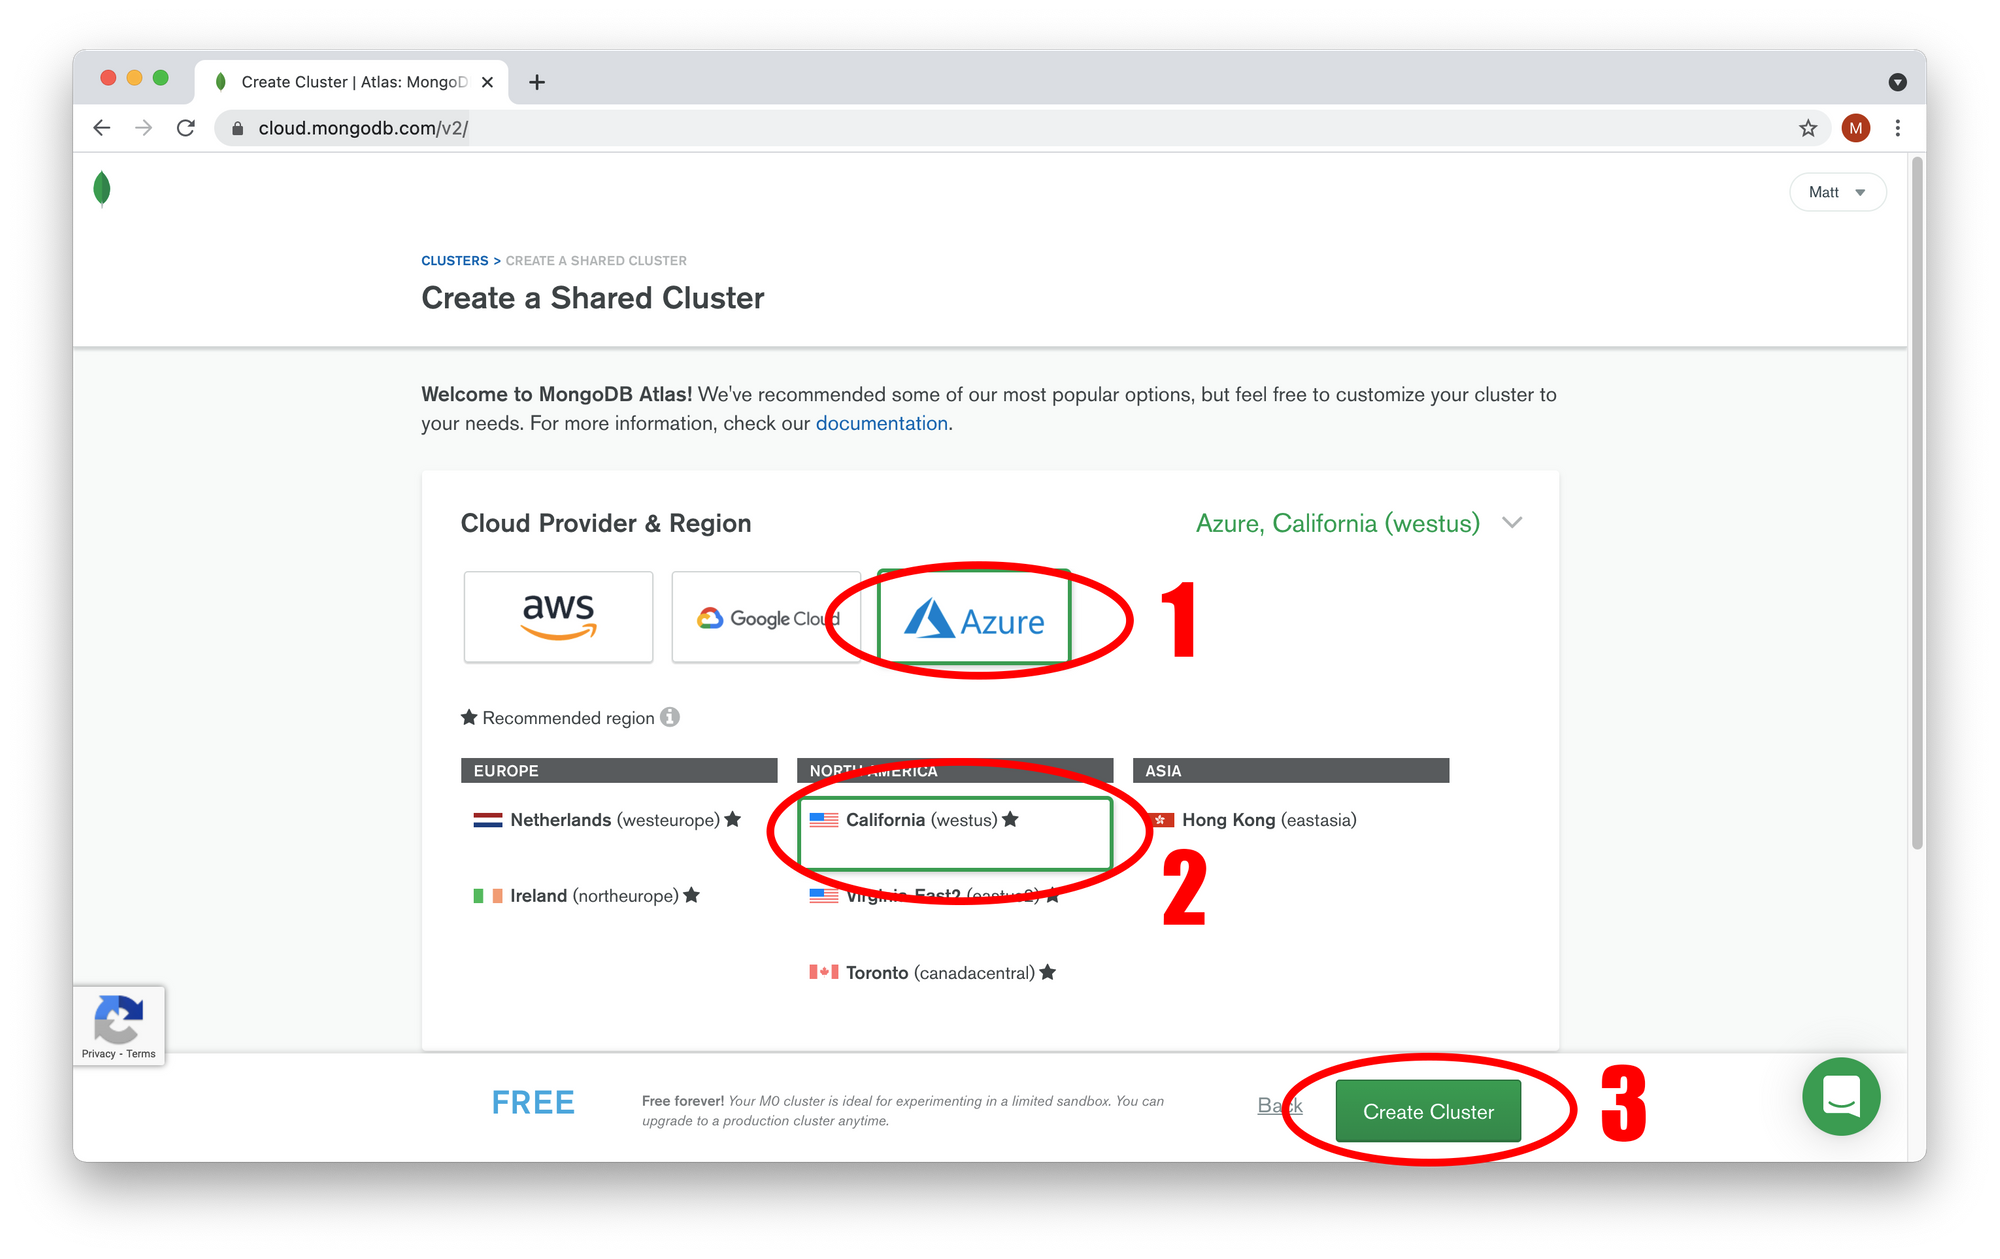
We will host our web app in Vercel. I did some quick research, and I found out that Vercel hosts my other free apps in California. So I needed to find the closest cluster to that location. And I found out they have a cluster hosted at Microsoft Azure in California.
That's the main reason I chose them, since it's important to reduce latency. If you want to host it somewhere else you should choose the closest cluster location to your hosting.
Now you need to click on the three buttons. Please follow the same order as below:
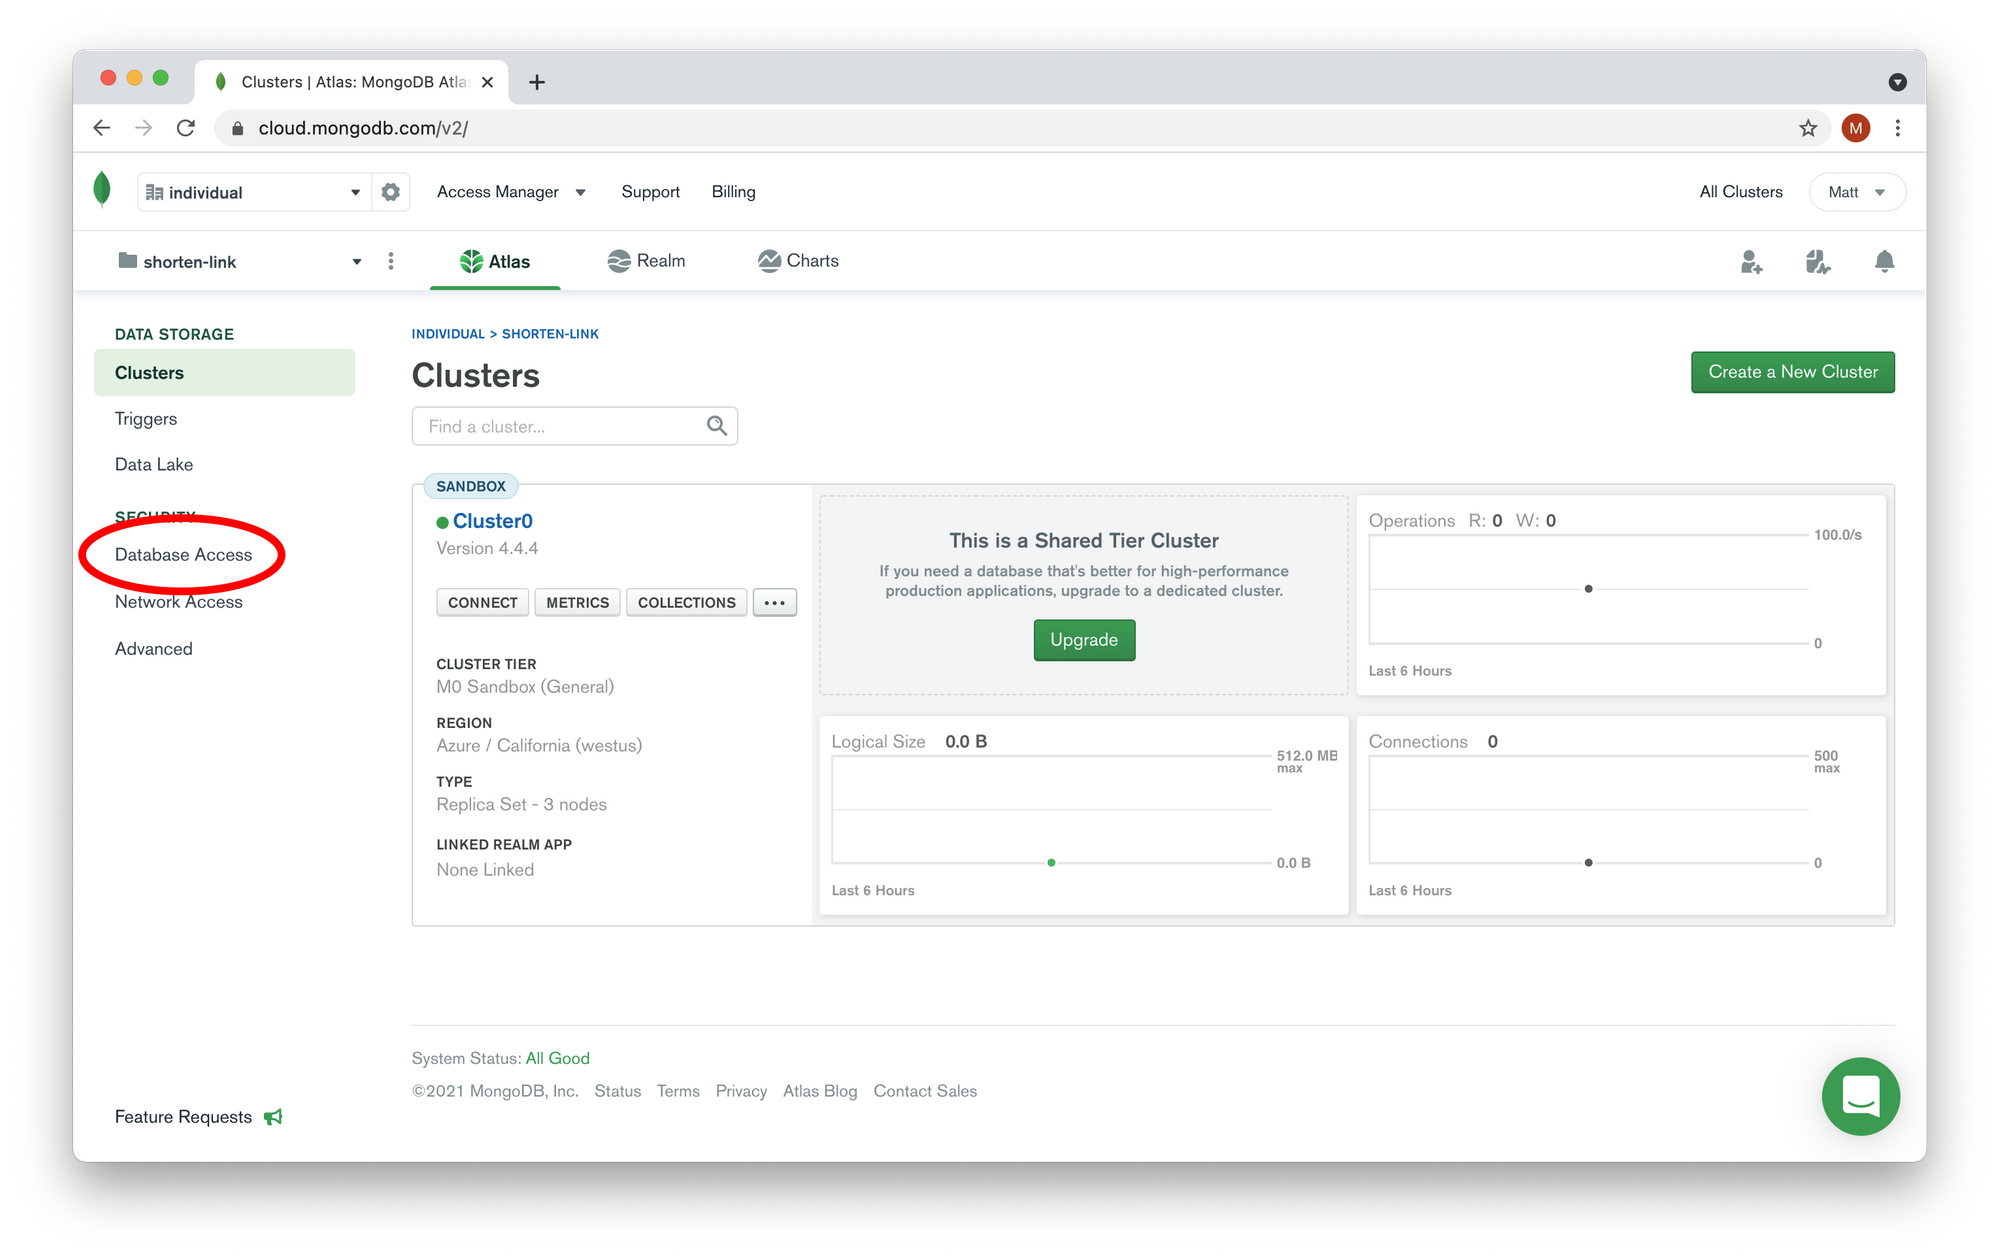
It will take up to three minutes to create your cluster. Meanwhile, let's create a database user. Just click on the "Database Access" link on the right-hand side:
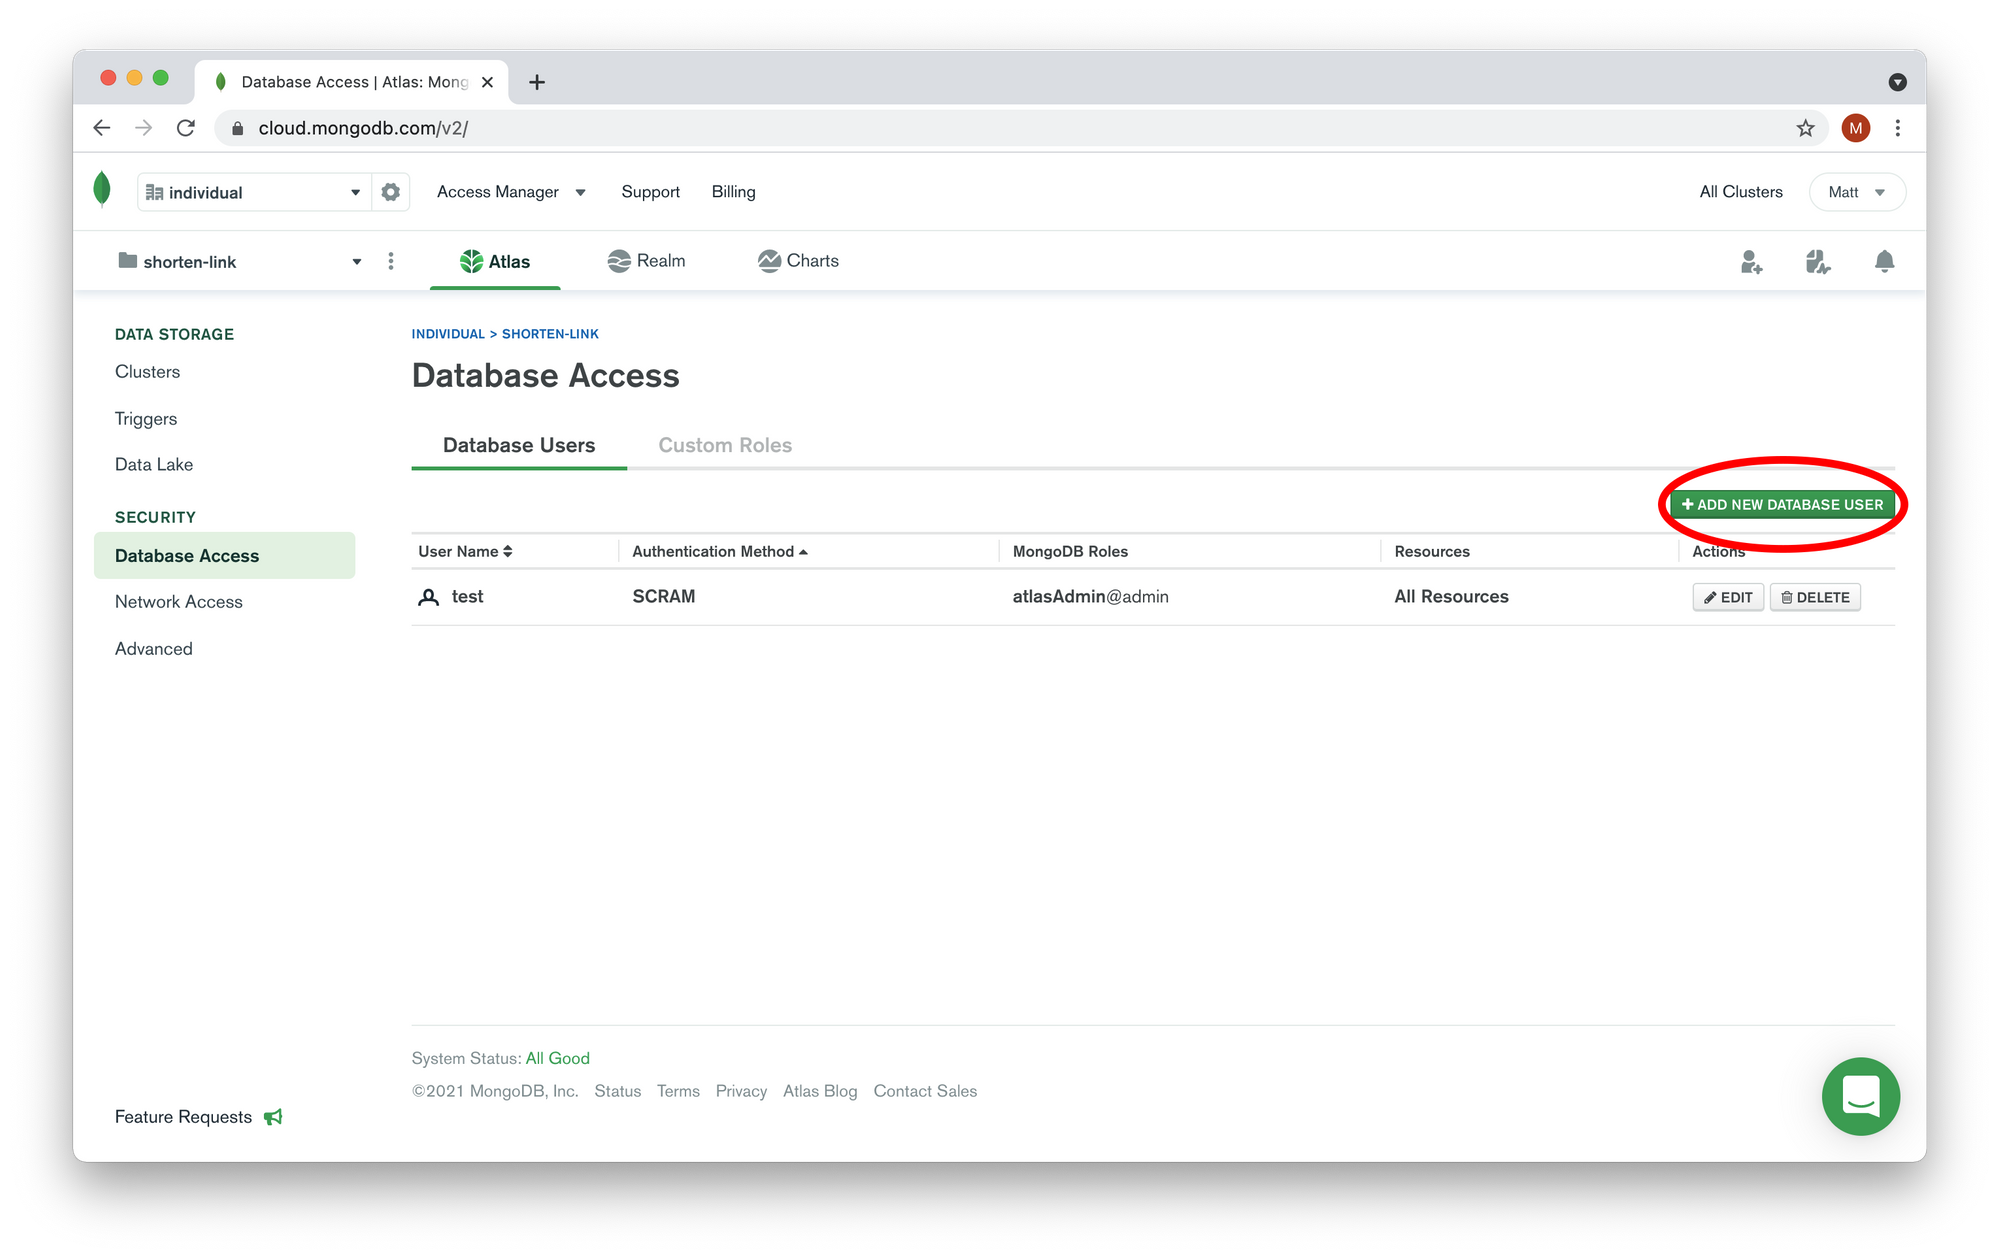
Now we need to click on the "Add New Database User" button:
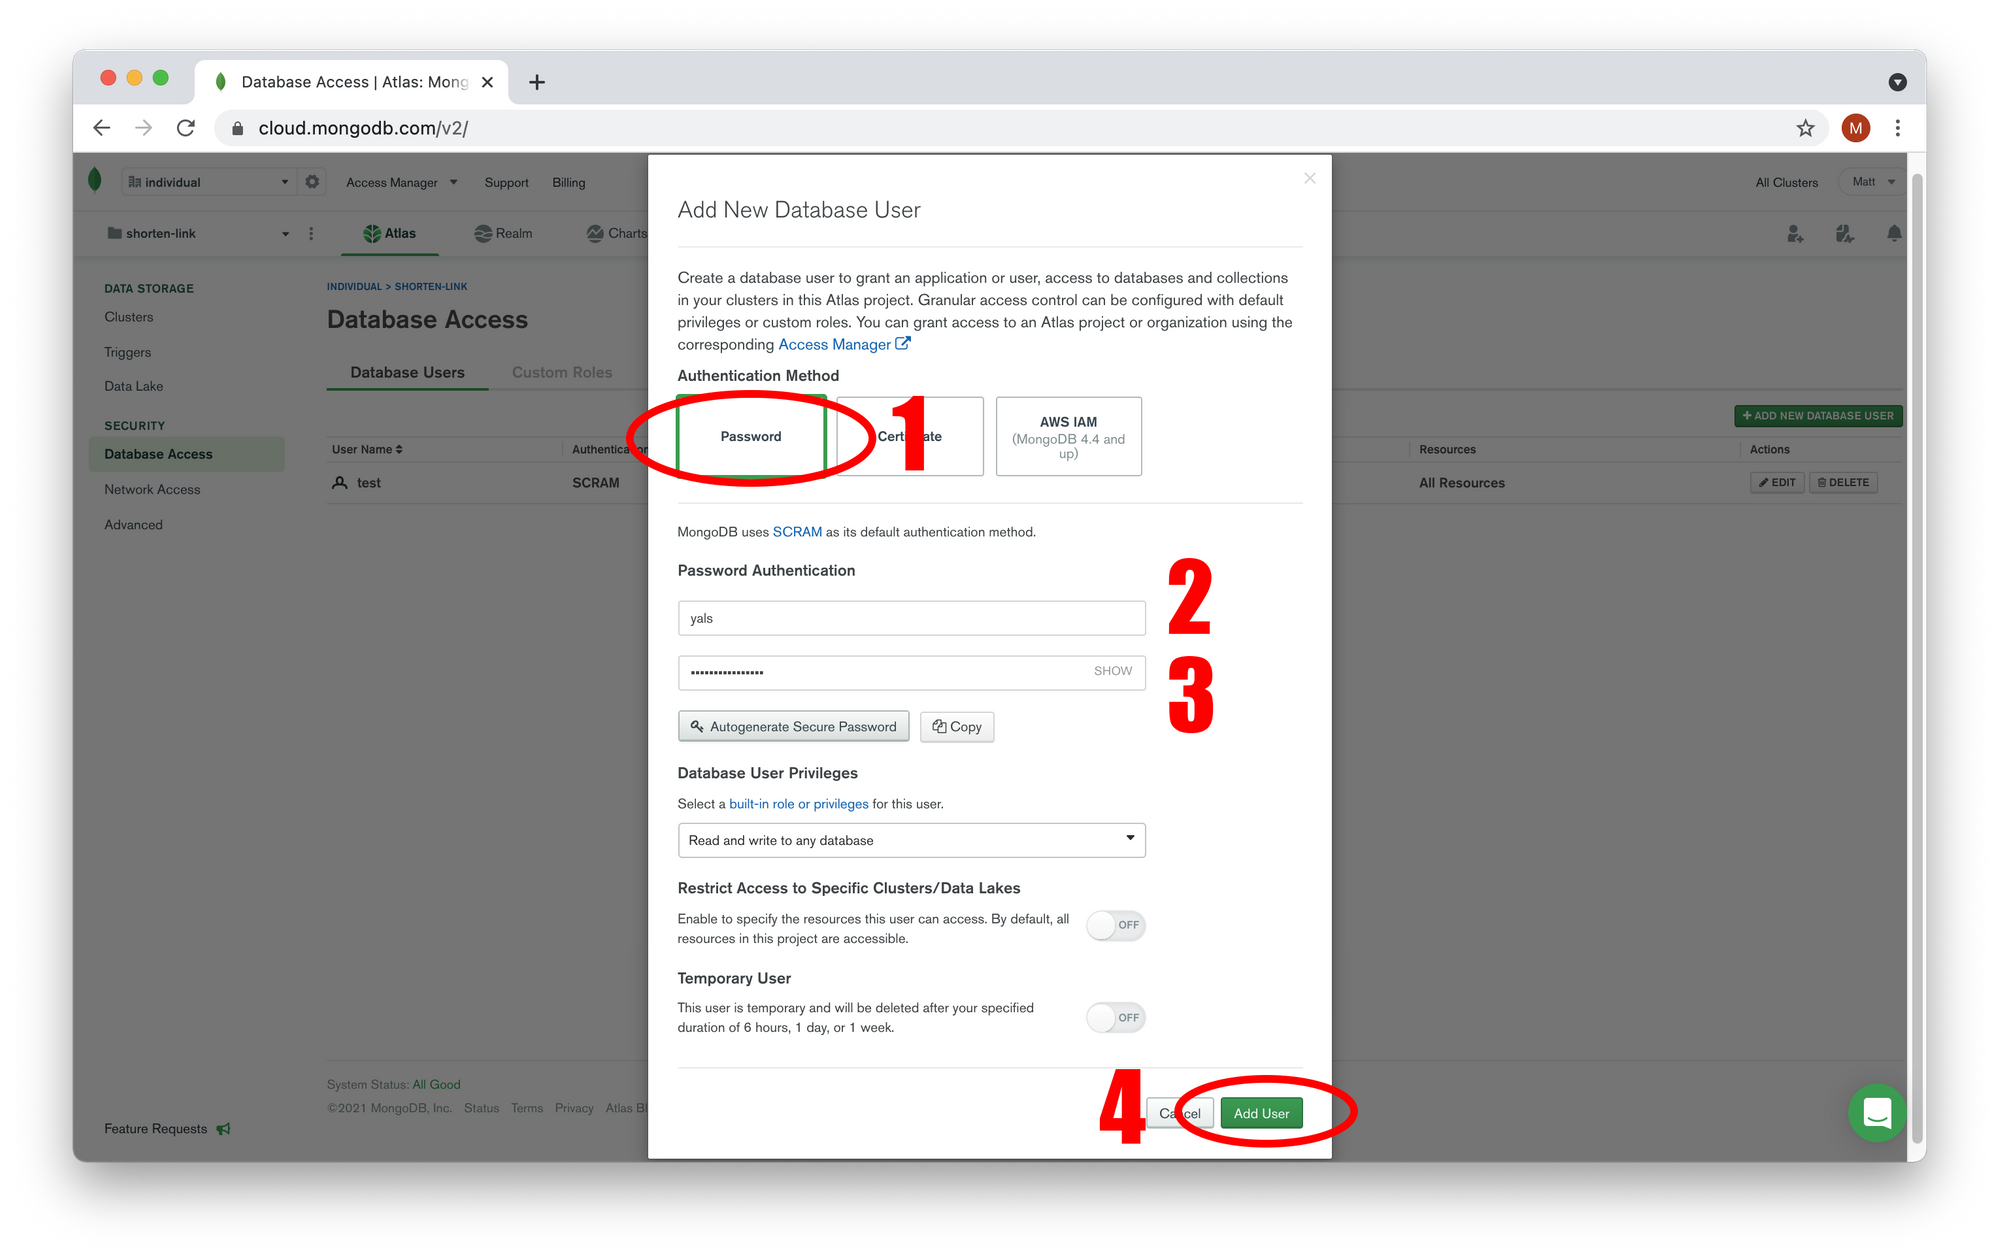
We need to fill out the simple form. Let's choose "Password" as the authentication method. Fill in your username, password (we will need it later so please write it down somewhere). Once you are done with the form, click on the "Add User" button:
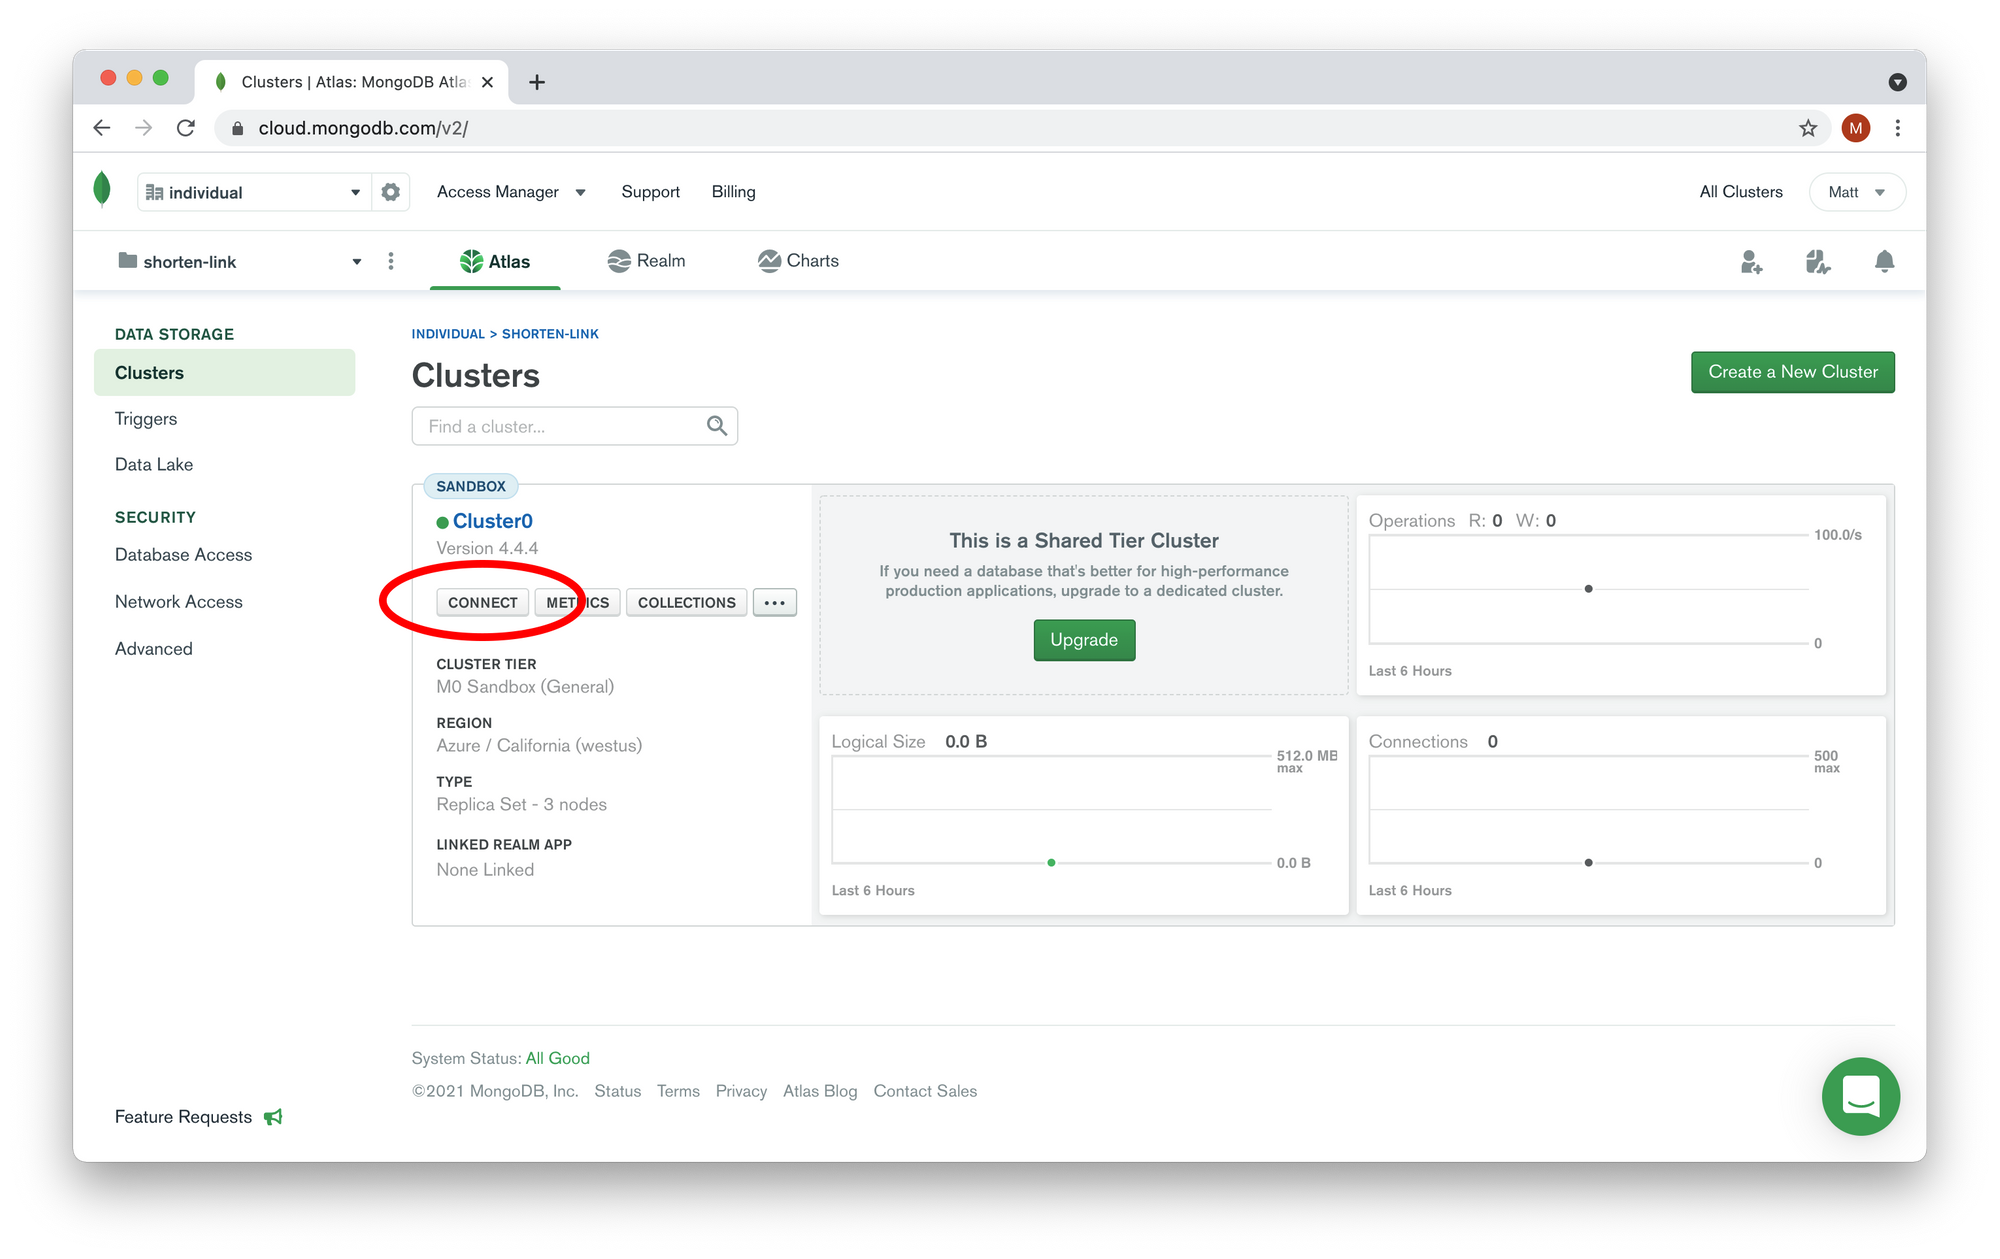
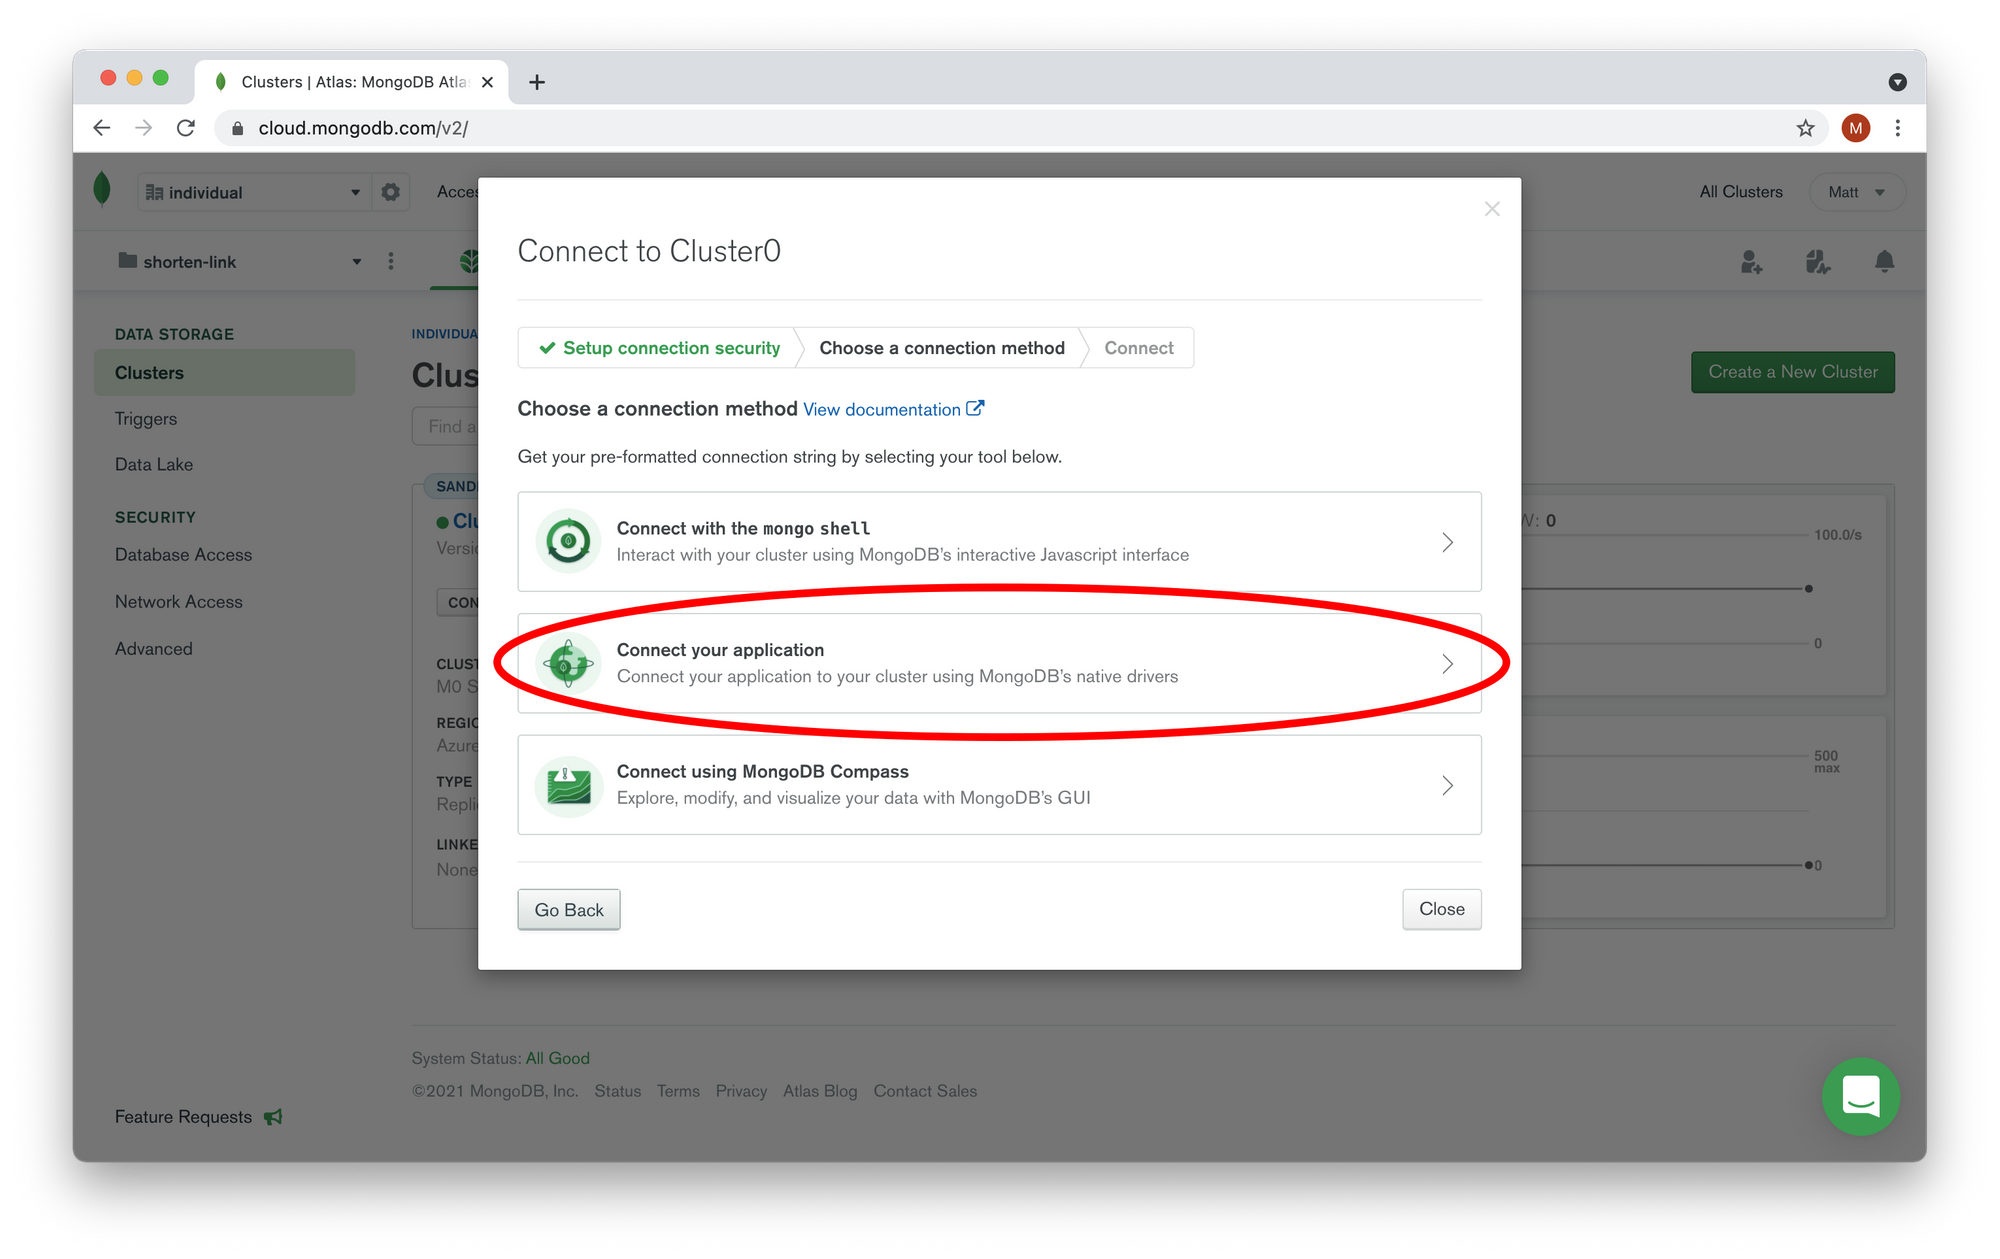
Now we can copy the connection string to our database. We need to click on the "Connect" button.
Select "Connect your application":
And now we can copy our connection string:
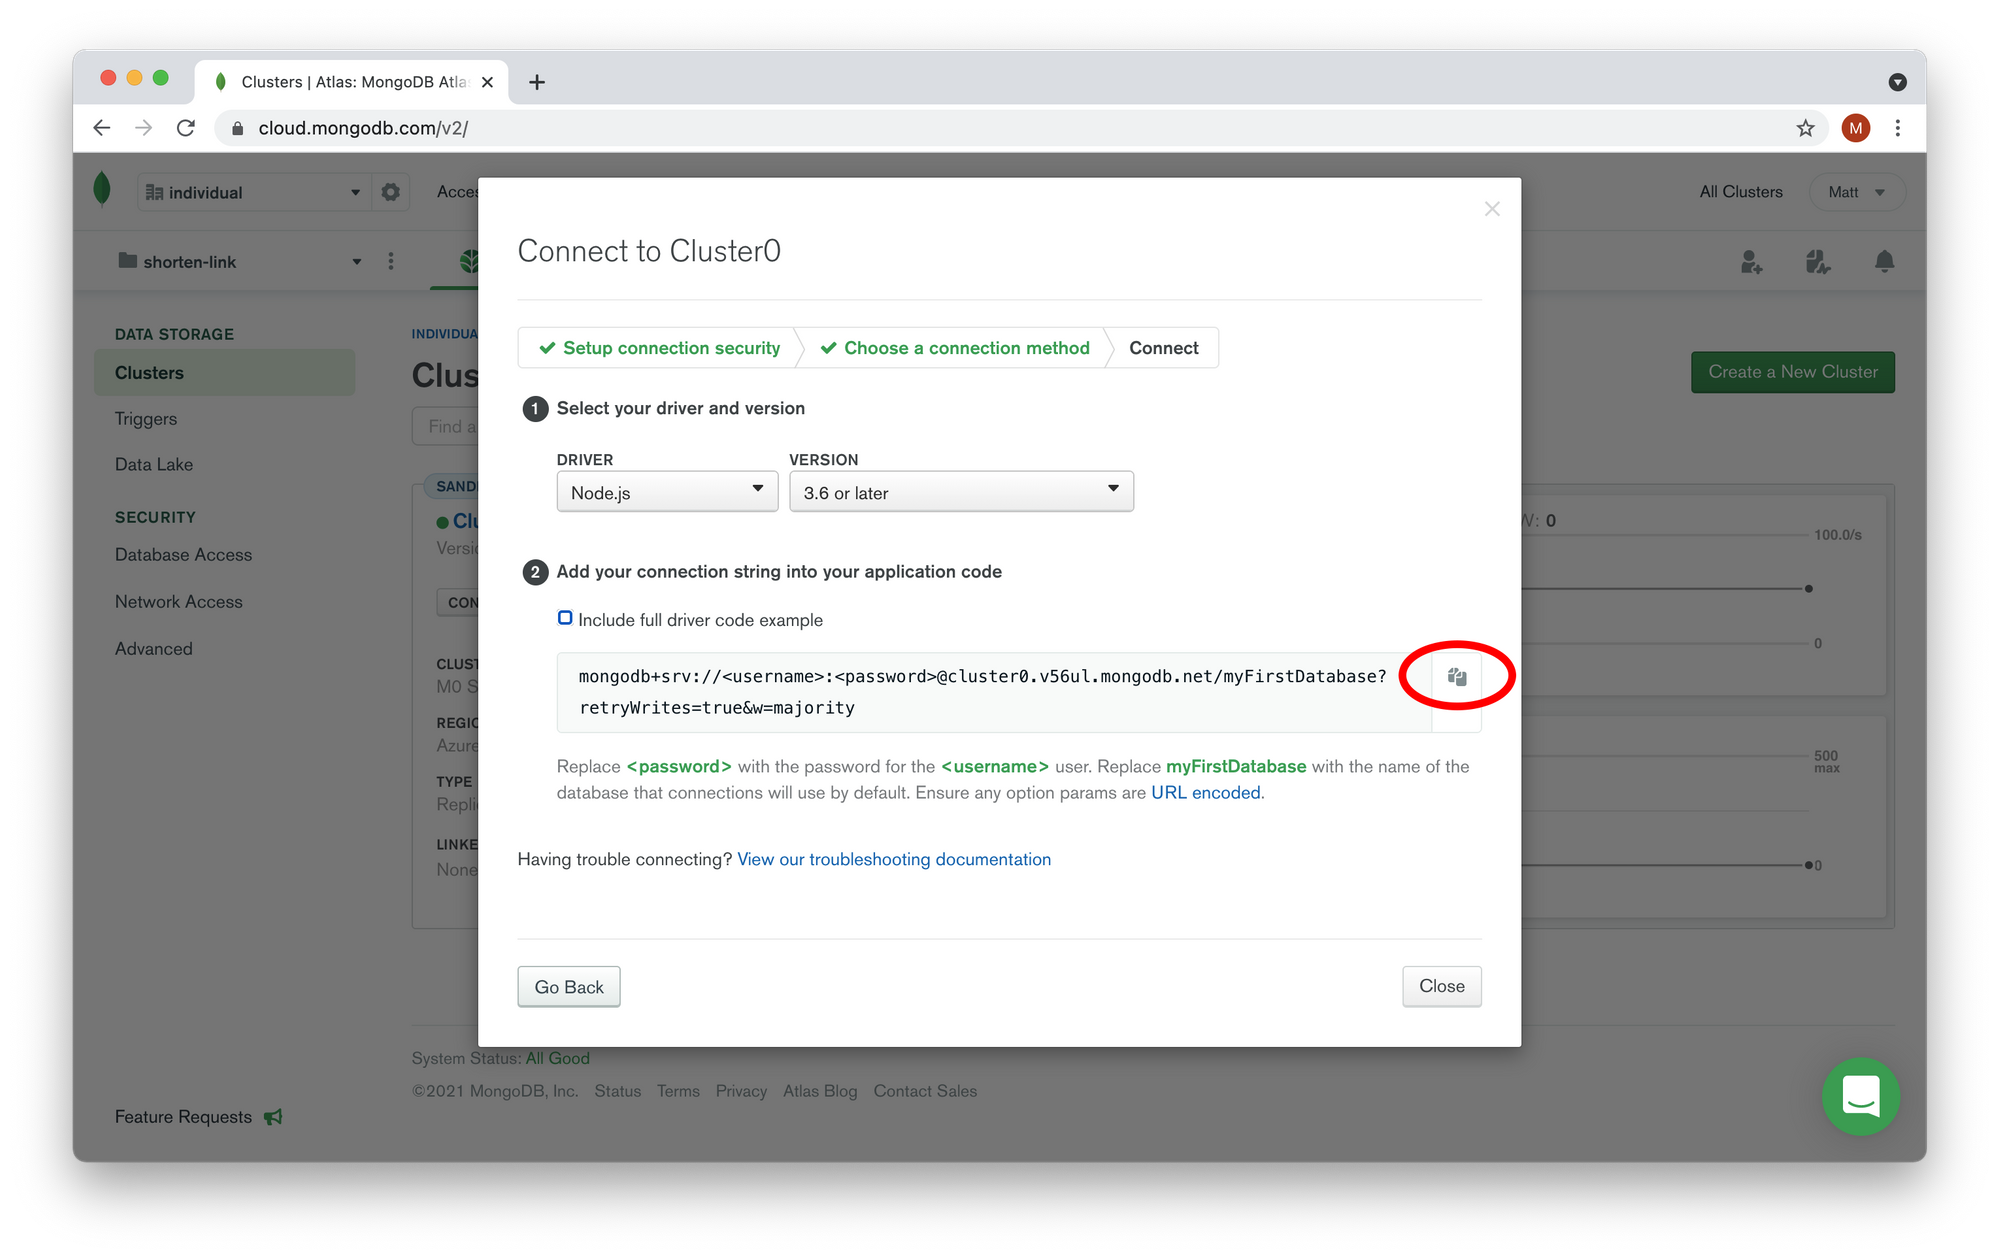
You have the connection string on your clipboard, so now we need to create the .env file in your project. You can do it by running the following command in your terminal:
$ touch .env
$ touch .env.local
Now we need to add a new variable:
# file: https://github.com/mateuszsokola/yals/blob/main/.env

MONGODB_URI=""
And we need to put similar content into .env.local with one difference. This time we will paste our connection string there. Remember to fill in the username and password you created before.
# file: THIS FILE WILL NOT BE PUSHED INTO THE GITHUB REPOSITORY

MONGODB_URI="mongodb+srv://<username>:<password>@cluster0.v56ul.mongodb.net/myFirstDatabase?retryWrites=true&w=majority"
I created two files (.env and .env.local) in case if you would like to push the code into a public GitHub repository. The .env.local is ignored so it won't be pushed into there. This means we will not leak your username and password to the public. Please have that in mind, and never add them into the .env file!
Let's restart the development server to check if Next.JS detects new variables.
Ctrl + C
$ npm run dev
If you can see logs telling you about two loaded files with variables, it is working:
ready - started server on 0.0.0.0:3000, url: http://localhost:3000
info  - Loaded env from /Users/msokola/code/own/yals/.env.local
info  - Loaded env from /Users/msokola/code/own/yals/.env
event - compiled successfully
Now we need to install a MongoDB adapter so we can execute commands on the database. Let's install two new packages:
$ npm install --save mongodb
$ npm install --save-dev @types/mongodb
We resolved all dependencies, and we can hook the application into MongoDB. Let's create a _connector.ts file in the pages/api directory:
$ touch pages/api/_connector.ts
And now we need to write the following code there:
import { MongoClient } from 'mongodb';

let cachedDb;

export async function connectToDatabase() {
  if (cachedDb) {
    return cachedDb;
  }
  const client = new MongoClient(process.env.MONGODB_URI, { useNewUrlParser: true, useUnifiedTopology: true });

  cachedDb = client;
  return await client.connect();
}
Let's look at what the code does. It checks if the connection to the database exists, and if it doesn't the code will establish it.
Pay close attention to the MONGODB_URI variable. Its value comes from the .env.local file which you created earlier on. Thanks to environment variables we avoid keeping the configuration in the code.
Next.JS creates an example API called hello. We are going to hook our connector there to verify if we can establish a connection to the database.
Let's open pages/api/hello.ts, and call the connectToDatabase inside of the callback. The final result should look like this:
import { connectToDatabase } from "./_connector";

export default async (req, res) => {
  await connectToDatabase();

  res.status(200).json({ name: 'John Doe' })
}
Now you can start your development sever, and open this URL in you browser: http://localhost:3000/api/hello. You should see the following screen:
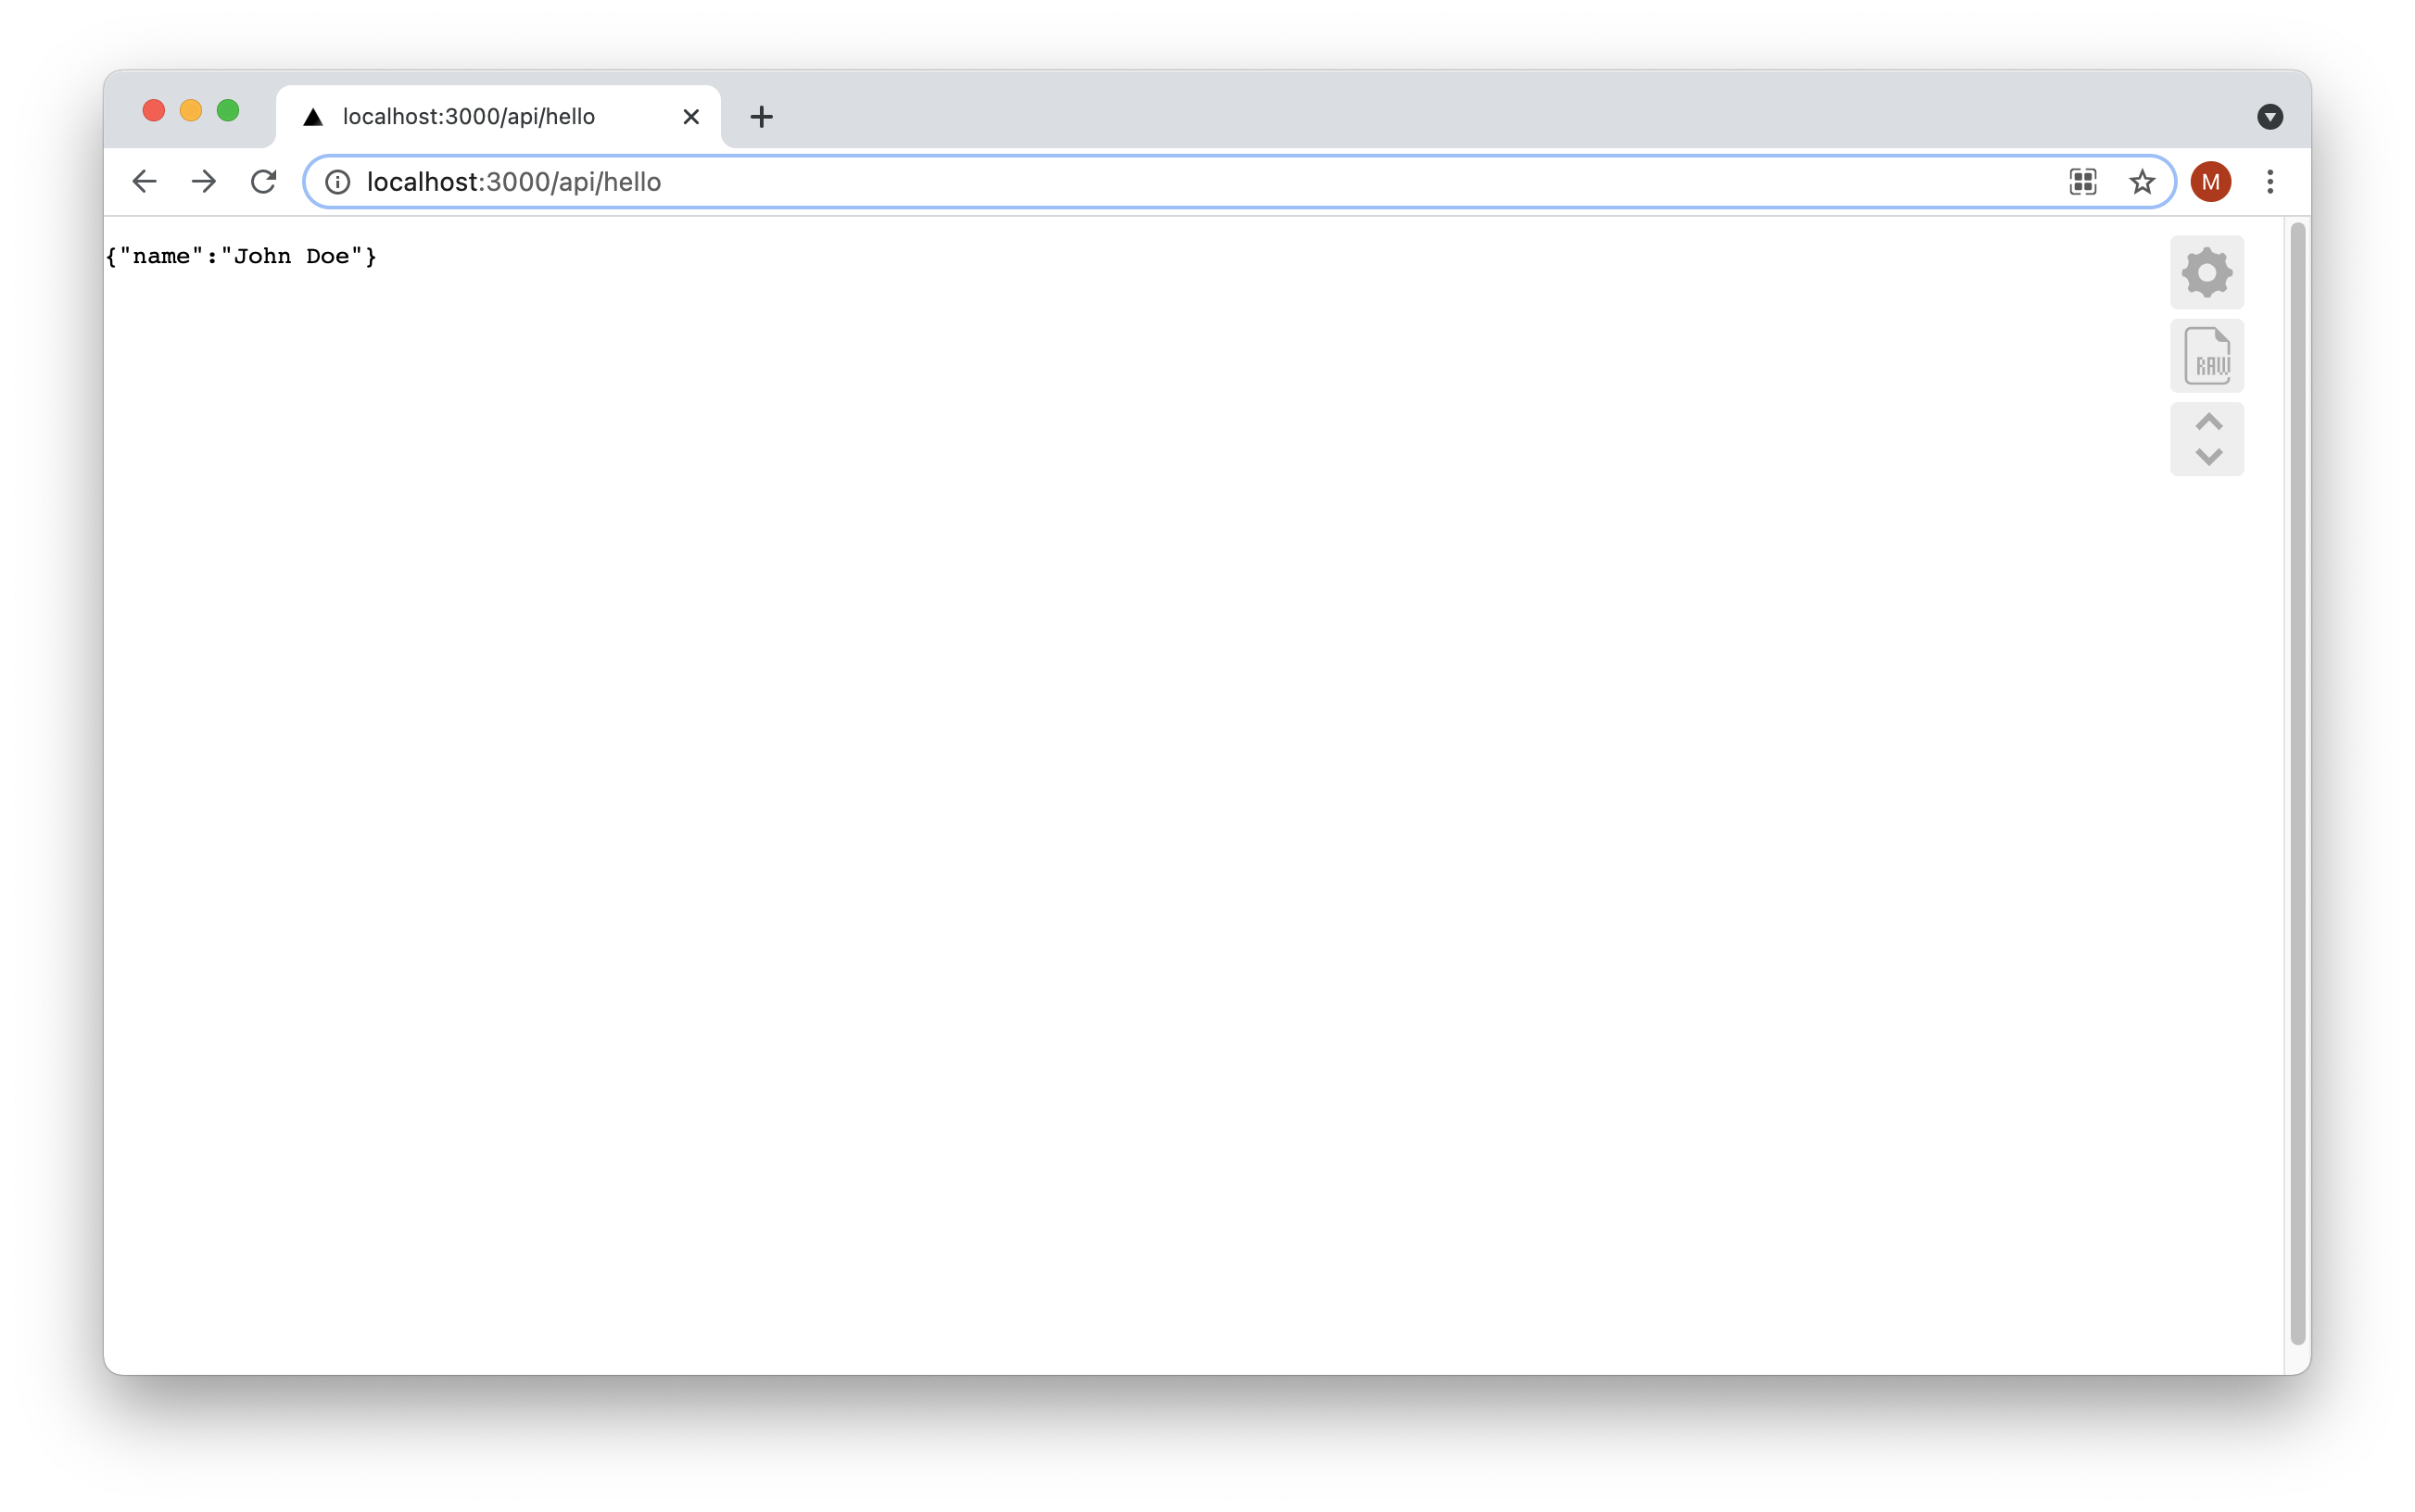
If you see an Internal Server Error instead of the screen above, it means your app couldn't connect to the database. You can find more info in your terminal. Likely, you mistyped your username or password.
How to Create the First API
Our database connection is ready, so we can work on our back end. Every link shortener has two behaviors: shorting links and redirecting them to their proper, full URLs. This means we will need to create two API endpoints, shorten_link and redirect. Let's start with the first one.
We need to create a shorten_link.ts file in the pages/api directory.
$ touch pages/api/shorten_link.ts
And now we need to add the following code:
import { connectToDatabase } from "./_connector";

export default async (req, res) => {
  const db = await connectToDatabase();

  if (req.body !== '' && req.body.link !== undefined && req.body.link !== '') {
    const entry = await db.db('links_db').collection('links_collection').insertOne({ link: req.body.link });

    res.statusCode = 201;
    return res.json({ short_link: `${process.env.VERCEL_URL}/r/${entry.insertedId}` });
  }

  res.statusCode = 409;
  res.json({ error: 'no_link_found', error_description: 'No link found'})
}
Here we've declared an API for making the links shorter. If the link was provided, the system will create a new link in the database. Otherwise, it will return code 409 (Conflict) saying that it didn't find any link to shorten.
Now I am going to try out our new API with Postman. If you don't know how to use Postman, and you want to learn it, you can watch this tutorial from freeCodeCamp. Otherwise, you can skip this section and jump to the next API. It isn't necessary.
We need to select the POST method (1), enter the URL (2), click on the Body tab (3), pass the link (4) and hit the Send button (5). We should get the following response:
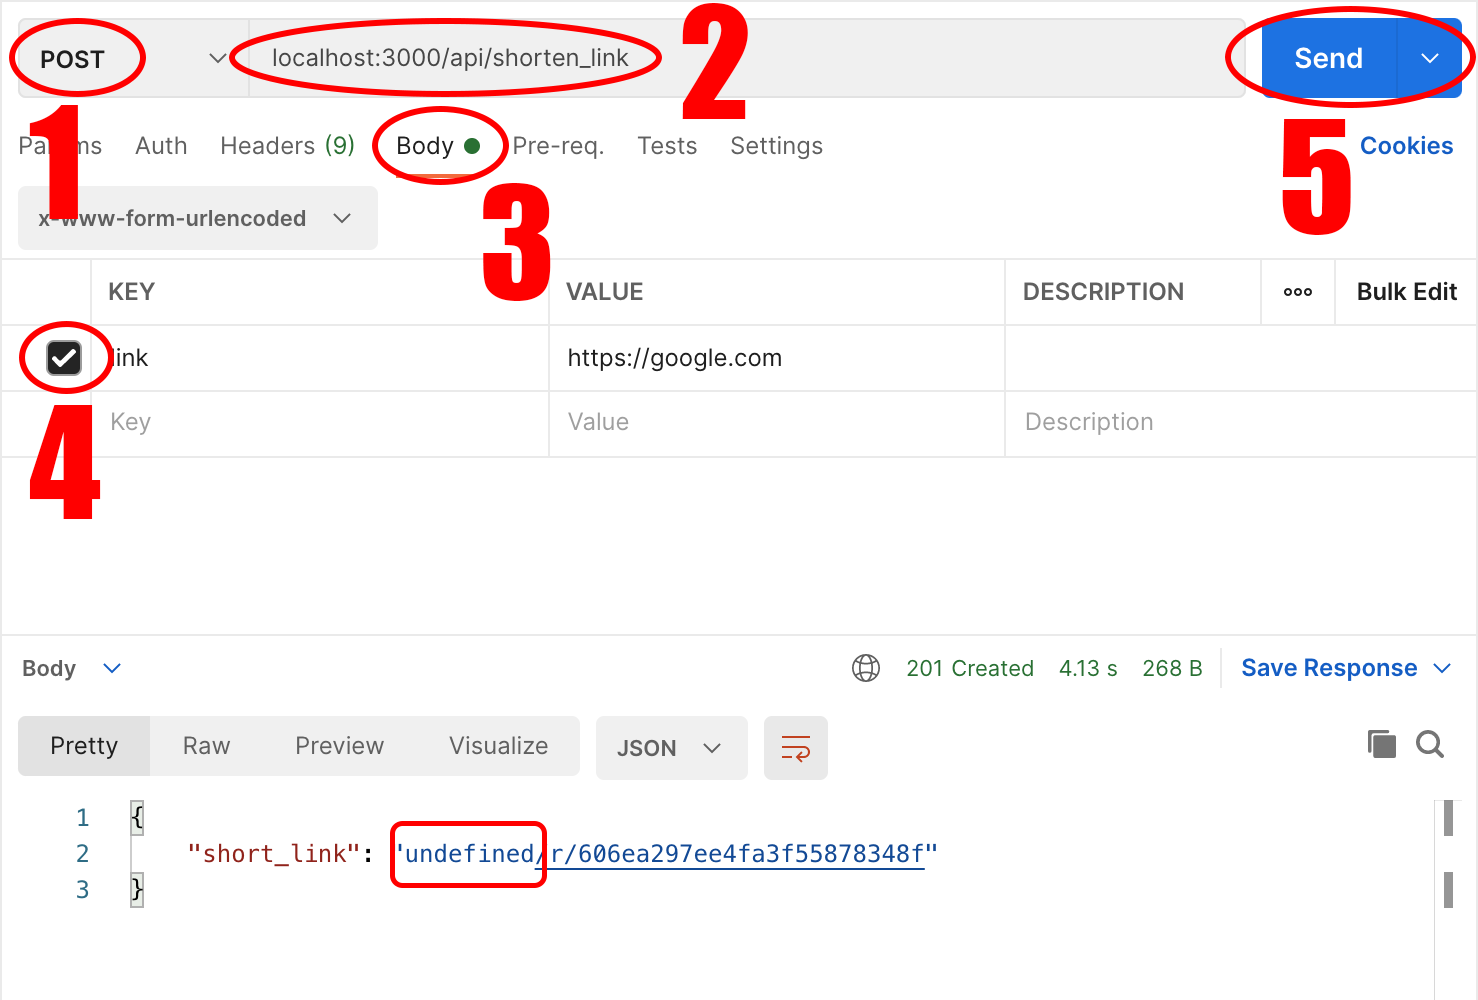
You might've noticed I marked with the red strike the undefined part in the short_link property. As you can see in the code we used the following snippet to generate the short link:
{ short_link: `${process.env.VERCEL_URL}/r/${entry.insertedId}` }
The VERCEL_URL is an environment variable available only on Vercel. It means we need to deploy our app on Vercel, and then it will replace the right value. Next.JS doesn't recognize it by default, so we see undefined in the API response. This is expected at the moment.
You can also try out the frontend of our app – it will also work:
How to Implement Redirects
Since we've already created the first short link, let's prepare redirects from short links to the full URLs.
We need to create a redirect.ts file in the pages/api directory, and we need to paste the following code there:
import { ObjectID } from 'mongodb';
import { connectToDatabase } from "./_connector";

export default async (req, res) => {
  const db = await connectToDatabase();

  const entry = await db.db('links_db').collection('links_collection').findOne({ _id: new ObjectID(req.query.id as string) });

    if (entry !== null) {
        return res.redirect(301, entry.link);
    }

    return res.redirect(301, '/');
}
As you can see, we are trying to find a link by its id in our database. If we find it, we redirect the user to the right location. If the system fails to find it, we will redirect the user to the main page.
I tried to test this endpoint with Postman. Unfortunately, the response doesn't look good – I could see the HTML code of the website rather than the redirect, so I decided to skip this part. We are going to deploy it soon anyway, so we can test it in the proper environment.
How to Rewrite our URLs
Before we can deploy our application to Vercel, we need to do something about our redirect link. Currently, if we want to redirect to the full link, our users need to paste the following link:
localhost:3000/api/redirect?id=606f512cbb6d7306eb5df189
This doesn't look good, and it's longer than the most of links our users would like to shorten. I think we should follow this pattern:
localhost:3000/r/606f512cbb6d7306eb5df189
It is shorter, and a bit cleaner. It's still not perfect but good enough for our example. If you want you can modify the code to support aliases or any other way of generating the short links.
We need to create a vercel.json file, and paste the following definition there:
{
    "rewrites": [{ "source": "/r/:id", "destination": "/api/redirect?id=:id" }]
}
This configuration tells our hosting provider that the server must rewrite all URLs starting with /r to /api/redirect?id=.
Now the code and configuration of our application is finished. If you want to deploy it to Vercel you need to push it into the GitHub repository. As I mentioned at the beginning of the article, I skipped this section here – just make sure you do it before continuing.
How to Deploy the Application to Vercel
Once our application is ready, we need to publish it so that users can shorten their links using our service. We are going to deploy our app to Vercel, because they offer free hosting for serverless apps, and their developer experience is just amazing.
As usual, I am going to skip the process of creating a new account. You can create one with one click using your GitHub or Google account.
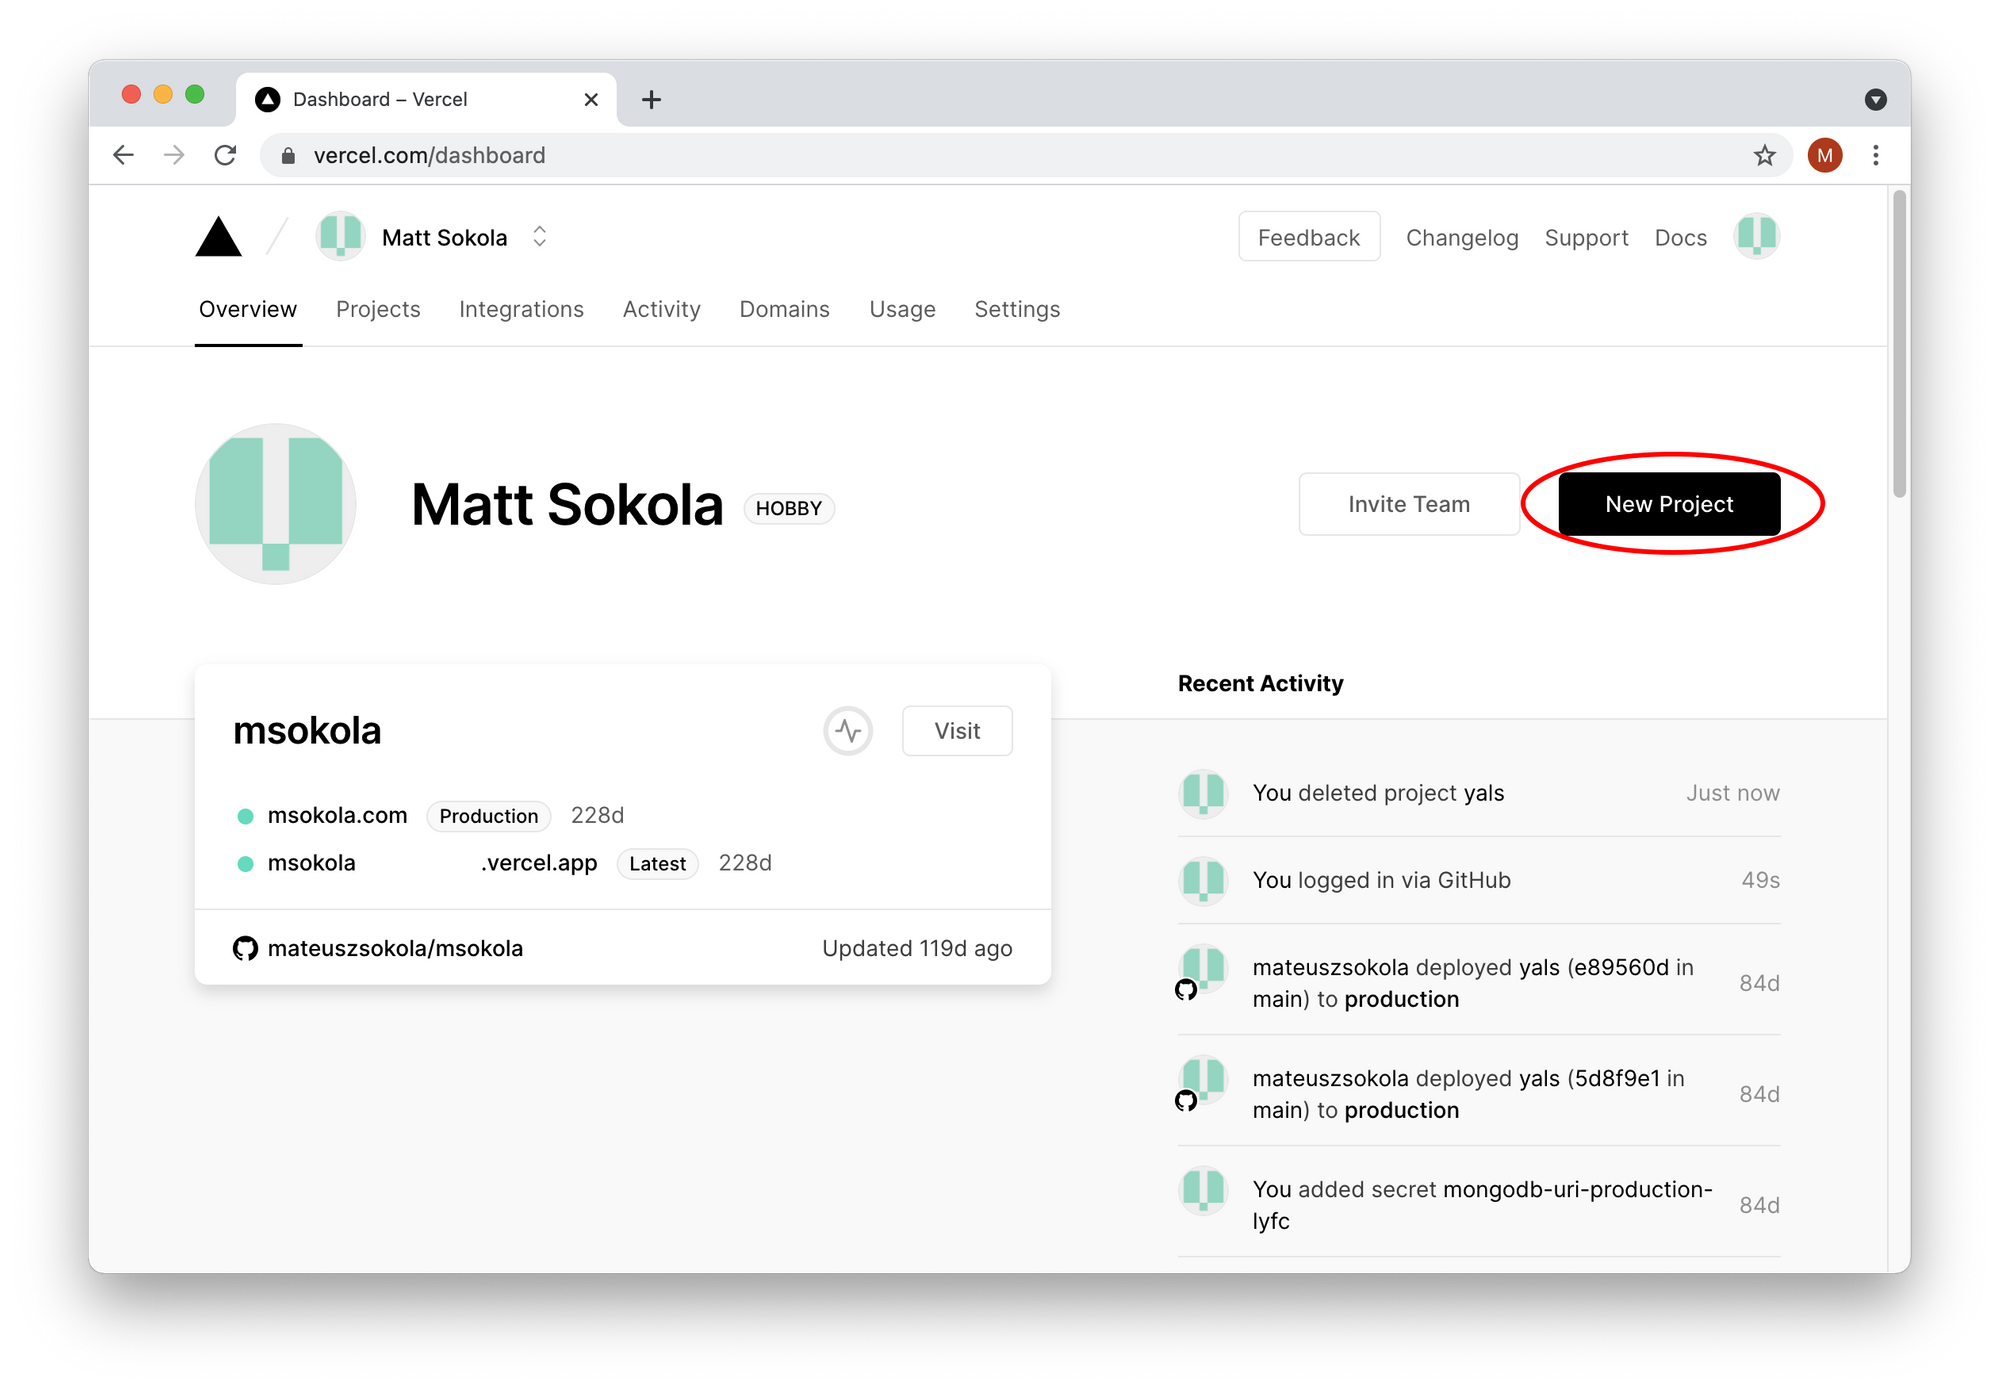
Once you've signed up, you should see this screen. Click on the "New Project" button:
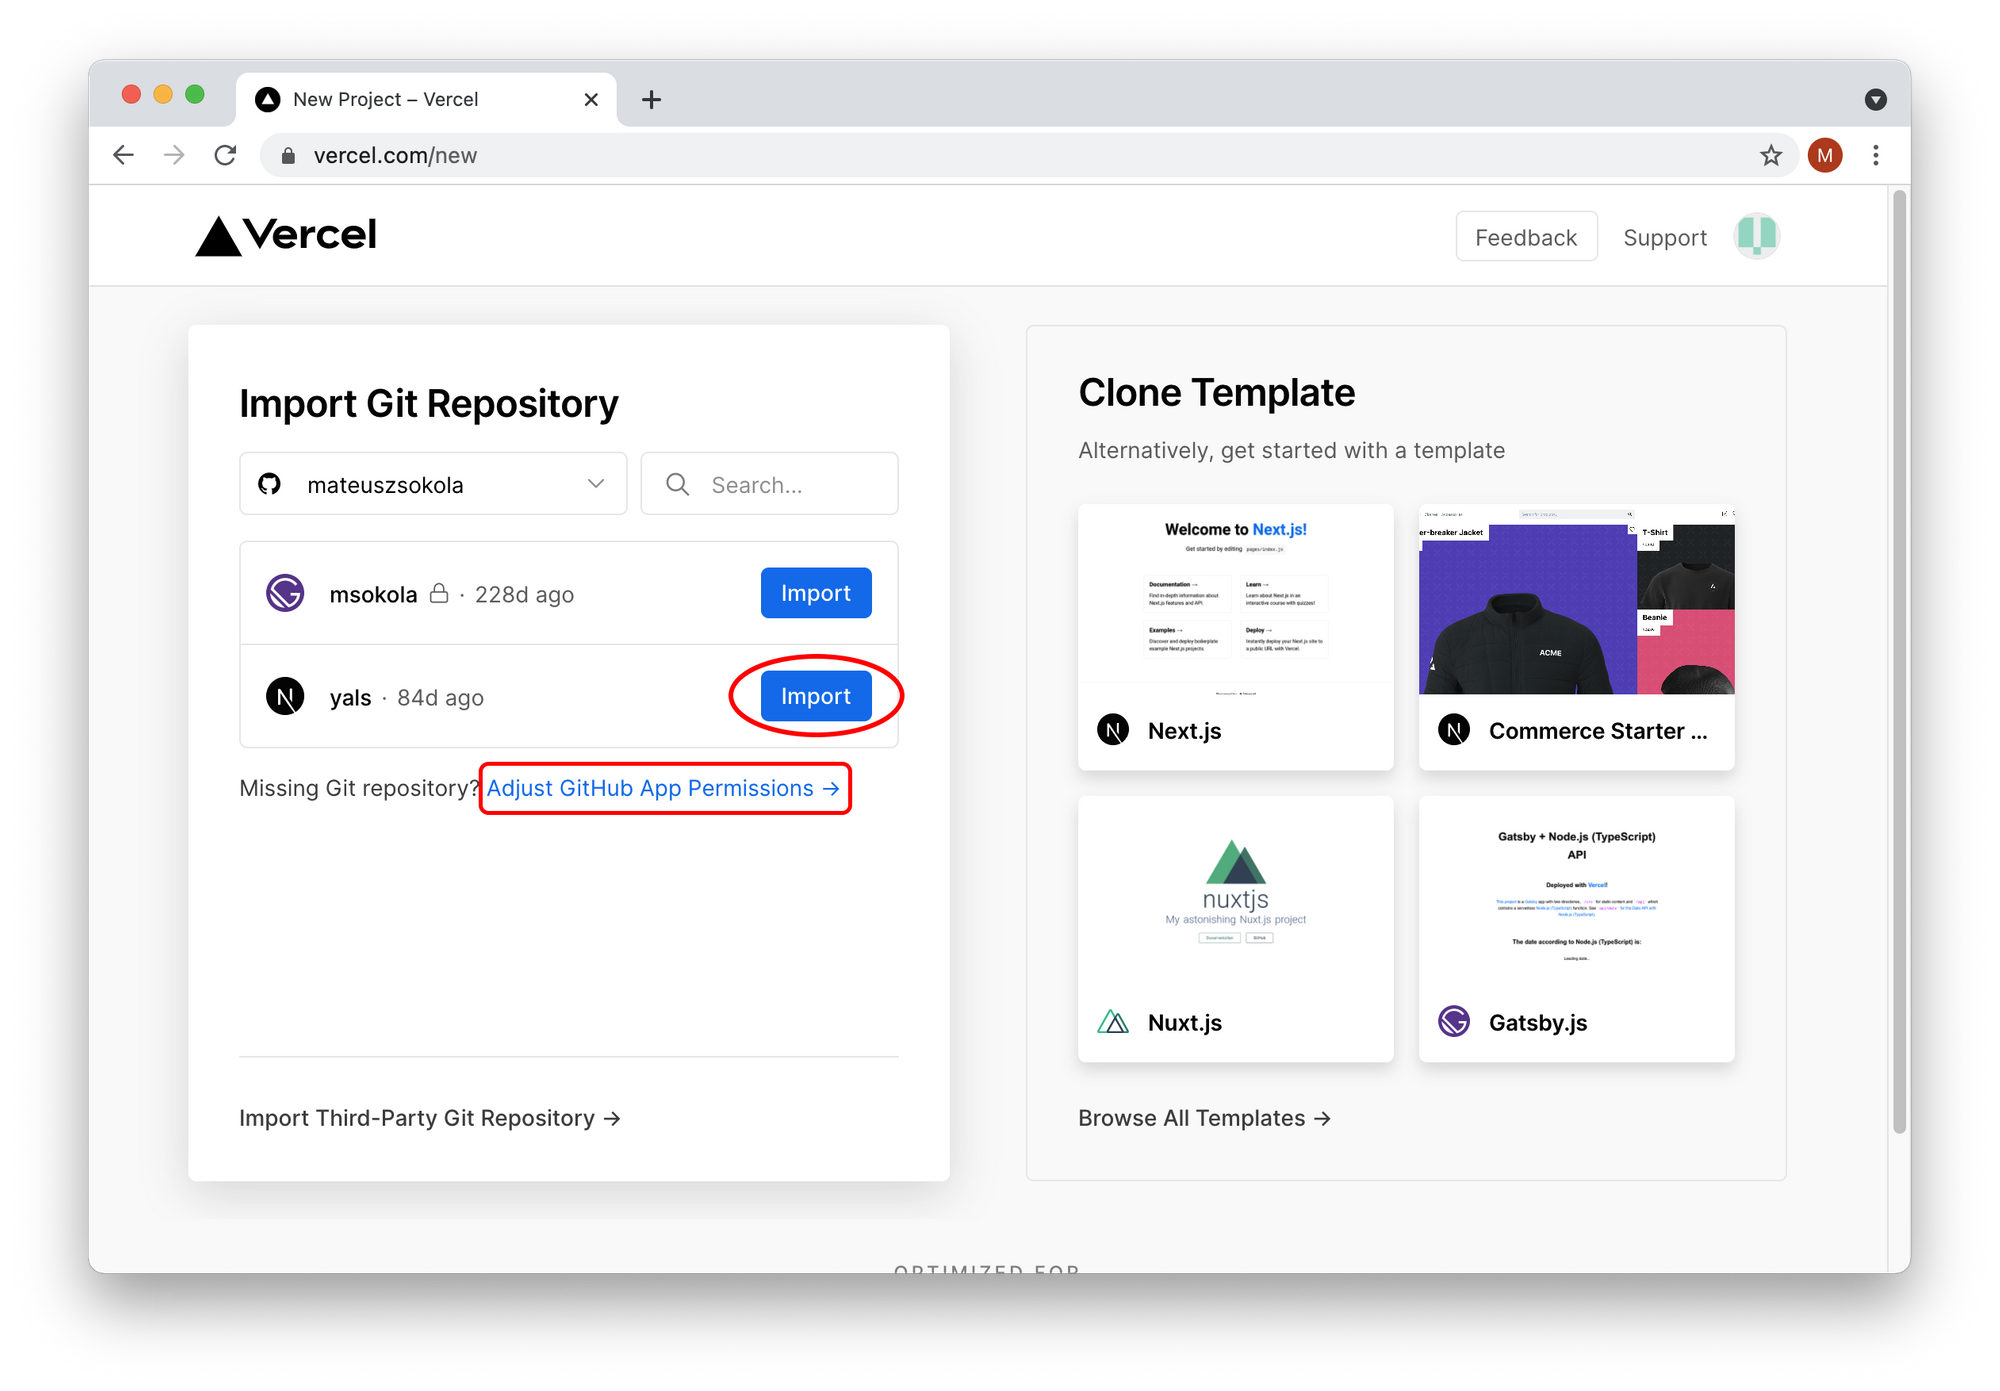
Now you need to select the GitHub repository you want to import. In my case, it is "yals", but you might've called it something else. If you don't see your repository, you need to click on "Adjust GitHub App Permission" (the link below marked with the red rectangle):
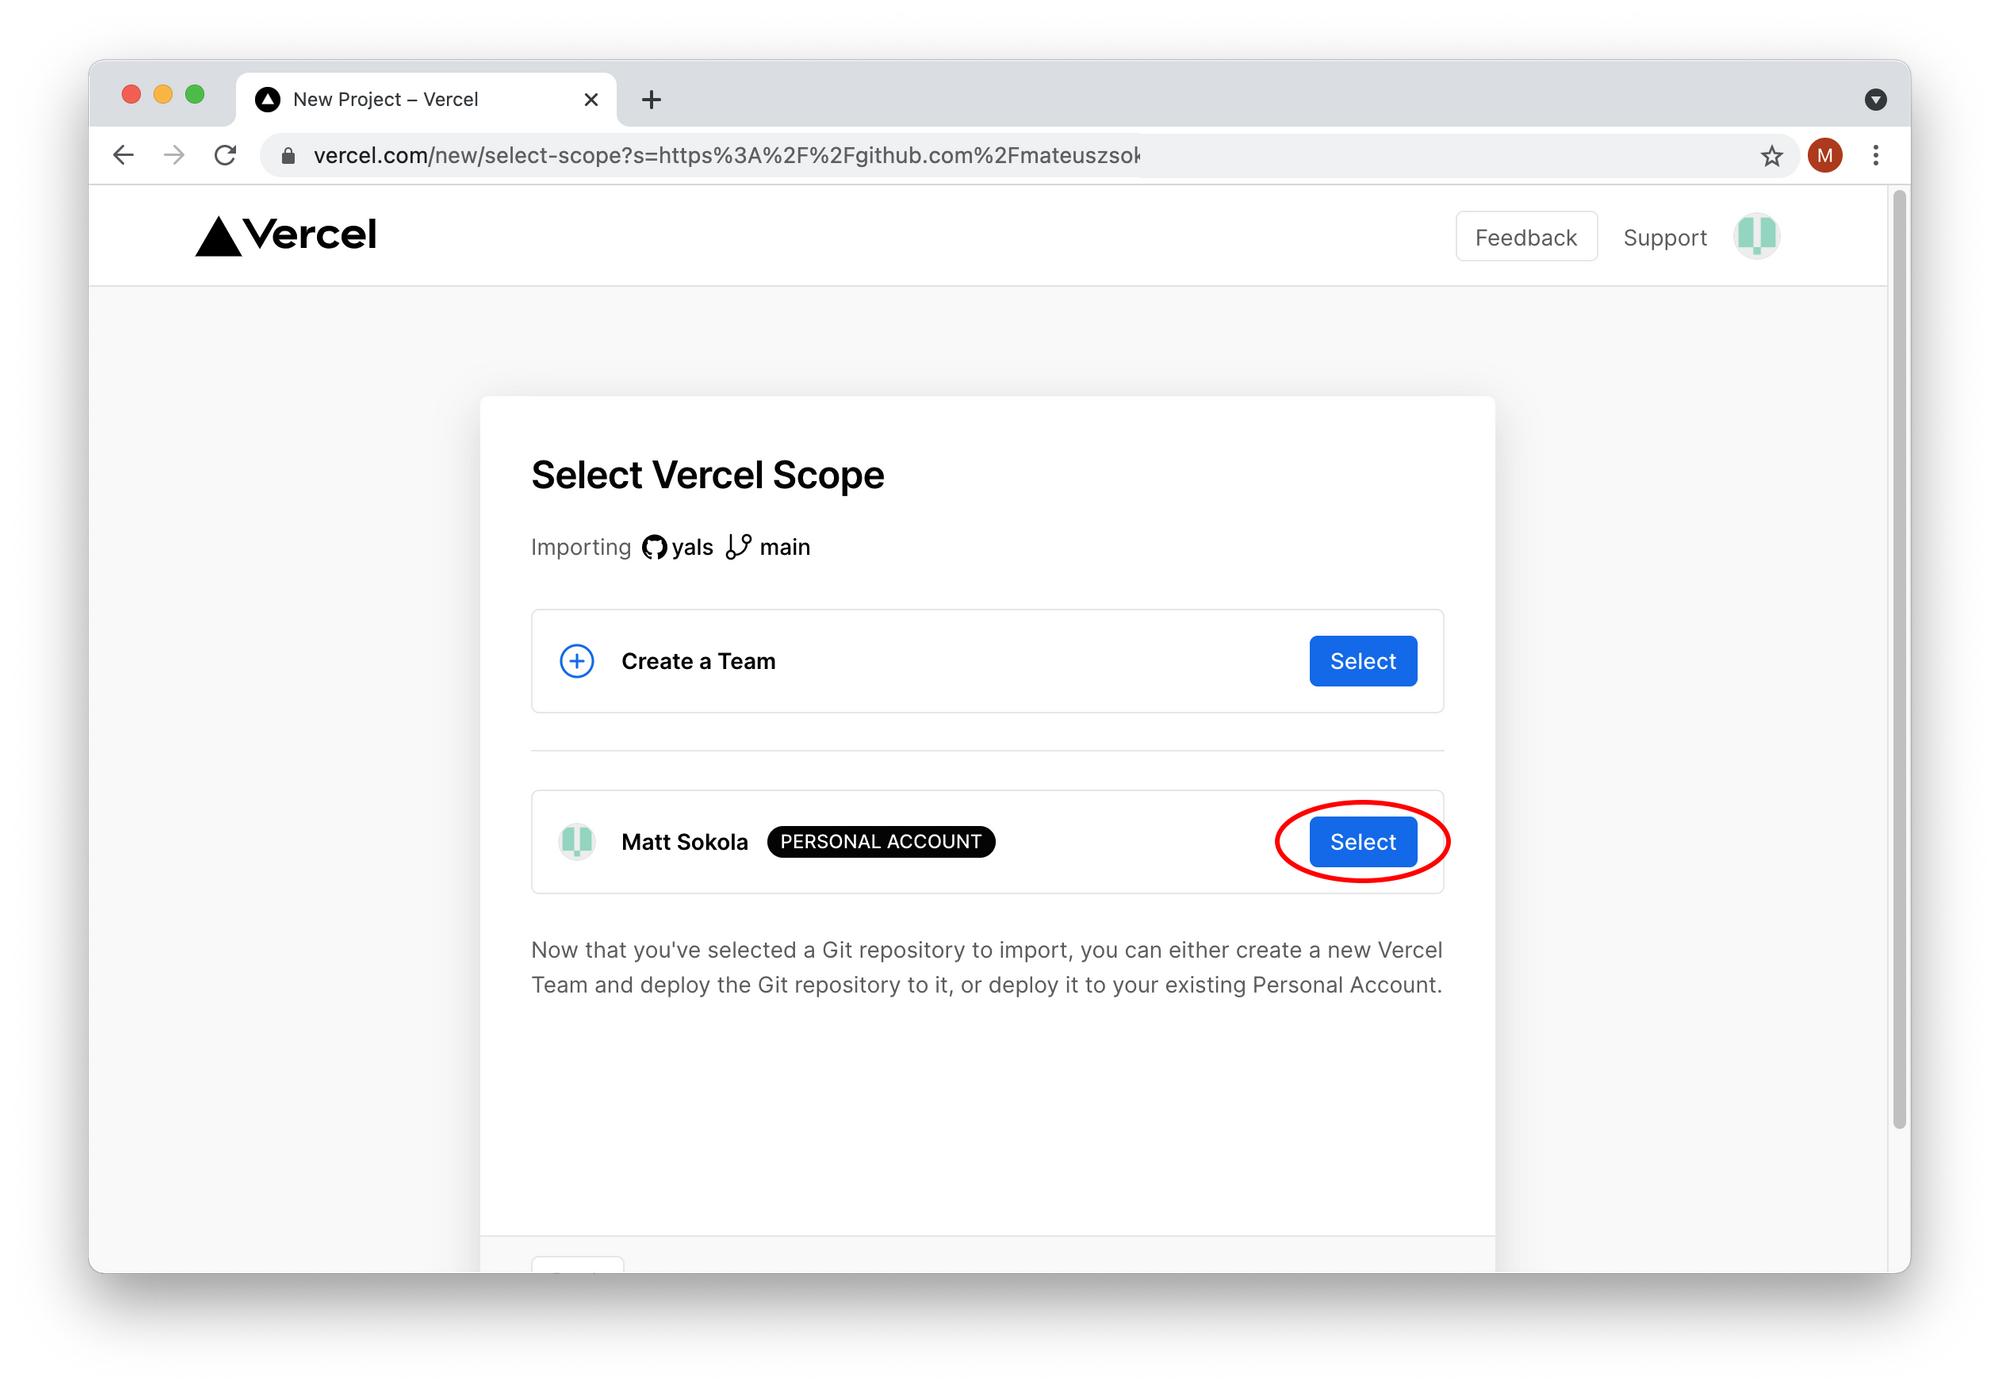
In the next step, we need to select if we are using a team repository or an individual account. In our case, it is an individual account:
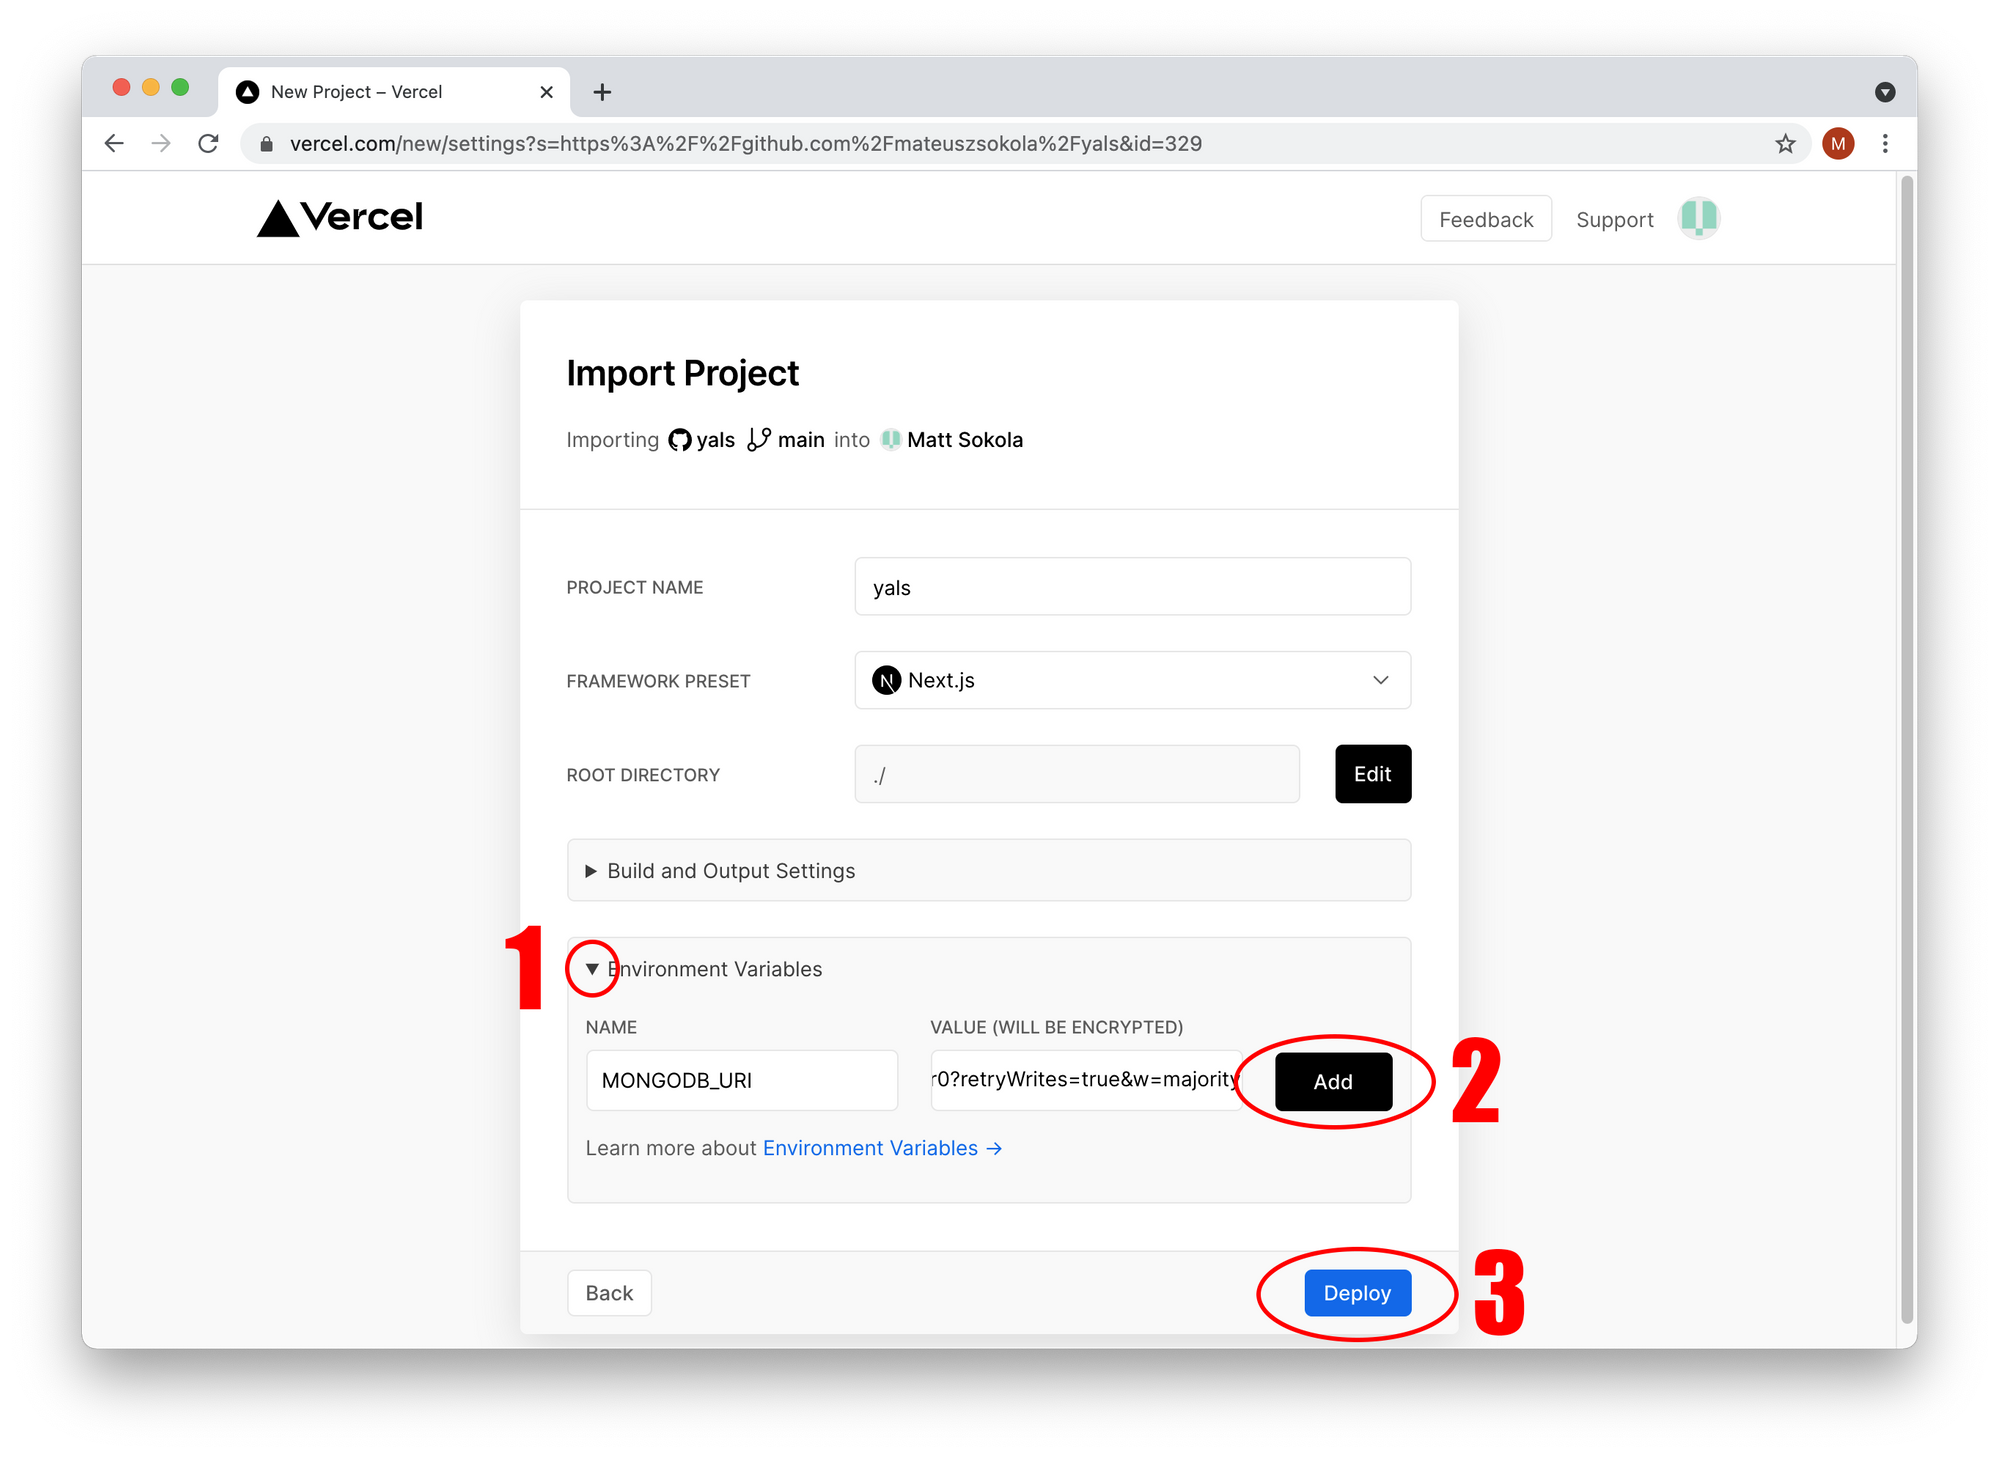
Now we need to configure the project. Let's open "Environment Variables", paste your connection string to MONGODB_URI, click on the "Add" button, and hit "Deploy":
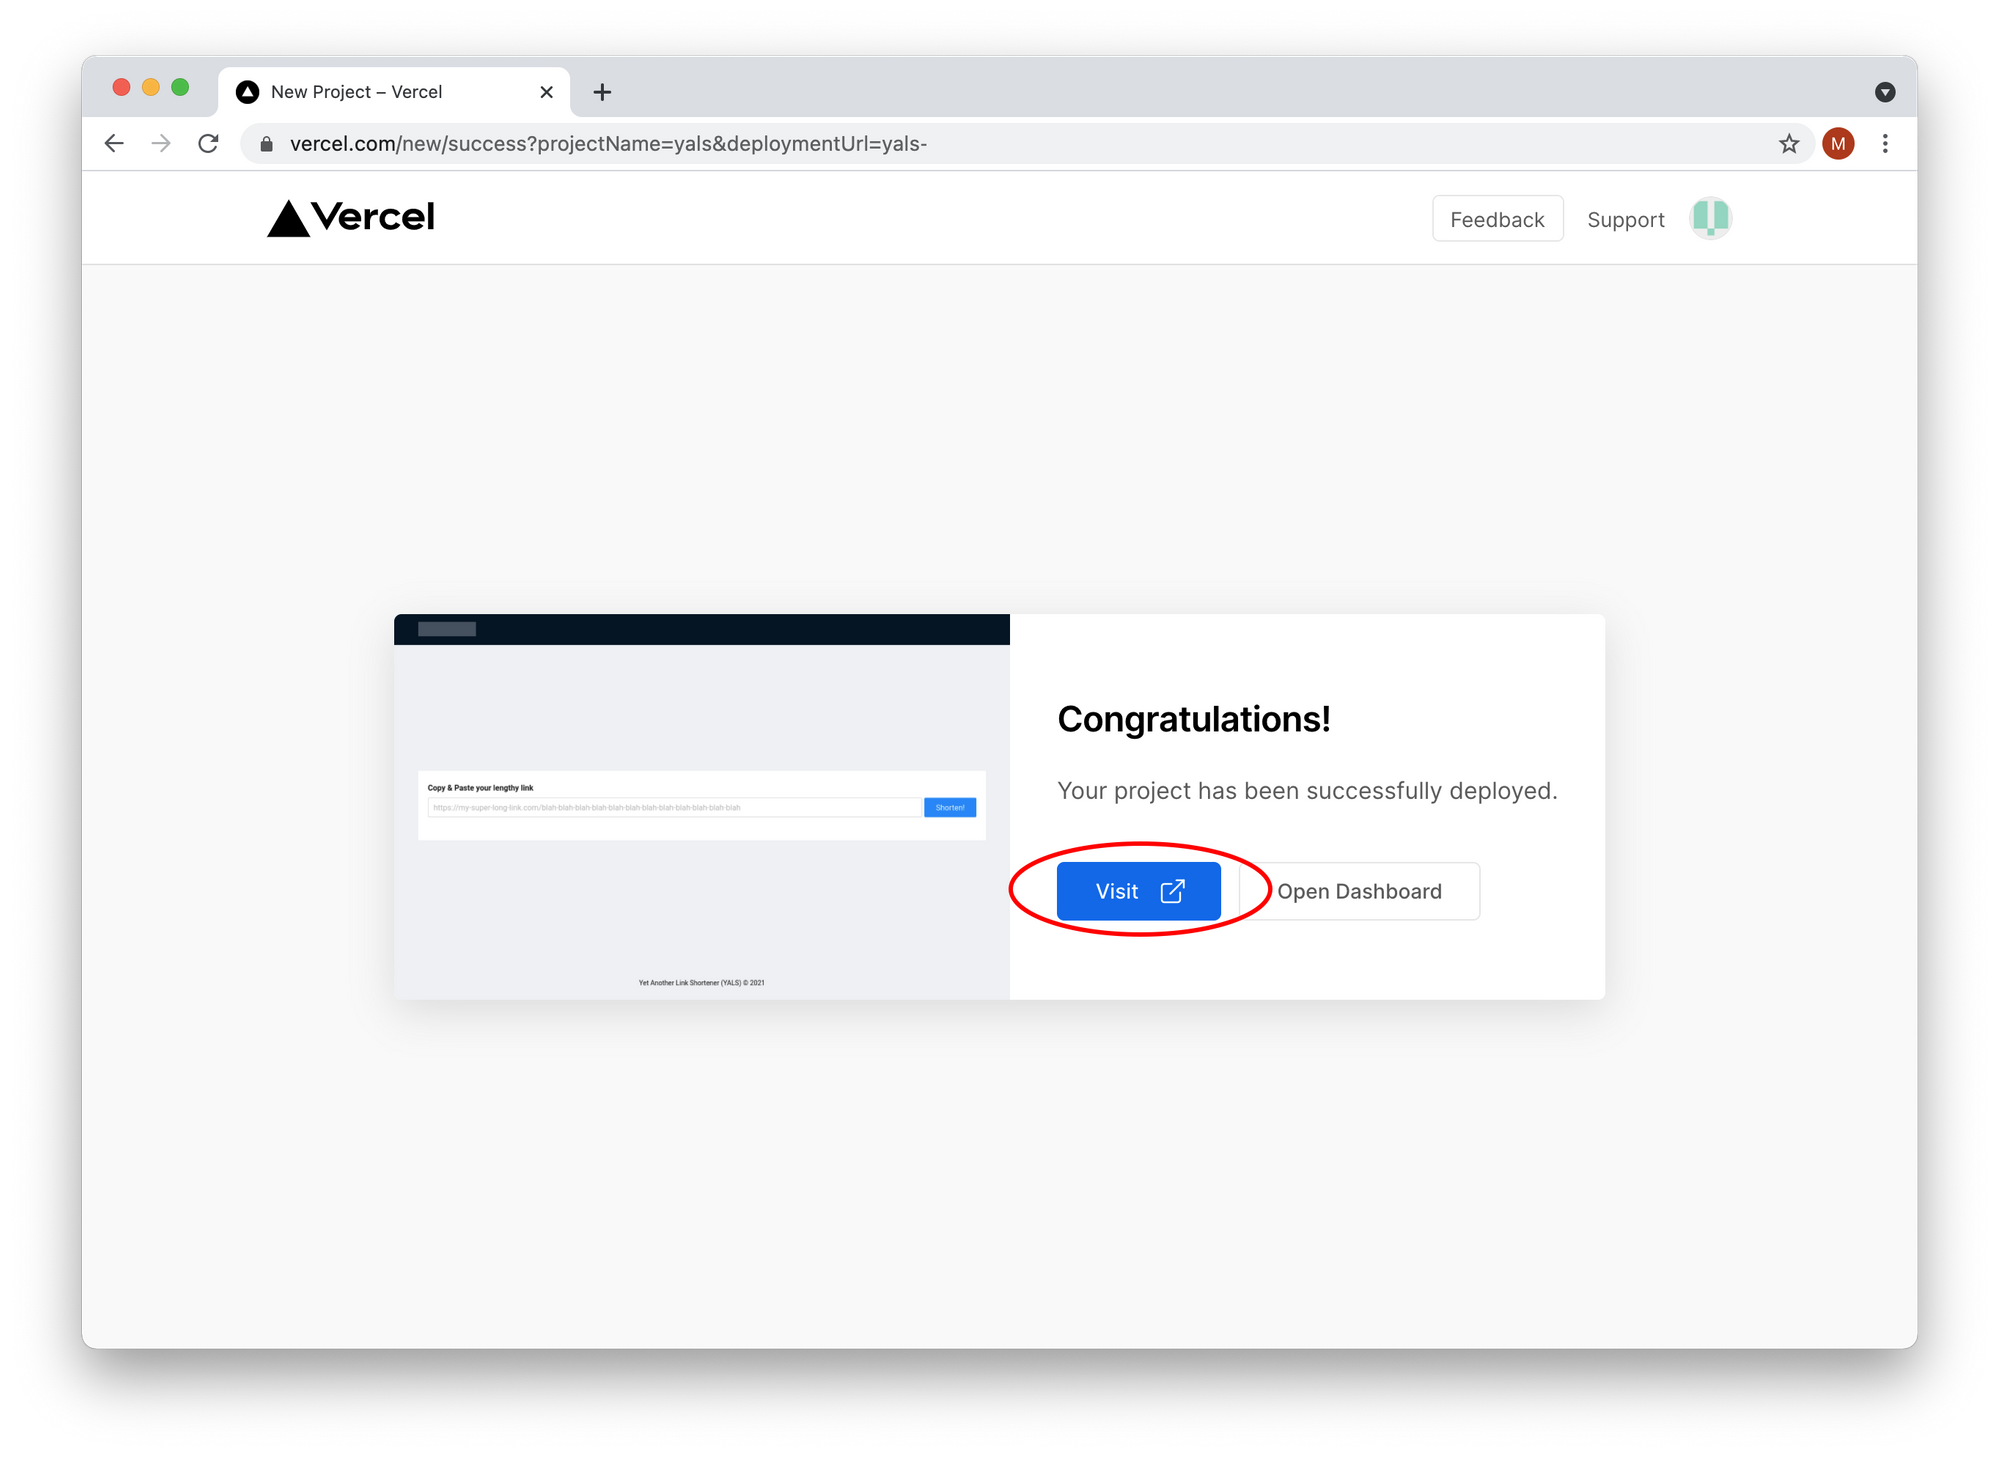
Our application is being deployed now. You should see the following screen once done. Just click on the "Visit" button:
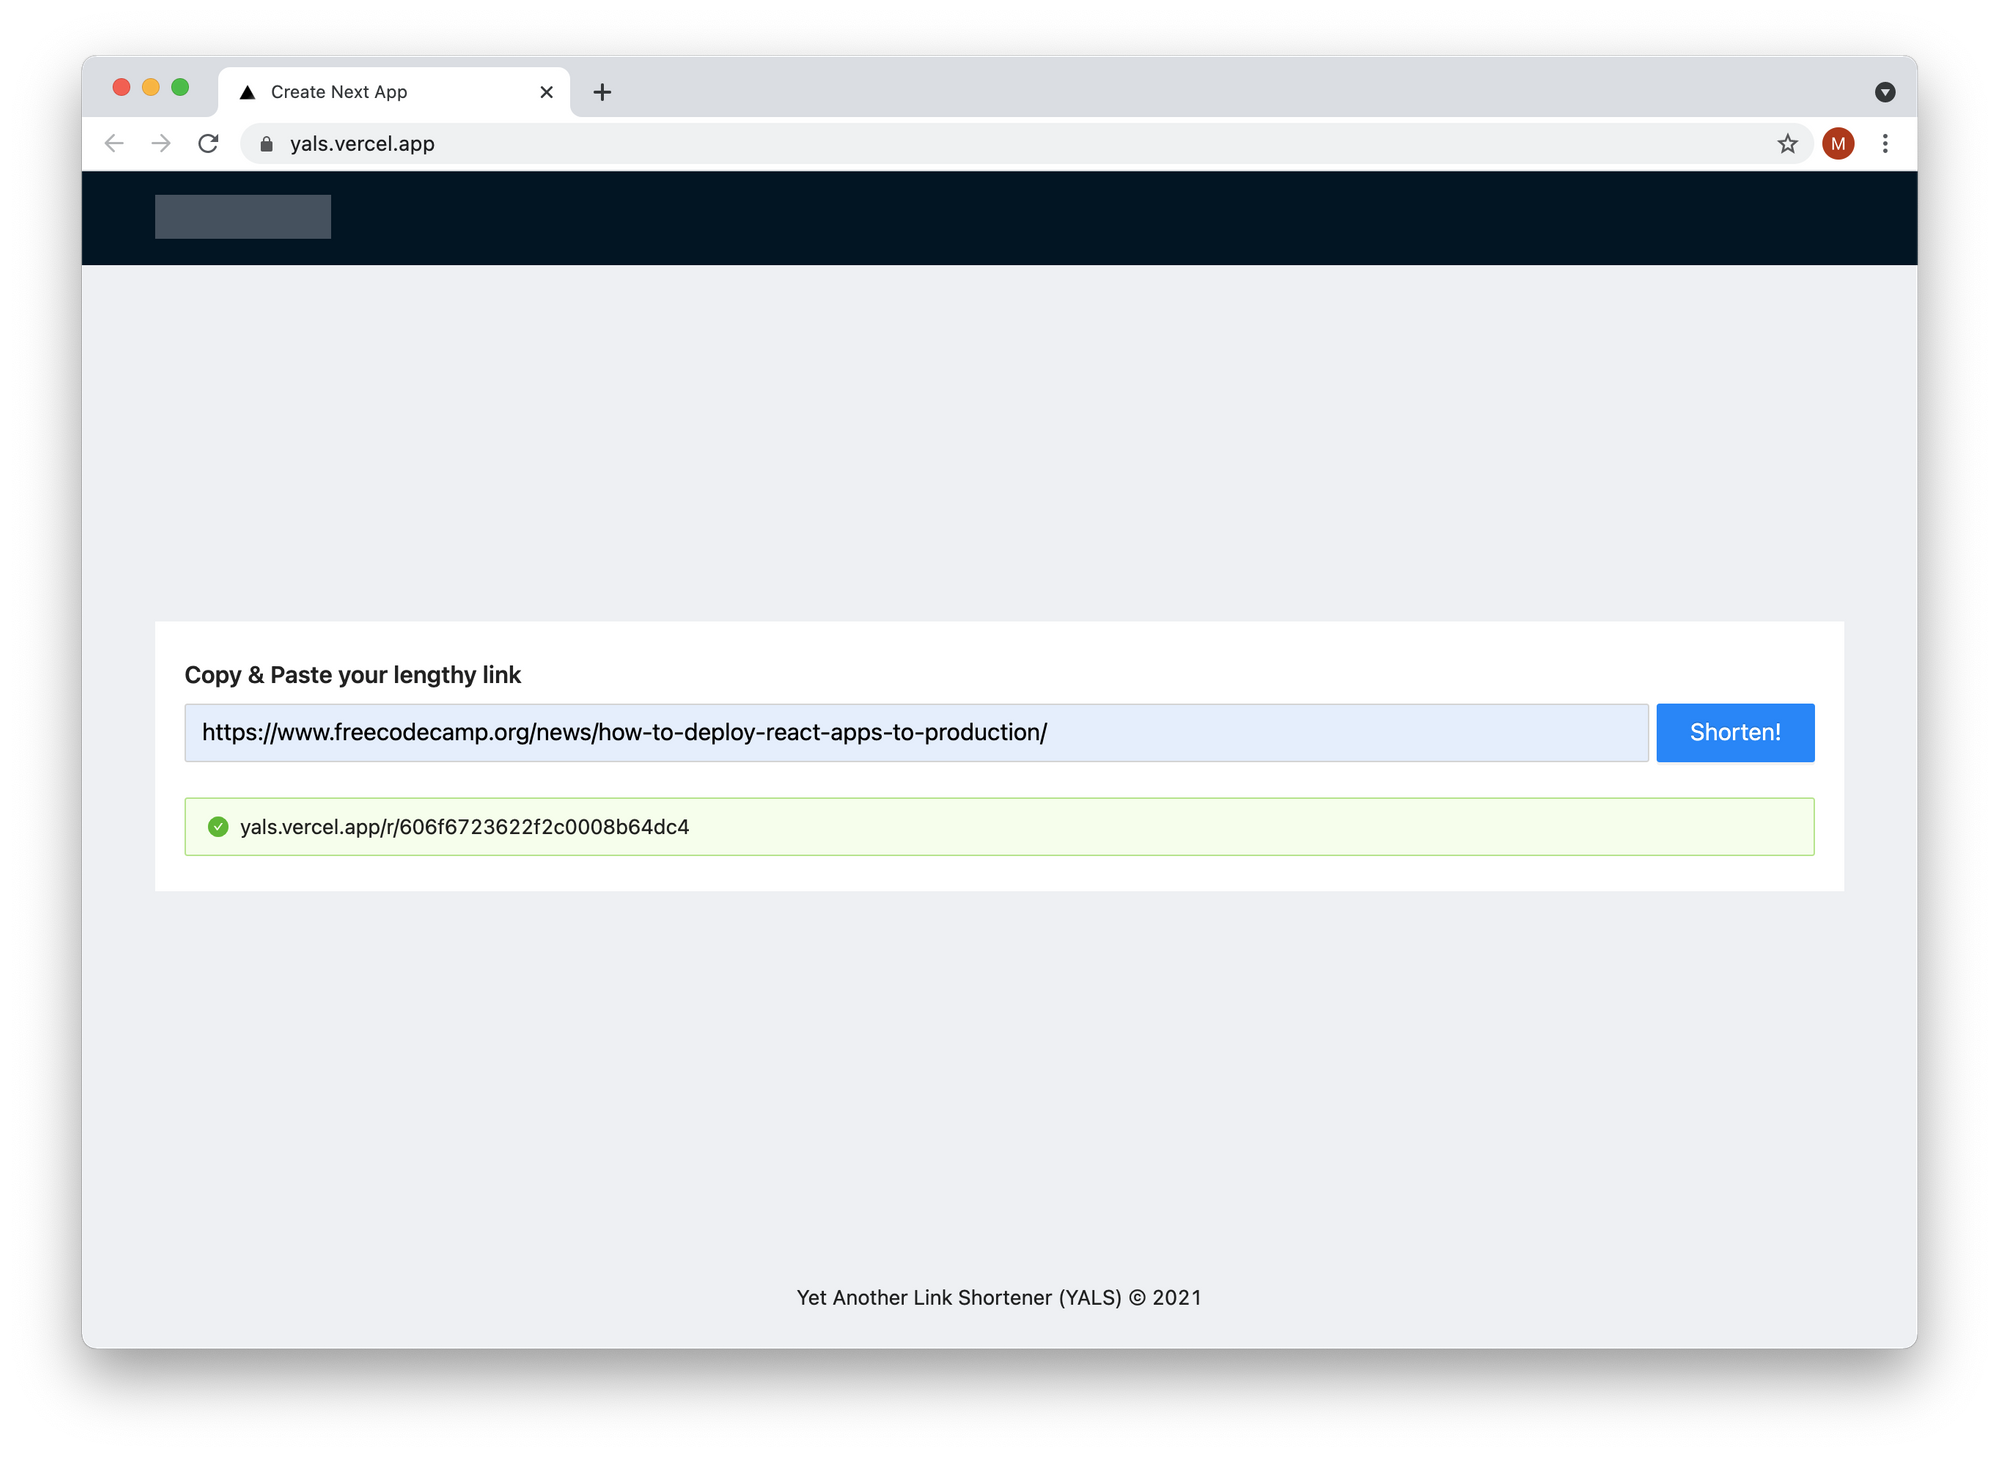
Let's test the application by pasting any long link into the form. I used a link to the article I wrote for freeCodeCamp some time ago, and this is what I received:
- Before:
https://www.freecodecamp.org/news/how-to-deploy-react-apps-to-production/. - After:
https://yals.vercel.app/r/606f6723622f2c0008b64dc4.
Summary
Congratulations! You've built a fully functional serverless application, and you are ready to share it to your friends.
I understand that link aliases aren't the shortest and the most readable. So as always, you can improve the project on your own, and show us yet another way of doing it. You can share it on the freeCodeCamp forum or in the comment section of YouTube videos below.
I created a YouTube tutorial where you can watch me writing every single line of the code. It takes about 90 minutes to watch it.
Keep in mind that this is my very first YouTube tutorial, and it isn't perfect. I don't have experience of working with the camera, or with recording a screencast. I tried to make every video better than the previous one.
If you find these videos useful I would appreciate if you click the like button and subscribe. I am going to publish some videos about how to keep your JavaScript code clean.
All episodes:
- Configure Next.JS + React + TypeScript.
- Prepare a Layout For React App Using Ant Design.
- Let's Style the Form.
- Form Validation With Ant React Components.
- Let's Code the First API.
- Storing Data In MongoDB Using Next.JS.
- Hooking the API With React App.
- Redirects With Next.JS.
- Deploying Serverless App to Vercel.
You can find all the code in this GitHub repository: https://github.com/mateuszsokola/react-to-aws
You can DM me on Twitter: @msokola
That is all folks! I hope you liked it and have a great day :)