
By Shane Duggan
Have you ever wanted to create your own game to share with others on your website? In this article, we'll be learning how to code a simple game using HTML, CSS, and JavaScript, and then host it on your website.
The game we'll be coding is a classic word-guessing game – Melting Snowman!
HTML, CSS, and JavaScript are some of the most classic languages for web development. There’s a certain charm and simplicity that comes with the old-school building blocks, coupled with the fact that it's relatively simple for beginners to learn and get it up on a hosted website, which inspired this tutorial.
Using these beginner-friendly web development languages to code the game, we'll walk through each step of the process. Whether you're new to coding or a seasoned developer, you'll be able to follow along and create your own version of Melting Snowman.
Plus, including projects in your résumé when applying for a software or programming role can be a great way to boost your chances of landing a job.
Once we've created the game, we'll learn how to host it on a simple HTML page or a website builder such as WordPress. By the end of this article, you'll have a fun and interactive game to share with your website visitors. Hosted on my website, it looks something like this:
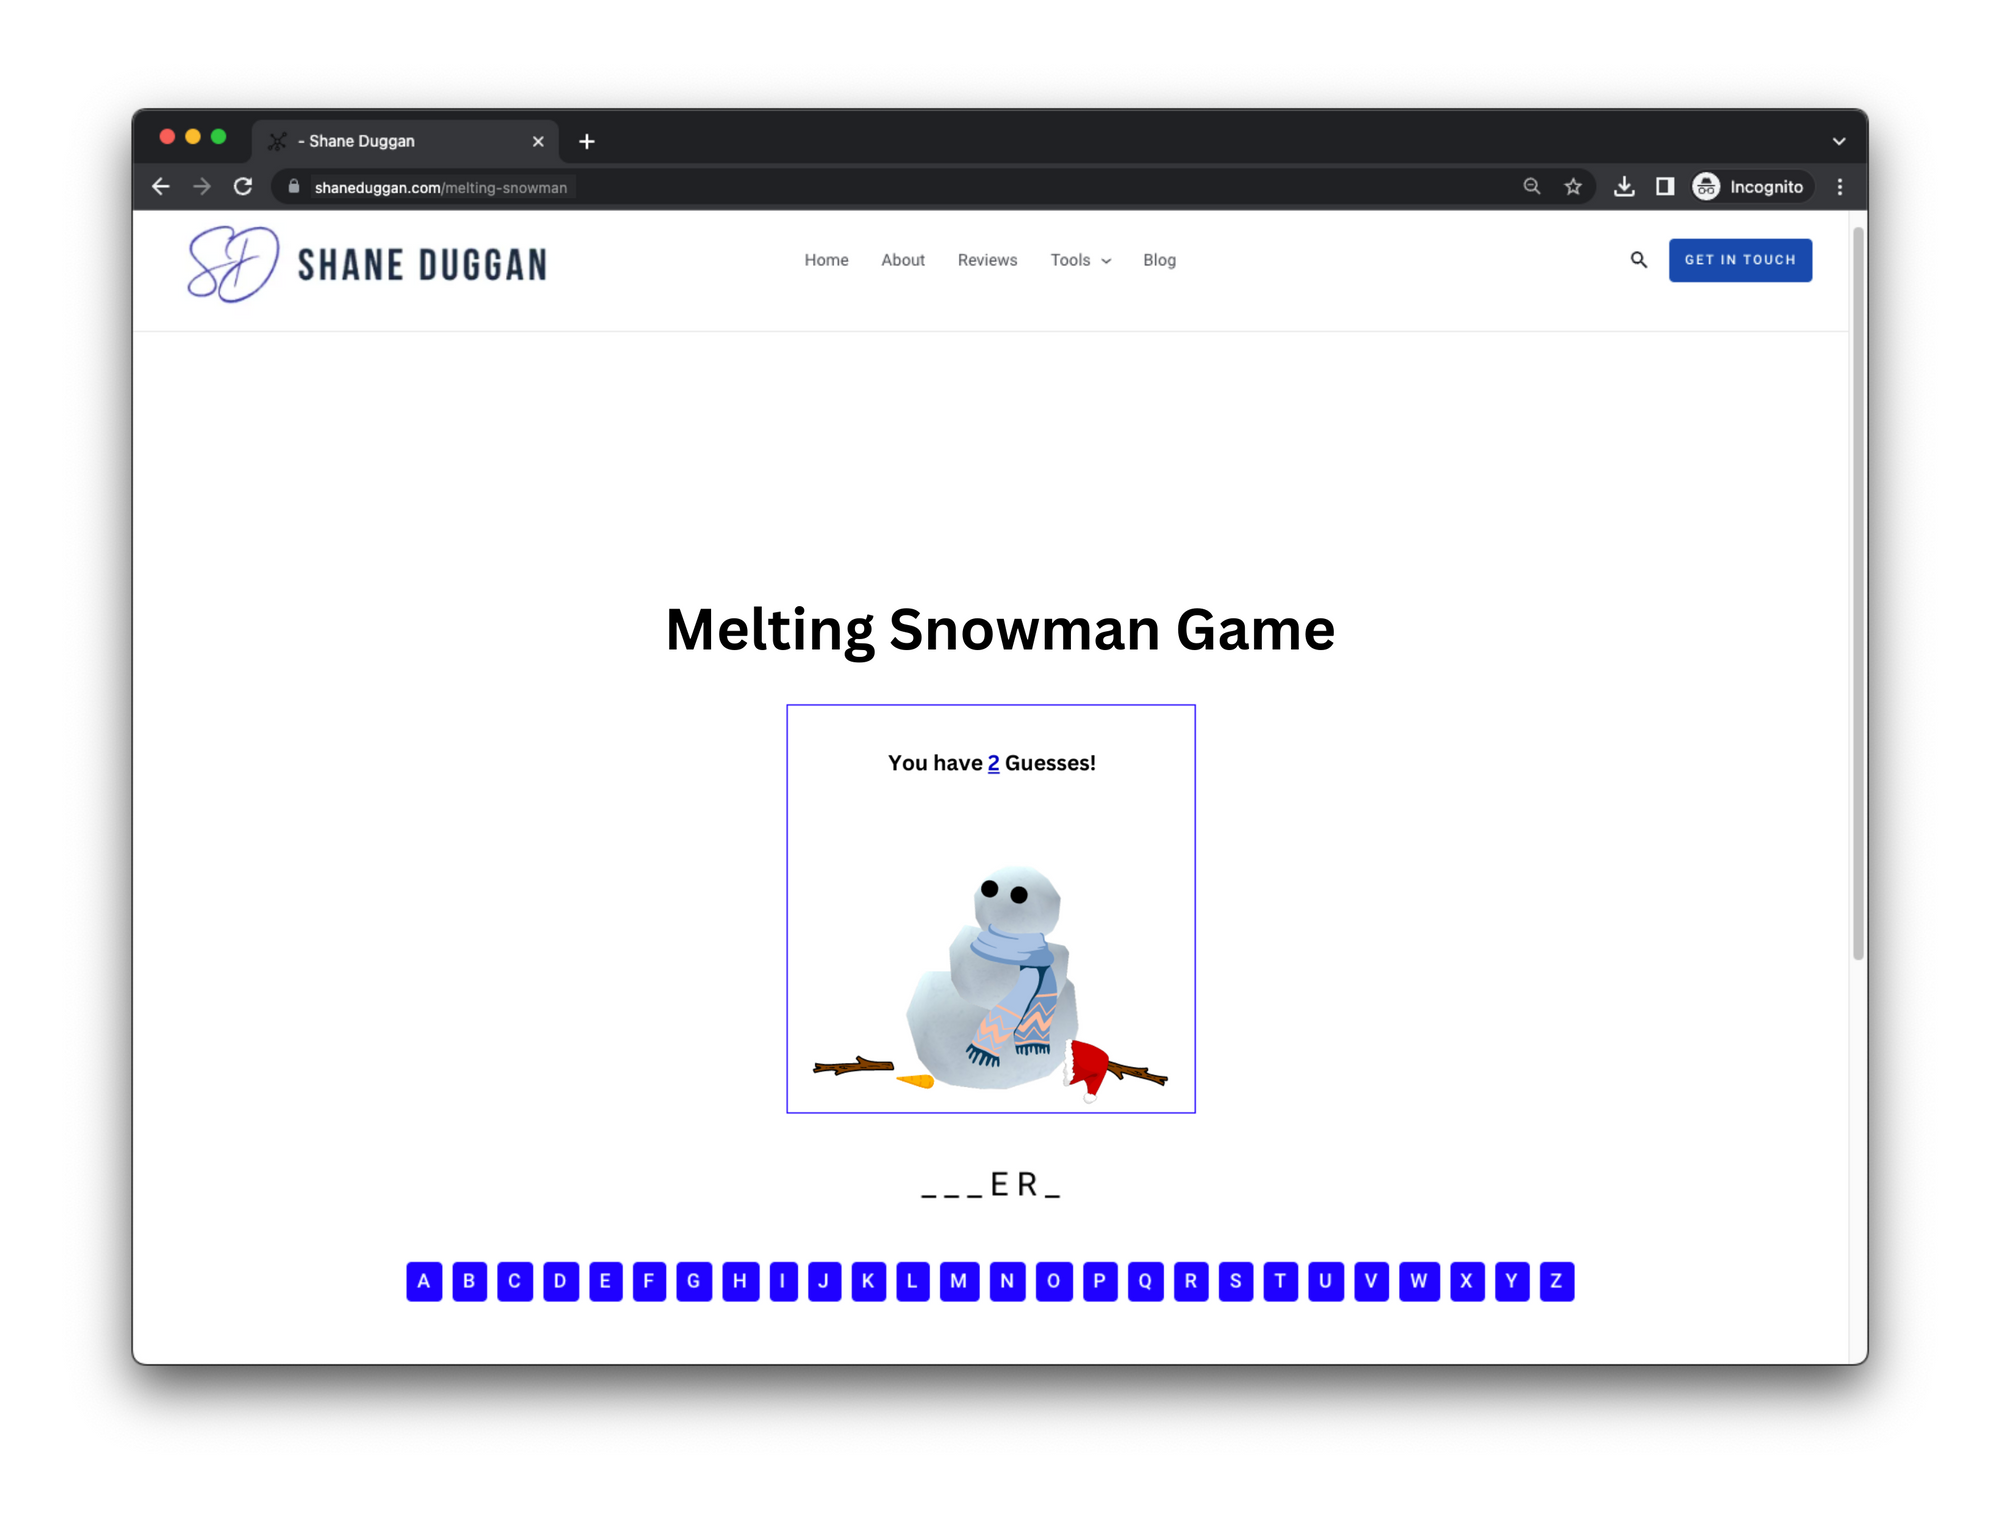 (The game we'll be making today)
Let's get started and learn how to code and host Melting Snowman on your website!
Planning and Preparation
Before commencing with the coding of your Melting Snowman game, it is crucial to engage in planning and preparation.
This process involves choosing a programming language and development environment, collecting the necessary resources and tools required for coding the game, and determining the game's features and functionalities.
How to choose a programming language and development environment
Melting Snowman can be coded in many programming languages, including Python, Java, C++, and JavaScript. As mentioned, for this simple guide, we will code the game using HTML, CSS, and JavaScript, the popular web development languages.
Doing so will also allow you to easily host your game on a variety of websites, including those of you who have websites created with no-code tools such as WordPress and Wix. With those, a simple plugin will allow you to easily host your game with minimal setup.
Aside from selecting a programming language, you'll also need to choose a development environment to write and test your code. Various popular options include Visual Studio Code, Sublime Text, and Atom.
These development environments are available for free download and offer features such as syntax highlighting, code completion, and debugging tools.
How to gather resources and tools needed to code the game
To efficiently code and host your Melting Snowman game, you'll need to assemble various resources and tools, including:
- A text editor or integrated development environment (IDE) to write your code
- A web browser to test your game
- Images to use as the Melting Snowman graphics
- Access to a web hosting service to host your game online
How to choose the features and functionalities of the game
Before embarking on the coding process, you should decide on the features and functionalities of your Melting Snowman game. Some possible things to think about could include:
- The number of permissible guesses
- The inclusion of a timer option
- The inclusion of a hint button option
- The ability to select different word categories (for example animals, movies, sports)
- The ability to keep score and track high scores
Once you've decided on the features and functionalities of your game, you can start coding the Melting Snowman game with HTML, CSS, and JavaScript.
The 5 Steps to Coding a Game of Melting Snowman
Now we’ve reached the fun part - coding! The process of game development is often long and arduous. But for this mini project, I have broken it all down into 5 simple steps. These will have you with your Melting Snowman game running in no time. They are:
- Creating the HTML structure for the game
- Adding the CSS styling to make the game look visually appealing
- Writing the JavaScript code to implement the game logic and functionality
- Adding interactivity and animations
- Testing and debugging
Let’s look at each of these steps in detail. Feel free to follow along and make any creative changes that you think of along the way.
How to Create the HTML Structure for the Game
To begin creating the Melting Snowman game, you need to initiate a new text document and reserve it with the ".html" file extension. Embed the fundamental HTML5 structure into the document, typically consisting of these fields:
<!DOCTYPE html>
<html>
<head>
  <meta charset="UTF-8">
  <title>Melting Snowman Game</title>
  <link rel="stylesheet" href="style.css">
</head>
<body>
</body>
</html>
You can see that for this configuration, the HTML file is linked to a "style.css" stylesheet that we'll deal with in a bit.
After setting up the <head> section, you'll create a <body> section that will contain the content of the webpage. There can be many sections here, such as an instructions paragraph that teaches users how to play the game. This is a simple addition, and can be churned out easily with AI. Although, since we will be hosting this on your website, be sure to check it for AI content against possible penalizations.
Inside the <body> section, create a <div> with a class attribute of "container". This will be the main container for the game.
Within the container, create an <h1> element with the text "Melting Snowman Game" as the title of the game. Below the title, create another <div> with a class attribute of "Melting Snowman". This will be where the visual representation of the Melting Snowman will be generated dynamically using JavaScript.
Next, create a <div> with a class attribute of "word". This will be where the current word to be guessed is displayed, and it will also be dynamically generated using JavaScript. Create another <div> with a class attribute of "letters" where the letters that have been guessed will be displayed. This, too, will be generated dynamically using JavaScript.
Finally, create one more <div> with a class attribute of "message". This is where the win/lose message will be displayed at the end of the game. With these HTML elements in place, you can now move on to styling the game with CSS and implementing its functionality with JavaScript. Here's what that all looks like:
<div class="container">
    <h1>Melting Snowman Game</h1>
    <div class="Melting Snowman">
      <!-- The Melting Snowman graphic will be dynamically generated using JavaScript -->
    </div>
    <div class="word">
      <!-- The current word will be dynamically generated using JavaScript -->
    </div>
    <div class="letters">
      <!-- The letters will be dynamically generated using JavaScript -->
    </div>
    <div class="message">
      <!-- The win/lose message will be dynamically generated using JavaScript -->
    </div>
  </div>
Similar to the stylesheet, the "MeltingSnowman.js" file will be linked to the JavaScript file to handle the game's functionality in the future.
If you have been following along with these guidelines, the rudimentary HTML structure for the Melting Snowman game is good to go. Following this, we can incorporate some CSS styling to enhance the game's visual appeal.
To sum up, here is the final complete HTML file snippet that we've created until this point:
<!DOCTYPE html>
<html>
<head>
  <meta charset="UTF-8">
  <title>Melting Snowman Game</title>
  <link rel="stylesheet" href="style.css">
</head>
<body>
  <div class="container">
    <h1>Melting Snowman Game</h1>
    <div class="Melting Snowman">
      <!-- The Melting Snowman graphic will be dynamically generated using JavaScript -->
    </div>
    <div class="word">
      <!-- The current word will be dynamically generated using JavaScript -->
    </div>
    <div class="letters">
      <!-- The letters will be dynamically generated using JavaScript -->
    </div>
    <div class="message">
      <!-- The win/lose message will be dynamically generated using JavaScript -->
    </div>
  </div>

  <script src="MeltingSnowman.js"></script>
</body>
</html>
How to Add the CSS Styling to Make the Game Look Visually Appealing
To aesthetically improve the Melting Snowman game, we will use CSS to style the HTML components. Our initial step is to construct a grid design for the game board by utilizing the CSS display attribute. We'll set the "container" category to exhibit as a flex container and center its contents.
Afterward, we will build a "Melting Snowman" classification that establishes the width and height of the game board, adds a perimeter, and centers its contents.
Following that, we will tailor the word to be guessed and the letters that have been used. We will apply the "word" classification to specify the font size and center the content.
For the "letters" classification, we will add margins and use flex-wrap to ensure that the buttons are systematically arranged in rows. We will also create a button style for the letter buttons, specifying a margin, padding, and background color.
Ultimately, we will insert a "message" classification to style the victory/defeat message. We will specify the font size and center the content using Flexbox. This CSS will help make the game visually appealing and user-friendly.
Keep in mind here that the images of Melting Snowman himself will be created with image files, not through code. I will explain that in the following steps.
If you don't want to use those, feel free to style your CSS however you like! It’s really freeplay here, so just let your creativity take charge. Here is the simple CSS code we'll be using:
body {
  background-color: #f5f5f5;
}

.container {
  display: flex;
  flex-direction: column;
  justify-content: center;
  align-items: center;
  height: 100vh;
}

.container img {
  max-width: 100%;
  max-height: 100%;
}

.MeltingSnowman {
  width: 400px;
  height: 400px;
  border: 2px solid blue;
  margin: 20px;
  display: flex;
  justify-content: center;
  align-items: center;
}

.word {
  font-size: 2rem;
  margin: 20px;
  display: flex;
  justify-content: center;
}

.letters {
  margin: 20px;
  display: flex;
  justify-content: center;
  flex-wrap: wrap;
}

.letters button {
  margin: 5px;
  padding: 10px;
  font-size: 1.2rem;
  border: none;
  background-color: blue;
  color: #fff;
  cursor: pointer;
}

.message {
  font-size: 1.5rem;
  margin: 20px;
  display: flex;
  justify-content: center;
  align-items: center;
}
How to Write the JavaScript Code to Implement the Game Logic and Functionality
In this step, we're going to take a closer look at the JavaScript code we're using to implement the game logic and functionality of our Melting Snowman game. This is probably the lengthiest step, and the most important one, so take your time to carefully go through this one.
First, we define an array called words which contains the list of words to choose from. We also define a constant variable called maxWrongGuesses which indicates the maximum number of incorrect guesses allowed before the game ends. For this example, I used coding languages as the word options:
const words = [
  'JAVASCRIPT',
  'HTML',
  'CSS',
  'NODE',
  'REACT',
  'ANGULAR',
  'JQUERY',
  'VUE'
];
Next, we declare four variables: wordToGuess, guessedLetters, wrongGuesses, and imageCount.
wordToGuess will hold the random word that the player needs to guess. guessedLetters will hold an array of underscores representing the unguessed letters in the word. wrongGuesses will keep track of the number of incorrect guesses the player has made. And imageCount is used to determine which Melting Snowman image to display.
We then define a function called selectRandomWord() which selects a random word from the words array using the Math.random() function.
function selectRandomWord() {
  return words[Math.floor(Math.random() * words.length)];
}
Next, we define the initializeGame() function which initializes the game. This function sets the wordToGuess variable to a randomly selected word, initializes the guessedLetters array to an array of underscores, sets wrongGuesses to 0, generates the letter buttons for the player to make guesses, and clears any previous win/lose messages.
function initializeGame() {
  wordToGuess = selectRandomWord();
  guessedLetters = Array(wordToGuess.length).fill('_');
  wrongGuesses = 0;

  // Update the word display
  updateWordDisplay();

  updateMeltingSnowmanGraphic();

  // Remove any previously generated buttons
  const lettersContainer = document.querySelector('.letters');
  while (lettersContainer.firstChild) {
    lettersContainer.removeChild(lettersContainer.firstChild);
  }

  // Generate the letter buttons
  for (let i = 0; i < 26; i++) {
    const letter = String.fromCharCode(65 + i);
    const button = document.createElement('button');
    button.innerText = letter;
    button.addEventListener('click', function () {
      handleGuess(letter);
    });
    lettersContainer.appendChild(button);
  }

  // Clear any previous win/lose message
  const messageContainer = document.querySelector('.message');
  messageContainer.innerText = '';
}
Now let’s implement the functions used when initializing the game. The updateWordDisplay() function updates the word display on the page by selecting the .word container element and setting its text to the joined guessedLetters array.
function updateWordDisplay() {
  const wordContainer = document.querySelector('.word');
  wordContainer.innerText = guessedLetters.join(' ');
}
The handleGuess() function handles a letter guess made by the player. It checks if the letter has already been guessed, adds the letter to the guessedLetters array if it's in the hidden word, increments wrongGuesses and updates the Melting Snowman graphic if the letter is not in the hidden word, and checks if the game has been won or lost.
function handleGuess(letter) {
  // If the letter has already been guessed, do nothing
  if (guessedLetters.includes(letter)) {
    return;
  }

  // Add the letter to the list of guessed letters
  guessedLetters.forEach((guessedLetter, index) => {
    if (wordToGuess[index] === letter) {
      guessedLetters[index] = letter;
    }
  });

  // If the letter is not in the hidden word, increment the wrong guesses count and update the Melting Snowman graphic
  if (!wordToGuess.includes(letter)) {
    wrongGuesses++;
    updateMeltingSnowmanGraphic();
  }

  // Update the word display
  updateWordDisplay();

  // Check if the game has been won or lost
  checkWinOrLose();
}
The updateMeltingSnowmanGraphic() function updates the Melting Snowman graphic by selecting the .MeltingSnowman container element and setting its inner HTML to an img element with the appropriate src and alt attributes.
Now remember, the images are going to be externally created and saved as png files from “MeltingSnowman1.png” to “MeltingSnowman6.png”, each with the corresponding graphic. Save those to a folder and copy the path to the “img src” tag:
function updateMeltingSnowmanGraphic() {
  const meltingSnowmanContainer = document.querySelector('.MeltingSnowman');
  meltingSnowmanContainer.innerHTML = `<img src="path/MeltingSnowman${imageCount}.png" alt="MeltingSnowman ${imageCount}">`;
  imageCount++;
}
The checkWinOrLose() function checks if the game has been won or lost by comparing the joined guessedLetters array to the wordToGuess variable and checking if wrongGuesses is greater than or equal to maxWrongGuesses. If the game has been won or lost, it displays the appropriate message and disables the letter buttons.
function checkWinOrLose() {
  if (guessedLetters.join('') === wordToGuess) {
    const messageContainer = document.querySelector('.message');
    messageContainer.innerText = 'You win!';
    const letterButtons = document.querySelectorAll('.letters button');
    letterButtons.forEach(button => {
      button.disabled = true;
      button.removeEventListener('click', handleGuess);
    });
  } else if (wrongGuesses >= maxWrongGuesses) {
    const messageContainer = document.querySelector('.message');
    messageContainer.innerText = `You lose! The word was "${wordToGuess}".`;
    const meltingSnowmanContainer = document.querySelector('.MeltingSnowman');
    meltingSnowmanContainer.innerHTML = `<img src="images/gameover.png" alt="gameover">`;
    const letterButtons = document.querySelectorAll('.letters button');
    letterButtons.forEach(button => {
      button.disabled = true;
      button.removeEventListener('click', handleGuess);
    });
  }
}
And to get everything running, the initializeGame() function is called when the page loads using the window.addEventListener('load', initializeGame) statement.
Your entire “MeltingSnowman.js” file should look like this:
// Define the list of words to choose from
const words = [
  'JAVASCRIPT',
  'HTML',
  'CSS',
  'NODE',
  'REACT',
  'ANGULAR',
  'JQUERY',
  'VUE'
];

// Define the maximum number of incorrect guesses allowed
const maxWrongGuesses = 6;

let wordToGuess = '';
let guessedLetters = [];
let wrongGuesses = 0;
let imageCount = 1;

// Select random word from the list
function selectRandomWord() {
  return words[Math.floor(Math.random() * words.length)];
}

// Initialize the game
function initializeGame() {
  wordToGuess = selectRandomWord();
  guessedLetters = Array(wordToGuess.length).fill('_');
  wrongGuesses = 0;

  // Update the word display
  updateWordDisplay();

  updateMeltingSnowmanGraphic();

  // Remove any previously generated buttons
  const lettersContainer = document.querySelector('.letters');
  while (lettersContainer.firstChild) {
    lettersContainer.removeChild(lettersContainer.firstChild);
  }

  // Generate the letter buttons
  for (let i = 0; i < 26; i++) {
    const letter = String.fromCharCode(65 + i);
    const button = document.createElement('button');
    button.innerText = letter;
    button.addEventListener('click', function () {
      handleGuess(letter);
    });
    lettersContainer.appendChild(button);
  }

  // Clear any previous win/lose message
  const messageContainer = document.querySelector('.message');
  messageContainer.innerText = '';
}

// Update the word display
function updateWordDisplay() {
  const wordContainer = document.querySelector('.word');
  wordContainer.innerText = guessedLetters.join(' ');
}

// Handle a letter guess
function handleGuess(letter) {
  // If the letter has already been guessed, do nothing
  if (guessedLetters.includes(letter)) {
    return;
  }

  // Add the letter to the list of guessed letters
  guessedLetters.forEach((guessedLetter, index) => {
    if (wordToGuess[index] === letter) {
      guessedLetters[index] = letter;
    }
  });

  // If the letter is not in the hidden word, increment the wrong guesses count and update the Melting Snowman graphic
  if (!wordToGuess.includes(letter)) {
    wrongGuesses++;
    updateMeltingSnowmanGraphic();
  }

  // Update the word display
  updateWordDisplay();

  // Check if the game has been won or lost
  checkWinOrLose();
}

// Update the Melting Snowman graphic
function updateMeltingSnowmanGraphic() {
  const meltingSnowmanContainer = document.querySelector('.MeltingSnowman');
  meltingSnowmanContainer.innerHTML = `<img src="images/MeltingSnowman${imageCount}.png" alt="MeltingSnowman ${imageCount}">`;
  imageCount++;
}

// Check if the game has been won or lost
function checkWinOrLose() {
  if (guessedLetters.join('') === wordToGuess) {
    const messageContainer = document.querySelector('.message');
    messageContainer.innerText = 'You win!';
    const letterButtons = document.querySelectorAll('.letters button');
    letterButtons.forEach(button => {
      button.disabled = true;
      button.removeEventListener('click', handleGuess);
    });
  } else if (wrongGuesses >= maxWrongGuesses) {
    const messageContainer = document.querySelector('.message');
    messageContainer.innerText = `You lose! The word was "${wordToGuess}".`;
    const meltingSnowmanContainer = document.querySelector('.MeltingSnowman');
    meltingSnowmanContainer.innerHTML = `<img src="images/gameover.png" alt="gameover">`;
    const letterButtons = document.querySelectorAll('.letters button');
    letterButtons.forEach(button => {
      button.disabled = true;
      button.removeEventListener('click', handleGuess);
    });
  }
}

// Initialize the game when the page loads
window.addEventListener('load', initializeGame);
How to Add Interactivity and Animations
As mentioned before, I used an png files to create the graphics for the display and named these “MeltingSnowman1.png” to “MeltingSnowman6.png”. Each of the images looked like this:

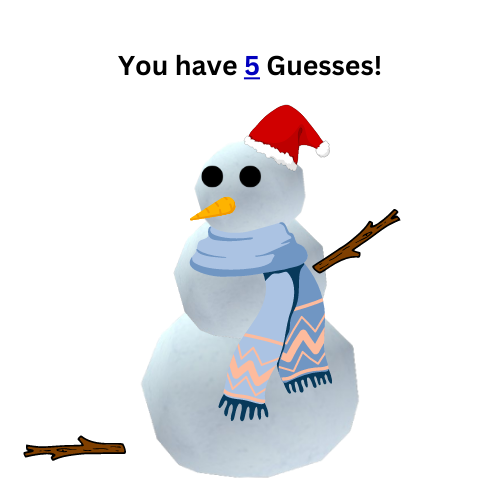


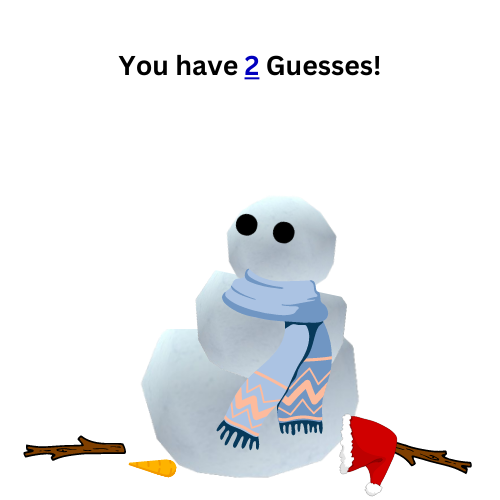
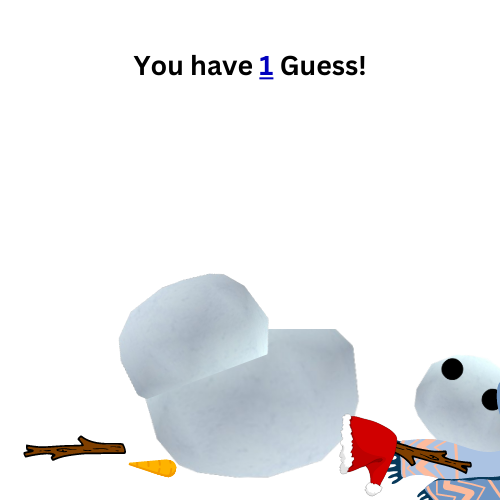
Then, when each wrong guess was called, I simply changed the image path from image one to image 6 with the imageCounter variable.
Of course, there are many ways you can do this and the possibilities are nearly endless. If you wanted to get really creative, you could generate some aesthetically pleasing images with an AI art generator. That would make for an amazing-looking interface. But make sure that your images are simple yet tasteful.
A good practice would be to condense these as well. Statistics have shown that slow image loading and unattractive images are two of the most prominent reasons users may stop engaging with your site.
Testing and Debugging the Game
After building this Melting Snowman game, it's a good idea to undergo testing and debugging as a part of the software development process. These stages help you make sure that the game functions correctly and as intended. By testing and debugging, you can find and fix any issues and bugs present in the game's code.
To test the game, start the process by playing the game and observing its functionality. This includes inputting distinct words and letters to verify their proper display on the screen and check that the game logic is working as expected.
Seeking feedback from friends and family on their experience and any problems they encounter during gameplay is another effective testing method.
If any issues or errors occur during the testing process, you can use the browser console to scan for error messages. You can also use tools such as Chrome DevTools to debug the code can help identify potential problems.
Finally, you can insert console.log statements to monitor the program's flow and help identify and fix issues.
When you find any bugs or issues during the testing process, you'll need to do some debugging. Debugging requires reviewing the code line by line, testing specific sections of the code, and employing debugging tools and techniques to identify and correct any errors or issues.
How to Get Your Game Hosted on Your Website
Once you have completed comprehensive testing and cleaning up of the code for your Melting Snowman game, next you'll want to deploy it on your website. This makes the game more accessible to anyone with an internet connection.
To host the game on your website, start by transferring the game's files to your website's server using an FTP client.
After you've done that, create a fresh webpage on your website dedicated to the game. You could embed the game on this webpage using either the HTML code generated by the game or an iframe to showcase the game on your webpage.
How to Host it on WordPress
Alternatively, if your website is operating on the WordPress platform, you could employ the WP-Coder plugin to host the Melting Snowman game. This plugin permits the integration of custom HTML, CSS, and JavaScript code into your WordPress site without requiring any manual file editing.
If you just want to focus on coding the game and not worry about the deployment aspect of your games, learning how to integrate your code into low-code platforms is a great way to make this step fuss free. Hosting your game on WordPress is a great example of this practice.
To deploy the Melting Snowman game utilizing the WP-Coder plugin, start by installing the plugin on your WordPress site. Then go to the WP-Coder menu and create a new code snippet specifically for the game.
In the code snippet, paste the HTML, CSS, and JavaScript code generated by the game. Once you save the snippet, it can be incorporated into any page or post on your WordPress site using a shortcode.

By leveraging the WP-Coder plugin, hosting the Melting Snowman game on your WordPress site is a streamlined and stress-free process.
If You Enjoyed Building This Game, Here Are Some Next Steps
Congratulations on creating and hosting your own basic game, Melting Snowman, on your website! With this newly acquired skillset, you can explore more intricate games and expand your game development skills, if that’s in your interests.
To elevate your game development expertise, diving into game engines like Unity is one way to go. Unity, a powerful game development platform, offers an extensive array of tools and resources to design high-caliber games for different platforms.
To embark on your Unity journey, you'll need to learn the C# programming language, the scripting language employed in Unity. Unity offers a comprehensive documentation library, tutorials, and online communities to facilitate your learning and troubleshoot your projects.
After learning C# and Unity, you can try building games using 3D models, physics engines, animations, and other sophisticated features. With Unity, you can create a wide variety of games, including 2D and 3D games, mobile games, virtual reality games, and even augmented reality games.
Wrapping Up and Conclusion
In this article, you’ve learned how to create your very own game of Melting Snowman and host it on your site. Of course, this is a stripped-down version, but you can feel free to add as many features as you like.
With your Melting Snowman game operational, it is time to put your skills to the test and challenge your companions to a competition to determine who can guess the most words accurately. To add even more difficulty and excitement to the game, consider incorporating new words or themes.
You can also share your creation with others and seek feedback to improve your skills. Who knows, perhaps your accomplishments will inspire others to embark on their own coding journey!
Keep on coding and most importantly, have fun!