

In this tutorial, you're going to learn about the app deployment platform Fly.io and the globally distributed S3-compatible object storage service Tigris.
Both platforms are deeply connected, which makes them a great choice for your projects. You get the app deployment experience from Fly.io and the object storage features from Tigris.
App deployment is pretty self-explanatory, so let's first get a quick introduction into bucket storage, which Tigris uses.
Prerequisites
- An IDE/Code editor installed like Visual Studio Code
- Node.js and npm installed
- Next.js installed or setup
- A free account on Fly.io
- A free account on Tigris
Table of Contents
- What is Bucket Storage?
- What We'll Be Building
- How to Create an Account on Fly.io and Tigris
- How to Set Up the User Database Project
- How to Build the User Database Application
- How to Create the User Database UI
- How to Deploy Your App to Fly.io
- Conclusion
What is Bucket Storage?
An Amazon S3 bucket is a resource for public cloud storage that is accessible via the Simple Storage Service (S3) platform of Amazon Web Services (AWS).
Low-latency storage is a feature that the globally distributed, S3-compatible object storage service Tigris uses. This means that you can access Amazon's S3 buckets on Tigris for your storage needs.
Tigris has also been fully integrated directly with Fly.io and is also completely integrated with flyctl which operates on hardware from Fly.io. Fly.io's command-line interface, flyctl, allows you to deal with the platform from account creation to application deployment.
What We'll Be Building
To learn the fundamentals of these platforms, we'll build a user database application. It's pretty straightforward: essentially we can perform full CRUD requests which means being able to read, add, update, and delete our user data.
Next.js will be our main framework because it allows us to build full-stack apps without having to create a separate server.
You can learn more about Fly.io and Tigris from their documentation. We will need to create an account on both platforms for this project, which I'll walk you through in a minute.
So now, with the theory out of the way, let's get started.
For this project, you can find the codebase on my GitHub here.
How to Create an Account on Fly.io and Tigris
Just follow these steps to get up and running on both platforms:
- Firstly you need to create an account on Fly.io, because to utilise Tigris you'll need a Fly.io account.
- Next, install the flyctl command line tool on your computer which is essential for setting up your account to deploy your applications.
Ok, let's move on to the next stage which is where we will set up our project as well as our Tigris bucket storage.
How to Set Up the User Database Project
Start by navigating to a directory on your computer where you plan to create the project. Then create a folder called fly-tigris-user-database and cd into it. Now run the command to setup a Next.js project inside of that folder:
npx create-next-app .
All we are doing is setting up our Next.js project and it's important that for the configuration you select yes for Tailwind CSS and the App router because we will need them in this project.
Now run this command to install the AWS SDK:
npm install @aws-sdk/client-s3
We just have one package to install (@aws-sdk/client-s3) which we need for connecting to our bucket.
Ok, good – now it is time to create a bucket for the project we just created. You can refer to their official documentation here.
Just run this command to create a bucket:
fly storage create
Now on the setup screen, choose a name for your bucket. The name should be unique, so you can't use a name that someone else has chosen.
Alright now for the most important stage: you should have your AWS and bucket secrets like the example here:
AWS_ACCESS_KEY_ID: yourkey
AWS_ENDPOINT_URL_S3: https://fly.storage.tigris.dev
AWS_REGION: auto
AWS_SECRET_ACCESS_KEY: your secret access
BUCKET_NAME: your bucket name
Create a .env.local file inside the root of your Next.js project and copy and paste all of those secret environment variables.
To get these environment variables to work properly inside our Next.js application, we need to adjust their names by making them public. See the example below and make the change to your .env.local file.
NEXT_PUBLIC_SECRET_AWS_ACCESS_KEY_ID: yourkey
NEXT_PUBLIC_SECRET_AWS_ENDPOINT_URL_S3: https://fly.storage.tigris.dev
NEXT_PUBLIC_SECRET_AWS_REGION: auto
NEXT_PUBLIC_SECRET_AWS_SECRET_ACCESS_KEY: your secret access
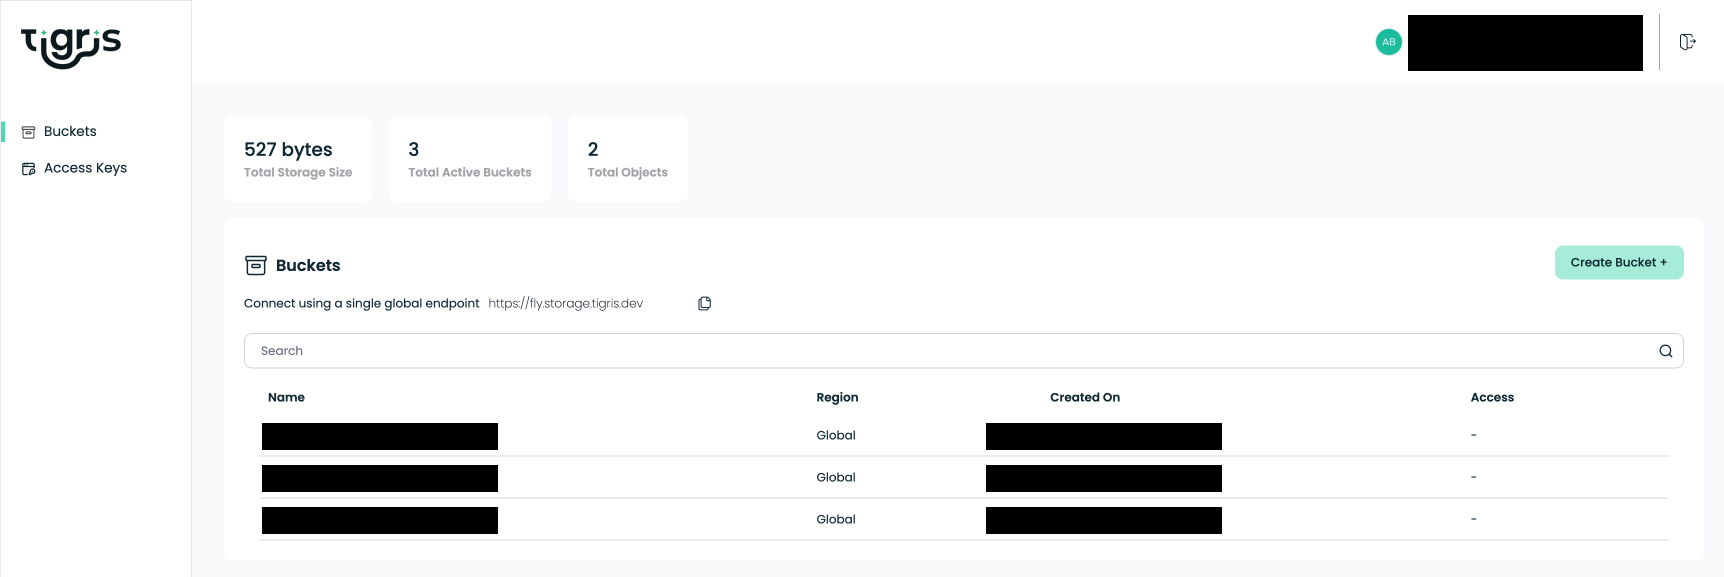
NEXT_PUBLIC_SECRET_BUCKET_NAME: your bucket nameRight now on the Tigris documentation page, if you click on the dashboard button and sign into your account you should see your newly created bucket like in my example shown here:
Great! That's the first phase done. We now have a bucket to store our app data online, so we can get started creating our application in the next section.
How to Build the User Database Application
I'll split this part into two sections. First, we'll get our server built and running so that we can test out the CRUD endpoints. Then we'll finish off by building our front end.
How to Create the User Database Server
To begin with, let's create our backend architecture. We are going to be creating four endpoints, so one for each CRUD request. We also need a helper file which will have some functions for getting users from our object storage.
If you have not already done so, cd into the root of the project and run the commands below. They will set up all of our files and folders quickly:
cd src/app
mkdir api
mkdir api/deleteuser api/getusers api/postuser api/updateuser
touch api/deleteuser/route.js
touch api/getusers/route.js
touch api/postuser/route.js
touch api/updateuser/route.js
mkdir helpers
touch helpers/getUsers.js
Good, that was quick. Now we just have to add the code to our five files and our backend API will be ready to test.
Let's do the helpers file first. The code in this file allows us to collect and access the user data stored in our S3 bucket on Tigris.
Put the below code inside of helpers/getUsers.js:
import {
  S3Client,
  ListObjectsV2Command,
  GetObjectCommand,
} from '@aws-sdk/client-s3';

const streamToString = (stream) =>
  new Promise((resolve, reject) => {
    const chunks = [];
    stream.on('data', (chunk) => chunks.push(chunk));
    stream.on('error', reject);
    stream.on('end', () => resolve(Buffer.concat(chunks).toString('utf8')));
  });

export async function fetchAllUsersFromS3() {
  try {
    const s3 = new S3Client({
      region: process.env.NEXT_PUBLIC_SECRET_AWS_REGION,
      endpoint: process.env.NEXT_PUBLIC_SECRET_AWS_ENDPOINT_URL_S3,
      credentials: {
        accessKeyId: process.env.NEXT_PUBLIC_SECRET_AWS_ACCESS_KEY_ID,
        secretAccessKey: process.env.NEXT_PUBLIC_SECRET_AWS_SECRET_ACCESS_KEY,
      },
    });

    const commandDetails = new ListObjectsV2Command({
      Bucket: process.env.NEXT_PUBLIC_SECRET_BUCKET_NAME,
      MaxKeys: 10,
    });
    const { Contents } = await s3.send(commandDetails);
    console.log('List Result', Contents);
    if (!Contents) {
      console.log('no users');
    } else {
      const users = await Promise.all(
        Contents.map(async (item) => {
          const getObject = new GetObjectCommand({
            Bucket: process.env.NEXT_PUBLIC_SECRET_BUCKET_NAME,
            Key: item.Key,
          });

          const { Body } = await s3.send(getObject);
          const data = await streamToString(Body);
          const userObject = JSON.parse(data);
          console.log('Data', data);
          return userObject;
        })
      );
      return users;
    }
  } catch (e) {
    console.error(e);
    throw e;
  }
}

export async function getUserById(users, userId) {
  if (!users) {
    console.log('no users');
  } else {
    return users.find((user) => user.id === userId);
  }
}

export async function getUserByIdEmail(users, email) {
  if (!users) {
    console.log('no users');
  } else {
    return users.find(
      (user) => user.email.toLowerCase() === email.toLowerCase()
    );
  }
}
The main function is fetchAllUsersFromS3(), which basically creates the S3 client with the credentials and configuration that we need. It uses the GetObjectCommand to get the objects contents which are then converted from a stream to a string using the streamToString function. The JSON data is then parsed with the user objects returned.
The other two function calls, getUserById(users, userId) and getUserByIdEmail(users, email), are helper functions that allow us to search for people in our S3 bucket based on their ID or email address. The code stores the essential AWS configuration parameters in environment variables, including the region, endpoint URL, access key, and secret access key, as well as the S3 bucket name.
Alright, just the routes left now.
Start by putting this code into getusers/route.js:
import {
S3Client,
ListObjectsV2Command,
GetObjectCommand,
} from '@aws-sdk/client-s3';

export async function GET() {
const streamToString = (stream) =>
new Promise((resolve, reject) => {
const chunks = [];
stream.on('data', (chunk) => chunks.push(chunk));
stream.on('error', reject);
stream.on('end', () => resolve(Buffer.concat(chunks).toString('utf8')));
});

try {
const s3 = new S3Client({
region: process.env.NEXT_PUBLIC_SECRET_AWS_REGION,
endpoint: process.env.NEXT_PUBLIC_SECRET_AWS_ENDPOINT_URL_S3,
credentials: {
accessKeyId: process.env.NEXT_PUBLIC_SECRET_AWS_ACCESS_KEY_ID,
secretAccessKey: process.env.NEXT_PUBLIC_SECRET_AWS_SECRET_ACCESS_KEY,
},
});

const listParams = {
Bucket: process.env.NEXT_PUBLIC_SECRET_BUCKET_NAME,
MaxKeys: 10,
};

const list = new ListObjectsV2Command(listParams);
const { Contents } = await s3.send(list);

console.log('List Result', Contents);

if (!Contents || Contents.length === 0) {
console.log('No users found');
return new Response(JSON.stringify({ error: 'No users found' }), {
status: 404,
});
}

const users = await Promise.all(
Contents.map(async (item) => {
const getObjectParams = {
Bucket: process.env.NEXT_PUBLIC_SECRET_BUCKET_NAME,
Key: item.Key,
};

const getObject = new GetObjectCommand(getObjectParams);
const { Body } = await s3.send(getObject);
const data = await streamToString(Body);
console.log('Backend API GET Data:', data);
return JSON.parse(data);
})
);

return new Response(JSON.stringify(users), { status: 200 });
} catch (e) {
console.error('Error:', e);
return new Response(
JSON.stringify({ error: e.message || 'Unknown error' }),
{ status: 500 }
);
}
}
In the code for this file, we retrieve the user data from our Tigris S3 bucket and send it back as a JSON response via the Next.js API route handler function.
The function also imports the AWS SDK clients required to communicate with our S3 bucket on Tigris. When the API route is requested, the main entry point, the GET function, is called. Using environment variables, the GET method first establishes an S3 client with the required setup for region, endpoint, and credentials.
After that, a ListObjectsV2Command is created to retrieve the user data list of items from the designated S3 bucket. The method then iterates through the object list, retrieving each object's data with the GetObjectCommand.
The streamToString method is used to convert each object's contents from a stream to a string.
Following parsing of the JSON input, user objects are sent out as a JSON response. A 404 error response is returned if no users are detected, and the function provides a 500 error response with the error message if there are any issues during the process.
Up next is the POST route, so put this code in postuser/route.js:
import { fetchAllUsersFromS3, getUserByIdEmail } from '../../helpers/getUsers';

import { S3Client, PutObjectCommand } from '@aws-sdk/client-s3';

export async function POST(req) {
  try {
    const { firstname, lastname, email, password } = await req.json();
    const id = crypto.randomUUID();
    const data = { firstname, lastname, email, password, id };
    console.log('Request body data', data);
    const allUsers = await fetchAllUsersFromS3();
    console.log('all users', allUsers);
    const existingUser = await getUserByIdEmail(allUsers, email);
    console.log(existingUser, email);
    if (existingUser) {
      return Response.json({
        error: 'Email address already in use',
      });
    }

    const s3 = new S3Client({
      region: process.env.NEXT_PUBLIC_SECRET_AWS_REGION,
      endpoint: process.env.NEXT_PUBLIC_SECRET_AWS_ENDPOINT_URL_S3,
      credentials: {
        accessKeyId: process.env.NEXT_PUBLIC_SECRET_AWS_ACCESS_KEY_ID,
        secretAccessKey: process.env.NEXT_PUBLIC_SECRET_AWS_SECRET_ACCESS_KEY,
      },
    });

    const commandDetails = new PutObjectCommand({
      Body: JSON.stringify(data),
      Bucket: process.env.NEXT_PUBLIC_SECRET_BUCKET_NAME,
      Key: email,
    });

    await s3.send(commandDetails);

    return Response.json({ message: 'User added' });
  } catch (e) {
    console.error(e);
    return Response.json({ error: 'Failed to create user' });
  }
}
This code manages user registration and saves user information in our Tigris S3 bucket. The two helper functions which are needed to communicate with the S3 bucket and collect user data are imported by the function fetchAllUsersFromS3 and getUserByIdEmail. The initial entry point, which is triggered when a POST request is made to access the API route, is the POST function.
The user's information (first and last name, email address, and password) is initially taken from the request body via the POST function. It then uses crypto.randomUUID() to create a unique user ID. To obtain all of the current user data from the S3 bucket, the method then invokes the fetchAllUsersFromS3 helper function.
The code uses the getUserByIdEmail helper function to determine whether the email address supplied in the request already exists in the user data. If the email address already exists, the method provides a JSON response including an error message. If the email address is unique, the method uses environment variables to generate an S3 client with the required setup with the region, endpoint, and credentials.
It then generates a PutObjectCommand that uploads the new user data (as a JSON string) to the S3 bucket, with the email address as the key. Finally, the method produces a JSON response confirming that the user has been successfully added. If an error occurs during the process, the function provides a JSON response including an error message.
Follow that up with our UPDATE route and this is the code which goes into updateuser/route.js:
import { getUserById, fetchAllUsersFromS3 } from '../../helpers/getUsers';

import {
  S3Client,
  DeleteObjectCommand,
  PutObjectCommand,
} from '@aws-sdk/client-s3';

export async function PUT(req) {
  try {
    const { firstname, lastname, email, originalEmail, id } = await req.json();
    console.log('request data', firstname, lastname, email, originalEmail, id);
    const allUsers = await fetchAllUsersFromS3();
    console.log('all users', allUsers);
    const userToUpdate = await getUserById(allUsers, id);
    console.log('user to update', userToUpdate);
    const user = allUsers.find((user) => user.id === id);
    const userEmail = user ? user.email : null;
    console.log('User Email', userEmail);
    if (!userToUpdate) {
      return Response.json({ error: 'User not found' });
    }

    if (!originalEmail || !email) {
      return Response.json({
        error: 'Both originalEmail and email are required for update',
      });
    }

    const data = { firstname, lastname, email, id };

    console.log('Updated data', data);

    const s3 = new S3Client({
      region: process.env.NEXT_PUBLIC_SECRET_AWS_REGION,
      endpoint: process.env.NEXT_PUBLIC_SECRET_AWS_ENDPOINT_URL_S3,
      credentials: {
        accessKeyId: process.env.NEXT_PUBLIC_SECRET_AWS_ACCESS_KEY_ID,
        secretAccessKey: process.env.NEXT_PUBLIC_SECRET_AWS_SECRET_ACCESS_KEY,
      },
    });

    console.log('Original email', originalEmail);
    console.log('New email', email);

    if (userEmail === originalEmail) {
      console.log('The emails are the same so its a match');
      const deleteCommand = new DeleteObjectCommand({
        Bucket: process.env.NEXT_PUBLIC_SECRET_BUCKET_NAME,
        Key: originalEmail,
      });

      await s3.send(deleteCommand);
      const putCommand = new PutObjectCommand({
        Body: JSON.stringify(data),
        Bucket: process.env.NEXT_PUBLIC_SECRET_BUCKET_NAME,
        Key: email,
      });

      await s3.send(putCommand);

      return Response.json({ message: 'User updated successfully' });
    } else {
      console.log('Error: The emails do not match');
      return Response.json({ error: 'Failed to update user' });
    }
  } catch (e) {
    console.error(e);
  }
}
The code includes the same helper functions from earlier, getUserById and fetchAllUsersFromS3, that are used to connect with the S3 bucket and obtain user data. The primary entry point is the PUT function, which is invoked anytime a PUT request is made to the API route. The PUT function first pulls user data (firstname, lastname, email, originalEmail, and id) from the request body.
It then invokes the fetchAllUsersFromS3 helper function, which retrieves all existing user data from the S3 bucket. The code then locates the user to be updated by invoking the getUserById helper function with the specified user ID. If the user cannot be found, the method provides a JSON response with an error message.
If the originalEmail or email is absent, the function provides a JSON response including an error message. The method then builds an updated user data object based on the information given. In addition the code can use environment variables to generate an S3 client with the required settings (region, endpoint, and credentials).
Assuming the initial email address matches the current user's, the function updates the user's information, but if the original email and the current user's email address do not match, the method provides a JSON response including an error message. Like before if an error is detected during the process, then the function will create a log without sending a response.
All thats left is our DELETE route. Add this code to deleteuser/route.js:
import { S3Client, DeleteObjectCommand } from '@aws-sdk/client-s3';

import { fetchAllUsersFromS3, getUserById } from '../../helpers/getUsers';

export async function DELETE(req) {
  try {
    const id = await req.json();
    console.log('Id', id.id);
    const allUsers = await fetchAllUsersFromS3();
    console.log('all users', allUsers);
    const userToDelete = await getUserById(allUsers, id.id);
    console.log('user to delete', userToDelete);

    if (!userToDelete) {
      return Response.json({ error: 'User not found' });
    }

    const userEmail = userToDelete.email;
    const s3 = new S3Client({
      region: process.env.NEXT_PUBLIC_SECRET_AWS_REGION,
      endpoint: process.env.NEXT_PUBLIC_SECRET_AWS_ENDPOINT_URL_S3,
      credentials: {
        accessKeyId: process.env.NEXT_PUBLIC_SECRET_AWS_ACCESS_KEY_ID,
        secretAccessKey: process.env.NEXT_PUBLIC_SECRET_AWS_SECRET_ACCESS_KEY,
      },
    });

    const deleteCommand = new DeleteObjectCommand({
      Bucket: process.env.NEXT_PUBLIC_SECRET_BUCKET_NAME,
      Key: userEmail,
    });

    await s3.send(deleteCommand);
    return Response.json({ message: 'User deleted successfully' });
  } catch (e) {
    console.error(e);
    return Response.json({ error: 'Failed to delete user' });
  }
}
This is used for removing data from our bucket. The code includes the same AWS SDK clients required for communicating with S3, as well as the two helper functions fetchAllUsersFromS3 and getUserById (which are used for getting user data from the S3 bucket). The key entry point is the DELETE function, which is called when a DELETE request is made to the API route.
In the DELETE function, the user ID is initially extracted from the request body. It then invokes the fetchAllUsersFromS3 helper method, which retrieves all existing user data from the S3 bucket. The code then locates the user to be removed by invoking the getUserById helper function with the specified user ID. If the client cannot be found, the method provides a JSON response with an error message.
It then generates a DeleteObjectCommand that deletes the item from the S3 bucket, with the user's email address as the key. Finally, the method produces a JSON response confirming that the user has been successfully erased. Once again errors are logged to the console.
Ok, good that's it – we're done with the backend. Start the server with the usual run code and test out those routes to make sure that you can connect to your bucket and use all of the CRUD requests:
npm run dev
To test the backend, you can use an API testing tool like Postman. Take a look at the example screenshots for reference:
Doing GET Requests
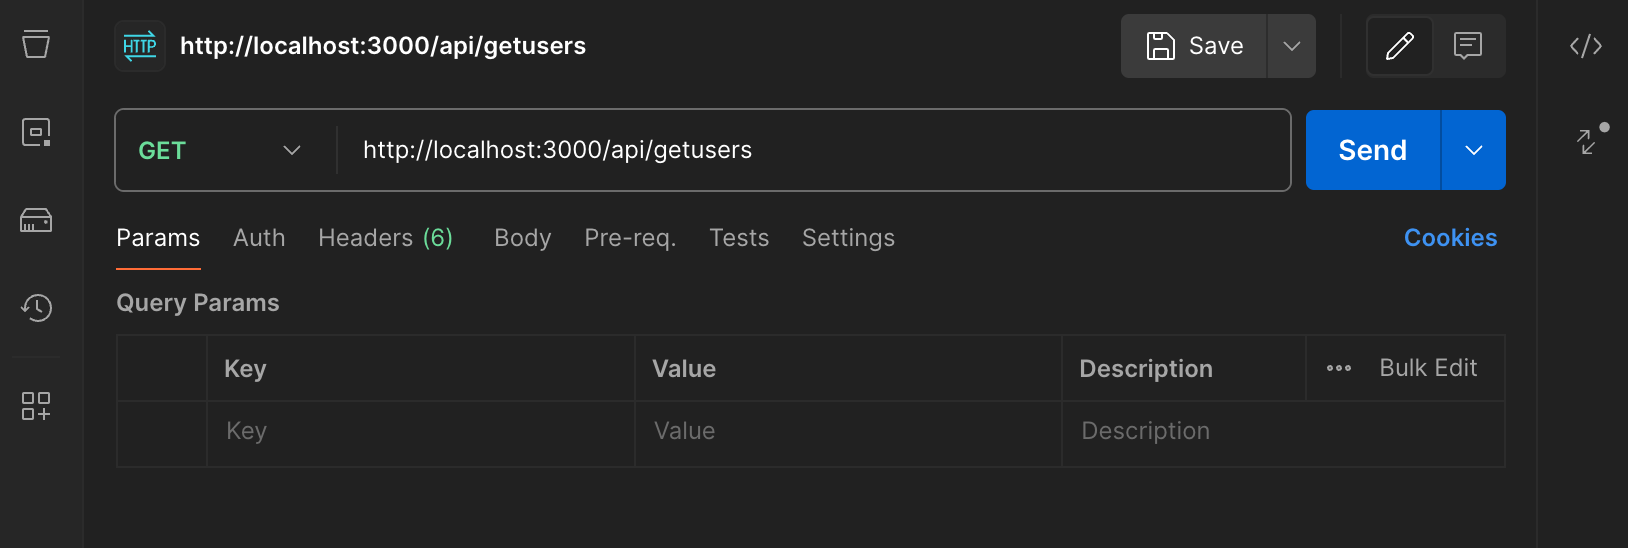
GET requests are pretty easy. Just go to http://localhost:3000/api/getusers.
Doing POST Requests
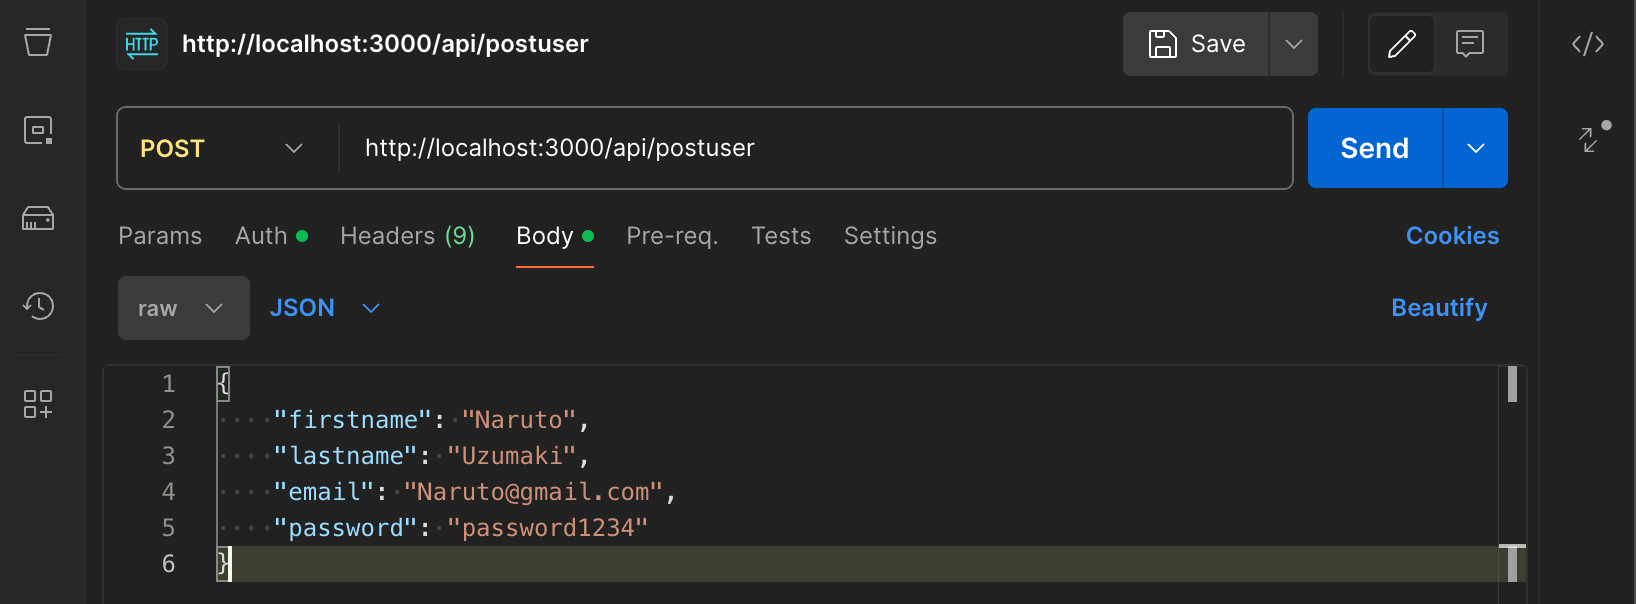
POST requests can be done here: http://localhost:3000/api/postuser.
Doing PUT Requests
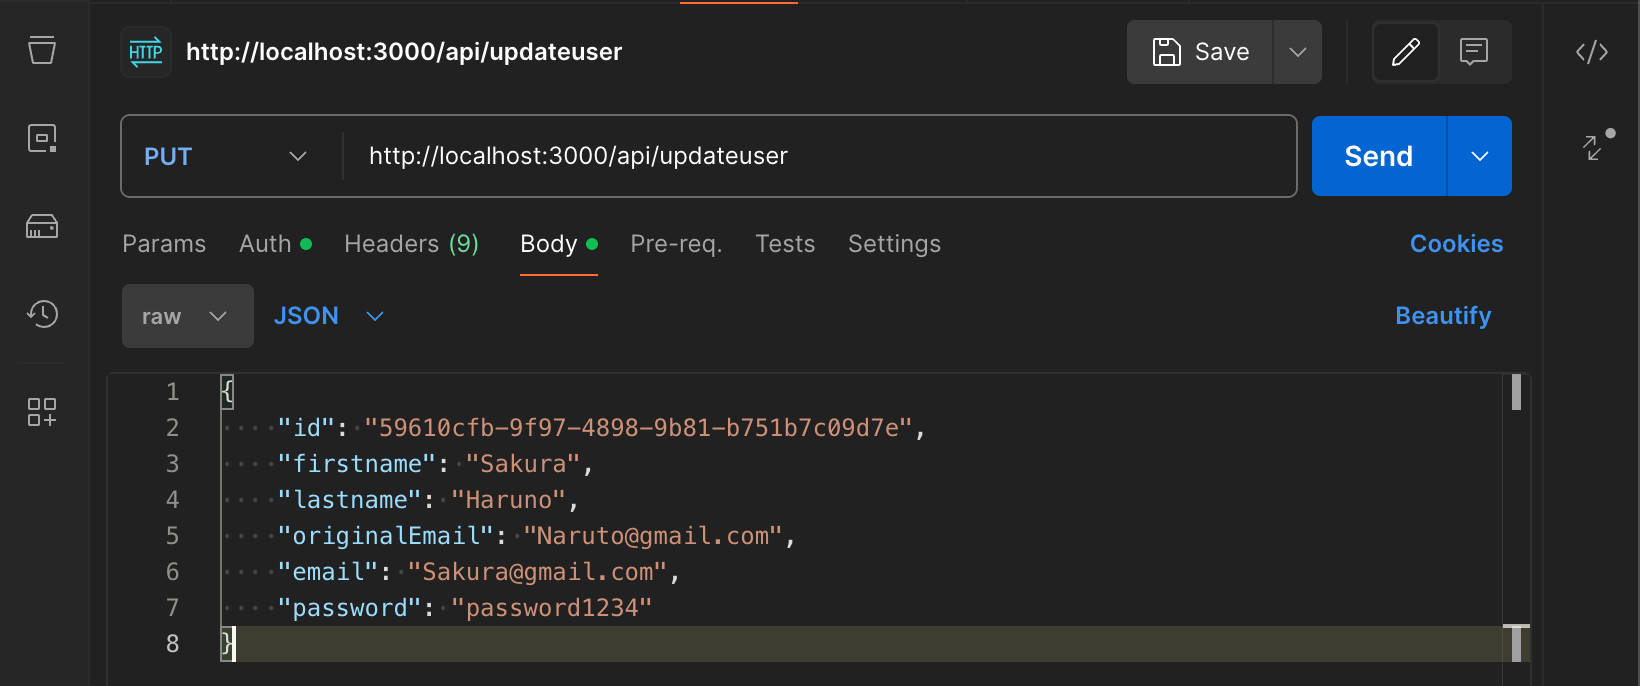
For PUT requests, go to this route: http://localhost:3000/api/updateuser. It's important to note that you MUST put the original email address for that ID, otherwise it's not going to work. And remember this for the front end, too, because we've only implemented basic error handling.
Doing DELETE Requests
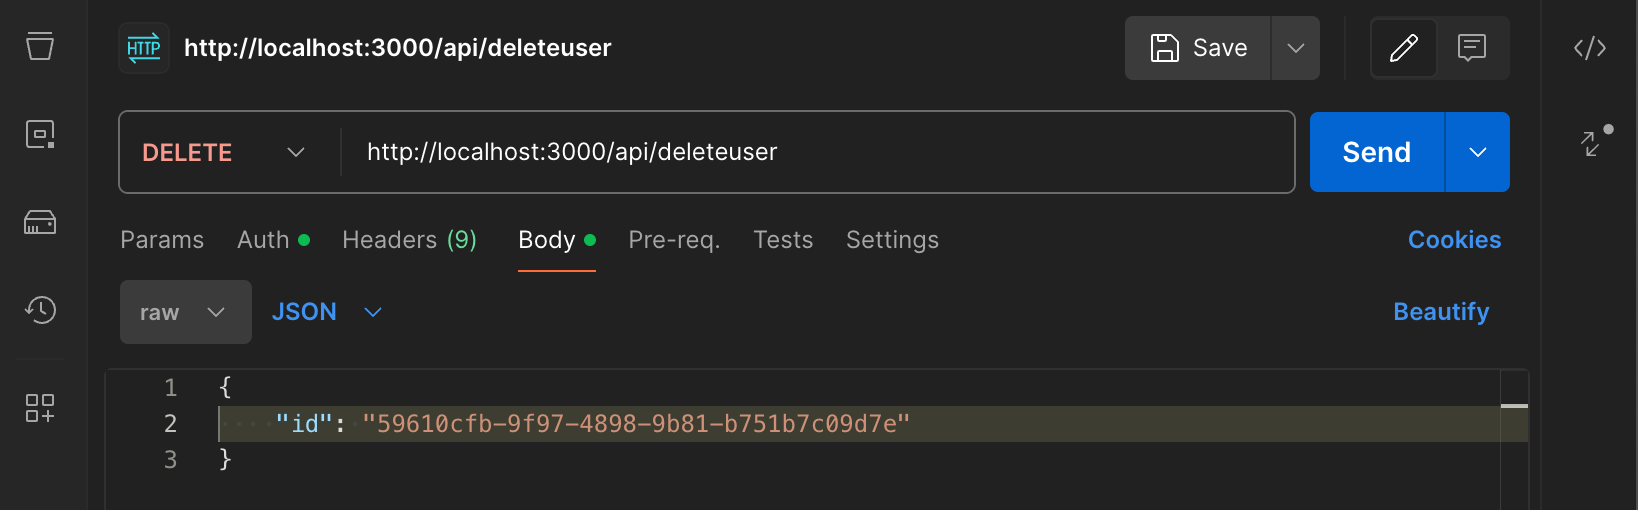
DELETE requests can be done here: http://localhost:3000/api/deleteuser.
Great, our backend should be fully working. Now we just have the frontend left. Then we can deploy our app online to fly.io.
How to Create the User Database UI
Now for the front end, we need to create four components and four custom hooks to integrate with them, and each one is self-explanatory. The component files hold our form and table data whereas the hook files perform our CRUD requests and that's all.
Other than that we need to modify a few files so that we get our Tailwind CSS styles working – then we can finish with building our frontend components.
Before we start, run this script from the root project folder so we can set the project folder structure for our components and custom hooks:
cd src/app
mkdir -p components/AddUserForm
touch components/AddUserForm/AddUserForm.js
mkdir -p components/DeleteUserForm
touch components/DeleteUserForm/DeleteUserForm.js
mkdir -p components/UpdateUserForm
touch components/UpdateUserForm/UpdateUserForm.js
mkdir -p components/UserDatabaseTable
touch components/UserDatabaseTable/UserDatabaseTable.js
mkdir -p hooks
touch hooks/useDelete.js
touch hooks/useFetch.js
touch hooks/usePost.js
touch hooks/useUpdate.js
Now that the folders are done, let's quickly do some setup for Tailwind CSS and styling before we complete our codebase.
Replace all of the code in the globals.css file with this code which just sets a background colour for our app:
@tailwind base;
@tailwind components;
@tailwind utilities;

body {
  background: #eeeff1;
  font-size: 16px;
  color: #0e0e0e;
}
Now do the same for layout.js – we are just adding the Arsenal font to our project:
import { Arsenal } from 'next/font/google';
import './globals.css';

const arsenal = Arsenal({
  weight: '400',
  subsets: ['latin'],
});

export const metadata = {
  title: 'Create Next App',
  description: 'Generated by create next app',
};

export default function RootLayout({ children }) {
  return (
    <html lang="en">
      <body className={arsenal.className}>{children}</body>
    </html>
  );
}
Ok moving on, let's get these hooks done.
Up first is useFetch.js which we use for getting data out of our S3 bucket. Give the useFetch.js file this code:
import { useState, useEffect } from 'react';

export function useFetch(url) {
  const [data, setData] = useState([]);
  const [error, setError] = useState(null);
  const [isLoading, setIsLoading] = useState(null);

  useEffect(() => {
    const fetchData = async () => {
      try {
        const json = await fetch(url).then((r) => r.json());
        setIsLoading(false);
        setData(json);
      } catch (error) {
        setError(error);
        setIsLoading(false);
      }
    };

    fetchData();

    const pollInterval = setInterval(() => {
      fetchData();
    }, 5000);

    return () => {
      clearInterval(pollInterval);
    };
  }, [url]);

  return { data, error, isLoading };
}
Let's take a look at this file and see how it works.
We have three state variables: one for our fetched data, another to take care of errors during the fetch process, and our loading state which indicates if our data is being fetched or not. The fetchData method is asynchronous and utilises the fetch API to retrieve data from the specified URL. It then adjusts the state variables accordingly.
If the fetch is successful, isLoading is changed to false, and the data state is updated with the retrieved JSON data. If an error occurs, it assigns error to the error object and sets isLoading to false.
There is also a function for polling set up at the end which is set to 5 seconds. Basically all it does is run the fetch function every 5 seconds, so if there is any new data in the API then the page will automatically be updated.
You can customise this so that it does it more frequently, less frequently, or not at all. If you disable this code, then you have to manually refresh your page to see new changes to the API.
Lastly, the useFetch function returns an object with the data, error, and isLoading state variables, which we can use in the component that calls this custom hook.
Now for the usePost.js file, add this code to the usePost.js file:
import { useState } from 'react';

export function usePost() {
  const [isLoading, setIsLoading] = useState(false);
  const [error, setError] = useState(null);
  const [response, setResponse] = useState(null);

  const postRequest = async (url, formData) => {
    setIsLoading(true);
    setError(null);
    setResponse(null);

    try {
      const response = await fetch(url, {
        method: 'POST',
        headers: {
          'Content-Type': 'application/json',
        },

        body: JSON.stringify(formData),
      });

      const responseData = await response.json();

      if (response.ok) {
        setResponse(responseData);
      } else {
        setError(responseData);
      }
    } catch (error) {
      setError(error);
    } finally {
      setIsLoading(false);
    }
  };

  return { isLoading, error, response, postRequest };
}
Let's run through the code to see how this custom hook works. Like our previous file, this file has state variables setup to check loading and error states. But this time, we also have a response state used to save the return data from the successful POST request.
The postRequest method is asynchronous and accepts a URL and formData as inputs. This function is responsible for performing the POST request and changing the state variables. It collects the form data from the frontend which would be a new entry for our API in the S3 bucket on Tigris. This is sent as JSON and saved in our S3 bucket.
Next is useUpdate.js, so now you can add this code to the useUpdate.js file:
import { useState } from 'react';

export function useUpdate() {
  const [isLoading, setIsLoading] = useState(false);
  const [error, setError] = useState(null);
  const [response, setResponse] = useState(null);
  const updateRequest = async (url, formData) => {
    setIsLoading(true);
    setError(null);
    setResponse(null);

    try {
      const response = await fetch(url, {
        method: 'PUT',
        headers: {
          'Content-Type': 'application/json',
        },

        body: JSON.stringify(formData),
      });

      const responseData = await response.json();

      if (response.ok) {
        setResponse(responseData);
      } else {
        setError(responseData);
      }
    } catch (error) {
      setError(error);
    } finally {
      setIsLoading(false);
    }
  };

  return { isLoading, error, response, updateRequest };
}
Just like our previous custom hooks, this file can track our loading and error states. It's quite similar to our POST custom hook, but it's now doing a PUT request and updating existing data in our S3 bucket as opposed to creating brand new entries.
And lastly it's time for the useDelete.js file. Add this code to our useDelete.js file:
import { useState } from 'react';

export function useDelete() {
  const [isLoading, setIsLoading] = useState(false);
  const [error, setError] = useState(null);
  const [response, setResponse] = useState(null);
  const deleteRequest = async (url, formData) => {
    setIsLoading(true);
    setError(null);
    setResponse(null);

    try {
      const response = await fetch(url, {
        method: 'DELETE',
        headers: {
          'Content-Type': 'application/json',
        },

        body: JSON.stringify(formData),
      });

      const responseData = await response.json();

      if (response.ok) {
        setResponse(responseData);
      } else {
        setError(responseData);
      }
    } catch (error) {
      setError(error);
    } finally {
      setIsLoading(false);
    }
  };

  return { isLoading, error, response, deleteRequest };
}
First, we will have an overview of how this custom hook works. We use this file for making delete requests, so essentially removing data from our S3 bucket.
Like our other custom hooks, it contains the same state for checking loading and errors. The response state gives us the data from a successful or bad DELETE request.
The file uses the fetch API to send a DELETE request to the specified URL. The request body contains the formData object with its response.
Our hook files are done, so we just need to finish with our component and page file and our application is good to go!
Ok our component files have the same name as their folder, which makes them easy to find.
First up is our AddUserForm.js file, and here is the code for our file:
import { useState } from 'react';
import { usePost } from '../../hooks/usePost';

export default function AddUserForm() {
  const API = 'http://localhost:3000/';

  // POST form input state
  const [firstname, setFirstname] = useState('');
  const [lastname, setlastname] = useState('');
  const [email, setEmail] = useState('');
  const [password, setPassword] = useState('');

  const handlePostForm = async (e) => {
    e.preventDefault();

    if (
      firstname === '' ||
      lastname === '' ||
      email === '' ||
      password === ''
    ) {
      console.log('The form needs all fields to be filled in');
    } else {
      try {
        const user = {
          firstname: firstname,
          lastname: lastname,
          email: email,
          password: password,
        };
        // POST Route
        postRequest(`${API}/api/postuser`, user);
        console.log(`User ${user}`);
        setFirstname('');
        setlastname('');
        setEmail('');
        setPassword('');

        setAddUserMessage();
      } catch (error) {
        console.log(error);
      }
    }
  };

  // CRUD message box state
  const useToggleMessage = (initialState = 'hidden') => {
    const [message, setMessage] = useState(initialState);

    const toggleMessage = () => {
      setMessage('');

      setTimeout(() => {
        setMessage('hidden');
      }, 3000);
    };

    return [message, toggleMessage];
  };

  const [addUserMessage, setAddUserMessage] = useToggleMessage();
  const { postRequest } = usePost();

  return (
    <div className="bg-white p-4 rounded drop-shadow-md">
      <h1 className="text-2xl mb-4">ADD User</h1>
      <form onSubmit={(e) => handlePostForm(e)}>
        <div className="flex flex-wrap items-center mb-2">
          <label className="p-2 w-36 border-solid border-2">Firstname</label>
          <input
            type="text"
            value={firstname}
            onChange={(e) => setFirstname(e.target.value)}
            className="grow p-2 border border-2"
            required
          />
        </div>

        <div className="flex flex-wrap items-center mb-2">
          <label className="p-2 w-36 border-solid border-2">Lastname</label>
          <input
            type="text"
            value={lastname}
            onChange={(e) => setlastname(e.target.value)}
            className="grow p-2 border border-2"
            required
          />
        </div>
        <div className="flex flex-wrap items-center mb-2">
          <label className="p-2 w-36 border-solid border-2">Email</label>
          <input
            type="email"
            value={email}
            onChange={(e) => setEmail(e.target.value)}
            className="grow p-2 border border-2"
            required
          />
        </div>
        <div className="flex flex-wrap items-center mb-2">
          <label className="p-2 w-36 border-solid border-2">Password</label>
          <input
            type="password"
            value={password}
            onChange={(e) => setPassword(e.target.value)}
            className="grow p-2 border border-2"
            required
          />
        </div>
        <div>
          <button
            type="submit"
            className="bg-slate-600 hover:bg-slate-400 p-2 text-white cursor-pointer font-bold rounded-lg"
          >
            Add User
          </button>
        </div>
        <div>
          <p className={`bg-amber-100 p-2 mt-4 rounded ${addUserMessage}`}>
            User added
          </p>
        </div>
      </form>
    </div>
  );
}
This component has a form which sends a POST request to our server. We are adding new users by sending the request body data for the state variables (Firstname, Lastname, Email and Password) to our backend server which then saves them to our S3 bucket on Tigris. The form uses the usePost hook we created to send the POST request to our server.
Alright next is the DeleteUserForm.js file. Here is the code needed for the file:
import { useState } from 'react';
import { useDelete } from '../../hooks/useDelete';

export default function DeleteUserForm() {
  const API = 'http://localhost:3000/';

  // DELETE form input state
  const [deleteId, setDeleteId] = useState('');
  const { deleteRequest } = useDelete();

  // CRUD message box state
  const useToggleMessage = (initialState = 'hidden') => {
    const [message, setMessage] = useState(initialState);

    const toggleMessage = () => {
      setMessage('');

      setTimeout(() => {
        setMessage('hidden');
      }, 3000);
    };

    return [message, toggleMessage];
  };

  const [deleteUserMessage, setDeleteUserMessage] = useToggleMessage();

  const handleDeleteForm = async (e) => {
    e.preventDefault();
    if (deleteId === '') {
      console.log('Form needs an id to be submitted');
    } else {
      try {
        const userId = {
          id: deleteId,
        };

        console.log('User ID', userId);
        // DELETE Route
        deleteRequest(`${API}/api/deleteuser`, userId);
        console.log(`User ${deleteId} deleted`);
        console.log(`UserId ${userId}`);
        setDeleteId('');

        setDeleteUserMessage();
      } catch (error) {
        console.log(error);
      }
    }
  };

  return (
    <div className="bg-white p-4 rounded drop-shadow-md mb-4 mt-4">
      <h1 className="text-2xl mb-4">DELETE User</h1>
      <form onSubmit={(e) => handleDeleteForm(e)}>
        <div className="flex flex-wrap items-center mb-2">
          <label className="p-2 w-36 border-solid border-2">ID</label>
          <input
            type="text"
            value={deleteId}
            onChange={(e) => setDeleteId(e.target.value)}
            className="grow p-2 border border-2"
            required
          />
        </div>
        <div>
          <button
            type="submit"
            className="bg-slate-600 hover:bg-slate-400 p-2 text-white cursor-pointer font-bold rounded-lg"
          >
            Delete User
          </button>
        </div>
        <div>
          <p className={`bg-amber-100 p-2 mt-4 rounded ${deleteUserMessage}`}>
            User deleted
          </p>
        </div>
      </form>
    </div>
  );
}
This one is pretty straightforward: it just has a form for deleting users from the database. Essentially, the logic searches for a user by its ID in the database. If it finds a match, then it sends a DELETE request to the server which removes that entry from our S3 bucket. Like our previous component, this uses a useDelete hook to perform the action.
Right, on to the UpdateUserForm.js file now. This is the code for our form, so go ahead and add it in:
import { useState } from 'react';
import { useUpdate } from '../../hooks/useUpdate';

export default function UpdateUserForm() {
  const API = 'http://localhost:3000/';

  // UPDATE/PUT form input state
  const [updateId, setUpdateId] = useState('');
  const [updateFirstname, setUpdateFirstname] = useState('');
  const [updateLastname, setUpdateLastname] = useState('');
  const [updateEmail, setUpdateEmail] = useState('');
  const [originalemail, setOriginalemail] = useState('');
  const [updatePassword, setUpdatePassword] = useState('');

  // CRUD message box state
  const useToggleMessage = (initialState = 'hidden') => {
    const [message, setMessage] = useState(initialState);

    const toggleMessage = () => {
      setMessage('');

      setTimeout(() => {
        setMessage('hidden');
      }, 3000);
    };

    return [message, toggleMessage];
  };

  const [updateUserMessage, setUpdateUserMessage] = useToggleMessage();
  const { updateRequest } = useUpdate();

  const handleUpdateForm = async (e) => {
    e.preventDefault();

    if (
      updateId === '' ||
      updateFirstname === '' ||
      updateLastname === '' ||
      originalemail === '' ||
      updateEmail === '' ||
      updatePassword === ''
    ) {
      console.log('The form needs all fields to be filled in');
    } else {
      try {
        const user = {
          id: updateId,
          firstname: updateFirstname,
          lastname: updateLastname,
          originalEmail: originalemail,
          email: updateEmail,
          password: updatePassword,
        };

        console.log(`User: ${user}`);
        // UPDATE Route
        updateRequest(`${API}/api/updateuser`, user);

        setUpdateId('');
        setUpdateFirstname('');
        setUpdateLastname('');
        setOriginalemail('');
        setUpdateEmail('');
        setUpdatePassword('');

        setUpdateUserMessage();
      } catch (error) {
        console.log(error);
      }
    }
  };

  return (
    <div className="bg-white p-4 rounded drop-shadow-md mb-4 mt-4">
      <h1 className="text-2xl mb-4">UPDATE User</h1>
      <form onSubmit={(e) => handleUpdateForm(e)}>
        <div className="flex flex-wrap items-center mb-2">
          <label className="p-2 w-36 border-solid border-2">ID</label>
          <input
            type="text"
            value={updateId}
            onChange={(e) => setUpdateId(e.target.value)}
            className="grow p-2 border border-2"
            required
          />
        </div>
        <div className="flex flex-wrap items-center mb-2">
          <label className="p-2 w-36 border-solid border-2">Firstname</label>
          <input
            type="text"
            value={updateFirstname}
            onChange={(e) => setUpdateFirstname(e.target.value)}
            className="grow p-2 border border-2"
            required
          />
        </div>

        <div className="flex flex-wrap items-center mb-2">
          <label className="p-2 w-36 border-solid border-2">Lastname</label>
          <input
            type="text"
            value={updateLastname}
            onChange={(e) => setUpdateLastname(e.target.value)}
            className="grow p-2 border border-2"
            required
          />
        </div>
        <div className="flex flex-wrap items-center mb-2">
          <label className="p-2 w-36 border-solid border-2">
            Original Email
          </label>
          <input
            type="email"
            value={originalemail}
            onChange={(e) => setOriginalemail(e.target.value)}
            className="grow p-2 border border-2"
            required
          />
        </div>
        <div className="flex flex-wrap items-center mb-2">
          <label className="p-2 w-36 border-solid border-2">Email</label>
          <input
            type="email"
            value={updateEmail}
            onChange={(e) => setUpdateEmail(e.target.value)}
            className="grow p-2 border border-2"
            required
          />
        </div>
        <div className="flex flex-wrap items-center mb-2">
          <label className="p-2 w-36 border-solid border-2">Password</label>
          <input
            type="password"
            value={updatePassword}
            onChange={(e) => setUpdatePassword(e.target.value)}
            className="grow p-2 border border-2"
            required
          />
        </div>
        <div>
          <button
            type="submit"
            className="bg-slate-600 hover:bg-slate-400 p-2 text-white cursor-pointer font-bold rounded-lg"
          >
            Update User
          </button>
        </div>
        <div>
          <p className={`bg-amber-100 p-2 mt-4 rounded ${updateUserMessage}`}>
            User updated
          </p>
        </div>
      </form>
    </div>
  );
}
The form in this component uses the useUpdate hook to send a PUT request to our backend server. The form takes state variables for ID, Firstname, Lastname, Original Email, Email and Password.
Most of the fields are easy to interpret – let's take note of the Original Email form field. You have to put in the current email address for the user, otherwise you will be unable to update the user because it will fail the check. The ID also needs to match, otherwise the form won't work.
Good, now we just have two files remaining – starting with the UserDatabaseTable.js file which requires this code:
import { useEffect } from 'react';
import { useFetch } from '../../hooks/useFetch';

export default function UserDatabaseTable() {
  const API = 'http://localhost:3000/';

  const { data, error, isLoading } = useFetch(`${API}/api/getusers`);
  if (error) return <div>An error has occurred.</div>;
  if (isLoading) return <div>Loading...</div>;

  useEffect(() => {
    console.log('Client API GET Data:', data);
  }, [data]);

  return (
    <div>
      <h1 className="text-4xl mb-2 text-center uppercase">User Database</h1>
      <div className="bg-gray-900 text-white p-4 rounded flex justify-center">
        <table className="table-auto border border-slate-500">
          <thead>
            <tr>
              <th className="border border-slate-600 p-2 text-2xl">ID</th>
              <th className="border border-slate-600 p-2 text-2xl">
                Firstname
              </th>
              <th className="border border-slate-600 p-2 text-2xl">Lastname</th>
              <th className="border border-slate-600 p-2 text-2xl">Email</th>
            </tr>
          </thead>

          {data === 0 ? (
            <tbody></tbody>
          ) : (
            <tbody>
              {data.map((user) => (
                <tr key={user.id}>
                  <td className="border border-slate-600 p-2 bg-gray-800 hover:bg-gray-600">
                    {user.id}
                  </td>
                  <td className="border border-slate-600 p-2 bg-gray-800 hover:bg-gray-600">
                    {user.firstname}
                  </td>
                  <td className="border border-slate-600 p-2 bg-gray-800 hover:bg-gray-600">
                    {user.lastname}
                  </td>
                  <td className="border border-slate-600 p-2 bg-gray-800 hover:bg-gray-600">
                    {user.email}
                  </td>
                </tr>
              ))}
            </tbody>
          )}
        </table>
      </div>
    </div>
  );
}
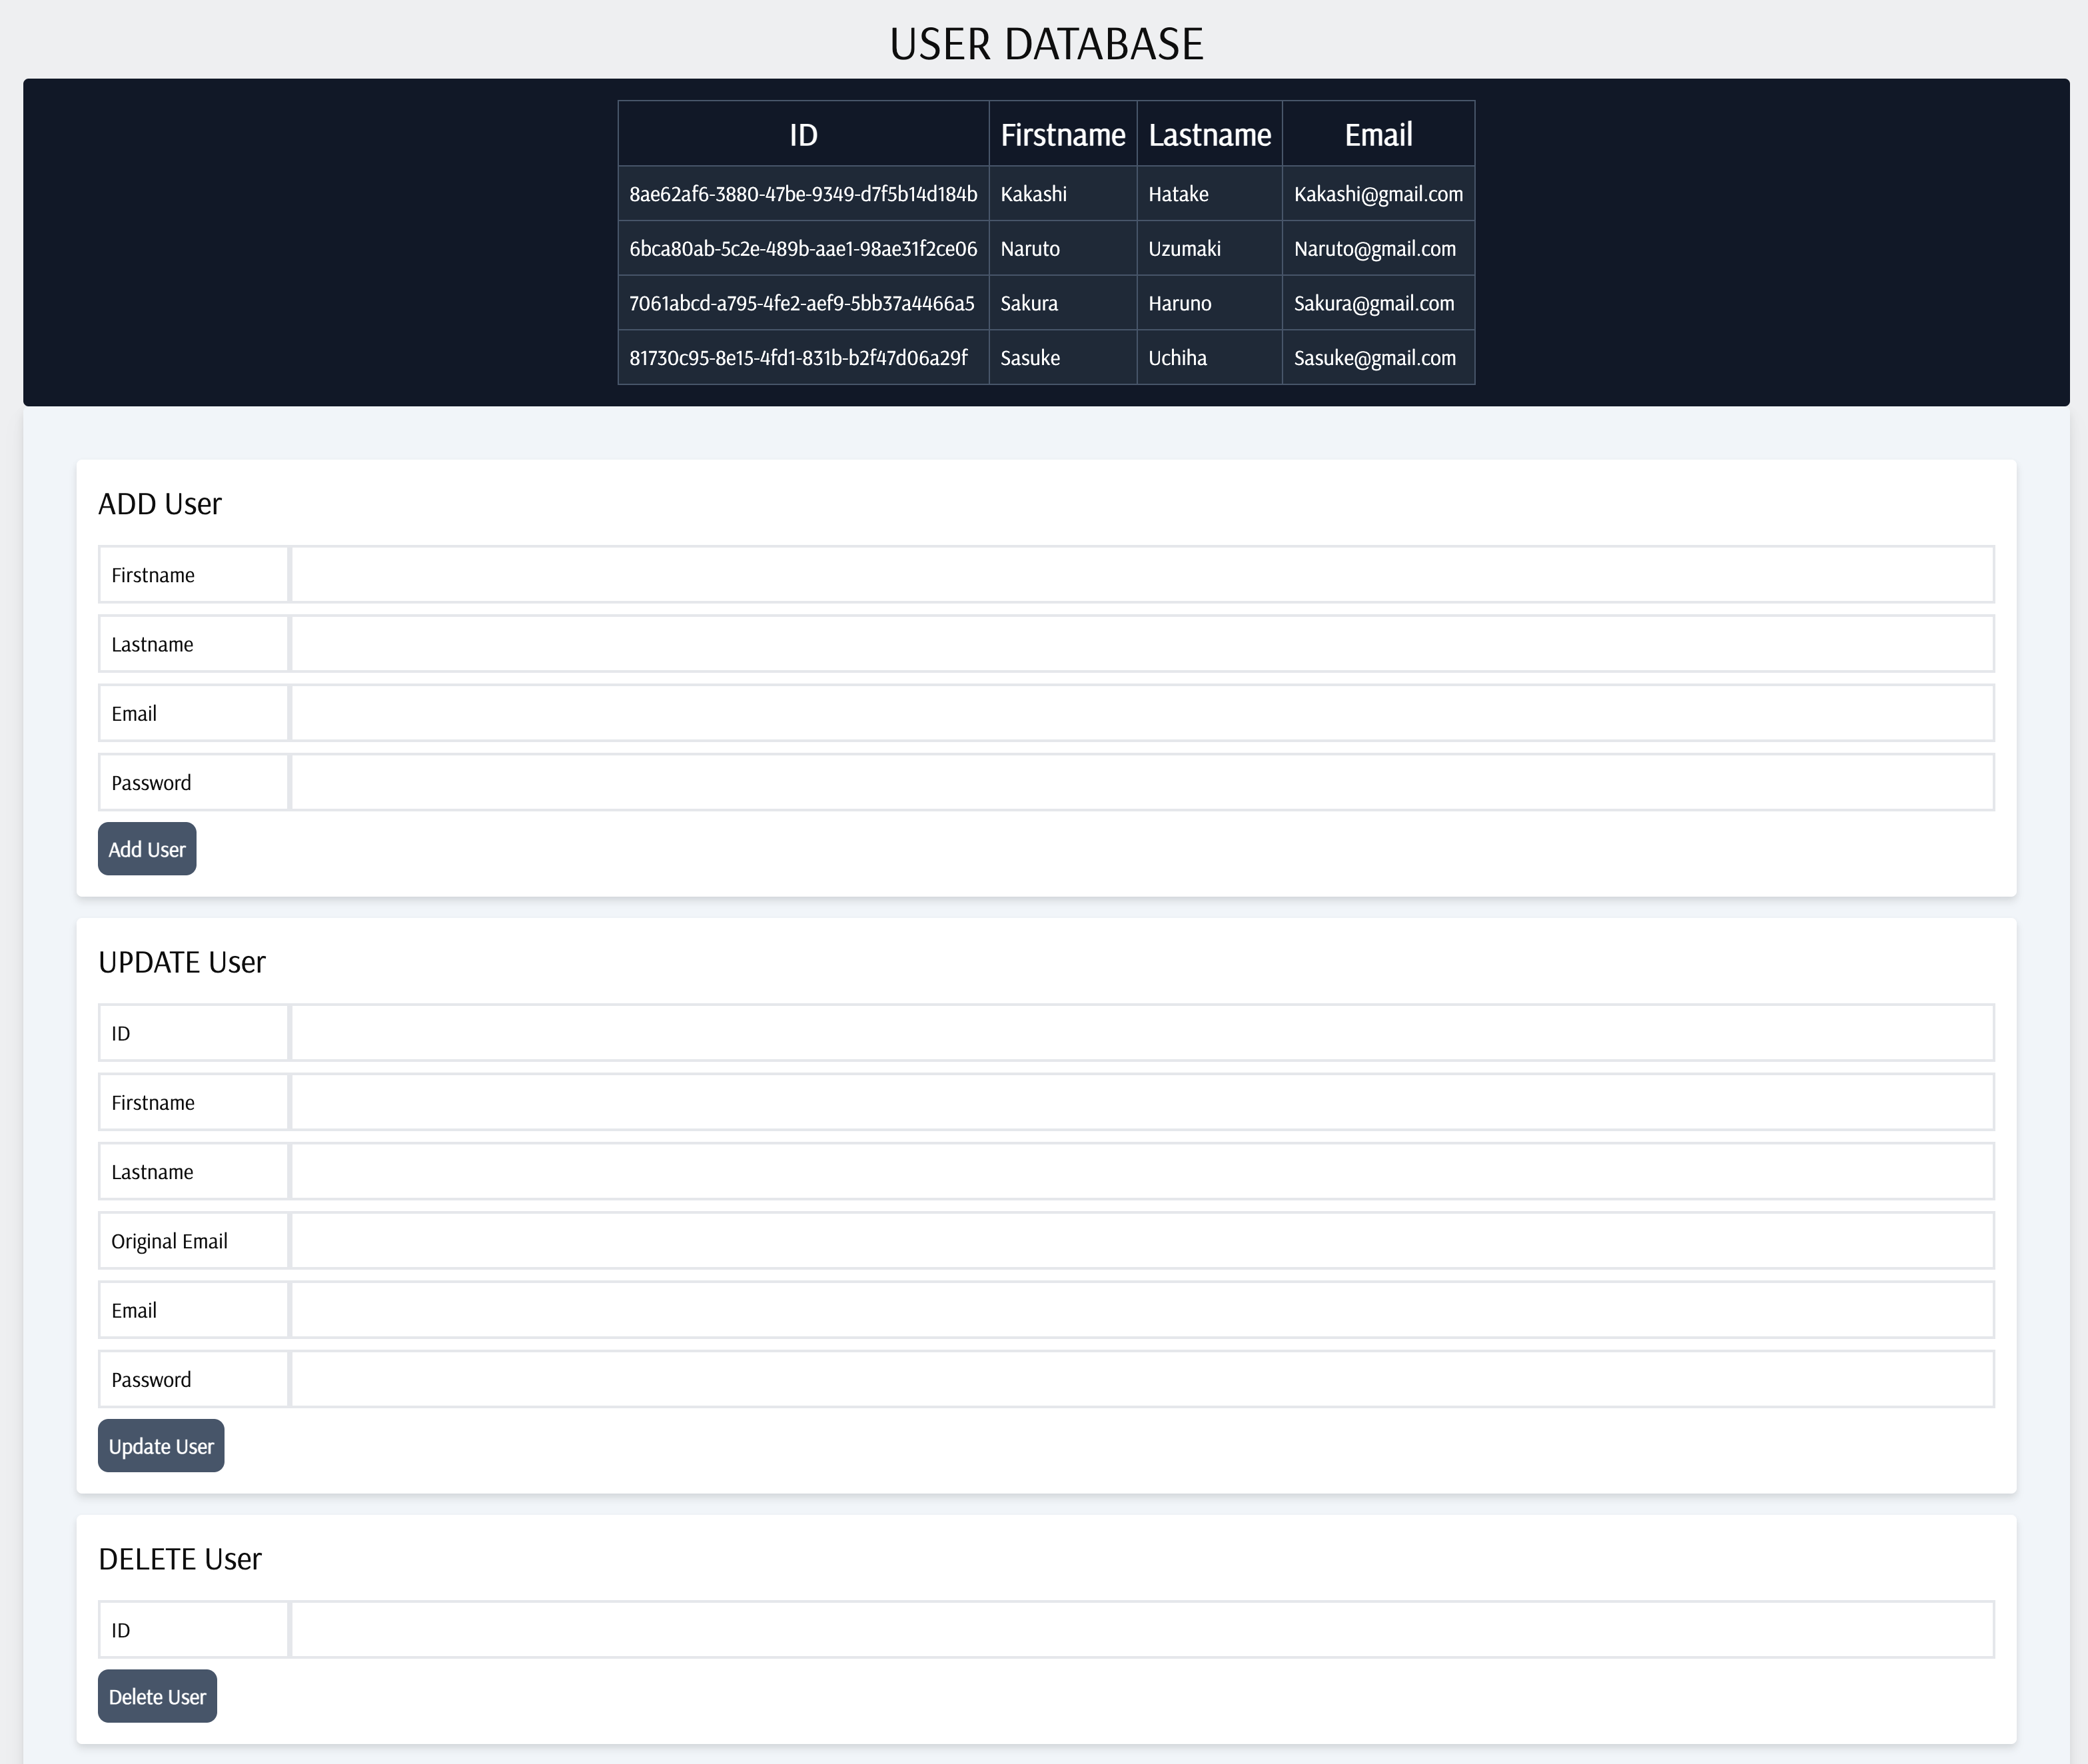
In this file, we are using the hook useFetch to do a GET request to our S3 bucket. That's how we retrieve the data that is inside of it. Then all we are doing is data.map to loop through the array of data and render it in a table on our screen.
Almost there – we have one file left: our page.js file in the root folder. Just add this code and let's get it completed:
'use client';
import UserDatabaseTable from './components/UserDatabaseTable/UserDatabaseTable';
import AddUserForm from './components/AddUserForm/AddUserForm';
import UpdateUserForm from './components/UpdateUserForm/UpdateUserForm';
import DeleteUserForm from './components/DeleteUserForm/DeleteUserForm';

export default function Home() {
  return (
    <div className="container mx-auto mt-4">
      <UserDatabaseTable />
      <div className="bg-slate-100 rounded p-10 drop-shadow-lg">
        <AddUserForm />
        <UpdateUserForm />
        <DeleteUserForm />
      </div>
    </div>
  );
}
All this file does is act as a main entry point for all of the components we created so that they render on our screen and complete the front end.
And we are done! Now you can run the app with npm run dev (if it's not running already) and give it a try.
Just a quick reminder: when using the UPDATE User form, you need to be sure that you are using the Original Email, otherwise it won't update.
Also, be careful of the white space when copying the ID because it will also stop the updates from going through. Feel free to implement better error handling and checking if you want to ;)
Our app should be fully working so now. We just need to deploy it online in the final section.
How to Deploy Your App to Fly.io
Deployment is the final part of this process, and it only takes a few simple steps to deploy your application online.
Firstly, you should be in the root of the fly-tigris-user-database project folder. Run the following command from your project's source directory to start a new Fly.io app:
fly launch
This command will create a fly.toml file and configure our project by setting up our project name, deployment region and other settings.
Now run the command below to deploy your application to Fly.io:
fly deployThe fly deploy flyctl command creates your Fly App and launches it on one or more Fly Machines, using the parameters supplied in the local fly.toml file.
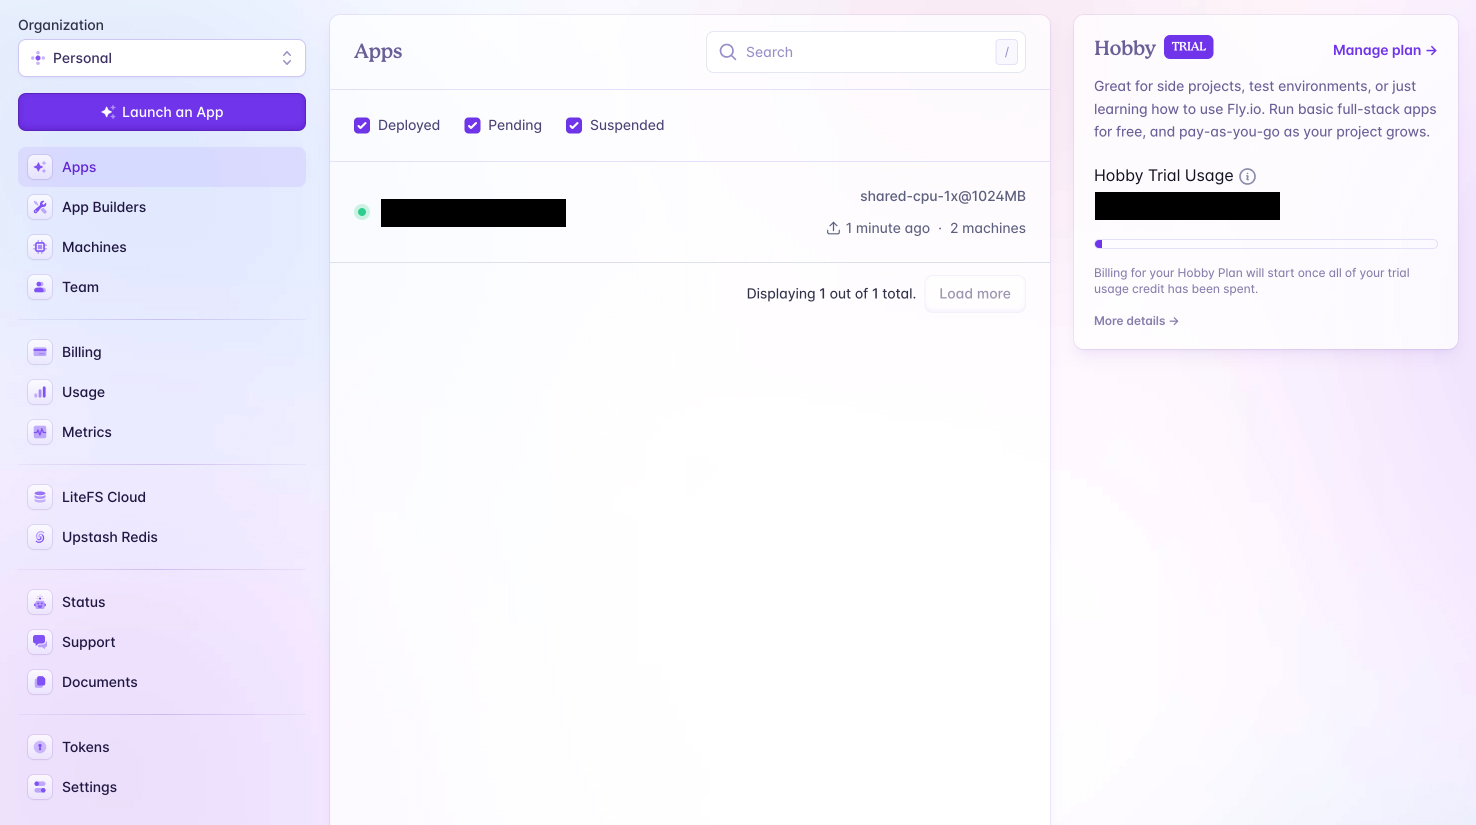
Now when you go to the dashboard on your Fly.io account, you will see your app like in the screenshot here:
Our app is now online but it won't work until we have added our environment variables from the .env.local file to the Secrets page for our app on Fly.io. We will also need to update our API route variable next so that it is using our Fly.io route and not localhost.
First lets do the secrets so use this example secrets page as a reference for your own app:
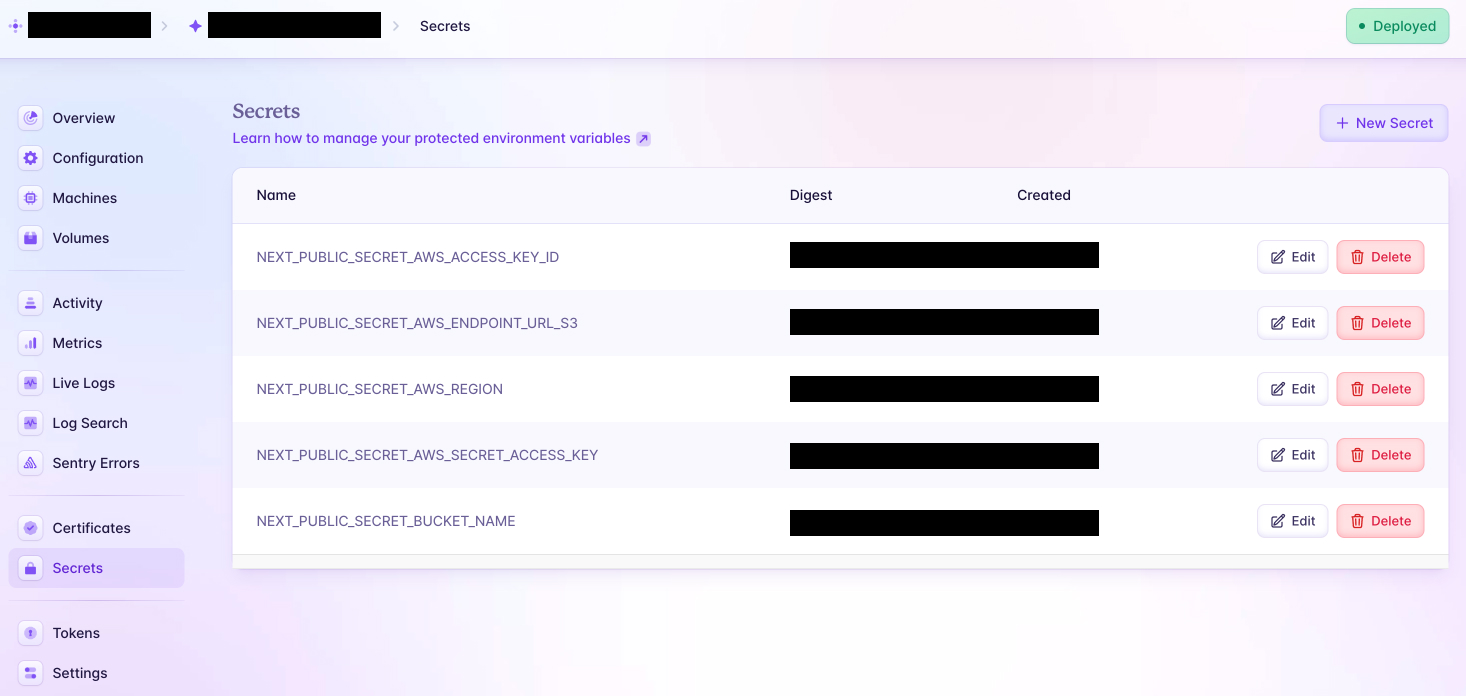
Secrets are staged for the next release. To trigger a deploy, run fly deploy from a terminal. Remember that your app won't work online until you update the API variable for the components inside of the components folder. Locally we use http://localhost:3000 and online we will ue the url that is automatically generated by fly.io.
The API variable is near the top inside of these files which you will need to update:
- components/AddUserForm/AddUserForm.js
- components/DeleteUserForm/DeleteUserForm.js
- components/UpdateUserForm/UpdateUserForm.js
- components/UserDatabaseTable/UserDatabaseTable.js
See the example code here for the API variable:
const API = 'https://your-online-url.fly.dev/';When your app is deployed online, you will get a URL. Just replace the value for the variable API with your Fly.io online URL. The routes in our application are now coming from our app on Fly.io and not our localhost app in the development test environment.
Don't forget to run the command fly deploy again (and every time you make a change to your local codebase or the secrets) so that your app on Fly.io gets the latest changes.
You can read the documentation here for more info on how deployment its done.
That's it! Deployment should be done as well, and we can access our application online.
Conclusion
So today we learned how to build a full-stack application using Next.js and deploy it online to the app hosting platform Fly.io. We also utilised Tigris for storing our user data in an AWS bucket online.
The combination of both platforms makes them a very useful and powerful tool for getting our apps online. Both platforms offer many different features so it's worth playing around with them and seeing how they can be beneficial for your projects.