

If you're working with React, it can be quite difficult to understand and implement API Requests.
So in this article, we'll learn how it all works by implementing CRUD Operations using React, React Hooks, React Router, and Axios.
Let's dive in.
How to Install Node and npm
First of all, let's install Node in our system. We'll mainly use it to execute our JavaScript code.
To download Node, go to https://nodejs.org/en/.
You'll also need the node package manager, or npm, which is built on Node. You can use it to install packages for your JavaScript apps. Fortunately it comes with Node, so you don't need to download it separately.
Once both of them are finished, open your terminal or command prompt and type node -v. This checks which version of Node you have.
How to Create your React Application
To create your React application, type npx create-react-app <Your app name> in your terminal, or npx create-react-appreact-crud in this case.
You'll see that the packages are being installed.
Once the packages are done, go into the project folder and type npm start.
You'll see the default React template, like this:

How to Install the Semantic UI Package for React
Let's install the Semantic UI React package in our project. Semantic UI is an UI library made for React that has pre-built UI components like tables, buttons, and many features.
You can install it using one of the commands below, depending on your package manager.
yarn add semantic-ui-react semantic-ui-cssnpm install semantic-ui-react semantic-ui-cssAlso, import the library in your app's main entry file, which is index.js.
import 'semantic-ui-css/semantic.min.css'How to Build your CRUD Application
Now, let's start building our CRUD Application using React.
First, we'll add a heading to our application.
In our app.js file, add a heading like this:
import './App.css';

function App() {
  return (
    <div>
      React Crud Operations
    </div>
  );
}

export default App;
Now, let's make sure it's in the center.
Give the parent div a classname of main. And in the App.css file, we will use Flexbox to center the header.
import './App.css';

function App() {
  return (
    <div className="main">
      React Crud Operations
    </div>
  );
}

export default App;
.main{
  display: flex;
  justify-content: center;
  align-items: center;
  height: 100vh;
}
Now our heading in perfectly centered.
So it looks a bit better, we need to make it bolder and add some cool fonts. To do this, we'll use heading tags around our header like this:
import './App.css';

function App() {
  return (
    <div className="main">
      <h2 className="main-header">React Crud Operations</h2>
    </div>
  );
}

export default App;
Let's import a font from Google Font. Head over to https://fonts.google.com/ to pick one.
Choose any font of your liking, but I will use the Montserrat font-family.
Import the font of your choice in the App.css file, like this:
@import url('https://fonts.googleapis.com/css2?family=Montserrat&display=swap');
Now, let's change the font of the header.
<div className="main">
      <h2 className="main-header">React Crud Operations</h2>
    </div>
Give the heading tag a className of main-header, just like this.
Then, in your App.css, add the font family:
.main-header{
  font-family: 'Montserrat', sans-serif;
}
Now you will see the changed heading.
How to Create your CRUD Components
Let's create four CRUD Components, which will be Create, Read, Update and Delete.
In our src folder, create a folder called components. And inside this folder, create three files – create, read and update. For delete, we don't need any extra component.

Now, let's implement the Create operation.
But for that, we need to use Mock API's. These API's will send data to the fake server that we will create, just for learning purposes.
So, head to https://mockapi.io/ and create your account.

Create a project by clicking the plus button.


Add your project name, and click the Create button.

Now, create a new resource by clicking on the NEW RESOURCE button.

It will ask you for the Resource Name, so enter the name you'd like to use.

Remove the extra fields like name, avatar, or createdAt, because we won't be needing those. Then, click Create.

Now, we have created our fake API, which I named fakeData.
Click on fakeData, and you will see the API opening up in a new tab. The database is empty right now.
How to Create a Form for the Create Component
Let's use a form from the Semantic UI library.
Head to Semantic React, and search for Form in the search bar on the left.

You will see a form like this, so click on Try it at the top right to get the code.

Copy this code and paste it into your Create.js file like this:
import React from 'react'
import { Button, Checkbox, Form } from 'semantic-ui-react'

const Create = () => (
    <Form>
        <Form.Field>
            <label>First Name</label>
            <input placeholder='First Name' />
        </Form.Field>
        <Form.Field>
            <label>Last Name</label>
            <input placeholder='Last Name' />
        </Form.Field>
        <Form.Field>
            <Checkbox label='I agree to the Terms and Conditions' />
        </Form.Field>
        <Button type='submit'>Submit</Button>
    </Form>
)

export default Create;
Import the Create Component in your app.js file.
import './App.css';
import Create from './components/create';

function App() {
  return (
    <div className="main">
      <h2 className="main-header">React Crud Operations</h2>
      <div>
        <Create/>
      </div>
    </div>
  );
}

export default App;
Just like this:

But there is a problem here – the items are not properly aligned and the text input label colors are black. So, let's change it.
In the create.js file, give Form a className of create-form.
import React from 'react'
import { Button, Checkbox, Form } from 'semantic-ui-react'

const Create = () => (
    <Form className="create-form">
        <Form.Field>
            <label>First Name</label>
            <input placeholder='First Name' />
        </Form.Field>
        <Form.Field>
            <label>Last Name</label>
            <input placeholder='Last Name' />
        </Form.Field>
        <Form.Field>
            <Checkbox label='I agree to the Terms and Conditions' />
        </Form.Field>
        <Button type='submit'>Submit</Button>
    </Form>
)

export default Create;And add the following class in your App.css file:
.create-form label{
  color: whitesmoke !important;
  font-family: 'Montserrat', sans-serif;
  font-size: 12px !important;
}This class will target all the form field labels and apply the color whitesmoke. It will also change the font and increase the font-size.
Now, in our main class, add a flex-direction property. This property will set the direction to column, so each element in the main className will be vertically aligned.
.main{
  display: flex;
  justify-content: center;
  align-items: center;
  height: 100vh;
  background-color: #212121;
  color: whitesmoke;
  flex-direction: column;
}
You can see that our form looks much better now.
Next, let's get data from the form fields into our console. For that, we will use the useState hook in React.
In our create.js file, import useState from React.
import React, { useState } from 'react';Then, create states for first name, last name, and the checkbox. We are initializing the states as empty or false.
import React, { useState } from 'react';
import { Button, Checkbox, Form } from 'semantic-ui-react'

export default function Create() {
    const [firstName, setFirstName] = useState('');
    const [lastName, setLastName] = useState('');
    const [checkbox, setCheckbox] = useState(false);
    return (
        <div>
            <Form className="create-form">
                <Form.Field>
                    <label>First Name</label>
                    <input placeholder='First Name' />
                </Form.Field>
                <Form.Field>
                    <label>Last Name</label>
                    <input placeholder='Last Name' />
                </Form.Field>
                <Form.Field>
                    <Checkbox label='I agree to the Terms and Conditions' />
                </Form.Field>
                <Button type='submit'>Submit</Button>
            </Form>
        </div>
    )
}
You can see that this is now acting as a functional component. So, we need to change the component into a functional component. This is because we can only use hooks in functional components.
Now, let's set up the first name, the last name, and the checkbox using the setFirstName, setLastName, and setCheckbox properties, respectively.
<input placeholder='First Name' onChange={(e) => setFirstName(e.target.value)}/>

<input placeholder='Last Name' onChange={(e) => setLastName(e.target.value)}/>

<Checkbox label='I agree to the Terms and Conditions' onChange={(e) => setCheckbox(!checkbox)}/>
We are capturing the states of first name, last name, and the checkbox.
Create a function called postData that we'll use to send data to the API. Inside the function, write this code:
const postData = () => {
        console.log(firstName);
        console.log(lastName);
        console.log(checkbox);
}
We are logging the first name, last name, and the checkbox values in the console.
On the Submit button, assign this function using an onClick event so that whenever we press the Submit Button, this function will be called.
<Button onClick={postData} type='submit'>Submit</Button>Here is the whole code for the create file:
import React, { useState } from 'react';
import { Button, Checkbox, Form } from 'semantic-ui-react'

export default function Create() {
    const [firstName, setFirstName] = useState('');
    const [lastName, setLastName] = useState('');
    const [checkbox, setCheckbox] = useState(false);
    const postData = () => {
        console.log(firstName);
        console.log(lastName);
        console.log(checkbox);
    }
    return (
        <div>
            <Form className="create-form">
                <Form.Field>
                    <label>First Name</label>
                    <input placeholder='First Name' onChange={(e) => setFirstName(e.target.value)}/>
                </Form.Field>
                <Form.Field>
                    <label>Last Name</label>
                    <input placeholder='Last Name' onChange={(e) => setLastName(e.target.value)}/>
                </Form.Field>
                <Form.Field>
                    <Checkbox label='I agree to the Terms and Conditions' onChange={(e) => setCheckbox(!checkbox)}/>
                </Form.Field>
                <Button onClick={postData} type='submit'>Submit</Button>
            </Form>
        </div>
    )
}
Type some value in the first name and last name, and check the checkbox. Then, click the Submit button. You will see the data popping up in the console like this:

How to Use Axios to Send API Requests to the Mock APIs
Let's use Axios to send our form data to the mock server.
But first, we need to install it.
Just type npm i axios to install this package.

After the package has been installed, let's start the create operation.
Import Axios at the top of the file.
import axios from 'axios';In the postData function, we will use Axios to send the POST request.
const postData = () => {
        axios.post(`https://60fbca4591156a0017b4c8a7.mockapi.io/fakeData`, {
            firstName,
            lastName,
            checkbox
        })
}As you can see, we are using axios.post. And inside axios.post, we have the API endpoint, which we created earlier. Then, we have the form fields wrapped in curly brackets.
When we click Submit, this function will be called and it will post data to the API server.

Enter your first name, last name, and check the checkbox. Click submit.

Then if you check the API, you will get your first name, last name, and the checkbox as true, wrapped in an object.
How to Implement the Read and Update Operations
To start the read operation, we need to create a Read Page. We also need the React Router package to navigate to different pages.
Go to https://reactrouter.com/web/guides/quick-start and install the package using npm i react-router-dom.
After it has been installed, import a few things from React Router:
import { BrowserRouter as Router, Route } from 'react-router-dom'In our App.js, wrap the whole return into a Router. This basically means that whatever is inside this Router will be able to use routing in React.
import './App.css';
import Create from './components/create';
import { BrowserRouter as Router, Route } from 'react-router-dom'

function App() {
  return (
    <Router>
      <div className="main">
        <h2 className="main-header">React Crud Operations</h2>
        <div>
          <Create />
        </div>
      </div>
    </Router>
  );
}

export default App;
Our App.js will look like the above now.
Replace the Create inside the return and add the following code:
import './App.css';
import Create from './components/create';
import { BrowserRouter as Router, Route } from 'react-router-dom'

function App() {
  return (
    <Router>
      <div className="main">
        <h2 className="main-header">React Crud Operations</h2>
        <div>
          <Route exact path='/create' component={Create} />
        </div>
      </div>
    </Router>
  );
}

export default App;
Here, we are using the Route component as Create. We have set the path of Create to '/create'. So, if we go http://localhost:3000/create, we will see the create page.
Similarly, we need routes for read and update.
import './App.css';
import Create from './components/create';
import Read from './components/read';
import Update from './components/update';
import { BrowserRouter as Router, Route } from 'react-router-dom'

function App() {
  return (
    <Router>
      <div className="main">
        <h2 className="main-header">React Crud Operations</h2>
        <div>
          <Route exact path='/create' component={Create} />
        </div>
        <div style={{ marginTop: 20 }}>
          <Route exact path='/read' component={Read} />
        </div>

        <Route path='/update' component={Update} />
      </div>
    </Router>
  );
}

export default App;
So create the read and update routes just like you see above.
And if you go to http://localhost:3000/read, you will see the following:

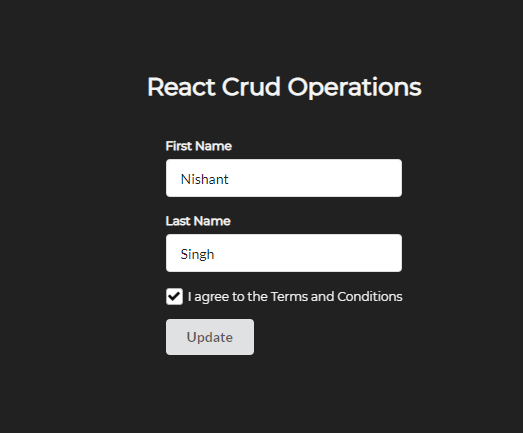
And on http://localhost:3000/update, we will see Update Component like this:

The Read Operation
For the Read operation, we will need a Table component. So, head over to React Semantic UI and use a table from the library.
import React from 'react';
import { Table } from 'semantic-ui-react'
export default function Read() {
    return (
        <div>
            <Table singleLine>
                <Table.Header>
                    <Table.Row>
                        <Table.HeaderCell>Name</Table.HeaderCell>
                        <Table.HeaderCell>Registration Date</Table.HeaderCell>
                        <Table.HeaderCell>E-mail address</Table.HeaderCell>
                        <Table.HeaderCell>Premium Plan</Table.HeaderCell>
                    </Table.Row>
                </Table.Header>

                <Table.Body>
                    <Table.Row>
                        <Table.Cell>John Lilki</Table.Cell>
                        <Table.Cell>September 14, 2013</Table.Cell>
                        <Table.Cell>jhlilk22@yahoo.com</Table.Cell>
                        <Table.Cell>No</Table.Cell>
                    </Table.Row>
                    <Table.Row>
                        <Table.Cell>Jamie Harington</Table.Cell>
                        <Table.Cell>January 11, 2014</Table.Cell>
                        <Table.Cell>jamieharingonton@yahoo.com</Table.Cell>
                        <Table.Cell>Yes</Table.Cell>
                    </Table.Row>
                    <Table.Row>
                        <Table.Cell>Jill Lewis</Table.Cell>
                        <Table.Cell>May 11, 2014</Table.Cell>
                        <Table.Cell>jilsewris22@yahoo.com</Table.Cell>
                        <Table.Cell>Yes</Table.Cell>
                    </Table.Row>
                </Table.Body>
            </Table>
        </div>
    )
}
Here, you can see we have a table with some dummy data. But we only need one Table Row. So, let's remove the rest.
import React from 'react';
import { Table } from 'semantic-ui-react'
export default function Read() {
    return (
        <div>
            <Table singleLine>
                <Table.Header>
                    <Table.Row>
                        <Table.HeaderCell>Name</Table.HeaderCell>
                        <Table.HeaderCell>Registration Date</Table.HeaderCell>
                        <Table.HeaderCell>E-mail address</Table.HeaderCell>
                        <Table.HeaderCell>Premium Plan</Table.HeaderCell>
                    </Table.Row>
                </Table.Header>

                <Table.Body>
                    <Table.Row>
                        <Table.Cell>John Lilki</Table.Cell>
                        <Table.Cell>September 14, 2013</Table.Cell>
                        <Table.Cell>jhlilk22@yahoo.com</Table.Cell>
                        <Table.Cell>No</Table.Cell>
                    </Table.Row>
                </Table.Body>
            </Table>
        </div>
    )
}

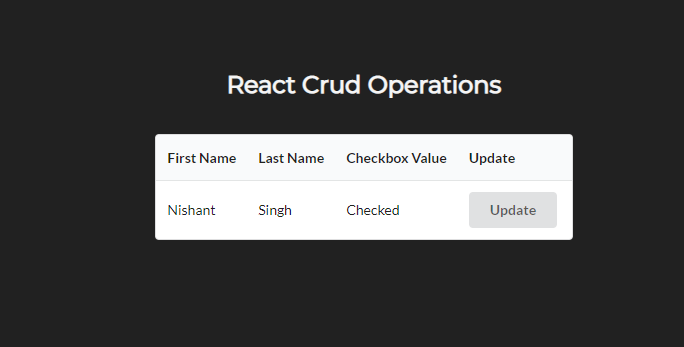
This is the output of the Read page. We have a table with four columns, but we only need three.
Remove the extra field columns and rename the fields like this:

This is how our Read Page looks now:
import React from 'react';
import { Table } from 'semantic-ui-react'
export default function Read() {
    return (
        <div>
            <Table singleLine>
                <Table.Header>
                    <Table.Row>
                        <Table.HeaderCell>First Name</Table.HeaderCell>
                        <Table.HeaderCell>Last Name</Table.HeaderCell>
                        <Table.HeaderCell>Checked</Table.HeaderCell>
                    </Table.Row>
                </Table.Header>

                <Table.Body>
                    <Table.Row>
                        <Table.Cell>Nishant</Table.Cell>
                        <Table.Cell>Kumar</Table.Cell>
                        <Table.Cell>Yes</Table.Cell>
                    </Table.Row>
                </Table.Body>
            </Table>
        </div>
    )
}
Now, let's send the GET Request to get the data from the API.
We need the data when our application loads. So, we are going to use the useEffect Hook.
import React, { useEffect } from 'react';

 useEffect(() => {

}, [])Create one state that will contain the incoming data. This will be an array.
import React, { useEffect, useState } from 'react';

const [APIData, setAPIData] = useState([]);
useEffect(() => {

}, [])In the useEffect Hook, let's send the GET Request.
 useEffect(() => {
        axios.get(`https://60fbca4591156a0017b4c8a7.mockapi.io/fakeData`)
            .then((response) => {
                setAPIData(response.data);
            })
    }, [])
So, we are using axios.get to send the GET request to the API. Then, if the request is fulfilled, we are setting the response data in our APIData state.
Now, let's map our Table rows according to the API Data.
We are going to use the Map function to do this. It will iterate over the array and display the data in the output.
<Table.Body>
  {APIData.map((data) => {
     return (
       <Table.Row>
          <Table.Cell>{data.firstName}</Table.Cell>
           <Table.Cell>{data.lastName}</Table.Cell>
           <Table.Cell>{data.checkbox ? 'Checked' : 'Unchecked'}</Table.Cell>
        </Table.Row>
   )})}
</Table.Body>
We are mapping our firstName, lastName, and checkbox according the data in the API. But our checkbox is a little bit different. I have used a Ternary Operator ('?') here. If the data.checkbox is true, the output will be Checked, or else it will be Unchecked.

The Update Operation
Create one more header for Update and one column in the table row for an update button. Use the button from Semantic UI React.
<Table.HeaderCell>Update</Table.HeaderCell>

<Table.Cell>
  <Button>Update</Button>
</Table.Cell>Now, when we click this button, we should be redirected to the update page. For that, we need Link from React Router.
Import Link from React Router. And wrap the table cell for the update button into Link tags.
import { Link } from 'react-router-dom';

<Link to='/update'>
  <Table.Cell>
     <Button>Update</Button>
   </Table.Cell>
</Link>So, if we click update button, we will be redirected to the update page.
In order to update the column data, we need their respective ID's, which comes from the APIs.
Create a function called setData. Bind it to the Update button.
<Button onClick={() => setData()}>Update</Button>Now, we need to pass the data as a parameter to the top function.
<Button onClick={() => setData(data)}>Update</Button>And in the function at the top, log this data in the console:
const setData = (data) => {
   console.log(data);
}
Click the update button in the table, and check the console. You will get the data of the respective table field.
Let's set this data into the localStorage.
const setData = (data) => {
        let { id, firstName, lastName, checkbox } = data;
        localStorage.setItem('ID', id);
        localStorage.setItem('First Name', firstName);
        localStorage.setItem('Last Name', lastName);
        localStorage.setItem('Checkbox Value', checkbox)
}We are destructuring our data into id, firstName, lastName, and checkbox, and then we are setting this data into local storage. You can use local storage to store data locally in the browser.
Now, in the Update component, we need one form for the update operation. Let's reuse the form from our Create component. Just change the name of the function from Create to Update.
import React, { useState } from 'react';
import { Button, Checkbox, Form } from 'semantic-ui-react'
import axios from 'axios';

export default function Update() {
    const [firstName, setFirstName] = useState('');
    const [lastName, setLastName] = useState('');
    const [checkbox, setCheckbox] = useState(false);

    return (
        <div>
            <Form className="create-form">
                <Form.Field>
                    <label>First Name</label>
                    <input placeholder='First Name' onChange={(e) => setFirstName(e.target.value)}/>
                </Form.Field>
                <Form.Field>
                    <label>Last Name</label>
                    <input placeholder='Last Name' onChange={(e) => setLastName(e.target.value)}/>
                </Form.Field>
                <Form.Field>
                    <Checkbox label='I agree to the Terms and Conditions' onChange={(e) => setCheckbox(!checkbox)}/>
                </Form.Field>
                <Button type='submit'>Update</Button>
            </Form>
        </div>
    )
}
Create a useEffect hook in the Update component. We will use it to get data we previously stored in Local Storage. Also, create one more state for the ID field.
const [id, setID] = useState(null);

useEffect(() => {
        setID(localStorage.getItem('ID'))
        setFirstName(localStorage.getItem('First Name'));
        setLastName(localStorage.getItem('Last Name'));
        setCheckbox(localStorage.getItem('Checkbox Value'))
}, []);
Set the respective data according to your keys from Local Storage. We need to set these values in form fields. It will automatically populate the fields when the Update page loads.
<Form className="create-form">
                <Form.Field>
                    <label>First Name</label>
                    <input placeholder='First Name' value={firstName} onChange={(e) => setFirstName(e.target.value)}/>
                </Form.Field>
                <Form.Field>
                    <label>Last Name</label>
                    <input placeholder='Last Name' value={lastName} onChange={(e) => setLastName(e.target.value)}/>
                </Form.Field>
                <Form.Field>
                    <Checkbox label='I agree to the Terms and Conditions' checked={checkbox} onChange={(e) => setCheckbox(!checkbox)}/>
                </Form.Field>
                <Button type='submit'>Update</Button>
</Form>Now, if we click the Update button in Read Page, we will be redirected to the update page, where we will see all the auto populated form data.

Now, let's create the Update request to update the data.
Create a function called updateAPIData. Inside this function, we are going to use axios.put to send a PUT request that will update our data.
const updateAPIData = () => {
    axios.put(`https://60fbca4591156a0017b4c8a7.mockapi.io/fakeData/${id}`, {
        firstName,
         lastName,
         checkbox
	})
}
Here, you can see we are appending the API endpoint with an id field.
When we click the field in the table, its ID is getting stored into Local Storage. And in the Update page, we are retrieving it. Then, we are storing that ID in the id state.
After that, we pass the id to the endpoint. This allows us to update the field of which we are passing the ID.
Bind the updateAPIData function to the Update button.
<Button type='submit' onClick={updateAPIData}>Update</Button>Click the Update button in the table in Read page, change your last name, and then click the Update button in the Update page.
Go back to the Read page, or check the API. You will see your last name has been changed.

The Delete Operation
Add one more Button in the Read table, which we'll use for the Delete operation.
<Table.Cell>
   <Button onClick={() => onDelete(data.id)}>Delete</Button>
</Table.Cell>Create a function called onDelete, and bind this function to the Delete button. This function will receive an ID parameter on the Delete button click.
const onDelete = (id) => {

}We are going to use axios.delete to delete the respective columns.
const onDelete = (id) => {
  axios.delete(`https://60fbca4591156a0017b4c8a7.mockapi.io/fakeData/${id}`)
}Click the Delete button and check the API. You will see the data has been deleted.
We need to load the table data after it has been deleted.
So, create a function to load the API data.
const getData = () => {
    axios.get(`https://60fbca4591156a0017b4c8a7.mockapi.io/fakeData`)
        .then((getData) => {
             setAPIData(getData.data);
         })
}Now, in the onDelete function, we need to load the updated data after we delete a field.
const onDelete = (id) => {
        axios.delete(`https://60fbca4591156a0017b4c8a7.mockapi.io/fakeData/${id}`)
     .then(() => {
        getData();
    })
}
So, now if we click Delete on any field, it will delete that field and refresh the table automatically.

Let's Make Some Improvements to our CRUD App
So, when we post our data in the Create page, we are just getting the data in the mock database. We need to redirect to the Read page when our data is created in the Create page.
Import useHistory from React Router.
import { useHistory } from 'react-router';Create a variable called history with let, and set it to useHistory:
let history = useHistory();Then, use the history.push function to push to the Read page just after the post API gets called.
const postData = () => {
        axios.post(`https://60fbca4591156a0017b4c8a7.mockapi.io/fakeData`, {
            firstName,
            lastName,
            checkbox
        }).then(() => {
            history.push('/read')
        })
}It will push to the Read page using the useHistory hook.
Do the same for the Update page.
import React, { useState, useEffect } from 'react';
import { Button, Checkbox, Form } from 'semantic-ui-react'
import axios from 'axios';
import { useHistory } from 'react-router';

export default function Update() {
    let history = useHistory();
    const [id, setID] = useState(null);
    const [firstName, setFirstName] = useState('');
    const [lastName, setLastName] = useState('');
    const [checkbox, setCheckbox] = useState(false);

    useEffect(() => {
        setID(localStorage.getItem('ID'))
        setFirstName(localStorage.getItem('First Name'));
        setLastName(localStorage.getItem('Last Name'));
        setCheckbox(localStorage.getItem('Checkbox Value'));
    }, []);

    const updateAPIData = () => {
        axios.put(`https://60fbca4591156a0017b4c8a7.mockapi.io/fakeData/${id}`, {
            firstName,
            lastName,
            checkbox
        }).then(() => {
            history.push('/read')
        })
    }
    return (
        <div>
            <Form className="create-form">
                <Form.Field>
                    <label>First Name</label>
                    <input placeholder='First Name' value={firstName} onChange={(e) => setFirstName(e.target.value)}/>
                </Form.Field>
                <Form.Field>
                    <label>Last Name</label>
                    <input placeholder='Last Name' value={lastName} onChange={(e) => setLastName(e.target.value)}/>
                </Form.Field>
                <Form.Field>
                    <Checkbox label='I agree to the Terms and Conditions' checked={checkbox} onChange={() => setCheckbox(!checkbox)}/>
                </Form.Field>
                <Button type='submit' onClick={updateAPIData}>Update</Button>
            </Form>
        </div>
    )
}
And now you know how to perform CRUD operations using React and React Hooks!
Alternatively, you can watch my Youtube video on React CRUD Operations if you want to supplement your learning.
You can find the code on GitHub if you want to experiment further.
Happy Learning.