

Hey Java developers, I’ve got good news: Spring now has official support for building AI applications using the Spring AI module.
In this tutorial, we’ll build a chatbot application using Spring Boot, React, Docker, and OpenAI. This app will let users interact with an AI-powered chatbot, ask questions, and receive responses in real time.
The entire source code mentioned in this article is already available on the GitHub repository. Feel free to give it a star and fork it to play around.
To give you an idea of what we’ll be building here, this is how the final application will look:

Are you excited? Let’s build it from scratch!
Table of Contents
Prerequisites
Before we dive into building the chatbot, here are a few things you’ll need to be familiar with:
Basic understanding of Java and Spring Boot.
Basic understanding of React and CSS.
Install JDK, Node Package Manager and Docker onto your machine.
Get Your OpenAI key
First, you’ll need to sign up for an OpenAI account if you don’t have one. Once signed in, you’ll be taken to the homepage.
In the top right corner, click the “Dashboard” menu. On the sidebar, click "API Keys," then click the "Create new secret key" button to generate your secret key:
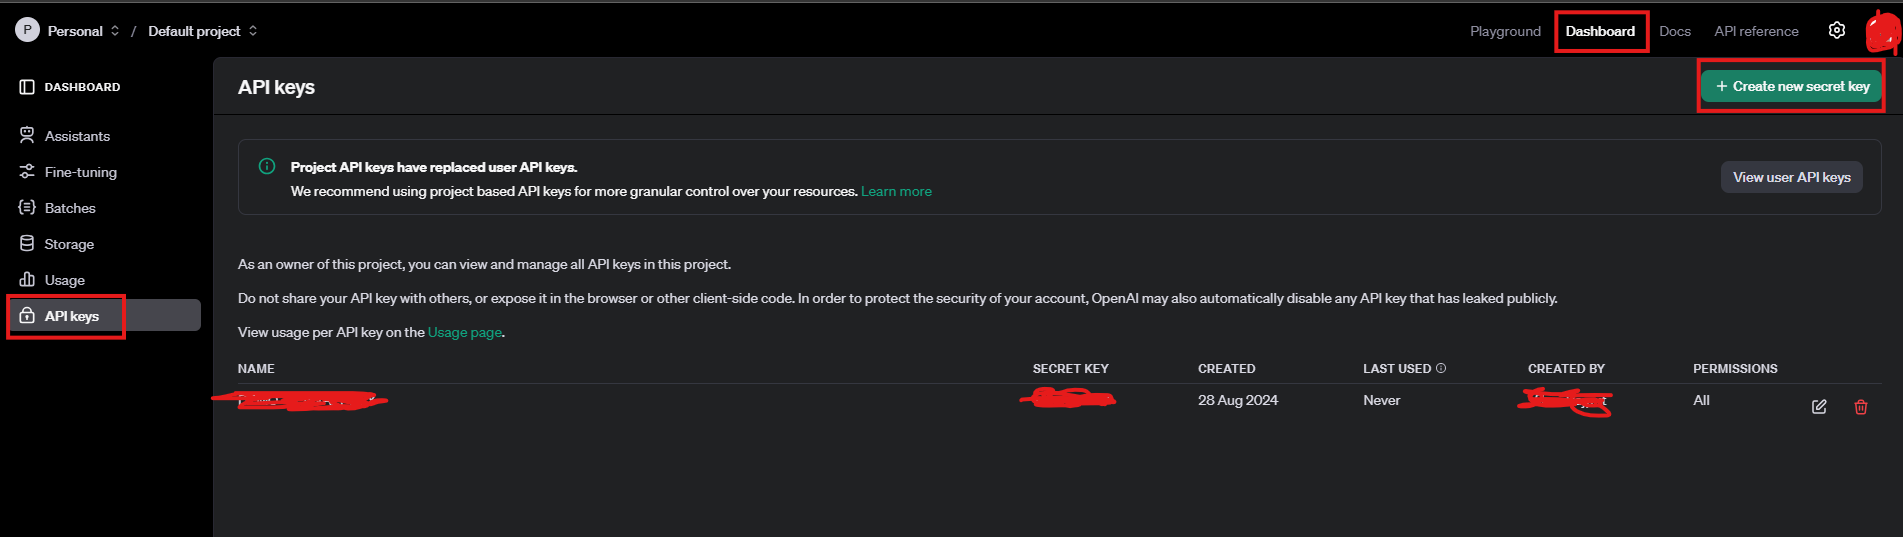
Copy the secret key and save it somewhere safe, as you’ll need it later to connect your app to the OpenAI API.
You can go through the OpenAI API reference guide to learn more about how to call the APIs, what requests it accepts, and the responses it gives.
Build the REST API in Spring Boot
Let’s head over to the spring initializer to generate the boilerplate code:
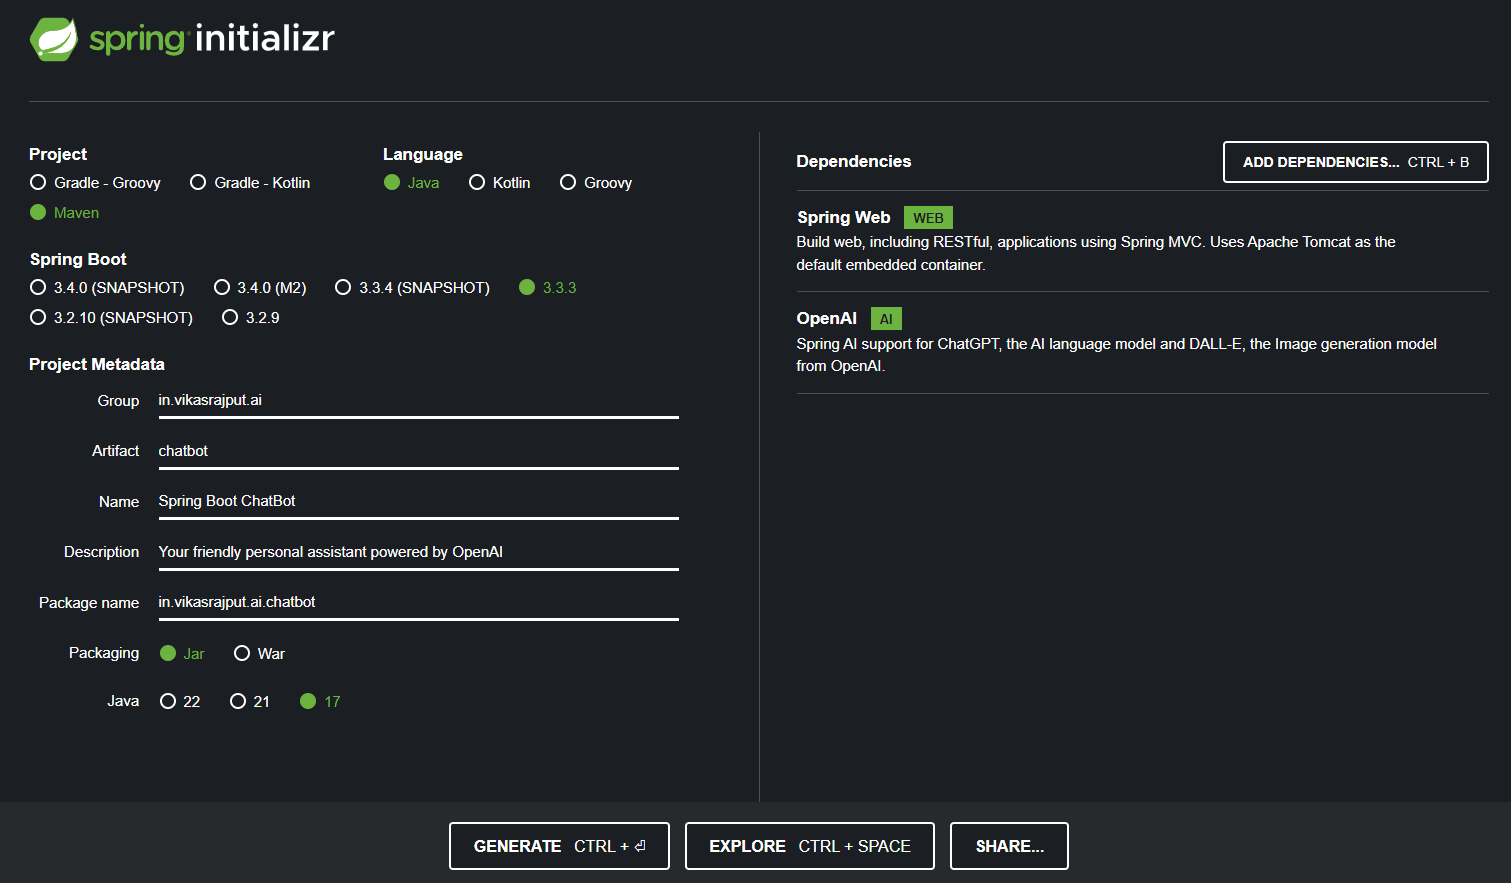
You can give the group, artifact, name, description, and package you choose. We’ve used Maven as the built tool, Spring boot version 3.3.3, Jar as a packaging option, and Java version 17.
Hit the generate button and the zip will be downloaded. Unzip the files and import them as a Maven project into your favourite IDE (mine is Intellij).
Configure your OpenAI key in Spring
You can either use the existing application.properties file or create a application.yaml file. I love working with Yaml, so created a application.yaml file where I can place all my Spring Boot configurations.
Add the OpenAIKey, Model, and Temperature to your application.yaml file:
spring:
  ai:
    openai:
      chat:
        options:
          model: "gpt-3.5-turbo"
          temperature: "0.7"
      key: "PUT YOUR OPEN_API_KEY HERE"
A similar configuration in application.properties may look like as follows:
spring.ai.openai.chat.options.model=gpt-3.5-turbo
spring.ai.openai.chat.options.temperature=0.7
spring.ai.openai.key="PUT YOUR OPEN_API_KEY HERE"
Build the ChatController
Let’s create a GET API with the URL /ai/chat/string and a method to handle the logic:
@RestController
public class ChatController {

    @Autowired
    private final OpenAiChatModel chatModel;

    @GetMapping("/ai/chat/string")
    public Flux<String> generateString(@RequestParam(value = "message", defaultValue = "Tell me a joke") String message) {
        return chatModel.stream(message);
    }
}
First, we’re adding
@RestControllerto mark theChatControllerclass as our spring controllerThen, we’re injecting the dependency for the
OpenAiChatModelclass. It comes out of the box as part of the Spring AI dependency we’ve used.The
OpenAiChatModelcomes with a methodstream(message)which accepts the prompt asStringand returns aStringresponse (technically it’s aFluxofStringas we’ve used a Reactive version of the same method).Internally,
OpenAiChatModel.stream(message)will call the OpenAI API and fetch the response from there. The OpenAI call will use the configuration steps mentioned in yourapplication.yamlfile, so make sure to use a valid OpenAI key.We’ve created a method to handle the GET API call, which accepts the message and returns
Flux<String>as the response.
Build, Run, and Test the REST API
Use the maven commands to build and run the Spring Boot application:
./mvnw clean install spring-boot:run
Ideally, it will run on a 8080 port unless you’ve customized the port. Make sure to keep that port free to successfully run the application.
You can either use Postman or the Curl command to test your REST API:
curl --location 'http://localhost:8080/ai/chat/string?message=How%20are%20you%3F'
Build the ChatUI using React.js
We will be making it super simple and easy for the sake of this tutorial, so pardon me if I don’t follow any React best practices.
Create App.js to Manage the ChatUI Form
We’ll be using useState to manage the state:
const [messages, setMessages] = useState([]);
const [input, setInput] = useState('');
const [loading, setLoading] = useState(false);
messages: It will store all the messages in the chat. Each message has atextand asender(either 'user' or 'ai').input: To hold what the user is typing in the text box.loading: This state is set totruewhile the chatbot is waiting for a response from the AI, andfalsewhen the response is received.
Let’s create a function handleSend and call it when the user sends a message by clicking a button or pressing Enter:
const handleSend = async () => {
    if (input.trim() === '') return;

    const newMessage = { text: input, sender: 'user' };
    setMessages([...messages, newMessage]);
    setInput('');
    setLoading(true);

    try {
        const response = await axios.get('http://localhost:8080/ai/chat/string?message=' + input);
        const aiMessage = { text: response.data, sender: 'ai' };
        setMessages([...messages, newMessage, aiMessage]);
    } catch (error) {
        console.error("Error fetching AI response", error);
    } finally {
        setLoading(false);
    }
};
Here’s what happens step by step:
Check empty input: If the input field is empty, the function returns early (nothing is sent).
New message from the user: A new message is added to the
messagesarray. This message has thetext(whatever the user typed) and is marked as being sent by the 'user'.Reset input: The input field is cleared after the message is sent.
Start loading: While waiting for the AI to respond,
loadingis set totrueto show a loading indicator.Make API request: The code is used
axiosto request the AI chatbot API, passing the user's message. When the response comes back, a new message from the AI is added to the chat.Error handling: If there is a problem getting the AI’s response, an error is logged to the console.
Stop loading: Finally, the loading state is turned off.
Let’s write a function to update the input state whenever the user types something in the input field:
const handleInputChange = (e) => {
    setInput(e.target.value);
};
Next, let’s create a function to check if the user presses the Enter key. If they do, it calls handleSend() to send the message:
const handleKeyPress = (e) => {
    if (e.key === 'Enter') {
        handleSend();
    }
};
Now let’s create UI elements to render the chat messages:
{messages.map((message, index) => (
    <div key={index} className={`message-container ${message.sender}`}>
        <img
            src={message.sender === 'user' ? 'user-icon.png' : 'ai-assistant.png'}
            alt={`${message.sender} avatar`}
            className="avatar"
        />
        <div className={`message ${message.sender}`}>
            {message.text}
        </div>
    </div>
))}
This block renders all the messages in the chat:
Mapping through messages: Each message is displayed as a
divusing.map().Message styling: The class name of the message changes based on who the sender is (
userorai), making it clear who sent the message.Avatar images: Each message shows a small avatar, with a different image for the user and the AI.
Let’s create some logic to show the loader based on a flag:
{loading && (
    <div className="message-container ai">
        <img src="ai-assistant.png" alt="AI avatar" className="avatar" />
        <div className="message ai">...</div>
    </div>
)}
While the AI is thinking (when loading is true), we show a loading message (...) so the user knows a response is coming soon.
At last, create a button to click the message send button:
<button onClick={handleSend}>
    <FaPaperPlane />
</button>
This button triggers the handleSend() function when clicked. The icon used here is a paper plane, which is common for "send" buttons.
The full Chatbot.js looks as below:
import React, { useState } from 'react';
import axios from 'axios';
import { FaPaperPlane } from 'react-icons/fa';
import './Chatbot.css';
const Chatbot = () => {
const [messages, setMessages] = useState([]);
const [input, setInput] = useState('');
const [loading, setLoading] = useState(false);
const handleSend = async () => {
if (input.trim() === '') return;
const newMessage = { text: input, sender: 'user' };
setMessages([...messages, newMessage]);
setInput('');
setLoading(true);
try {
const response = await axios.get('http://localhost:8080/ai/chat/string?message=' + input);
const aiMessage = { text: response.data, sender: 'ai' };
setMessages([...messages, newMessage, aiMessage]);
} catch (error) {
console.error("Error fetching AI response", error);
} finally {
setLoading(false);
}
};
const handleInputChange = (e) => {
setInput(e.target.value);
};
const handleKeyPress = (e) => {
if (e.key === 'Enter') {
handleSend();
}
};
return (
<div className="chatbot-container">
<div className="chat-header">
<img src="ChatBot.png" alt="Chatbot Logo" className="chat-logo" />
<div className="breadcrumb">Home > Chat</div>
</div>
<div className="chatbox">
{messages.map((message, index) => (
<div key={index} className={`message-container ${message.sender}`}>
<img
src={message.sender === 'user' ? 'user-icon.png' : 'ai-assistant.png'}
alt={`${message.sender} avatar`}
className="avatar"
/>
<div className={`message ${message.sender}`}>
{message.text}
</div>
</div>
))}
{loading && (
<div className="message-container ai">
<img src="ai-assistant.png" alt="AI avatar" className="avatar" />
<div className="message ai">...</div>
</div>
)}
</div>
<div className="input-container">
<input
type="text"
value={input}
onChange={handleInputChange}
onKeyPress={handleKeyPress}
placeholder="Type your message..."
/>
<button onClick={handleSend}>
<FaPaperPlane />
</button>
</div>
</div>
);
};
export default Chatbot;
Use <Chatbot/> inside the App.js to load the Chatbot UI:
function App() {
  return (
    <div className="App">
            <Chatbot />
        </div>
  );
}
Along with this, we’re also using CSS to make our chatbot a little more beautiful. You can refer to App.css and Chatbot.css for that.
Run the Frontend
Use the npm command to run the application:
npm start
This should run the frontend on the URL http://localhost:3000. The application is good to be tested now.
But running the backend and frontend separately is a bit of a hassle. So let’s use Docker to make the entire build process easier.
How to Dockerize the Application
Let’s dockerize the entire application to help bundle and ship it anywhere hassle-free. You can install and configure Docker from the official Docker website.
Dockerize the Backend
The backend of our chatbot is built with Spring Boot, so we will create a Dockerfile that builds the Spring Boot app into an executable JAR file and runs it in a container.
Let’s write the Dockerfile for it:
# Start with an official image that has Java installed
FROM openjdk:17-jdk-alpine

# Set the working directory inside the container
WORKDIR /app

# Copy the Maven/Gradle build file and source code into the container
COPY target/chatbot-backend.jar /app/chatbot-backend.jar

# Expose the application’s port
EXPOSE 8080

# Command to run the Spring Boot app
CMD ["java", "-jar", "chatbot-backend.jar"]
FROM openjdk:17-jdk-alpine: This specifies that the container should be based on a lightweight Alpine Linux image that includes JDK 17, which is needed to run Spring Boot.WORKDIR /app: Sets the working directory inside the container to/app, where our application files will live.COPY target/chatbot-backend.jar /app/chatbot-backend.jar: Copies the built JAR file from your local machine (usually in thetargetfolder after building the project with Maven or Gradle) into the container.EXPOSE 8080: This tells Docker that the application will listen for requests on port 8080.CMD ["java", "-jar", "chatbot-backend.jar"]: This specifies the command that will run when the container starts. It runs the JAR file that launches the Spring Boot app.
Dockerize the Frontend
The front end of our chatbot is built using React, and we can Dockerize it by creating a Dockerfile that installs the necessary dependencies, builds the app, and serves it using a lightweight web server like NGINX.
Let’s write the Dockerfile for the React frontend:
# Use a Node image to build the React app
FROM node:16-alpine AS build

# Set the working directory inside the container
WORKDIR /app

# Copy the package.json and install the dependencies
COPY package.json package-lock.json ./
RUN npm install

# Copy the rest of the application code and build it
COPY . .
RUN npm run build

# Use a lightweight NGINX server to serve the built app
FROM nginx:alpine
COPY --from=build /app/build /usr/share/nginx/html

# Expose port 80 for the web traffic
EXPOSE 80

# Start NGINX
CMD ["nginx", "-g", "daemon off;"]
FROM node:16-alpine AS build: This uses a lightweight Node.js image to build the React app. We install all dependencies and build the app inside this container.WORKDIR /app: Sets the working directory inside the container to/app.COPY package.json package-lock.json ./: Copiespackage.jsonandpackage-lock.jsonto install dependencies.RUN npm install: Installs the dependencies listed in the package.json.COPY . .: Copies all the frontend source code into the container.RUN npm run build: Builds the React application. The built files will be in abuildfolder.FROM nginx:alpine: After building the app, this line starts a new container based on thenginxweb server.COPY --from=build /app/build /usr/share/nginx/html: Copies the built React app from the first container into the nginx container, placing it in the default folder where NGINX serves files.EXPOSE 80: This exposes port 80, which NGINX uses to serve web traffic.CMD ["nginx", "-g", "daemon off;"]: This starts the NGINX server in the foreground to serve your React app.
Docker Compose to Run Both
Now that we have separate Dockerfiles for the frontend and backend, we’ll use docker-compose to orchestrate running both containers at once.
Let’s write the docker-compose.yml file inside the root directory of the project:
version: '3'
services:
  backend:
    build: ./backend
    ports:
      - "8080:8080"
    networks:
      - chatbot-network

  frontend:
    build: ./frontend
    ports:
      - "3000:80"
    depends_on:
      - backend
    networks:
      - chatbot-network

networks:
  chatbot-network:
    driver: bridge
version: '3': This defines the version of Docker Compose being used.services:: This defines the services we want to run.backend: This service builds the backend using the Dockerfile located in the./backenddirectory and exposes port 8080.frontend: This service builds the front end using the Dockerfile located in the./frontenddirectory. It maps port 3000 on the host to port 80 inside the container.
depends_on:: This makes sure the front end waits for the backend to be ready before it starts.networks:: This section defines a shared network so that both the backend and frontend can communicate with each other.
Run the Application
To run the entire application (both frontend and backend), you can use the following command:
docker-compose up --build
This command will:
Build both the frontend and backend images.
Start both containers (backend on port 8080, frontend on port 3000).
Set up networking so that both services can communicate.
Now, you can head over to http://localhost:3000 load the Chatbot UI and start asking your questions to the AI.
Congratulations 🎉
You’ve successfully built a full-stack chatbot application using Spring Boot, React, Docker, and OpenAI.
The source code shown in the project is available on Github, if you found it helpful give it a star, and feel free to fork it and play around with it.