
Have you ever wanted to create your own interactive tools using just HTML, CSS, and JavaScript? In this article, we'll create a fun and straightforward project: a color picker tool.
This handy little tool will let users select any color they like and instantly see its HEX and RGB values.
So, grab your favorite code editor, and let's get started!
Step 1: Set Up Your Project
Create a New Folder: Start by creating a new folder on your computer for this project. You can name it color-picker-tool.
Create Files: Inside the folder, create three files:
index.html
styles.css
script.js
Step 2: Build the HTML Structure
Open the index.html file in your code editor.
Add Basic HTML Structure: Add the following code into index.html: or press
SHIFT+!then pressEnterto set the Emmet structure, then change the document title to"Color Picker Tool".Link your styles.css and script.js files too.
 <!DOCTYPE html>
 <html lang="en">
 <head>
     <meta charset="UTF-8">
     <meta name="viewport" content="width=device-width, initial-scale=1.0">
     <title>Color Picker Tool</title>
     <link rel="stylesheet" href="styles.css">
 </head>
 <body>

     <script src="script.js"></script>
 </body>
 </html>
Explanation:
<!DOCTYPE html>: This tells the browser that the document is an HTML5 document.<html lang="en">: The root element of the HTML document, with the language set to English.<head>: Contains meta-information about the document, like character set and title.<title>: Sets the title of the webpage, which appears in the browser tab.<link rel="stylesheet" href="styles.css">: Links to the CSS file that styles the page.<body>: Contains the content of the webpage.<script src="script.js"></script>: Links to the JavaScript file that adds interactivity to the page.
Add the body content:
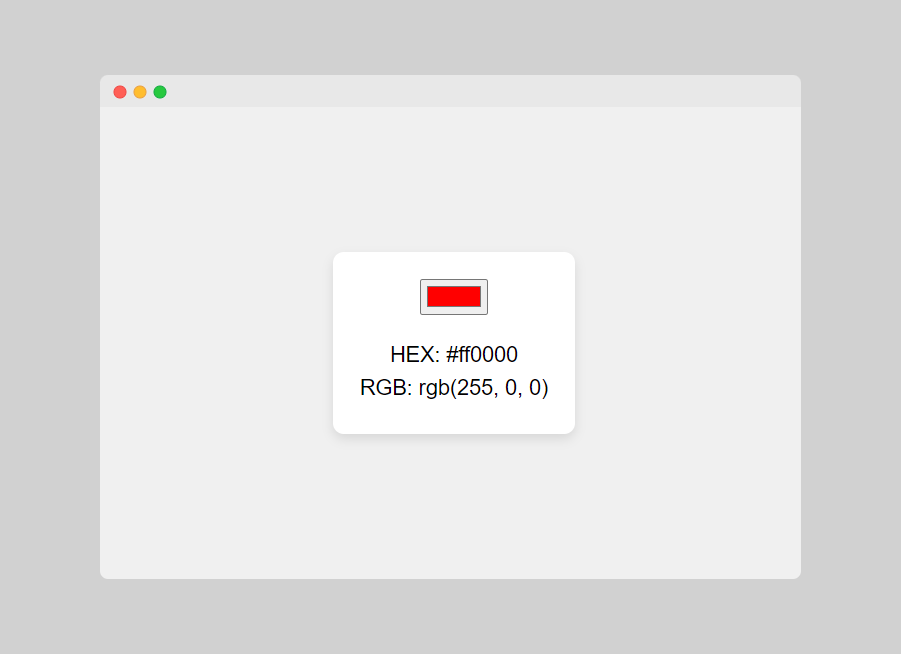
 <div class="color-picker">
   <input type="color" id="colorInput" value="#ff0000">
     <div class="color-info">
        <p>HEX: <span id="hexValue">#ff0000</span></p>
        <p>RGB: <span id="rgbValue">rgb(255, 0, 0)</span></p>
     </div>
 </div>
Explanation:
<div class="color-picker">: A container for the color picker elements.<input type="color" id="colorInput" value="#ff0000">: An input element that lets users pick a color. Thevalueattribute sets the default color.<div class="color-info">: A container for displaying color information.<p>HEX: <span id="hexValue">#ff0000</span></p>: Displays the HEX value of the selected color.<p>RGB: <span id="rgbValue">rgb(255, 0, 0)</span></p>: Displays the RGB value of the selected color.
Here is what we'll have:

Step 3: Style with CSS
Open the styles.css file in your code editor.
Add CSS Styles: Copy and paste the following code into styles.css:
 body {
     font-family: Arial, sans-serif;
     display: flex;
     justify-content: center;
     align-items: center;
     height: 100vh;
     margin: 0;
     background-color: #f0f0f0;
 }
 .color-picker {
     background-color: #fff;
     padding: 20px;
     border-radius: 8px;
     box-shadow: 0 4px 8px rgba(0, 0, 0, 0.1);
     text-align: center;
 }
 .color-info {
     margin-top: 20px;
 }
 p {
     margin: 5px 0;
     font-size: 16px;
 }
Explanation:
body: Styles the body of the page. It centers the content both vertically and horizontally and sets a light gray background.font-family: Arial, sans-serif;: Sets the font for the text on the page.display: flex;: Uses Flexbox to layout the page.justify-content: center;andalign-items: center;: Centers the content.height: 100vh;: Sets the height to 100% of the viewport height.margin: 0;: Removes default margin.background-color: #f0f0f0;: Sets the background color of the page..color-picker: Styles the color picker container with a white background, padding, rounded corners, and a shadow for a card-like appearance..color-info: Adds a margin at the top to separate it from the color input.p: Styles the paragraphs within the color info, setting margin and font size.
Here is what we will have:
At this point, we can pick a color but the color codes won't be displayed. To have the color codes displayed, we'll have to add some JavaScript.
Step 4: Add JavaScript Functionality
Open the
script.jsfile in your code editor.Add JavaScript Code: Add the following code into
script.js:document.getElementById('colorInput').addEventListener('input', function() { const color = this.value; document.getElementById('hexValue').textContent = color; document.getElementById('rgbValue').textContent = hexToRgb(color); }); function hexToRgb(hex) { const r = parseInt(hex.slice(1, 3), 16); const g = parseInt(hex.slice(3, 5), 16); const b = parseInt(hex.slice(5, 7), 16); return `rgb(${r}, ${g}, ${b})`; }Explanation:
document.getElementById('colorInput'): Selects the color input element by itsID..addEventListener('input', function() {...}): Adds an event listener that triggers whenever the user selects a new color.const color = this.value;: Gets the current value of the color input, which is in HEX format.document.getElementById('hexValue').textContent = color;: Updates the text content of the HEX value display with the selected color.document.getElementById('rgbValue').textContent = hexToRgb(color);: Converts the HEX color to RGB and updates the RGB value display.function hexToRgb(hex) {...}: A function that converts a HEX color string to an RGB string.parseInt(hex.slice(1, 3), 16): Converts the first two characters of the HEX color (after the#) to a decimal number, representing the red component.parseInt(hex.slice(3, 5), 16): Converts the next two characters to the green component.parseInt(hex.slice(5, 7), 16): Converts the last two characters to the blue component.returnrgb(${r}, ${g}, ${b});: Returns the RGB color as a string.
Step 5: Test Your Color Picker Tool
Open the Project in a Browser: Open the index.html file in a web browser to view your color picker tool.
Interact with the Tool: Use the color input to select different colors. The HEX and RGB values should update automatically as you select new colors.
Final Thoughts
Congratulations! You've successfully created a color picker tool using HTML, CSS, and JavaScript.
This project is a great way to practice working with user input and manipulating the DOM. You can further enhance this tool by adding features like copying color values to the clipboard or saving favorite colors.
Enjoy experimenting and learning!