
You may have seen the shiny technologies like React, Vue, and Angular that promise to revolutionize your front-end development. It's tempting to dive headfirst into these frameworks, eager to build stunning user interfaces. But hold on! Before you embark on this exciting journey, consider this:
A strong foundation in JavaScript is the cornerstone of any successful front-end project.
In this article, I aim to provide you with the fundamental JavaScript knowledge required to succeed in React and other front-end frameworks. By the end of this piece, you will better understand key JavaScript concepts—such as destructuring, short-circuiting, and fetching data, among others—and how to use them effectively.
Are you ready to improve your JavaScript skills? Let's dive right in 😉
Table of Contents
How to Use Template Literals
Ever felt like string construction in JavaScript was a bit of a chore? Imagine putting together a birthday message and constantly adding quotes and plus(+) signs to include the name.
Before ES6, that was the reality with string concatenation. Let's say you wanted to greet a user:
let name = prompt("What is your name?");
let greeting = alert("Hello, " + name + “!");
This code works, but it can get messy when dealing with multiple variables or dynamic content.
Then came template literals! Introduced in ES6, they offer a more elegant way to create strings using backticks (``) instead of quotes. Here's how to rewrite the greeting with template literals:
let name = prompt("What is your name?");
let greetings = alert(`Hello ${name}`);
See the difference? The ${name} part tells JavaScript to insert the value of the name variable directly into the string.
Template literals give you the power to perform string interpolation easily in the JavaScript ecosystem, no more clunky concatenation 😉!
The Benefits of Template Literals include:
Readability: Your code becomes clearer and easier to understand.
Maintainability: Updates are simpler since changes are localized within the template literal.
Expressiveness: You can create multi-line strings and even use functions within them!
Not only do template literals make your life easier, but they're also instrumental in building dynamic components with React. You can, for instance, create dynamic list items, conditionally render components, or format output based on data.
const name = 'Alice';
const greeting = `Hello, ${name}! How are you today?`;
console.log(greeting); // Output: Hello, Alice! How are you today?

const items = ['apple', 'banana', 'orange'];
const listItems = items.map(item => `<li>${item}</li>`).join('');
const list = `<ul>${listItems}</ul>`;
As you can see, template literals make building dynamic and readable string-based components in React easier.
How to Destructure Objects and Arrays
Destructuring in JavaScript allows you to extract values from arrays or properties from objects into separate variables, providing a concise and efficient way to handle data structures.
How to Destructure Objects in JavaScript
To destructure an object, use curly braces { } and specify the property names you want to extract. Let's consider an example:
const person = {
    firstName: 'Olalekan',
    lastName: ‘Akande',
    middleName: ‘Toheeb’,
    age: 30
};

const {  lastName , firstName} = person;
console.log(firstName, lastName); // Output: Akande Olalekan
In this code, we destructured the person object and extracted the firstName and lastName properties into separate variables.
Nested Destructuring:
You can also destructure nested objects:
const address = {
    street: '123 Main St’,
    city: 'Ilorin'
    state: {
        name: 'Kwara',
        abbreviation: 'KW'
    }
};


const { street, city, state: { name } } = address;
console.log(street, city, name); // Output: 123 Main St Ilorin Kwara
Default Values:
You can provide default values for properties if they are undefined:
const config = {
    theme: 'light'
};

const { theme = 'dark' } = config;
console.log(theme); // Output: light
Renaming Property
Occasionally, you might need to change an existing property name to a different one for better readability or consistency within your project. Destructuring offers a convenient way to achieve this.
Using a different property name within the destructuring assignment can effectively rename the property as you extract it.
const person = {
    firstName: 'Olalekan',
    lastName: ‘Akande',
    middleName: ‘Toheeb’,
    age: 30
};

const { firstName: givenName, lastName: familyName } = person;
console.log(familyName, givenName); // Output: Akande Olalekan
In this example, firstName is renamed to givenName, and lastName is renamed familyName during the destructuring process.
This renaming technique can improve code clarity and maintainability, especially when dealing with complex objects.
Destructuring Arrays
To destructure an array, you use square brackets [] and specify the indices of the elements you want to extract:
const numbers = [1, 2, 3, 4, 5];
const [first, second] = numbers;
console.log(first, second, rest); // Output: 1 2
Destructuring in React
Destructuring is widely used in React components to extract props, state, and context values. It simplifies code and improves readability:
import React from 'react';

const MyComponent = ({ name, age }) => {
  return (
    <div>
      <h1>Hello, {name}!</h1>
      <p>You are {age} years old.</p>
    </div>
  );
};
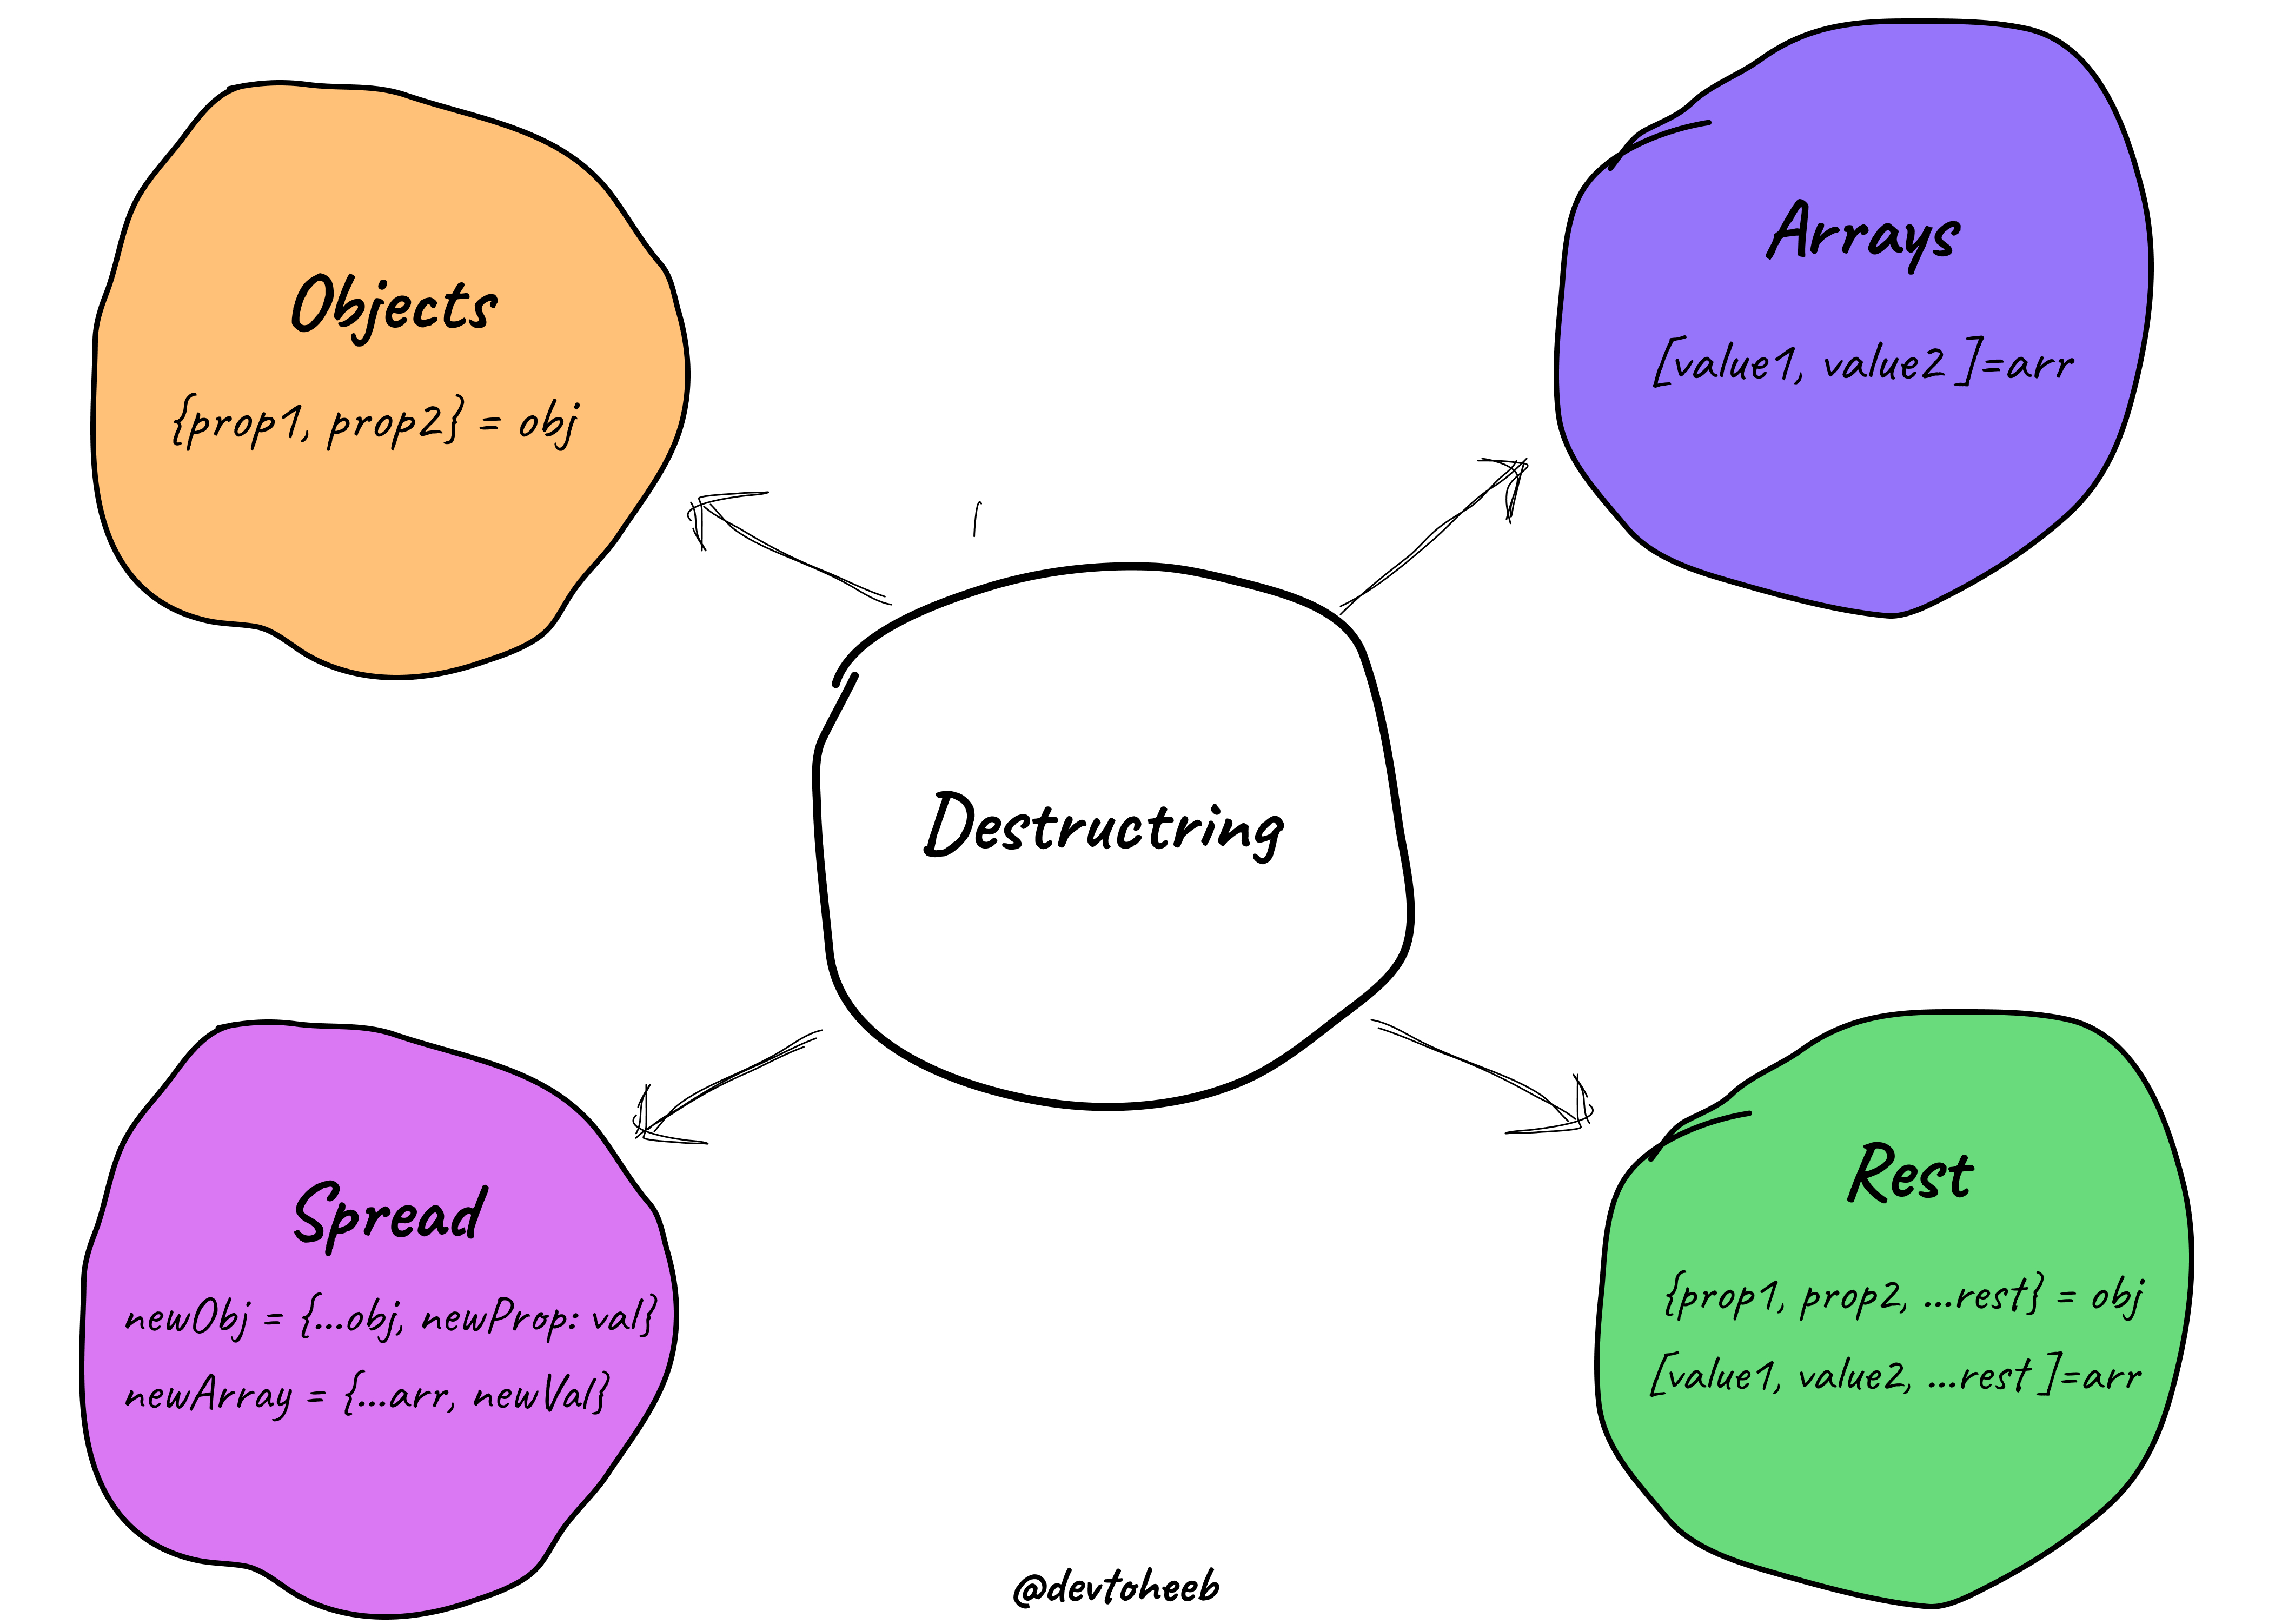
Rest and Spread Operator
The rest and spread operators are closely related to destructuring.
Rest Operator
The rest operator (...) collects the remaining elements of an array or object into a new array or object:
const numbers = [1, 2, 3, 4, 5];
const [first, ...rest] = numbers;
console.log(rest); // Output: [2, 3, 4, 5]
Spread Operator
The spread operator also uses ... but is used to expand an iterable into individual elements:
const numbers = [1, 2, 3];
const newArray = [...numbers, 4, 5];
console.log(newArray); // Output: [1, 2, 3, 4, 5]
In React, the spread operator is often used to clone arrays or objects, or to pass props to components:
const person = { name: 'John', age: 30 };
const newPerson = { ...person, city: 'New York' };
console.log(newPerson); // Output: { name: 'John', age: 30, city: 'New York' }
Understanding destructuring and the rest/spread operators can help you write more concise and expressive JavaScript code, especially when working with React.
Ternaries Instead of if/else Statements
Ternary operators offer a concise and fine alternative to traditional if/else statements in JavaScript. They are particularly useful for conditional expressions that return a value based on a condition.
Why Ternaries Over if/else?
While if/else statements are versatile, they can sometimes lead to verbose code, especially when dealing with simple conditional logic. Ternary operators provide a more compact and readable syntax, making your code easier to understand and maintain.
Syntax and Usage
The syntax for a ternary operator is as follows:
condition ? expression1 : expression2
If the condition is true, expression1 is evaluated and returned. Otherwise, expression2 is evaluated and returned.
Pure Example:
let age = 19;

const isAdult = age >= 18;
const message = isAdult ? 'You are an adult.' : 'You are a minor.';
console.log(message);
The above example will return a message based on the value of the age variable. Can you predict what will be displayed in the console?
Example in React:
const MyComponent = ({ isLoggedIn }) => {
    return (
        <div>
        {isLoggedIn ? (
        <p>Welcome, user!</p>
        ) : (
        <p>Please log in.</p>
        )}
        </div>
    );
};
In this React component, the ternary operator renders different content based on the isLoggedIn prop conditionally.
Benefits of Ternary Operators:
Concise syntax: Ternary operators provide a more compact way to express conditional logic.
Readability: They can improve code readability by making conditional expressions more concise and easier to understand.
Efficiency: Sometimes, ternary operators are more efficient than
if/elsestatements.
By incorporating ternary operators into your JavaScript code, you can write more elegant and efficient programs.
How to Use Arrow Functions
Arrow functions, introduced in ES6, provide a concise syntax for defining functions. They are particularly useful in functional programming paradigms and can significantly improve code readability and maintainability.
What are Arrow Functions?
Arrow functions are a shorthand syntax for declaring functions. They have a simpler structure compared to traditional function declarations or expressions. They are often used for short, inline functions.
Syntax:
const myFunction = (arg1, arg2) => {
    // Function body
};
Key Features:
Implicit this binding: Arrow functions do not create their own
thiscontext. Instead, they inherit thethisvalue from the enclosing scope, which can be helpful in callback functions and event handlers.Concise syntax: The arrow function syntax is often shorter and more readable than traditional declarations.
Implicit return: For single-line arrow functions with a
returnstatement, thereturnkeyword can be omitted.
Example:
const greet = name => `Hello, ${name}!`;
console.log(greet('Akande')); // Output: Hello, Akande!
Using Arrow Functions in React
Arrow functions are commonly used in React components for various purposes, including:
- Event handlers:
<button onClick={() => this.handleClick()}>Click me</button>
Explanation: Here, the arrow function is used as the event handler for the onClick event. This ensures that the this context within the handler refers to the component instance, allowing you to access the component's state and methods.
- Map, filter, and reduce:
const numbers = [1, 2, 3, 4, 5];
const doubledNumbers = numbers.map(number => number * 2);
Explanation: Arrow functions are often used with array methods like map, filter, and reduce to perform transformations on data. In this example, the map method creates a new array where each element is doubled, using an arrow function for the callback.
Props:
const MyComponent = ({ name, onButtonClick }) => {
    return (
        <button onClick={onButtonClick}>Click me</button>
    );
};
Explanation: Arrow functions can be used to define props that are functions. In this example, the onButtonClick prop is a function that can be passed to the component. When the button is clicked, the onButtonClick function will be called.
By using arrow functions effectively, you can write more concise, readable, and maintainable React code.
Short-Circuiting with && , ||, and ??
Short-circuiting is a JavaScript evaluation technique that can optimize conditional expressions. It involves stopping the evaluation of a logical expression as soon as the final result is determined.
Short-circuiting in logical operators means that, in certain conditions, the operator will immediately return the first value and not even look at the second value.
We can say that short-circuiting depends on the truthy and falsy values
Falsy values include: 0, empty string (‘’), null, undefinded.
Truty values are basically anything that is not fasly value.
When do logical operators short-circuit?
Logical AND (&&)
The && operator short circuit when the left-hand side of the operator (first operand) is false (that is, it immediately returns the first value when it’s any of the falsy values). There is no short-circuit if the first operand is truthy, it will return the right-hand side of the operator(second operand).
This is known as short-circuiting to the left.
Example:
const isLoggedIn = true;
const greeting = isLoggedIn && <p>Welcome, user!</p>;
In this example, the greeting variable will only be assigned the JSX element if isLoggedIn is true. If isLoggedIn is false, the && operator will short-circuit, and the JSX element will not be rendered.
Logical OR (||)
The || operator works in the opposite direction as the && operator. The || operator short circuits when the first operand is true. That is, If the left-hand side of the || operator is true, it immediately returns the second value.
This is known as short-circuiting to the right.
Example:
const username = 'Akande';
const greeting = username || ‘Guest';
This code will assign greeting the value of username if it's not any of the falsy values. Otherwise, it will assign the default value of Guest.
Note: You have to be very careful when using the || operator in cases where you might actually wish to return the 0. .
For example
let numberOfBooksRead = 0;
const hasRead = numberOfBooksRead || ‘No data’;

// hasRead = ‘’No data’
The above will return No data because the first operand—numberOfBooksRead —is a falsy value. In this kind of situation, it’s better to use the nullish coalescing operator (??)
Nullish Coalescing Operator (??)
Nullish coalescing operator (??) returns the left-hand side operand if it is not null or undefined. Otherwise, it returns the right-hand side operand.
The above example can now be written as
let numberOfBooksRead = 0;
const hasRead = numberOfBooksRead ?? ‘No data’;

// hasRead = 0;
Optional Chaining (?.)
The optional chaining operator (?.) provides a safer way—in React—to access nested properties without throwing an error if a property is undefined or null.
const user = { address: { street: '123 Main St' } };
const street = user?.address?.street;
In this example, street will be assigned the value of 123 Main St if both user and user.address exist. If either is null or undefined, street will be undefined without throwing an error.
Effective usage of short-circuiting and optional chaining makes you write more concise and robust React components.
How to Use Array Methods
Arrays are fundamental data structures in JavaScript that store collections of elements. They are ordered and can contain elements of different data types.
Essential Array Methods
map(): Creates a new array by applying a function to each original array element. Use
map()to update existing elements.filter(): Creates a new array containing only elements that pass a test implemented by a provided function. Use
filter()to delete elements.reduce(): Applies a function to an accumulator and each array element to reduce it to a single value.
sort(): Sorts the elements of an array in place.
Advanced Array Methods
flatMap(): Flattens an array and applies a mapping function to each element.
reduceRight(): Similar to
reduce(), but starts from the end of the array.find(): Returns the first element in an array that satisfies a test implemented by a provided function.
Relating Array Methods to React
Array methods are indispensable for working with data in React components. They can transform, filter, and aggregate data to render dynamic UI elements.
Example using map() to update elements:
const items = ['apple', 'banana', 'orange'];
const updatedItems = items.map(item => item === 'apple' ? 'grapefruit' : item);
In this example, the map() method creates a new array where the element 'apple' is replaced with 'grapefruit'.
Example using filter() to delete elements:
const numbers = [1, 2, 3, 4, 5];
const evenNumbers = numbers.filter(number => number % 2 === 0);
In this example, the filter() method creates a new array containing only the even numbers from the original array.
Example using reduce() to aggregate data:
const numbers = [1, 2, 3, 4, 5];
const sum = numbers.reduce((acc, curr) => acc + curr, 0);
In this example, the reduce() method calculates the sum of all elements in the numbers array.
Example using flatMap() to flatten an array:
const nestedArrays = [[1, 2], [3, 4]];
const flattenedArray = nestedArrays.flatMap(array => array);
In this example, the flatMap() method flattens the nested arrays into a single array.
Chaining Array Methods
You can chain multiple array methods together to perform complex transformations on data concisely and efficiently.
Example:
const users = [
    { name: 'Akande', age: 30 },
    { name: 'Toheeb', age: 25 },
    { name: 'Olalekan', age: 35 }
];

const adultUsers = users
.filter(user => user.age >= 18)
.map(user => ({ name: user.name, age: user.age }));
In this example, we first filtered the users based on their age and then mapped over the filtered array to create a new array with only the name and age properties.
By mastering array methods, you can write more efficient and expressive React components that effectively handle and manipulate data.
How to Fetch Data
Data is the lifeblood of web applications, and React is no exception. Fetching data from external sources, such as APIs, is a fundamental task in React development. This data is used to populate components, update the UI, and provide a dynamic user experience.
Promises and Fetch
Promises represent the eventual completion (or failure) of an asynchronous operation. The fetch() API is a built-in JavaScript function that returns a Promise representing the fetching of a resource.
Example using fetch():
fetch('https://api.example.com/data')
    .then(response => response.json())
    .then(data => {
    // Handle the data here
    console.log(data);
    })
    .catch(error => {
    // Handle errors here
    console.error(error);
    };
Async/Await
The async/await syntax provides a cleaner way to work with Promises. It allows you to write asynchronous code in a more synchronous-looking style.
Example using async/await:
async function fetchData() {
    try {
        const response = await fetch('https://api.example.com/data');
        const data = await response.json();
        console.log(data);
    } catch (error) {
    console.error(error);
    }
}

fetchData();
Fetching Data in React Components
In React components, you typically fetch data within lifecycle methods like componentDidMount or useEffect. This ensures that data is fetched after the component is mounted and any initial state is set.
Example:
import React, { useEffect, useState } from 'react';

function MyComponent() {
const [data, setData] = useState(null);

useEffect(() => {
    const fetchData = async () => {
        try {
            const response = await fetch('https://api.example.com/data');
            const data = await response.json();
            setData(data);
            } catch (error) {
            console.error(error);
            }
        };

    fetchData();
}, []);

    return (
        <div>
        {data ? (
        <p>Data: {JSON.stringify(data)}</p>
        ) : (
        <p>Loading...</p>
        )}
        </div>
    );
}
In this example, the useEffect hook is used to fetch data when the component mounts. The useState hook is used to manage the loading state and display the fetched data.
Error Handling
It's essential to handle errors that may occur during data fetching. You can use try/catch blocks to catch exceptions and provide appropriate feedback to the user.
By understanding Promises, Fetch API, async/await, and Error handling, you can effectively fetch and manage data in your React applications.
You Can Start React Now
This article explores the essential JavaScript concepts that form the foundation for successful React development.
By mastering template literals, destructuring, ternaries, arrow functions, short-circuiting, array methods, fetch API, and asynchronous/await, you'll be well-equipped to tackle the challenges and opportunities that React presents.
Further Learning
To deepen your understanding of React, consider checking out the following:
Create React App: A popular tool for setting up React projects quickly
Online Courses: Platforms like freeCodeCamp, Udemy, and Coursera offer comprehensive React courses.
React Community: Engage with the React community on forums, social media, and meetups to learn from others and stay updated on the latest trends.
Call to Action
Now that you have a strong JavaScript foundation, it's time to dive into React and build amazing web applications. Don't be afraid to experiment, make mistakes, and learn from your experiences. The React community is welcoming and supportive, so don't hesitate to ask for help when needed.
Remember: The journey of mastering React is ongoing. Stay curious, keep learning, and enjoy the process of creating innovative web experiences.
Don't forget to share and recommend this article for anyone who might need it.
