

As you may know, the freeCodeCamp community now uses Hashnode for our publication's backend instead of Ghost.
Many of our contributors already have Hashnode accounts and publish there regularly on their personal blogs. But if you're new to Hashnode, this guide will help you get started.
And if you're already familiar with Hashnode, read on anyway – there will be some important tips you'll need to know to write and submit drafts for freeCodeCamp's Hashnode publication.
Here's what we'll cover:
How to set up your Hashnode account
How to submit drafts to the freeCodeCamp editorial team
How to use the Hashnode editor
Text formatting in the Hashnode editor
Other writing tips – freeCodeCamp's publication style guide
How to Set up Your Hashnode Account
To start writing on freeCodeCamp's publication, you'll need a Hashnode account. If you don't already have one, you can sign up for one for free at hashnode.com.
Once you have an account, send us your username at editorial@freecodecamp.org and we'll invite you to the publication.
You'll see a notification in your Hashnode profile once we do that:

You'll also see the freeCodeCamp publication listed as one of your available publications.

Then you can share drafts with us when you're ready.
Something to keep in mind: if you have a different Hashnode profile/username from what you had on Ghost, the URL for your author profile will change. We'll eventually have redirects in place, but this will take some time.
In the meantime, we just want you to be aware of this in case you've listed this URL on your personal portfolio, résumé, and so on. We appreciate your patience as we get those redirects set up.
How to Submit Drafts to the Editorial Team
When you set up your account and sign into Hashnode, you'll see the home screen. Click on "Write", and you'll be taken to this page:

Go ahead and write your draft (or paste it in from whatever other editor you use. If you do this, make sure you check that all formatting, code blocks, and so on render correctly. You'll also need to delete and directly upload any images you want to share, as this is the best way to assure they'll render correctly in the published version of the article).
When your draft is ready to submit, you'll click the "Publish" button in the upper right. Then you'll see the option to choose which publication – you should see both your own blog and freeCodeCamp's publication. Select freeCodeCamp's publication.
Hashnode will ask you if you want to switch, and if you do, it'll refresh the page, switching to freeCodeCamp's publication.

Then you'll see a "Submit Article" button in the upper right. Click that.
But there's a key (required) second step: you then also need to copy the draft URL and send it to editorial@freecodecamp.org. Make sure you send the draft URL and not the preview URL – this will make it much easier for us to get to your draft (as we can just click into it, rather than searching through the Hashnode interface).
You'll need to do this – that is, email us the draft URL – so that we can establish an email chain in case we need to share any feedback and make any edit requests before publishing.
Note: you must email the draft to the editorial team for us to review it (as well as submitting it via Hashnode's "Submit Article" button). You can't just click the submit button (or just email it) – both steps are required.
How to Use the Hashnode Editor
Hashnode's editor is pretty straightforward to use – and isn't all that different from the Ghost editor.
Here's what the page looks like when you get ready to write:

When you write a draft in Hashnode, you'll need to:
Send us your photo for the cover image (if you'd like your photo included. If not, no worries - our designer will create a cover without your photo). Note that you just need to do this the first time you submit a draft. After that, we'll have the photo saved. If you ever want to change the photo we use for the covers, just send us a new one and we'll update it in our spreadsheet.
Add an article title (we don't use subtitles in freeCodeCamp's publication, so you can ignore that)
And then you can start writing.
Once you've finished your article, make sure you click the "Publish" button. You'll see this menu (you'll be able to scroll down for more options, which I'll talk about below):

Then you'll need to:
Select the freeCodeCamp publication ("Select a blog")
Check your article slug and make sure it's nice and clear/concise (like javascript-array-tutorial or learn-python-by-building-projects)
Create a table of contents. Note that the auto-generate ToC feature in Hashnode won't work for our publication – so you'll need to manually create your own. More on that below.
Select and add the tags you'd like your article to have. We recommend 3-5 tags, or as needed.
Finally, click "Submit for review", and then email the draft URL to editorial@freecodecamp.org. Again, both are required in order for us to be able to access and review your draft and send you feedback.
The process after that will be pretty similar to our current process: we'll share any feedback or update requests, you'll make your updates and let us know via email that they're done, and we'll do our final review and either ask for more edits or we'll publish the article.
Note that the /news front end will remain the same – readers won't know the difference. It's just the back end/editor/writing experience that's changed a bit.
Text Formatting in the Hashnode Editor
To access text formatting options, just type a forward slash and a pretty extensive menu will appear:

You can scroll down, click through the buttons along the top, or just start typing what you're looking for (like "table", "embed a link", "code", "quote" and so on) and the menu will filter through options accordingly.
There are a few things we'd like to call out that are a bit different from Ghost:
1. How to Add a Table of Contents to Your Articles in Hashnode
There are two ways to add a table of contents to your article: using a handy ToC generator that one of our contributors created, or manually (which we'll describe below).
How to use the ToC generator
One of our contributors created this freeCodeCamp Table of Contents (TOC) Generator (thanks, Ashutosh!). It's designed to simplify your writing process by automatically generating a structured TOC based on the headings in your draft post.
To get started, simply paste the Hashnode Preview URL from your freeCodeCamp post into the input field. You can get this by clicking the "Preview" button in the top right of your draft, under the three dots, and copying the URL from your draft preview from the new tab.

The TOC generator works with both single-level (H2 headings only) and multi-level (H2 and H3) structures, so you can choose the level of detail you want for your TOC.
Once you've selected the TOC type and entered your post link, click the "Generate TOC" button. The generated TOC will appear in the output box on the right, ready for you to copy and paste directly into your article. The links in the TOC will automatically correspond to the headings in your post, making it easy for readers to navigate.
If you encounter any issues or have questions, refer to this detailed guide for further instructions on using the TOC Generator effectively.
How to add your ToC manually
If you'd prefer to manually add a ToC to your Hashnode draft, you'll have to follow a bit of a workaround at the moment.
What you'll need to do is create the ToC in markdown in another editor of your choice (that is, NOT in Hashnode) and then paste it into your draft in Hashnode.
So, for example, it'll look like this:
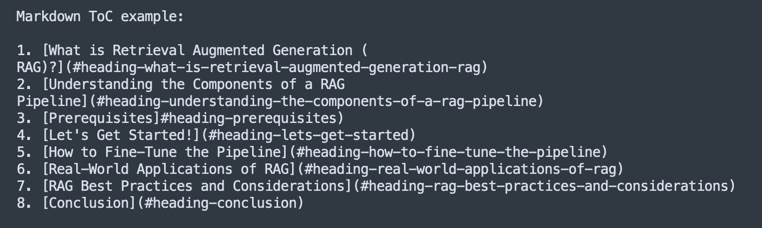
So, here are the steps to create the markdown ToC in your editor of choice (not Hashnode) with the headings (and, if necessary, subheadings) you'd like to include in the ToC:
Open the article preview (in Hashnode) by clicking the three dots and selecting "see preview" in the top-right corner of the page. This will bring you to Preview mode. Scroll down until you see your first heading that you'd like to include.
Next, you'll need to get the IDs from the headings to create the internal links (just as you've likely done in Ghost). So just inspect each heading and grab the "heading id" text from the devtools:

Format it like this: [Heading Text](#heading-heading-text). Yes - you do need that first "heading" term before the rest of the dasherized text. You'll get this automatically if you just copy the heading id text as shown above. Just paste it in after the #.
So again, it'll look like this in your other editor of choice:
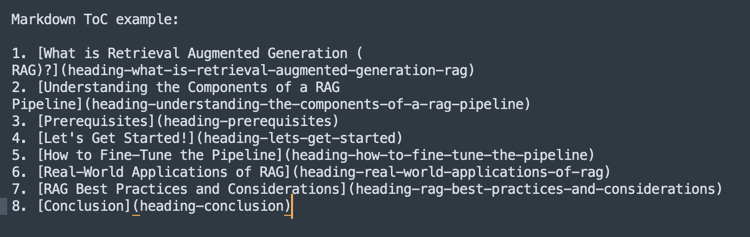
Then, paste that directly into your Hashnode draft where you'd like the ToC to be (typically right after the intro). This should properly format as rich text in Hashnode with the internal ToC links!
2. A Note on Markdown in Hashnode's Editor
At the moment, you shouldn't write in markdown directly in Hashnode's editor, as it doesn't fully support all markdown features.
You can use basic markdown formatting if you're used to writing that way – like using ## for headings, * or - for bullet points, and so on – and the editor will convert those into rich text.
But for now, links and images don't work in markdown. So if you go to add a markdown link, for example [freecodecamp.org](https://www.freecodecamp.org), it won't render properly as a link in the published article. It'll just look like what you typed. Same with images.
So for the time being, just use in-line linking like this (which you can do by highlighting the text you want to link and then choosing the little link symbol from the menu that pops up and pasting in the link there).
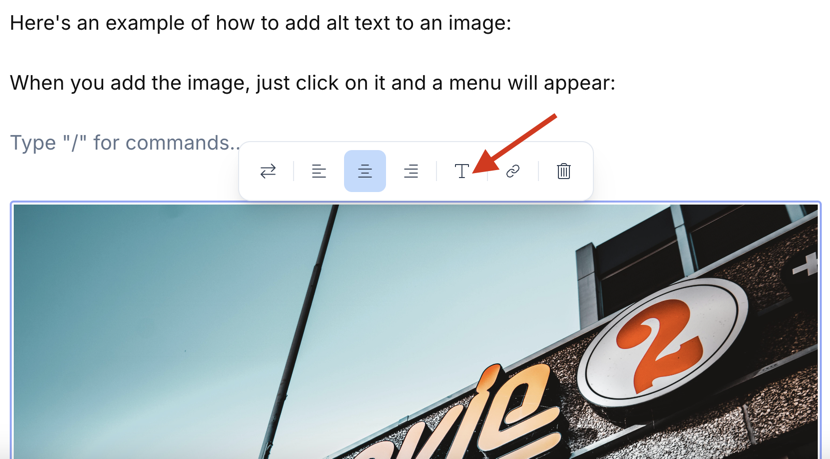
A note on images
As for images, you can drag/drop them in where you want them, or use the / menu we talked about above and search for "image". Then you can upload whatever image you'd like to use.
And if you're looking for a way to add a caption, you won't find it at the moment. So instead, just add alt text to your images. You can do this by clicking on the image, and you'll see a menu appear. There's an uppercase "T" in that menu – click on that and there you can add your alt text:
Note that if you write the markdown elsewhere (in another text editor) and paste it into the Hashnode editor, it should work fine (including images and links). Hashnode's editor will convert the markdown into rich text.
Adding tables in the Hashnode editor
If you'd like to include a table in your article, it's pretty easy to do in Hashnode. The editor's table builder is quite good for simple tables, and you can just copy and paste simple markdown tables into the editor directly.
If you need a more complex table - for example one that needs line breaks or a list within a cell - it's best just to put the markdown table into a code block. That will ensure that all the formatting renders properly.
3. How to Format Math Equations in Hashnode
Hashnode uses a tool called MathJax to add properly formatted equations to articles (you may have heard of similar tools like LaTeX or KaTeX). You can read about how to use MathJax on their website here.
So if you're using mathematical equations in your tutorials, please format them using MathJax. Don't include screenshots of equations, as this isn't accessible and won't be readable by screen readers.
Here's a helpful preview tool for your MathJax equations so you can make sure they've turned out correctly.
You'll also need to add the "MathJax" tag as one of your article tags (just make it the last one). This lets the editor know to apply the proper formatting.
Other Writing Tips
For more general writing tips and guidelines, you can still refer to our publication style guide here.
Happy writing!