
Have you ever wanted to create a web app that works smoothly on any device—whether it's on the web, mobile, or desktop? Imagine if your app could load quickly, work without an internet connection, and feel like a native app, all without needing to be installed from an app store. That’s exactly what Progressive Web Apps (PWAs) can do.
In this tutorial, you’ll learn how to build a PWA using Next.js. We’ll start by creating a functional movie search website with these tools. Once we have the basics set up, we’ll transform this app into a PWA, adding offline support and faster load times. By the end, you’ll have a powerful PWA that offers a smooth user experience across all platforms—all from a single codebase.
What We’ll Cover
Setting Up the Project: We'll begin by creating the movie search app using Next.js, which is an ideal choice in 2024 for building fast, reliable React apps that work well on all devices.
Turning the App into a PWA: Next, we’ll walk through the steps to convert the app into a Progressive Web App, covering the key features and best practices of PWAs.
Adding Offline Support: Finally, we’ll ensure your app stays functional even when there’s no internet connection by implementing offline capabilities.
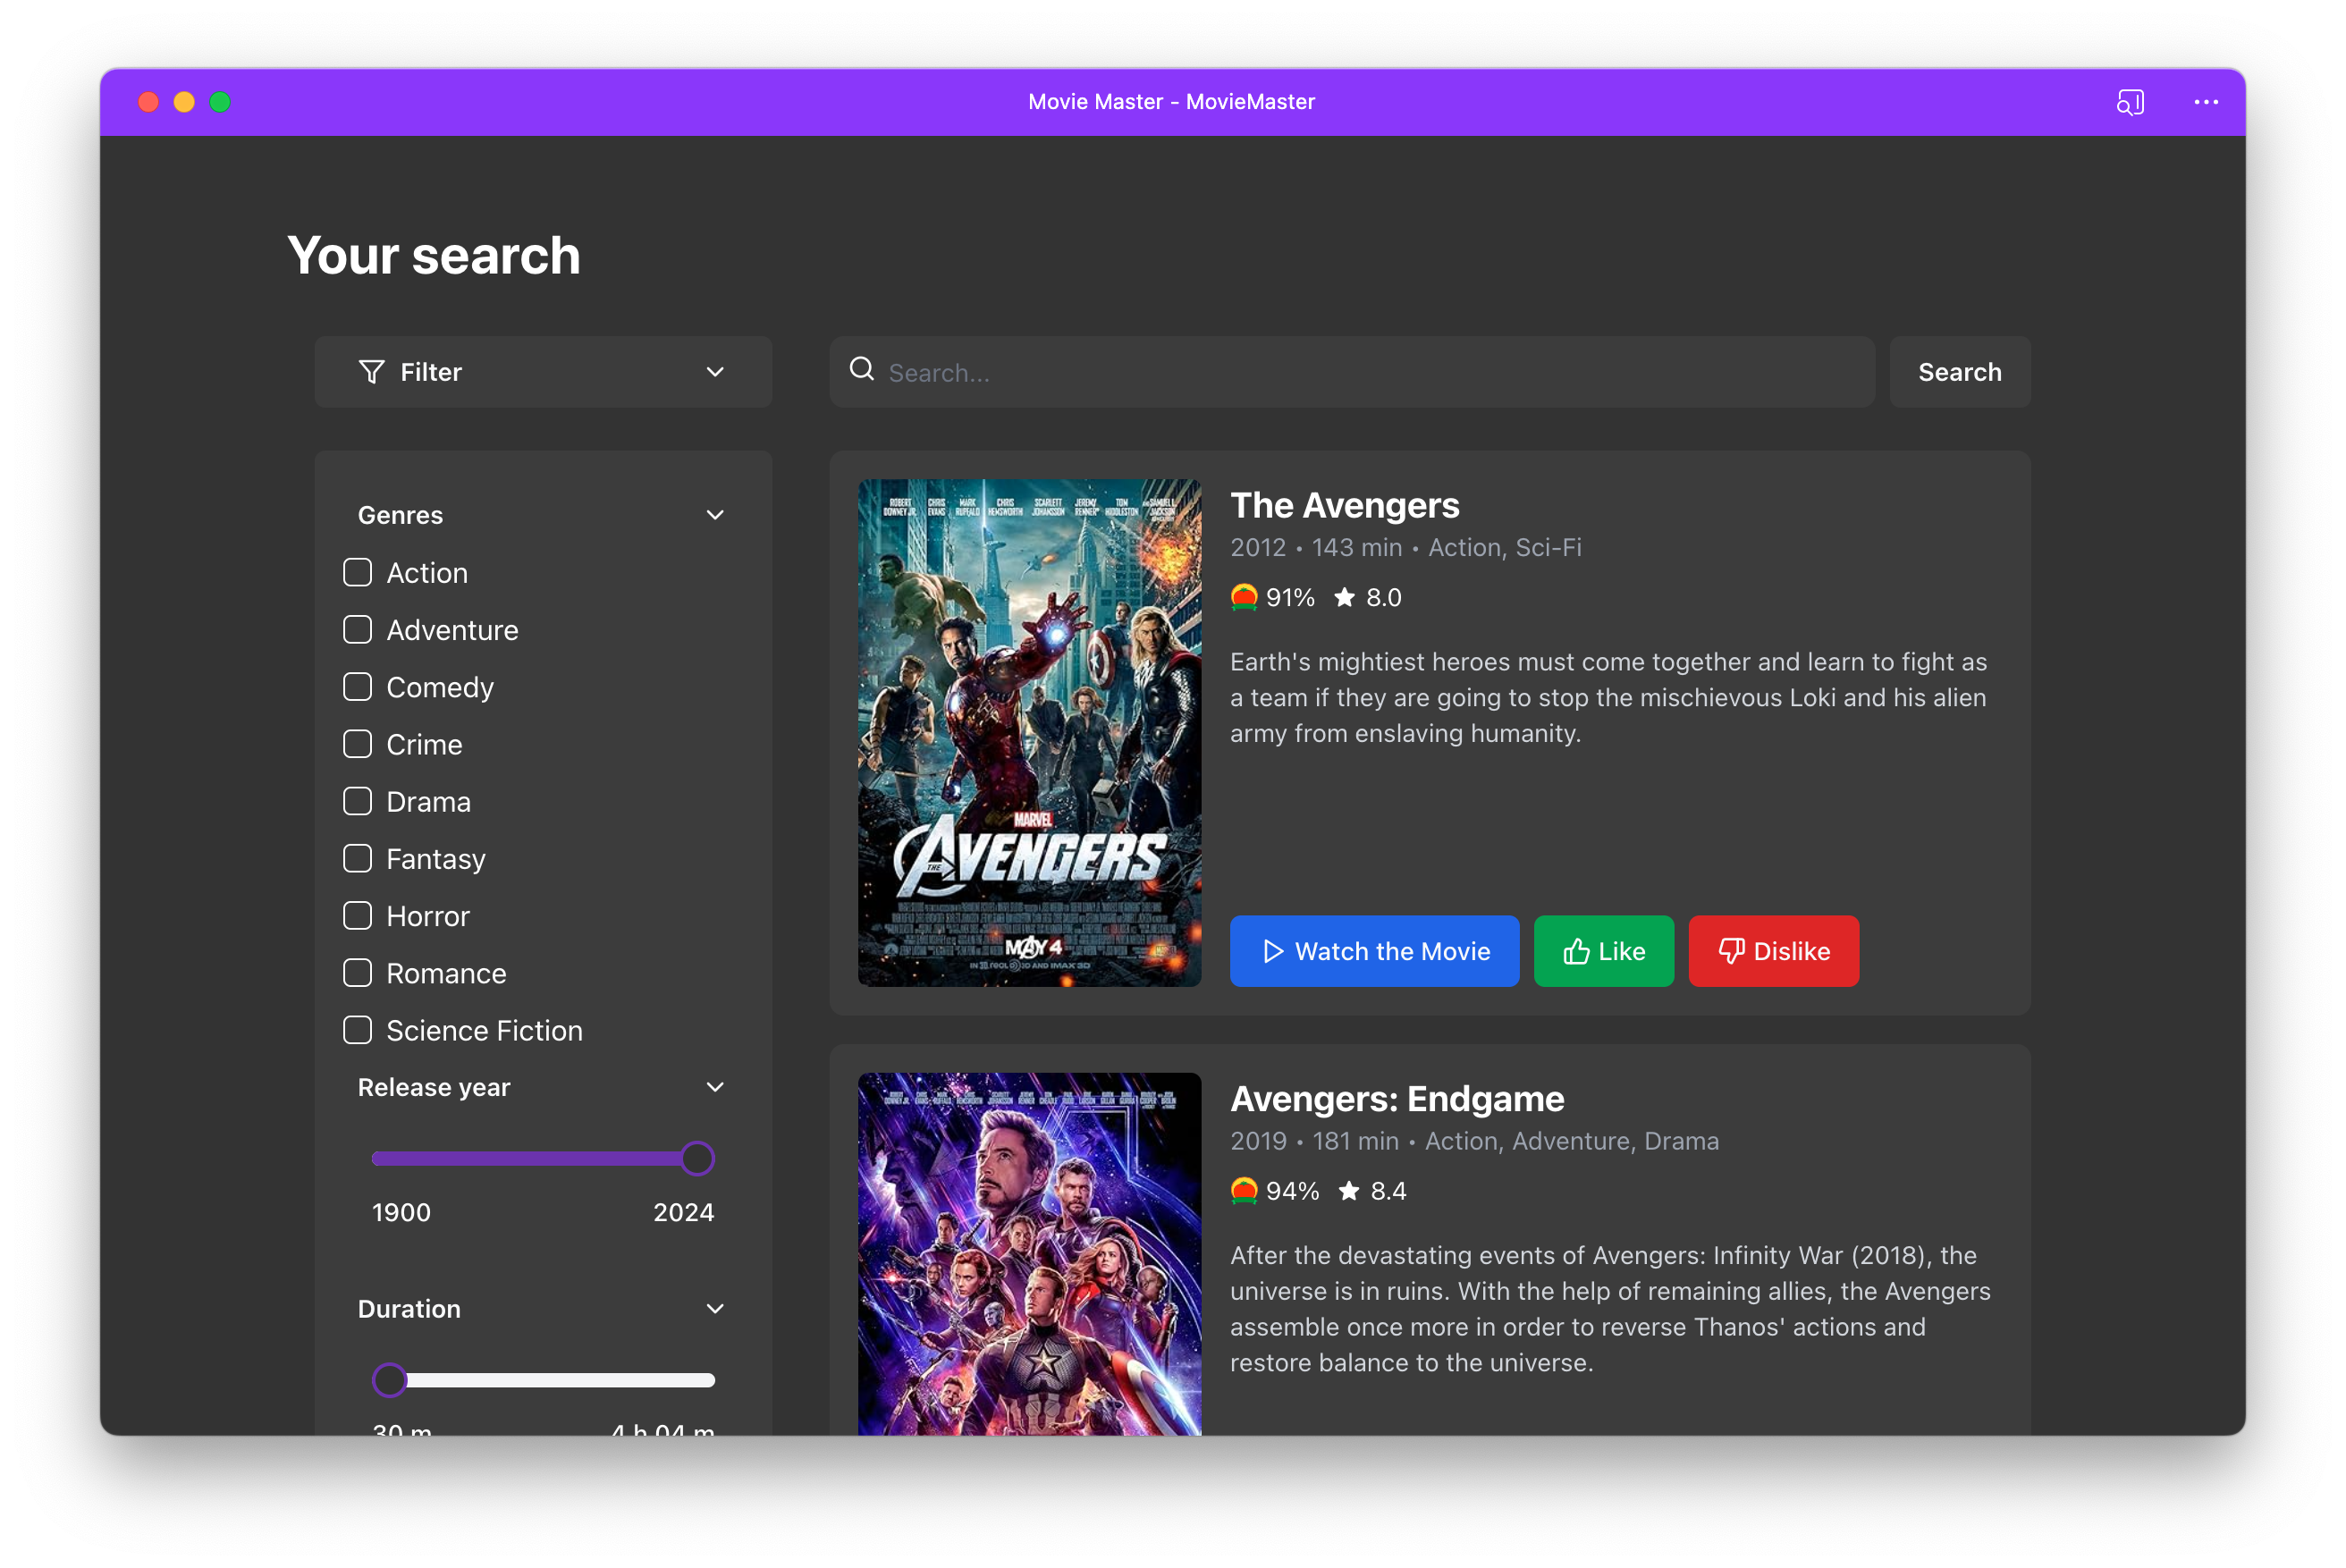
Here’s what the final application will look like:

Audience
This tutorial is for React developers of all levels, whether you’re just starting out or already experienced. If you want to enhance your web apps with PWA features, this guide will take you through the necessary steps.
Prerequisites
Before you begin, make sure you’re familiar with React.js and Next.js. If you’re new to PWAs, you might want to read some introductory articles to get a quick overview.
What is a Progressive Web App (PWA)?
A Progressive Web App (PWA) is a type of web application built using standard web technologies like HTML, CSS, and JavaScript. PWAs work on the web, desktop, and mobile devices, combining the best features of web and native apps to deliver a fast, reliable, and engaging experience.
What makes PWAs special is their ability to work offline, send push notifications, and be installed on a user’s device without an app store. In short, a PWA makes your web app feel like a native app while keeping the flexibility and wide reach of the web.
Why Turn Your Web App into a PWA?
Converting your web app into a PWA brings several benefits:
- Cross-Platform Availability: A PWA works on any device with a browser, so you only need to develop and maintain one codebase for web, mobile, and desktop apps. This saves time and ensures a consistent experience across all platforms.
Offline Capabilities: PWAs can work offline or in areas with poor connectivity by caching essential resources, keeping your app functional even without internet access.
Improved Performance: PWAs are built to load quickly and run smoothly, even on slow networks, thanks to techniques like service workers and caching.
Increased User Engagement: Users can add PWAs directly to their home screen without needing an app store. This easy access, along with features like push notifications, helps keep users engaged and coming back.
Disadvantages of PWAs
While PWAs offer many benefits, there are a few downsides:
Limited Access to Device Features: PWAs don’t have full access to certain device features like Bluetooth or advanced camera controls. For apps that need deep hardware integration, this can be a limitation.
Less Visibility: Since PWAs don’t go through app stores, they miss out on the visibility that app stores offer. Some users might also prefer downloading apps from app stores rather than directly from the browser.
Limited iOS Support: Some features of PWAs, like push notifications, don’t work as well on iPhones and iPads compared to Android devices, which can limit engagement with iOS users.
Getting Started: Setting Up the Next.js Project
Now that we’ve talked about the benefits of PWAs, let’s get into the actual implementation. We’ll start by setting up the necessary files in our project.
Why Choose Next.js in 2024?
Next.js is a top choice for building React apps in 2024. It offers features like server-side rendering and static site generation, making it easier to create fast and reliable web apps. These features ensure your app performs well on all devices and even works offline.
Project Installation
Follow these steps to set up your Next.js project:
Clone the Repository: Open your terminal and run:
git clone https://github.com/iamspruce/MovieMaster.gitNavigate to Your Project Directory:
cd your-repoInstall Dependencies: Install the required packages with:
npm installConfigure Environment Variables: Create a .env.local file in the root directory and add your OMDB API key:
NEXT_PUBLIC_OMDB_API_KEY=your-api-key
You can obtain your API key from the OMDB API website.
Why is the OMDB API Key Needed?
The OMDB API key allows your PWA to fetch movie data, like titles, posters, and descriptions, directly from the OMDB database. This is essential for a movie-related app like MovieMaster, as it provides up-to-date information for users without you having to store all the data yourself.
In a PWA, using an API like OMDB ensures that the app can deliver fresh content to users, even when it's installed on their devices. Combined with the PWA's caching and offline features, users can still view movie details that were previously fetched, even if they lose internet connectivity.
Note: Make sure Node.js and npm are installed on your system. If they are not, you can download them from nodejs.org.
Project Structure Overview
Here’s a brief overview of the project layout:
/public: Contains static files such as images and favicons.
/src/app: Houses the main application files, including global styles (globals.css), the main page (page.tsx), layout configurations (layout.tsx), and client-side logic (RootLayoutClient.tsx).
/src/components: Includes reusable components. Shadcn UI components are located in the /ui directory, and other specific components like MovieCard.tsx are here.
/src/lib: Contains utility functions and data-fetching code, such as fetchMovies.ts and useMediaQuery.ts.
For styling, we use:
TailwindCSS: Applied through globals.css for a utility-first approach to design.
Shadcn UI: A library providing accessible, ready-to-use UI components.
Understanding Layouts
The project uses two key layouts:
layout.tsx: Manages server-side rendering and sets the application’s metadata. It uses the
RootLayoutClientcomponent to handle client-side functionality. Here’s how it looks:import React from "react"; import type { Metadata } from "next"; import { cn } from "@/lib/utils"; import { Inter as FontSans } from "next/font/google"; import RootLayoutClient from "./RootLayoutClient"; const fontSans = FontSans({ subsets: ["latin"], variable: "--font-sans", }); export const metadata: Metadata = { title: "MovieMaster", description: "MovieMaster PWA helps you find the latest movies with an easy search by genre, year, and more. It works smoothly on any device, even offline, giving you a great movie browsing experience.", manifest: "/web.manifest", }; export default function RootLayout({ children }: { children: React.ReactNode }) { return ( <html lang="en" suppressHydrationWarning> <body className={cn("min-h-screen bg-background font-sans antialiased", fontSans.variable)}> <RootLayoutClient>{children}</RootLayoutClient> </body> </html> ); }RootLayoutClient.tsx: Handles client-side logic, essential for rendering interactive elements and managing UI states."
 "use client";

 import React from "react";
 import { Toaster } from "@/components/ui/sonner";
 import "./globals.css";

 export default function RootLayoutClient({ children }: { children: React.ReactNode }) {
   return (
     <div className="text-white flex flex-col">
       <div className="container mx-auto px-4 max-w-[1024px]">
         {children}
         <Toaster />
       </div>
     </div>
   );
 }
Running and Previewing the Project
To start working with your project:
Start the Development Server: In your terminal, execute:
npm run dev
This will start the development server, and you can view the application by navigating to http://localhost:3000 in your browser.
How to Turn Your Web App into a PWA
To transform your web app into a PWA, there are certain criteria that your app must meet. Let's walk through these requirements and implement the necessary changes step by step.
Criteria for a PWA
Served Over HTTPS: Your app must be served over a secure origin (HTTPS) or
localhostfor development. If you’re developing locally, this criterion is already met.Web Manifest File: A web manifest file provides metadata about your app, such as its name, icons, and start URL. This file is crucial for making your app installable on a user's device.
Service Worker with a
fetchEvent: Your app must register a service worker with at least afetchevent. Registering a service worker with at least a fetch event is essential for your app to be recognized as a PWA and be installable. Beyond that, service workers enhance your app's performance and reliability, allowing it to cache resources and handle network requests even when offline.
How to Add a Web Manifest File to Your Next.js App
To add a web manifest file in your Next.js app, place it in the public/ directory and reference it in your layout file. Ensure that all the images you include in your manifest file are also in the public/ directory.
Here’s an example of a web.manifest file:
{
  "name": "Movie Master",
  "short_name": "Moviemaster",
  "theme_color": "#8936FF",
  "background_color": "#333333",
  "start_url": "/",
  "id": "MovieMaster",
  "display": "standalone",
  "description": "MovieMaster PWA helps you find the latest movies with an easy search by genre, year, and more. It works smoothly on any device, even offline, giving you a great movie browsing experience.",
  "icons": [
    {
      "purpose": "maskable",
      "sizes": "512x512",
      "src": "icon512_maskable.png",
      "type": "image/png"
    },
    {
      "purpose": "any",
      "sizes": "512x512",
      "src": "icon512_rounded.png",
      "type": "image/png"
    }
  ],
  "screenshots": [
    {
      "src": "screenshot1.png",
      "type": "image/png",
      "sizes": "1080x1920",
      "form_factor": "narrow"
    }
  ]
}
Required Fields
name: The full name of your app.short_name: A shorter version of the app’s name, displayed when there isn’t enough space for the full name.icons: Icons representing your app at various sizes.start_url: The URL that opens when the app is launched.display: Defines the display mode (for example,standalonefor a full-screen experience).
Recommended Fields
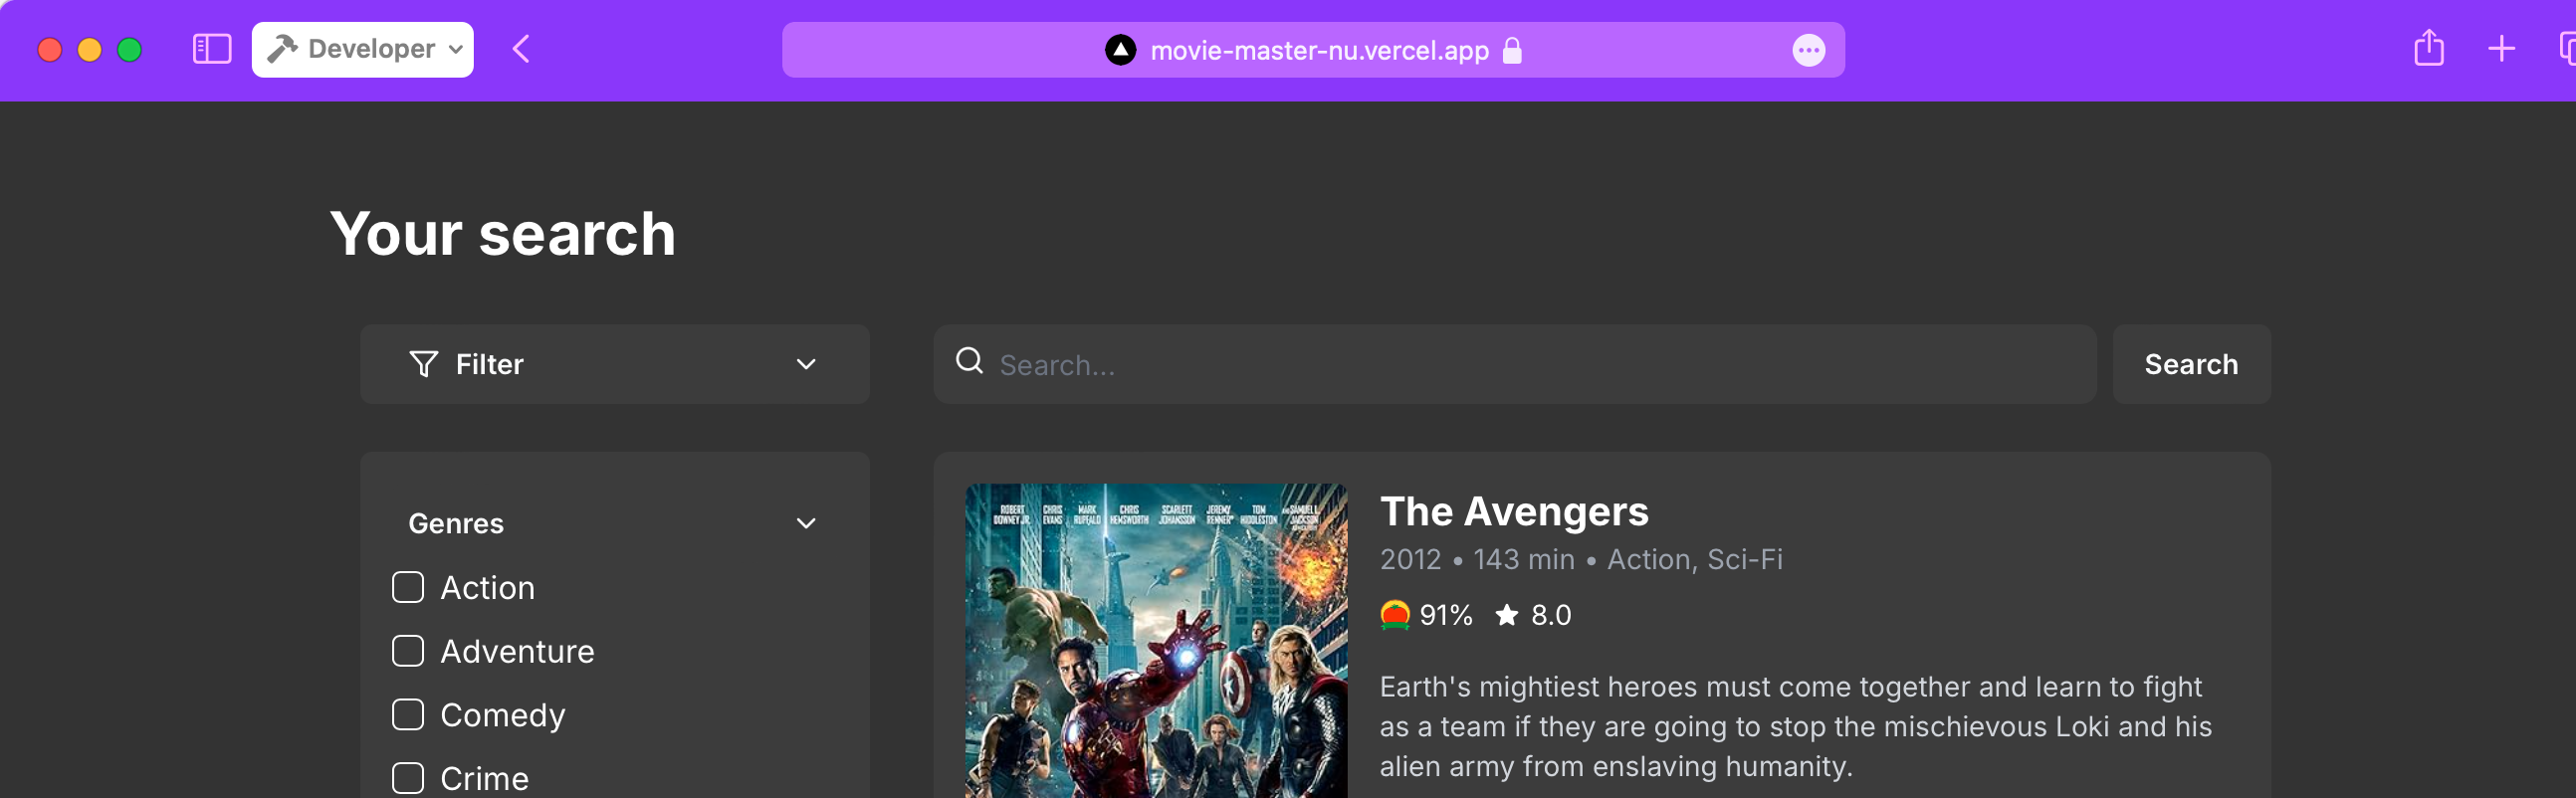
theme_color: Sets the theme color of the browser’s UI, such as the address bar. This color enhances the native feel of your PWA.
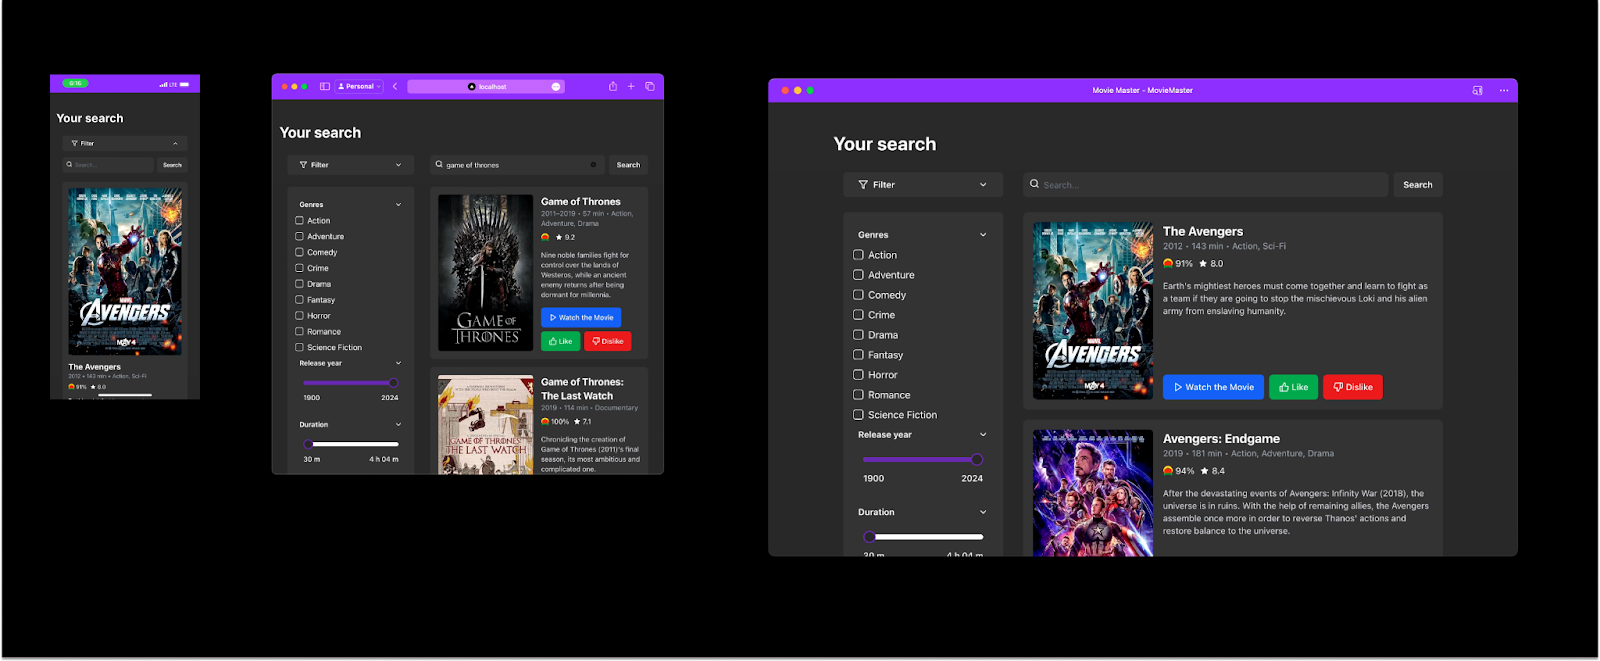
This example shows how the theme color (#8936FF) is applied to the browser's UI, giving your PWA a native feel.
background_color: Defines the background color for the splash screen when your app is launched.screenshots: Provide screenshots of your app to improve the installation experience, especially on Android devices.
This example illustrates how screenshots are displayed during the installation process, enhancing the user experience, especially on Android devices.

id: Unique identifier for the app
How to Reference the Web Manifest File
Next, let’s add the manifest file to your pages. In Next.js, you can include it in the metadata of your Layout.tsx:
export const metadata: Metadata = {
  title: "MovieMaster",
  description: "Find the latest movies with ease.",
  manifest: "/web.manifest", // Link to the manifest file
};
How to Register a Service Worker
A service worker is a script that your browser runs in the background, allowing you to control how your app handles network requests, caching, and other tasks.
Registering a service worker with at least a fetch event is essential for your app to be recognized as a PWA and be installable.
Create a service-worker.js file in the public/ directory with the following code:
self.addEventListener('install', (event) => {
  console.log('Service Worker installing.');
});

self.addEventListener('activate', (event) => {
  console.log('Service Worker activating.');
});

self.addEventListener('fetch', (event) => {
  console.log('Fetching:', event.request.url);
  event.respondWith(fetch(event.request));
});
Then, register the service worker in your RootLayoutClient.tsx file:
"use client";

import React from "react";

export default function RootLayoutClient({ children }) {
  React.useEffect(() => {
    if ("serviceWorker" in navigator) {
      navigator.serviceWorker
        .register("/service-worker.js")
        .then((registration) => {
          console.log("Service Worker registered with scope:", registration.scope);
        })
        .catch((error) => {
          console.error("Service Worker registration failed:", error);
        });
    }
  }, []);

  return (
    <div className="text-white flex flex-col">
      <div className="container mx-auto px-4 max-w-[1024px]">
        {children}
      </div>
    </div>
  );
}
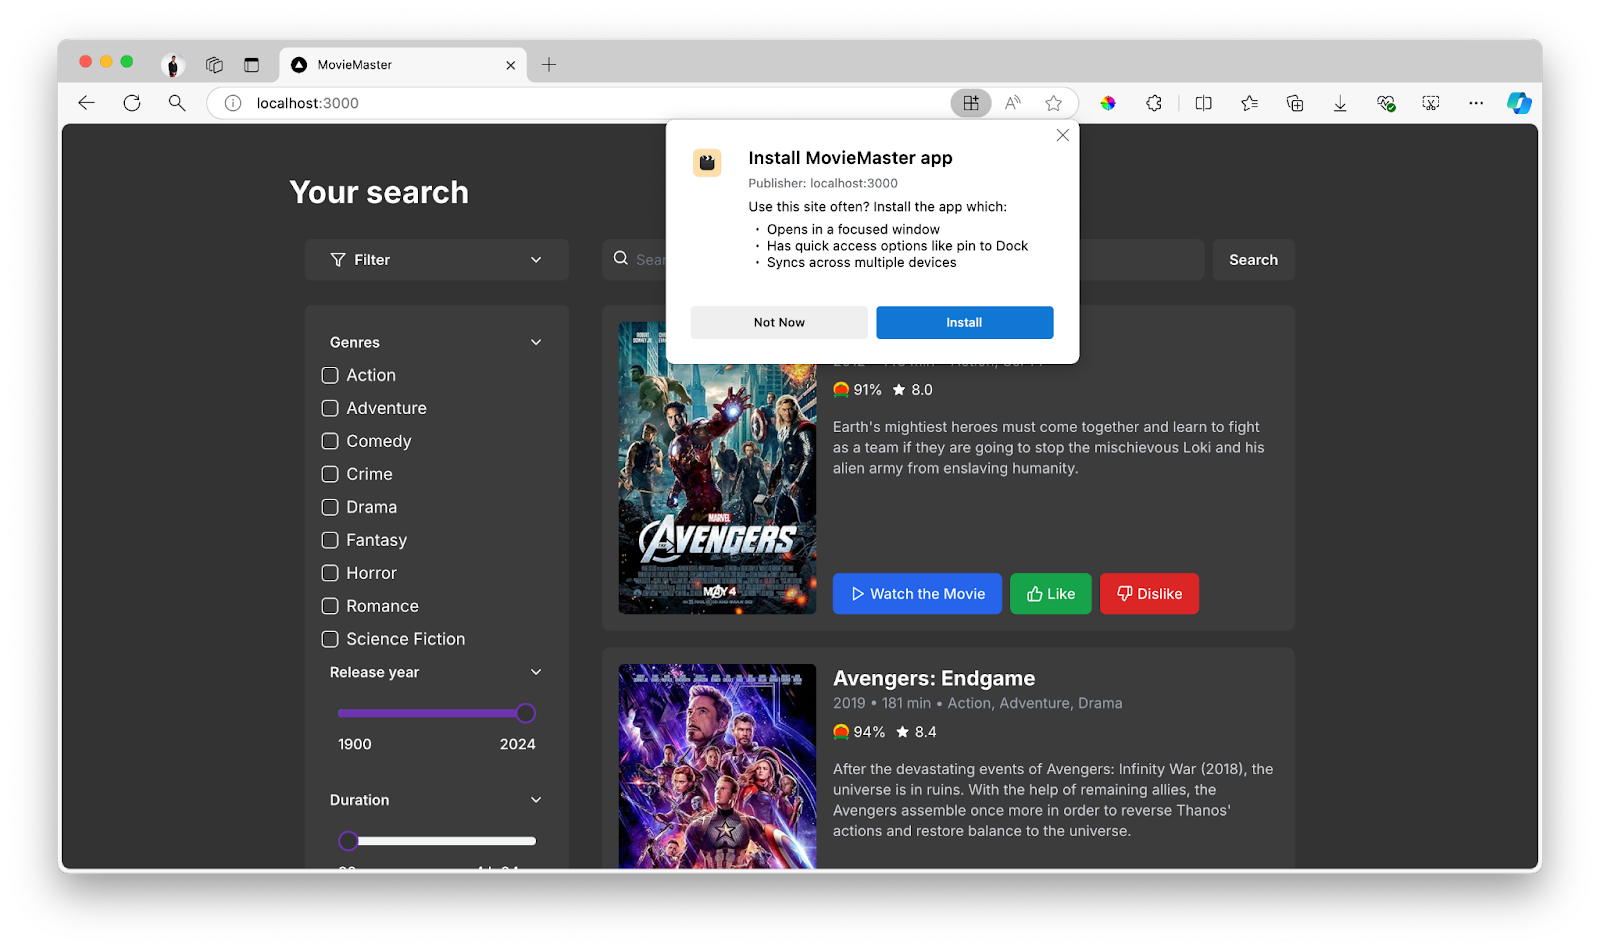
Once your app meets all the criteria, users can easily install it on their devices. For example, when using the Edge browser, an install option will appear in the browser’s menu, allowing users to add your app directly to their desktop or home screen.
Here's what the installation process looks like:
How to Add Offline Support
At this stage, even though our app is technically a PWA, it still behaves like a regular web application. Whenever a user requests a resource, the app makes a network request, and if the network fails, the user is greeted with an error page. This isn’t ideal, especially when the power of a PWA lies in its ability to function offline or in poor network conditions.
With a PWA, you can intercept every request made by your app using a service worker. This gives you the flexibility to decide how to serve content—from the network or from a cache. This control allows you to ensure that users can still access the app, even without an internet connection.
How to Deliver Resources from the Network
Let’s start by looking at how our app currently behaves, which is similar to any standard web application:
self.addEventListener("fetch", (event) => {
  event.respondWith(fetch(event.request));
});
This code simply fetches resources directly from the network. If the network is unavailable, the request will fail, leading to an error. This is the default behavior for a standard web app.
How to Implement Offline Support
To provide an offline experience, we need to cache our app’s resources when the user is online and then serve these cached resources when the user is offline. For this, we’ll use the Cache Storage API, which allows us to store resources locally on the user's device.
What to Cache?
The decision on what to cache depends on the needs of your application. For a movie search app like ours, we’ll want to cache the essential resources required to render a basic version of the application:
The main HTML page
CSS stylesheets needed to render the site
Images used in the user interface
JavaScript files required for functionality
API request responses
Note: While you can cache almost anything, be mindful of storage limitations, as all cached items are stored on the user’s device. Use storage wisely to avoid taking up too much space.
When to Cache?
Once we know what to cache, the next thing to consider is when to cache. Should you cache everything during the service worker installation, or should you cache resources as they are requested?
The answer depends on the app's needs, but a good practice is to cache the core files required to render a basic version of the app during the service worker installation.
Here’s how you can do that:
const CACHE_NAME = "MOVIE_MASTER_V1";

async function cacheCoreAssets() {
  const cache = await caches.open(CACHE_NAME);
  return cache.addAll([
    "/",
    "/imdb-logo.svg",
    "/rotten-tomatoes-logo.svg",
  ]);
}

self.addEventListener("install", (event) => {
  event.waitUntil(cacheCoreAssets());
  self.skipWaiting();
});
In this code, self.skipWaiting() ensures that the new service worker activates immediately after installation, bypassing the waiting phase.
It’s also important to delete old caches when a new service worker is activated:
async function clearOldCaches() {
  const cacheNames = await caches.keys();
  return Promise.all(
    cacheNames
      .filter((name) => name !== CACHE_NAME)
      .map((name) => caches.delete(name))
  );
}

self.addEventListener("activate", (event) => {
  event.waitUntil(clearOldCaches());
  self.clients.claim();
});
The self.clients.claim() method ensures that the new service worker takes control of all pages as soon as it activates.
Dynamic Caching
Dynamic caching is particularly useful for React apps like ours, where static files are automatically generated. With dynamic caching, you don’t need to know all the files in advance. Instead, it handles the caching process for you as files are requested.
async function dynamicCaching(request) {
  const cache = await caches.open(CACHE_NAME);

  try {
    const response = await fetch(request);
    const responseClone = response.clone();
    await cache.put(request, responseClone);
    return response;
  } catch (error) {
    console.error("Dynamic caching failed:", error);
    return caches.match(request);
  }
}
With dynamic caching, files requested by the app are cached as they are fetched, ensuring that they are available for future offline use.
Caching API Requests
When it comes to caching API responses, instead of caching the entire response, it’s often better to cache the specific data returned by the API. For this, we can use IndexedDB, a local database built into the browser.
IndexedDB is more powerful than the Cache Storage API, especially for storing and retrieving structured data like JSON. This makes it an excellent choice for apps that require storing complex data or handling large amounts of information efficiently.

How to Set Up IndexedDB
First, create a function to open the database and create an object store:
const DB_NAME = "MovieMaster";
const DB_VERSION = 1;
const DB_STORE_NAME = "myStore";

function openDb() {
  return new Promise((resolve, reject) => {
    const request = indexedDB.open(DB_NAME, DB_VERSION);
    request.onsuccess = () => resolve(request.result);
    request.onerror = () => reject(request.error);
    request.onupgradeneeded = (event) => {
      const db = event.target.result;
      db.createObjectStore(DB_STORE_NAME, { keyPath: "url" });
    };
  });
}
Next, create functions to add data to and retrieve data from the database:
async function addData(url, jsonData) {
  const db = await openDb();
  const transaction = db.transaction(DB_STORE_NAME, "readwrite");
  const store = transaction.objectStore(DB_STORE_NAME);

  const data = {
    url,
    response: JSON.stringify(jsonData),
  };

  const request = store.put(data);
  await new Promise((resolve, reject) => {
    request.onsuccess = () => resolve();
    request.onerror = () => reject(request.error);
  });
}

async function getData(url) {
  try {
    const db = await openDb();
    const transaction = db.transaction(DB_STORE_NAME, "readonly");
    const store = transaction.objectStore(DB_STORE_NAME);

    const request = store.get(url);

    const result = await new Promise((resolve, reject) => {
      request.onsuccess = () => resolve(request.result);
      request.onerror = () => reject(request.error);
    });

    if (result && result.response) {
      return JSON.parse(result.response);
    }

    return null;
  } catch (error) {
    console.error("Error retrieving from IndexedDB:", error);
    return null;
  }
}
How to Serve Cached Resources
Once we have cached our assets and stored API data in IndexedDB, the next step is to serve this data to users when they are offline. There are several strategies to achieve this:
Cache First Strategy
In the cache-first strategy, we check if a resource is available in the cache. If it is, we serve it from the cache; if not, we fetch it from the network. This is particularly useful for serving static assets like HTML, CSS, and JavaScript files:
async function cacheFirstStrategy(request) {
  try {
    const cache = await caches.open(CACHE_NAME);
    const cachedResponse = await cache.match(request);

    if (cachedResponse) {
      return cachedResponse;
    }

    const networkResponse = await fetch(request);
    const responseClone = networkResponse.clone();
    await cache.put(request, responseClone);
    return networkResponse;
  } catch (error) {
    console.error("Cache first strategy failed:", error);
    return caches.match("/offline");
  }
}

self.addEventListener("fetch", (event) => {
  const { request } = event;
  if (event.request.mode === "navigate") {
    event.respondWith(cacheFirstStrategy(request));
  } else {
    event.respondWith(dynamicCaching(request));
  }
});
In this setup, the cache-first strategy is applied when navigating to new pages, while dynamic caching handles other requests.
Network First Strategy
The network-first strategy is the opposite: it attempts to fetch resources from the network first, and if the network is unavailable, it falls back to the cache. This strategy is particularly useful for API requests where you want the most up-to-date data:
async function networkFirstStrategy(request) {
  try {
    const networkResponse = await fetch(request);

    if (networkResponse.ok) {
      const responseClone = networkResponse.clone();
      const responseData = await responseClone.json();
      await addData(request.url, responseData);
      return networkResponse;
    }

    throw new Error("Network response was not ok");
  } catch (error) {
    console.error("Network first strategy failed:", error);
    const cachedResponse = await getData(request.url);

    if (cachedResponse) {
      console.log("Using cached response:", cachedResponse);
      return new Response(JSON.stringify(cachedResponse), {
        status: 200,
        headers: { "Content-Type": "application/json" },
      });
    }

    return new Response("[]", { status: 200 });
  }
}

self.addEventListener("fetch", (event) => {
  const { request } = event;
  const url = new URL(request.url);

  if (url.origin === "https://www.omdbapi.com") {
    event.respondWith(networkFirstStrategy(request));
  } else if (event.request.mode === "navigate") {
    event.respondWith(cacheFirstStrategy(request));
  } else {
    event.respondWith(dynamicCaching(request));
  }
});
In our app, we use the network-first strategy for API calls, ensuring that the user gets the latest data when online, while falling back to cached data in IndexedDB when offline.
Full Service Worker Code
Here’s the complete service-worker.js file that incorporates everything we’ve discussed:
const CACHE_NAME = "MOVIE_MASTER_V1";
const DB_NAME = "MovieMaster";
const DB_VERSION = 1;
const DB_STORE_NAME = "myStore";

async function cacheCoreAssets() {
  const cache = await caches.open(CACHE_NAME);
  return cache.addAll([
    "/",
    "/imdb-logo.svg",
    "/rotten-tomatoes-logo.svg",
    "/offline",
  ]);
}

self.addEventListener("install", (event) => {
  event.waitUntil(cacheCoreAssets());
  self.skipWaiting();
});

async function clearOldCaches() {
  const cacheNames = await caches.keys();
  return Promise.all(
    cacheNames
      .filter((name) => name !== CACHE_NAME)
      .map((name) => caches.delete(name))
  );
}

self.addEventListener("activate", (event) => {
  event.waitUntil(clearOldCaches());
  self.clients.claim();
});

async function dynamicCaching(request) {
  const cache = await caches.open(CACHE_NAME);

  try {
    const response = await fetch(request);
    const responseClone = response.clone();
    await cache.put(request, responseClone);
    return response;
  } catch (error) {
    console.error("Dynamic caching failed:", error);
    return caches.match(request);
  }
}

function openDb() {
  return new Promise((resolve, reject) => {
    const request = indexedDB.open(DB_NAME, DB_VERSION);
    request.onsuccess = () => resolve(request.result);
    request.onerror = () => reject(request.error);
    request.onupgradeneeded = (event) => {
      const db = event.target.result;
      db.createObjectStore(DB_STORE_NAME, { keyPath: "url" });
    };
  });
}

async function addData(url, jsonData) {
  const db = await openDb();
  const transaction = db.transaction(DB_STORE_NAME, "readwrite");
  const store = transaction.objectStore(DB_STORE_NAME);

  const data = {
    url,
    response: JSON.stringify(jsonData),
  };

  const request = store.put(data);
  await new Promise((resolve, reject) => {
    request.onsuccess = () => resolve();
    request.onerror = () => reject(request.error);
  });
}

async function getData(url) {
  try {
    const db = await openDb();
    const transaction = db.transaction(DB_STORE_NAME, "readonly");
    const store = transaction.objectStore(DB_STORE_NAME);

    const request = store.get(url);

    const result = await new Promise((resolve, reject) => {
      request.onsuccess = () => resolve(request.result);
      request.onerror = () => reject(request.error);
    });

    if (result && result.response) {
      return JSON.parse(result.response);
    }

    return null;
  } catch (error) {
    console.error("Error retrieving from IndexedDB:", error);
    return null;
  }
}

async function cacheFirstStrategy(request) {
  try {
    const cache = await caches.open(CACHE_NAME);
    const cachedResponse = await cache.match(request);

    if (cachedResponse) {
      return cachedResponse;
    }

    const networkResponse = await fetch(request);
    const responseClone = networkResponse.clone();
    await cache.put(request, responseClone);
    return networkResponse;
  } catch (error) {
    console.error("Cache first strategy failed:", error);
    return caches.match("/offline");
  }
}

async function networkFirstStrategy(request) {
  try {
    const networkResponse = await fetch(request);

    if (networkResponse.ok) {
      const responseClone = networkResponse.clone();
      const responseData = await responseClone.json();
      await addData(request.url, responseData);
      return networkResponse;
    }

    throw new Error("Network response was not ok");
  } catch (error) {
    console.error("Network first strategy failed:", error);
    const cachedResponse = await getData(request.url);

    if (cachedResponse) {
      console.log("Using cached response:", cachedResponse);
      return new Response(JSON.stringify(cachedResponse), {
        status: 200,
        headers: { "Content-Type": "application/json" },
      });
    }

    return new Response("[]", { status: 200 });
  }
}

self.addEventListener("fetch", (event) => {
  const { request } = event;
  const url = new URL(request.url);

  if (url.origin === "https://www.omdbapi.com") {
    event.respondWith(networkFirstStrategy(request));
  } else if (event.request.mode === "navigate") {
    event.respondWith(cacheFirstStrategy(request));
  } else {
    event.respondWith(dynamicCaching(request));
  }
});
With this setup, your PWA is now fully equipped to handle both static and dynamic content, provide an offline experience, and cache API data intelligently.
Further Reading
There are many more strategies and nuances to building a robust offline experience with service workers. If you want to dive deeper into this topic, consider reading more about:
Different caching strategies: Cache-First, Network-First, Stale-While-Revalidate, and so on.
Advanced service worker features like background sync and push notifications.
Best practices for managing cache and storage limits
By understanding and implementing these concepts, you can ensure that your app remains functional and user-friendly, even in challenging network conditions.
Providing a Fallback Page
Even with caching strategies in place, there may be times when users try to access a resource that isn’t available offline and in the network. To handle these situations gracefully, we can create a fallback page. This page will be shown whenever a user tries to access content that can't be retrieved from either the cache or the network.
If you cloned the example project for this tutorial, you should already have a fallback page located in the app directory. This page is designed to handle offline scenarios gracefully and includes a simple Tic-Tac-Toe game for users to play while waiting for the connection to be restored. Here’s what the fallback page looks like:
"use client";
import TicTacToe from "@/components/TicTacToe";
import { useState, useEffect } from "react";
import { useRouter } from "next/navigation";
import Link from "next/link";

const Fallback: React.FC = () => {
  const [isOnline, setIsOnline] = useState(false);
  const router = useRouter();

  useEffect(() => {
    const handleOnline = () => {
      setIsOnline(true);
      // Redirect to homepage if online
      router.push("/");
    };

    const handleOffline = () => {
      setIsOnline(false);
    };

    window.addEventListener("online", handleOnline);
    window.addEventListener("offline", handleOffline);

    return () => {
      window.removeEventListener("online", handleOnline);
      window.removeEventListener("offline", handleOffline);
    };
  }, [router]);

  const handleRefresh = () => {
    if (navigator.onLine) {
      router.push("/");
    } else {
      setIsOnline(false);
    }
  };

  return (
    <div className="flex mx-auto h-screen max-w-[500px] w-full flex-col items-center justify-center h-screen bg-foreground text-black p-6 mt-12 text-white">
      <h1 className="text-3xl font-bold mb-6">
        {isOnline ? "You are online!" : "You are offline"}
      </h1>
      <p className="text-lg text-center mb-6">
        {isOnline
          ? "You are back online."
          : "Please check your internet connection and try again."}
      </p>
      <div className="">
        <TicTacToe />
      </div>
      {isOnline ? (
        <Link
          href={"/"}
          className="mt-6 px-4 py-2 bg-blue-500 text-white rounded shadow hover:bg-blue-600"
        >
          Return to Homepage
        </Link>
      ) : (
        <button
          onClick={handleRefresh}
          className="mt-6 px-4 py-2 bg-blue-500 text-white rounded shadow hover:bg-blue-600"
        >
          Refresh
        </button>
      )}
    </div>
  );
};

export default Fallback;
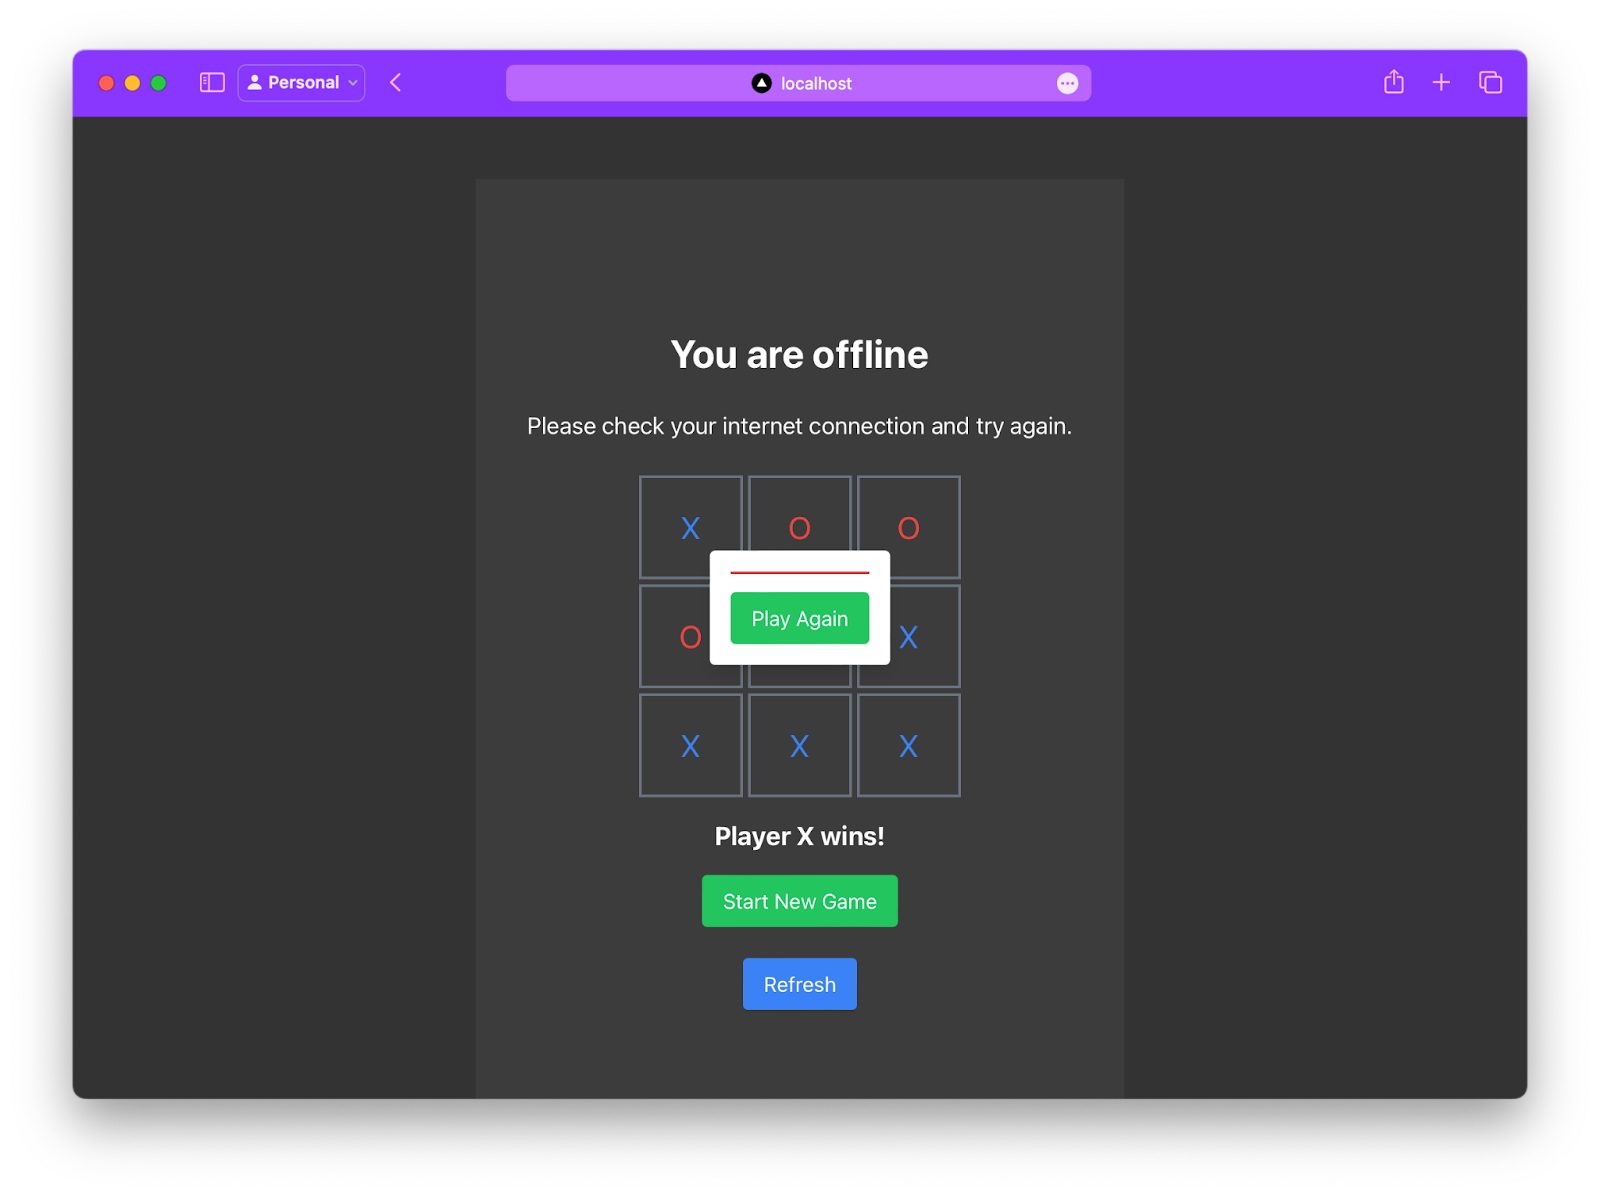
Note: You can customize this fallback page to suit your application’s needs, whether that’s displaying helpful offline content, providing a message, or offering a small interactive feature like the Tic-Tac-Toe game included here.
Caching the Fallback Page
Next, ensure that the fallback page is cached when the service worker is installed:
const CACHE_NAME = "MOVIE_MASTER_V1";

async function cacheCoreAssets() {
  const cache = await caches.open(CACHE_NAME);
  return await cache.addAll([
    "/",
    "/fallback",
    // other assets
  ]);
}
Serving the Fallback Page
Finally, modify the cacheFirstStrategy to serve the offline.html page when a request fails:
async function cacheFirstStrategy(request) {
  try {
    const cache = await caches.open(CACHE_NAME);
    const cachedResponse = await cache.match(request);

    if (cachedResponse) {
      return cachedResponse;
    }

    const networkResponse = await fetch(request);
    const responseClone = networkResponse.clone();
    await cache.put(request, responseClone);
    return networkResponse;
  } catch (error) {
    console.error("Cache first strategy failed:", error);
    return caches.match("/offline.html");
  }
}
This approach ensures that users always see a meaningful message instead of an error when they’re offline or when a resource is unavailable.
Conclusion
With our Next.js app set up, we’ve successfully transformed it into a fully functional Progressive Web App (PWA), making it better and more user-friendly.
This guide showed how to build a strong PWA using Next.js by adding features like offline support, caching, and service workers. These improvements boost performance and provide a smooth experience on all devices, combining the best of web and native apps.
With these tips, you’ll be ready to create engaging, reliable, and high-performance PWAs that stand out in web development.