
Uploading files is an important need in many applications. Using Multer, you can set up a NestJS file upload feature in an easy and straightforward way.
In this guide, we’ll walk through the steps to create a resource dedicated to file uploads, ensuring that your application can easily manage user files. You'll configure your application to handle files securely and seamlessly.
Prerequisites
This is a hands-on guide. To follow along, you must have the following things:
Node.js (v14 and above)
Node package manager
Basic understanding of Node.js and NestJS
A code editor, like VS Code
NestJS CLI. You can use the
npm install -g @nestjs/clicommand to install the CLI.
How to Set up the Project
Create a new NestJS project:
$ nest new file-upload-example
Then navigate to your project directory and run:
$ cd file-upload-example
Next, install the multer package—the middleware that will handle your file uploads:
$ npm install @nestjs/platform-express multer
Lastly, install the @types/express and @types/multer packages:
$ npm install -save-dev @types/express @types/multer
With the project set up and dependencies installed, let’s create the resource for the file upload feature.
How to Create a Resource for File Upload
Using the NestJS CLI, generate the resource to handle file uploads:
nest generate resource file-upload
This command creates a resource file-upload in the src directory: module, controller and service, to manage file uploads.
file-upload.module.ts organizes the file upload logic, file-upload.controller.ts handles incoming file upload requests, and file-upload.service.ts handles the file upload operations. With the resource created, let’s configure the module, service and controller.
How to Configure the File Upload Resource
In this section we’ll configure the file-upload.module.ts, file-upload.controller.ts and file-upload.service.ts files.
Module configuration:
import { Module } from '@nestjs/common';
import { FileUploadService } from './file-upload.service';
import { FileUploadController } from './file-upload.controller';
import { MulterModule } from '@nestjs/platform-express';
import { diskStorage } from 'multer';
@Module({
  imports: [
    MulterModule.register({
      storage: diskStorage({
        destination: './uploads',
        filename: (req, file, cb) => {
          const filename = `${Date.now()}-${file.originalname}`;
          cb(null, filename);
        },
      }),
    }),
  ],
  controllers: [FileUploadController],
  providers: [FileUploadService],
})
export class FileUploadModule {}
Above is the file-upload.module.ts file, where we configured the MulterModule to specify the upload destination and how it should name the file.
Controller configuration:
import {
  Controller,
  Post,
  UseInterceptors,
  UploadedFile,
} from '@nestjs/common';
import { FileInterceptor } from '@nestjs/platform-express';
import { FileUploadService } from './file-upload.service';

@Controller('file-upload')
export class FileUploadController {
  constructor(private readonly fileUploadService: FileUploadService) {}

  @Post('upload')
  @UseInterceptors(FileInterceptor('file'))
  uploadFile(@UploadedFile() file: Express.Multer.File) {
    return this.fileUploadService.handleFileUpload(file);
  }
}
Is the file-upload.controller.ts file above, a POST route is created to handle file uploads. The route listens for file uploads and passes the file to the service for processing
Service configuration:
import { Injectable } from '@nestjs/common';

@Injectable()
export class FileUploadService {
  handleFileUpload(file: Express.Multer.File) {
    return { message: 'File uploaded successfully', filePath: file.path };
  }
}
The service processes the file and returns a response with the file’s path.
Now that the module, service and controller has been configured, we can now add some validation to check the file size and file type.
import { BadRequestException, Injectable } from '@nestjs/common';

@Injectable()
export class FileUploadService {
  handleFileUpload(file: Express.Multer.File) {
    if (!file) {
      throw new BadRequestException('no file uploaded');
    }

    // validate file type
    const allowedMimeTypes = ['image/jpeg', 'image/png', 'application/pdf'];
    if (!allowedMimeTypes.includes(file.mimetype)) {
      throw new BadRequestException('invalid file type');
    }

    // validate file size (e.g., max 5mb)
    const maxSize = 5 * 1024 * 1024;
    if (file.size > maxSize) {
      throw new BadRequestException('file is too large!');
    }

    return { message: 'File uploaded successfully', filePath: file.path };
  }
}
We have done the necessary configurations to test the file upload.
How to Test the File Upload
Testing is an important part of building features, in this section we’ll test the file-upload feature using Postman, but you can use any similar tool to test the file upload endpoint. Let’s see our API in action!
Post an image file with the /file-upload/upload endpoint:
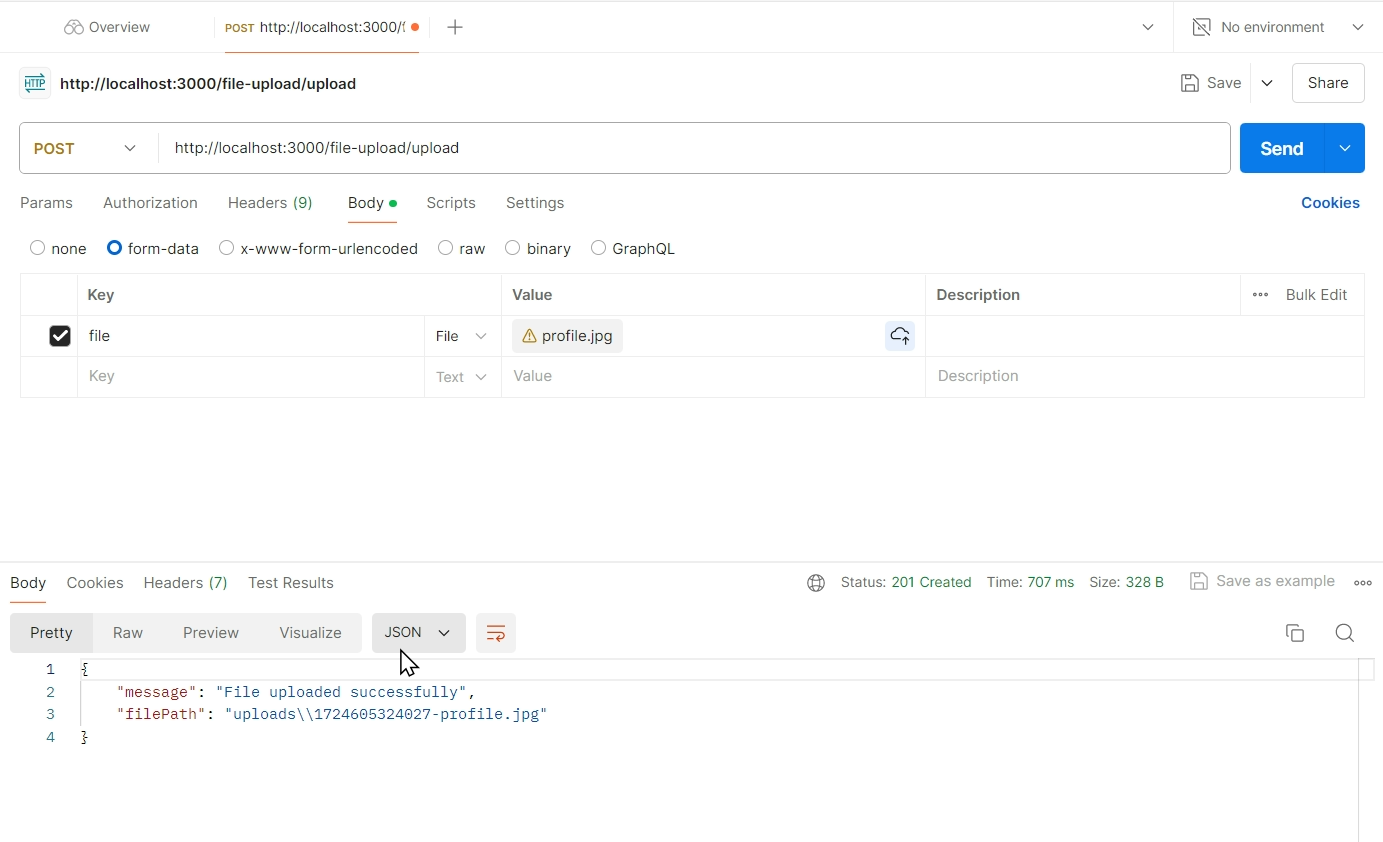
After sending the request, check your response to ensure the file was uploaded successfully. And to further confirm the upload, check the file-upload-example and you’ll see the uploads directory already created with the file you uploaded.
Conclusion
Congratulations to you now that you’ve successfully set up a file upload feature with Multer and NestJS. You configured the module, controller, and service to handle the files securely, and tested the endpoint.
You should understand that these are basic and essential steps to uploading files. You can add to these by building more complex features like handling multiple file uploads, storage in cloud services, and so on.
I really enjoyed working on this demo, and I hope you also find it helpful. For your convenience, the project repository is avalilable on Github. You can also connect with me on Twitter. I’d love to hear from you.