

A linter is a tool that scans code for potential issues. This is invaluable with a programming language like JavaScript which is so loosely typed.
Even for TypeScript, which is a strongly typed language whose compiler does a great job of detecting errors at compile time, linters such as ESLint have plugins that catch problems which are not caught by the compiler.
When you generate a new app using the Next.js CLI (npx create-next-app), ESLint is configured by default. But there are several problems with the linting setup generated by create-next-app:
If you choose SCSS for styling, you should use Stylelint in the build process to lint CSS or SCSS stylesheets. But it’s not set up automatically.
If instead you opt for Tailwind for styling, you should set up the Tailwind plugin for ESLint. But again, this isn’t done in the generated ESLint configuration.
If you choose TypeScript, then in Next.js v14 and below, TypeScript-specific ESLint rules are not configured, contrary to what the documentation states. While a Next.js v15 app has these set up, I would still tweak the setup further with the more powerful linting rules provided by the typescript-eslint project. These include the no-floating-promises rule which points out if you have forgotten to
awaita method that returns aPromise. These and other rules from typescript-eslint are going to save you lots and lots of times as you write TypeScript code.And finally, Prettier is not set up. Prettier is a code formatting tool. It can prevent inconsistently formatted code from getting into the code repository, which would make comparisons between different versions of the same file difficult. Also, nicely formatted code is easier to work with. So this is a pretty big omission.
In this tutorial, I'll show you how I set up linting and formatting in my Next.js projects in a way that addresses the issues above. I’ll also teach you how to install and configure some related VS Code extensions for coding assistance.
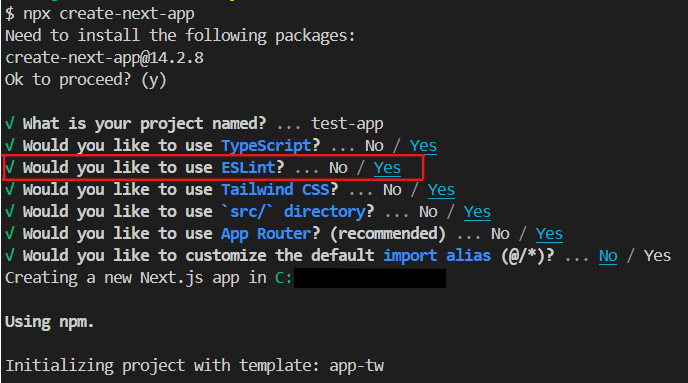
To follow along, you can either use a Next.js project you already have, or generate a new app by running npx create-next-app on the terminal.
If you’re scaffolding a new app, your choices are up to you (defaults are fine) but make sure to choose YES in response to the question about whether you’d like to use ESLint:
If you are following along with an existing app rather than a new one, upgrade it by running the following command in app root:
npm i next@latest react@latest react-dom@latest eslint-config-next@latest
npm i --save-dev eslint
This will avoid versioning conflicts down the line.
If you cannot upgrade to the latest version, you’ll need to specify versions for packages that will be installed in this tutorial to get around any version conflicts. Be warned that this can be frustrating.
Now you’re ready to open up the app in your code editor and proceed as follows.
MONOREPO NOTE: A monorepo is a Git repository that contains multiple projects, each in its own subfolder. For example this repo is for a full-stack solution that contains two projects: a Next.js app in folder flowmazonfrontend and a .NET Core API project in folder flowmazonbackend:
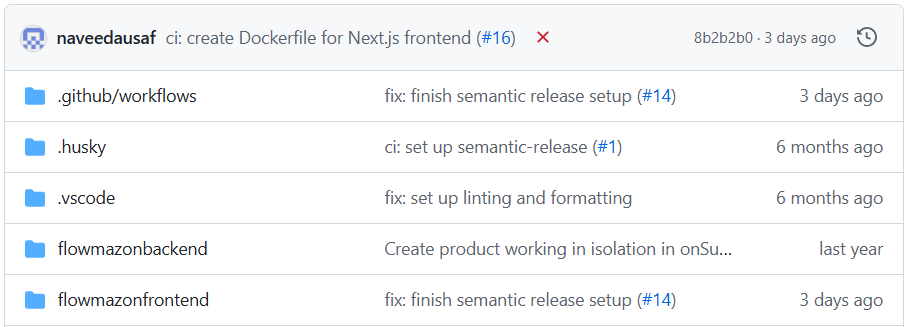
If your Next.js app is contained in a monorepo that contains both a Next.js app and other projects, I recommend that you do all of the setup below within the Next.js app's folder. This is the folder you should open in your code editor and cd into on the terminal. There is one bit of setup (lint-staged and Husky) that will need to be done in the monorepo root folder. I shall point it out in due course.
Prerequisites
For this tutorial, I assume that you know how to:
write a basic Next.js app with two or more pages.
install additional NPM packages into your app
Table of Contents
Set Up Prettier
Prettier is an opinionated code formatter that can format pretty much any file (.html, .json, .js, .ts, .css, .scss and so on).
Set it up in yuor app as follows:
Install Prettier:
npm install --save-dev prettierIf you chose Tailwind for styling when generating the app, then install
prettier-plugin-tailwindcss:npm install --save-dev prettier-plugin-tailwindcssThis package is a Prettier plugin and provides rules for reordering of Tailwind classes used in a
classorclassNameattribute according to a canonical ordering. It helps keep the ordering of Tailwind classes used in the markup consistent.%[https://youtu.be/tQkBJXwzY8A?autoplay=1]
Create
.prettierrc.jsonin youyr project root. If you’re using SCSS for styling, paste the following snippet into this file:{ "singleQuote": true, "jsxSingleQuote": true }If you’re using Tailwind instead, paste the following into
.prettierrc.json:{ "plugins": ["prettier-plugin-tailwindcss"], "singleQuote": true, "jsxSingleQuote": true }Create
.prettierignorefile in the app root, with the following content:node_modules .next .husky coverage .prettierignore .stylelintignore .eslintignore stories storybook-static *.log playwright-report .nyc_output test-results junit.xml docsThis file ensure that files which are not app code (that is, those which are not
.js,.ts,.cssfiles and so on.) do not get formatted. Otherwise Prettier will end up spending too much time processing files whose formatting you don't really care about.'prettierignore(the file we just created),.eslintignore, and.stylelintignorehave been ignored because these are plain text files with no structure so Prettier would complain that it cannot format them.Finally, I recommend that you follow the steps in this post to set LF as the EOL character, both in the repo and in your VS Code settings. Reasoning for this is given in the following subsection.
A note on line endings in Prettier
Prettier defaults to LF (Line Feed character) for line endings. This means that when it formats files, it will change all occurrences of the CRLF character sequence, if any, to LF.
LF is also the default in text editors and other tools in Unix-based systems (Linux, MacOS etc.). But on Windows, the default for line endings is CRLF (Carriage Return character, followed immediately by Line Feed character).
Windows tooling such as text and code editors can easily handle LF as line ending. But CRLF can be problematic for tools on Unix-based systems such as Linux and various flavours of Unix. Therefore it makes sense to only use LF as line endings in code as this would work on both Windows and Unix-based systems.
Configuring LF as the EOF character in Git repo and in code editors will bring your tooling in line with Prettier's default. It will also ensure that all files in the Git repo consistently have LF line endings. Thus if a contributor to your repo is on Windows which uses CRLF as EOL character, the code they add or modify in the repo would still use LF: the code editor would default new code files to LF; git commit` would convert any CRLFs to LF when committing.
Finally, setting LF as the line endings for the whole repo would avoid strange things that happen when on Windows, Prettier retains its default of LF but Git and your code editor continue to use their default of CRLF for line endings:
When VS Code Prettier extension formats a file (for example, when the extension is set up to "autoformat on save"), it does not change CRLF line endings. But formatting the same file by running Prettier on the command line does change line endings to LF. This discrepancy can be annoying.
Git may show warnings like this when when you run
git add .:
Set Up ESLint
Basics of ESLint configuration
ESLint comes with a number of linting rules out of the box. But you can also supplement these with ESLint plugins.
An ESLint plugin defines some linting rules. For example, if you look in the GitHub repo for Next's ESLint plugin, eslint-plugin-next, each file in the src/rules folder defines a linting rule as a TypeScript function. The index.js of the package then exports these rule functions in the rules object in its default export:
module.exports = {
  rules: {
    'google-font-display': require('./rules/google-font-display'),
    'google-font-preconnect': require('./rules/google-font-preconnect'),
    'inline-script-id': require('./rules/inline-script-id'),
    ...
The basic way to use these rules in your app is to install the plugin package, then reference it in the ESLint configuration file in the app's root folder.
For example, we can use rules from the eslint-plugin-next mentioned above by running npm install --save-dev eslint-plugin-next, then placing the following content in the ESLint config file .eslintrc.json in the app root:
{
    plugins: ["next"],
    "rules": {
        "google-font-display": "warning",
        "google-font-preconnect": "warning",
        "inline-script-id": "error",
    }
}
If you now run npx eslint . in your app's root folder, ESLint will lint every JavaScript file in the app against each of the three rules configured above.
There are three severities you can assign to a rule when configuring it for use: off, warning and error. As the snippet above shows, you enable a rule by assigning to it a severity of warning or error in the app's .eslintrc.json.
When referencing a plugin in your app's ESLint configuration file, the prefix eslint-plugin- in the plugin's package name is omitted. This is why the package that contains linting rules for Next.js, eslint-plugin-next, is referenced only as "next" in the snippet above.
Since it is quite cumbersome to configure a severity level - off, warning or error - for every single rule from every plugin that you want to use, the norm is to reference an ESLint sharable config , or config for short, that is exported by an NPM package. This is a JavaScript object that declares plugins and configures rules from these with severity levels just as we did above.
For example, the default export from eslint-plugin-next also contains several ESLint configs. Here is a another snippet from index.js of the plugin, this time showing exported ESLint configs in addition to the rules object for exporting rule functions:
module.exports = {
  rules: {
    'google-font-display': require('./rules/google-font-display'),
    'google-font-preconnect': require('./rules/google-font-preconnect'),
    'inline-script-id': require('./rules/inline-script-id'),
    ...
},
configs: {
    recommended: {
      plugins: ['@next/next'],
      rules: {
        // warnings
        '@next/next/google-font-display': 'warn',
        '@next/next/google-font-preconnect': 'warn',
        ...

        // errors
        '@next/next/inline-script-id': 'error',
        '@next/next/no-assign-module-variable': 'error'
        ...

      }
    },
    'core-web-vitals': {
      plugins: ['@next/next'],
      extends: ['plugin:@next/next/recommended'],
      rules: {
        '@next/next/no-html-link-for-pages': 'error',
        '@next/next/no-sync-scripts': 'error',
      },
    },
}
As you can see, in addition to the rules (there are many more than those shown above), the plugin also exports two configs - recommended and core-web-vitals - that enable different selections of the rules defined in the plugin by assigning severity levels of error or warning to them.
The config that is normally used in Next.js projects is core-web-vitals. We can use this config object in our app’s ESLint configuration file (.eslintrc.json in app root) as follows:
{
  "extends": ["plugin:next/core-web-vitals"]
}
Thus is much simpler than declaring the plugin in plugins object and then assigning a severity level of error or warning to each rule from the plugin that we want to use.
Note the difference between Configuration File – this is the ESLint configuration file named .eslintrc.json - and Shareable Config (or config for short) – this is an object that configures some rules from an ESLint plugin for use in a client project by assigning severities to selected rules.
Contents of the configuration file are themselves a config. But in configuration files, we do not typically import a plugin and configure all rules from it that we want to use. Instead we almost always import a well-known/trusted config object that is exported by an NPM package. Such a config object - one that is exported by an NPM package for use in ESLint configuration files (in other packages/apps) - is also known as a shareable config.
Typically, plugins - these define ESLint rules as JavaScript/TypeScript functions - also bundle their rules into one or more shareable configs. The recommended config from plugin eslint-plugin-next that we used above is just one such config.
Shareable configs do not only come from plugin packages, although it is customary for plugins to also export one or more shareable configs composed of their own rules. Other packages, whose names begin with eslint-config- (as opposed to eslint-plugin-) can provide one or more named configs.
Next.js provides one such package named eslint-config-next. This re-exports configs recommended and core-web-vitals from the plugin. It also re-exports (in v15 and above of the package) a config of TypeScript linting rules from plugin typescript-eslint/eslint-plugin. So instead of using recommended config from the plugin like we have done above:
{
  "extends": ["plugin:next/core-web-vitals"]
}
we could have installed the package eslint-config-next and used that in .eslintrc.json:
{
  "extends": ["next/core-web-vitals"]
}
Since the package's name is not prefixed with plugin:, ESLint considers it to be a config package, reconstructing the name as eslint-config-next rather than as eslint-plugin-next. Notice how with config packages also, we delete the canonical prefix eslint-config- when referencing it in the ESLint configuration file.
NOTE: In order to reference a shareable config provided by a package that only provides such configs but does not define or export linting rules, such as eslint-config-next, all you need to do is install the package and add the shareable config to "extends" in your .eslintrc.js. This is shown in the snippet above.
But if you want to reference a shareable config from an ESLint plugin, for example the package eslint-plugin-storybook which exports a shareable config named recommended, but you do NOT want to configure individual rules exported by the plugin, then I am not sure whether you need to declare the package in "plugins" array in your .eslintrc.js or not. I would declare it in "plugins" anyway as it may actually be necessary but wouldn't do any harm if it's not. Almost every ESLint example that I have come across, such as this one, does the same.
For example, if I want to use shareable config recommended from plugin eslint-plugin-storybook, and even though I would not be configuring any individual linting rules provided by this plugin, I would both reference the config in "extends" and, just to be safe, declare the plugin itself in "plugins" (after installing the plugin via command npm install -D eslint-plugin-storybook):
{
    "plugins": ["storybook"],
    "extends: ["plugin:storybook/recommended",]
}
It is possible to reference multiple shareable configs in extends. In this case, all the rules from all configs are used - except where there are multiple configs that each provide a rule with the same name. In this case the last config, proceeding left to right, wins. This is to say where there is a naming conflict, ESLint will use the rule from the last config on the list.
It is possible to use ESLint configuration file formats other than JSON. You can provide the same information as in an .eslintrc.json file in a JavaScript (.eslintrc.js or .eslintrc.cjs) or yaml (.eslintrc.yml or .eslintrc.yaml) file instead.
Also, ESLint has a new configuration file format often called flat config (which I haven't used here) where the config files are either JavaScript or TypeScript files.
Armed with an understanding of how to configure ESLint for use, you are ready to set up ESLint in your Next.js project. The sections below shows you how to do this.
ESLint Setup for TypeScript
If your app uses TypeScript, modify the ESLint configuration file (.esilntrc.json) as follows:
On the terminal, in app's root folder, run the following command:
npm install --save-dev @typescript-eslint/parser @typescript-eslint/eslint-plugin typescript@typescript-eslint/eslint-pluginprovides a number of linting rules for TypeScript files, as well as shareable configs, that augment the checking that the TypeScript compiler does.@typescript-eslint/parseris a parser that allows ESLint to parse TypeScript files (by default it can only parser JavaScript files).I am adding TypeScript compiler as a package -
typescript- becausetypescript-eslintGetting Started instructions do the same.In app root folder, rename
.eslintrc.jsonto.eslintrc.js. Then Replace contents of.eslintrc.jsin app root with the following:/* eslint-env node */ module.exports = { root: true, extends: [ 'next/core-web-vitals', ], plugins: ['@typescript-eslint', 'tailwindcss'], parser: '@typescript-eslint/parser', overrides: [ { files: ['*.ts', '*.tsx'], parserOptions: { project: ['./tsconfig.json'], projectService: true, tsconfigRootDir: __dirname, }, extends: [ 'next/core-web-vitals', 'plugin:@typescript-eslint/recommended', //'plugin:@typescript-eslint/recommended-type-checked', // 'plugin:@typescript-eslint/strict-type-checked', // 'plugin:@typescript-eslint/stylistic-type-checked', ] }, ], };This is what the various lines of this file do:
/* eslint-env node */stops ESLint from complaining that this is a CommonJS module. We have had to put this in because ESLint, as we have configured it here, does not allow CommonJS modules (which.eslintrc.jsis, seemodule.exports = ...at the top) and expects modules in the project to be ES6.root: truesays this is the topmost ESLint configuration file even though there may be nested ESLint configs in subfolders.extends:specifies various ESLint configs, each of which enables a collection of linting rules.'next/core-web-vitals'is a config provided byeslint-config-nextthat bundles Next.js-specific rules (both for JavaScript and TypeScript, from an inspection of its code on GitHub).The
recommended-type-checkedconfig (used in a nestedextendswithinoverridesobject - this is explained shortly) is provided by@typescript-eslint/eslint-plugin. This plugin is part of the typescript-eslint project that publishes packages for linting rules and parsers to support linting of TypeScript files by ESLint.The configs used is described here. It is a superset of the non-type checked versions of the config,
recommended. It adds linting rules which use TypeScript's type checking API for additional type information. These rules are more powerful than those contained in the base, non-type-checkedrecommendedconfig that only rely on the ESLint parser for TypeScript - package@typescript-eslint/parser.You might prefer to use the
strict-type-checkedandstylistic-type-checkedconfigs, also provided by@typescript-eslint/eslint-plugin. These are stricter than what I have used.The least strict choice for TypeScript linting would probably be the
recommendedconfig. This is what is re-exported byeslint-plugin-nextas config namedtypescriptand is referenced in Next.js instructions for setting up ESLint with TypeScript asnext/typescript(at least as of the time of this writing, September 2024). I prefer the config I have used instead.parser: '@typescript-eslint/parser'specifies the ESLint TypeScript parser to be used instead of the default Espree parser which cannot parser TypeScript files.parserOptions:tells the parser where to find thetsconfig.jsonfile. This information allows the rules in the type-checked config used above -recommended-type-checked- to use TypeScript type checking APIs.If we were using non-type-checked rules contained in other configs exported by the plugin, such as the
recommendedconfig, we would not need to provide this information.plugins: ['@typescript-eslint']: I don't know what the purpose of this line is. It shouldn't be necessary and I have tested that the given ESLint configuration works fine without it. But it doesn't do any harm and was contained in an example in the plugin's documentation from which I adapted the above config. So I have kept it.The
overridessection ensures that the TypeScript parser options that we’ve had to configure in order to support type-checked configs apply only to.tsand.tsxextensions (from this excellent StackOverflow answer). Otherwise, ifparserandparserOptionsobjects had been at the top level, then running ESLint on the project would throw errors on.jsfiles.This is a problem as we have several
.jsconfig files including the.eslintrc.jsitself, so there will be linting errors. We can avoid these errors by using the override.
ESLint Setup for Tailwind
If your app uses Tailwind, modify the config as follows:
On the terminal, in app's root folder, run
npm install --save-dev eslint-plugin-tailwindcssIn ESLint config, add
"plugin:tailwindcss/recommended"to the END ofextends:{ "extends": ["next/core-web-vitals", ..., "plugin:tailwindcss/recommended"], }In the ESLint config, add
"tailwindcss"topluginsand add arulesobject as shown below:{ "plugins": [..., "tailwindcss"], "rules": { "tailwindcss/classnames-order": "off" }, }If your app uses TYPESCRIPT, then also add
"plugin:tailwindcss/recommended"to innerextendsinsideoverridesand duplicate therulesobject insideoverrides:{ ... overrides: [ { extends: ["next/core-web-vitals", ..., "plugin:tailwindcss/recommended"], rules: { 'tailwindcss/classnames-order': 'off', }, } }
In the Tailwind setup steps above, we have installed the package for the ESLint plugin for Tailwind, eslint-plugin-tailwindcss, and used the config recommended provided by the plugin.
eslint-plugin-tailwind provides some useful linting rules for Tailwind CSS classes used in HTML or JSX/TSX markup. The biggest one for me is that if a class used in code is not a Tailwind class, there would be a linting error. This makes sense as when I am using Tailwind, I only use Tailwind-generated classes and do not define my own CSS classes.
The plugin also has a rule that checks that the sequence of Tailwind class names used in the class or className attribute in markup follows a canonical ordering. But we installed prettier-plugin-tailwindcss in our Prettier configuration above which also reorders Tailwind class names. So we don’t need this rule in ESLint and it might conflict with what Prettier does in our workflow.
We’ll turn this rule off, which is named tailwindcss/classnames-order, in the configuration above by declaring the plugin in plugins object, then setting the rule to off in the rules object.
ESLint Setup for Prettier
On the terminal run:
npm install --save-dev eslint-config-prettierIn ESLint config, add
"prettier"to the END ofextends:{ "extends": ["next/core-web-vitals", ..., "prettier"] }If your app uses TypeScript, then also add
"plugin:tailwindcss/recommended"to the innerextendsinsideoverridesalso:{ ... overrides: [ { "extends": ["next/core-web-vitals", ..., "prettier"], } }In the Prettier setup steps above, the config referenced as
prettieris the name of the NPM package eslint-config-prettier witheslint-config-deleted. The default export from the package is an entire ESLint config object and this is the config we want to use.So in this case, we do not suffix the name
prettierwith/<name of config>as we have done when referencing the named configcore-web-vitalsfrom packageeslint-config-nextwhen we referenced is asnext/core-web-vitals(see step 1 above).This config switches off those rules in ESLint that conflict with the code formatting done by Prettier. This should be the last config in
extends.Create
.eslintignorein the project root. It doesn't need to have any content for now, but will come in handy in the future if ever you need to add folders or files that should be ignored by ESLint (see the final section of this post for an example).
Set Up Stylelint
Stylelint is a linter for CSS and SCSS stylesheets.
If you are using SCSS and NOT Tailwind, then set up Stylelint by following the instructions below. This set up will work for both CSS and SCSS files:
On the terminal in project root run this command:
npm install --save-dev sassNext.js has built-in SASS/SCSS support (so the Webpack config knows how to handle
.scssand.sassfiles). But you still need to install a version of thesasspackage yourself, which is what we did above.Next, install packages for Stylelint and its rule configs:
npm install --save-dev stylelint stylelint-config-standard-scss stylelint-config-prettier-scssOf these three packages:
stylelintis the linter.stylelint-config-standard-scssis a Stylelint config that provides linting rules. It uses the Stylelint plugin stylelint-css and extends configs stylelint-config-standard which defines rules for vanilla CSS, and stylelint-config-recommended-scss which defines SCSS specific rules. As a result, extending from this one config is enough to get linting support for both CSS and SCSS files.stylelint-config-prettier-scssextends stylelint-config-prettier and turns off those Stylint rules that conflict with Prettier's code formatting. This should be declared last inextends:array in.stylelintrc.json(as shown below).
Now, create
.stylelintrc.jsonin project root with the following contents:{ "extends": [ "stylelint-config-standard-scss", "stylelint-config-prettier-scss" ], "rules": { "selector-class-pattern": null } }The
"extends"section declares the two Stylelint configs whose NPM packages we installed in the previous step.The
"rules"section is used to configure stylints rules. Here you can turn on or off, or configure the behavior of, individual Stylelint rules.You can turn off a rule by setting it to
null, as I have done for"selector-class-pattern". I turned it off because it insists on having CSS classes in the so called kebab case (for example,.panel-quizinstead of.panelQuiz). I find it inconvenient for various reasons so I turned it off.Next, create
.stylelintignorein the project root with the following contents:styles/globals.css styles/Home.module.css coverageI created this file so that the two stylesheets generated by the Next.js CLI which do not comply with the linting rules can get ignored (there might be a better way of doing this but this works for me). Also, files in
coveragefolder do not need to be linted and would likely throw up errors.
Set Up package.json Scripts
The most important script is
"build". The default command for this script,next build, runs ESLint but not Prettier or (if you are using SCSS) Stylelint. So modify it inpackage.jsonfile as follows:If your app uses Tailwind, then:
 {
   "scripts": {
     "build": "prettier --check . && next build",
     ...
Otherwise, if your app uses SCSS, then:
 {
   "scripts": {
     "build": "prettier --check . && stylelint --allow-empty-input \"**/*.{css,scss}\" && next build",
     ...
With this tweak to the existing
buildscript, we can runnpm run buildeither locally or in a CI/CD pipeline and it will fail not only on ESLint failure (this was the case before) but also on Prettier formatting or Stylelint failure.Indeed if you deploy your app to Vercel, the default pipeline there also calls
npm run build. So when I introduced an error in one of my stylesheets, then deployed to Vercel, I got the following Stylelint error during deployment:
Note that I used the
--checkflag withprettierin the script (that is, I used the commandprettier --check .). This runs Prettier in check mode, so it only checks for correct formatting and does not change the formatting.I did this because the
buildscript is what Vercel's deployment pipeline calls by default to build the code, and I don't want formatting to change during a CI build (nor do I want to tinker with Vercel defaults unless I absolutely have to).To run Prettier locally to actually format the codebase, I define a separate
build:localscript which is same asbuildbut runs Prettier without the--checkflag, as well as a separateformatscript just to format with Prettier (but not build). These are set up below.Set up the
"format"script in yourpackage.json. This formats the codebase with Prettier and comes in handy every now and then:{ "scripts": { ... "format": "prettier --write ."I recommend setting up a
build:localscript as follows:If your app uses Tailwind, then:
"build:local": "prettier --write . && next build"Otherwise, if your app uses SCSS, then:
"build:local": "prettier --write . && stylelint --allow-empty-input \"**/*.{css,scss}\" && next build"Since we cannot format the code with Prettier prior to executing
next buildin the existingbuildscript (for reasons described above), we can use this script locally to format code then lint and build in one go.
Set Up lint-staged
lint-staged is a package that you can use to run formatting and linting commands on staged files in a Git repo. Staged files are those that have been added to the Git index using git add .. These are the files that have changed since the last commit and will get committed when you next run git commit.
Husky is the typical choice in Node.js packages for registering commands to run in Git hooks. For example, registering the command npx lint-staged with Husky to run in the Git pre-commit hook means lint-staged will run automatically whenever you execute git commit.
At that time, the formatter (Prettier) and linters (ESLint or Stylelint) that have been configured to run in the lint-staged configuration file will run on the staged files. If there are any errors during formatting checks or linting, the commit will fail.
Whenever git commit fails due to linting errors, we can fix those, then run git add . and git commit again. Thus code only ever gets into the repo after it has been consistently formatted and verified to be free of linting errors. This is particularly advantageous in a team setting.
I prefer to only run prettier --check . on staged files. In particular, I do not change formatting of staged files and do not lint during a commit, for the following reasons:
Reason for not formatting code: I almost always build and test my code before committing. Any code formatting should have happened prior to or during this local build and test.
I find the idea that code going into my repo should change automatically just as it is being committed after I have ascertained that any code changes are good to go, a little bit unappealing.
Reason for not linting code: With TypeScript code, the compiler can catch a huge number of issues in code. The additional linting rules provided by eslint-typescript/eslint-plugin only supplement the checks made by the TypeScript compiler. So if I am linting code in staged files at commit time, I should build as well (so that the TypeScript compiler runs).
But building can be very time consuming on a large codebase. Besides, I almost always build and test before committing. Doing so implicitly runs linting (next build runs ESLint and my build scripts in package.json, as set up above, run any other linting that is necessary e.g. StyleLint). So I don’t feel the need to repeat lint or build on staged files via lint-staged.
Any lint- or build errors that might occasionally slip through into the Git repo would be pointed out when my Continuous Delivery pipeline builds the codebase (let's say in GitHub Actions on in Vercel's build pipeline). I can fix them then, in the pull request, before merge to main.
So, my personal preference is only to check for formatting on staged files, and neither reformat nor lint the code. This prevents inconsistently formatted code from getting into the Git repo where inconsistent formatting would make comparisons between different versions of the same file difficult.
So now, set up lint-staged and Husky as follows:
Note: These tools need to be set up in the root of the Git repo. If you have a monorepo that contains multiple projects, including the Next.js app in which you performed the setup above, then open the root folder of this monorepo in your code editor and also cd into it on the terminal. Otherwise stay in the folder of your Next.js app.
If you have a monorepo and its root folder does NOT have a
package.jsonfile, initialize an NPM package in the root:npm init -yInstall the lint-staged package:
npm install --save-dev lint-stagedCreate a file named
lint-staged.config.jswith the following contents:/* eslint-env node */ const path = require('path'); const formatCommand = 'prettier . --check'; module.exports = { '*': formatCommand, };If you are in a monorepo, the
lint-staged.config.jscreated above needs needs to be tweaked because in this, Prettier would be invoked from multi-repo root but the files it needs to format, as well as its config file (.prettierrc.json) and its ignore file (.prettierignore), are all in the subfolder that contains the Next.js app. Do the following:npm install --save-dev prettier prettier-plugin-tailwindcssReplace the contents of
lint-staged.config.jswith the following. Make sure to substitute<Next.js app subfolder>with the actual name of your Next.js app folder:/* eslint-env node */ const path = require("path"); const formatCommand = "prettier --check --config ./<Next.js app subfolder>/.prettierrc.json --ignore-path ./<Next.js app subfolder>/.prettierignore"; module.exports = { "./<Next.js app subfolder>/**/*": formatCommand, };
Install the Husky NPM package.
npm install --save-dev huskyRun the following on the terminal in app root to configure Husky to run
lint-stagedwhenevergit commitruns (in Git's pre-commit hook):npx husky init echo "npx lint-staged" > .husky/pre-commitYou should now have a file
.husy/pre-commitin your app's folder (or in your monorepo root folder, if you're working in a monorepo) with only one line:npx lint-staged.
Set Up VS Code Extensions
If you use VS Code as your code editor, you can install the following VS Code extensions to provide linting and formatting on file save and syntax highlight on linting errors:
Stylelint extension (if you're using SCSS and not Tailwind)
TaliwindCSS extension (if you are using Tailwind and not SCSS)
Put the following in a settings.json file in the .vscode folder in the project (you can of course put these settings in you User Preferences file also. You can access it from Command Palette Ctrl + P).
{
  "[javascript]": {
    "editor.defaultFormatter": "esbenp.prettier-vscode"
  },
  "[typescript]": {
    "editor.defaultFormatter": "esbenp.prettier-vscode"
  },
  "[typescriptreact]": {
    "editor.defaultFormatter": "esbenp.prettier-vscode"
  },
  "[javascriptreact]": {
    "editor.defaultFormatter": "esbenp.prettier-vscode"
  },
  "[scss]": {
    "editor.defaultFormatter": "esbenp.prettier-vscode"
  },
  "stylelint.validate": ["css", "scss"],
  "editor.formatOnSave": true,
  "eslint.useFlatConfig": false
}
As they’re set up, the extensions will lint and format on Save.
"eslint.useFlatConfig": false ensures that the ESLint extension is able to pick up your .eslintrc.js and doesn't look for eslint.config.js which is the filename for a config file in ESLint's new flat config format that I have NOT used in this post.
If you encounter any problems in getting the ESLint extension to work, turn on the extension's debug output by adding line "eslint.debug": true to the end of the .vscode/settings.json you just created. Then restart VS Code and look at ESLint extension's output in the OUTPUT window:

Final Checks and Troubleshooting
Now it’s time to build and commit:
npm run format
npm run build
git add .
git commit -m "fix: set up linting and formatting"
Building and committing is a good sanity check for the setup we just did.
If anything had not been set up correctly, you might get errors either during build or at commit.
If you already had some code in the project, then there might be a few errors when you commit. Typically, these can be resolved by:
Adding folders or files to one of the
*ignorefiles. For example, I already had some code in my project with Storybook installed. So I had to add folders.storybookandstorybook-staticto each of.stylelintignore,.eslintignoreand.prettierignoreas all three tools complained about them.stories storybook-staticIf Prettier complains (shows a
[warn]or[error]on the terminal) about some files not being formatted properly, you either need to add them to.prettierignoreor format them by runningnpm run formatin the folder of your Next.js app.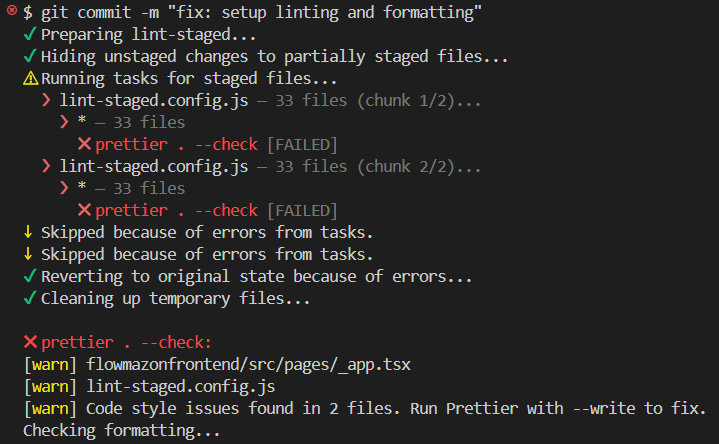
Adding plugins for specific file types. For example, I had Gherkin
.featurefiles in my project to describe integration tests. Prettier couldn't format these. So I added the prettier-plugin-gherkin by simply running:npm install prettier-plugin-gherkin --save-devNote that usually it is enough to install the package for a Prettier plugin for Prettier to locate it and additional configuration is not required.
Likewise, ESLint complained when it encountered
.cy.tsfiles containing Cypress interaction tests for my app. To resolve this linting error, I installed the NPM package for Cypress ESLint plugin and configured it as described here (unlike Prettier, to get this ESLint package to work, some configuration was required).The typescript config might be too strict and there might be a lot of errors when you build, such as:
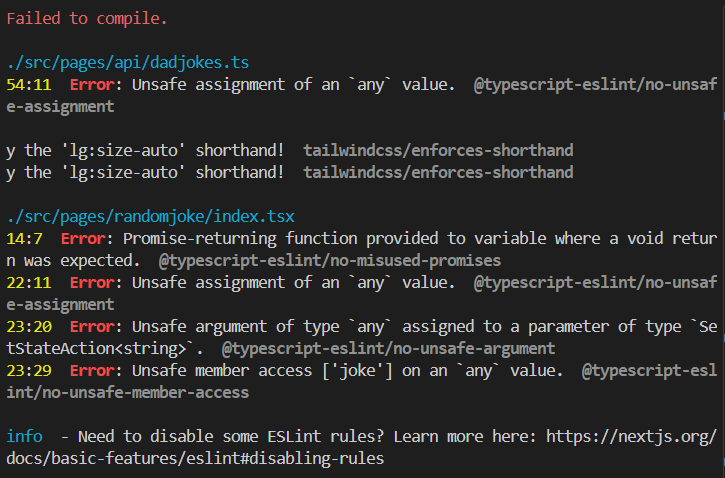
If you do not want to fix individual errors in your existing codebase, and they are too many to disable specific rules at error locations using ESLint comments (see below), then the simplest solution would be to disable the
@typescript-eslint/recommended-type-checkedconfig by commenting it out in.eslintrc.jsand uncommenting@typescript-eslint/recommendedwhich is less strict.Sometimes it is safe to turn off a linting rule at a specific line or for a whole file. While I am always wary of doing this, in a (deliberately bad) experimental code file, I had many instances of an error that VS Code ESLint extension pointed. This was not caught before but was now being pointed out because strict TypeScript linting rules had been enabled:

So I pressed
Ctrl + .to Show Code Actions (I could instead have clicked the yellow lighbulb icon shown next to the issue), then selected “Disable@typescript/no-non-null-assertionfor the entire file”.
This placed the comment
/* eslint-disable @typescript-eslint/no-non-null-assertion */on top of my file to disable all instances of that particular error within the file:
Conclusion
This tutorial showed you how to configure linting and formatting tools in your Next.js app. I hope that it also gave you the background necessary both to understand the configurations given, and to customize them as needed.