

In this article, we will explore the Secure Shell (SSH) protocol, a vital tool for securing network communications.
SSH is widely used for accessing remote servers and managing code repositories securely, particularly in environments like GitHub. You’ll learn about the fundamental concepts of SSH, how it works, and practical steps to set it up on Windows. We will cover everything from generating SSH keys to testing your connection and cloning repositories.
By the end of this guide, you will have a solid understanding of SSH and be equipped to enhance your workflow with secure connections.
What we’ll cover:
Prerequisites
Before you begin this tutorial, ensure you have the following:
Basic Understanding of Command Line: You should be familiar with using the command line interface (CLI) on Windows, including how to open PowerShell or Command Prompt.
Windows Operating System: This tutorial is specifically tailored for users running Windows 10 or later versions.
OpenSSH Client Installed: Ensure that you have the OpenSSH client installed on your system. You can check this by typing
sshin your command line interface.GitHub Account: You’ll need a GitHub for testing SSH connections and managing repositories.
Text Editor: You’ll also need a code editor (like Visual Studio Code, Notepad++, or similar) to edit configuration files if needed.
What is SSH?
SSH stands for secure shell (protocol). The secure shell protocol is a cryptographic network protocol for operating network services securely over an unsecured network.
In simpler terms, SSH is a way to safely use services on a network, like accessing a remote computer, even when the network itself isn’t fully secure. It protects your data and communications by scrambling (encrypting) everything, so no one can eavesdrop or tamper with it, even if they intercept it.
This is especially useful when connecting to services like GitHub, where you want to securely manage code on a remote server.
How Does The Secure Shell Protocol Work?
SSH runs on the TCP/IP set of rules that computers use to communicate over the internet.
TCP/IP
TCP stands for Transmission Control Protocol. It’s one of the core protocols in the TCP/IP suite, which is used to send data over the internet. The IP stands for Internet Protocol. It's part of the TCP/IP set of rules also, and its job is to guide packets of data to the right destination on the internet.
You can read more about the TCP/IP protocol here if you’d like to go deeper.
The SSH Connection Process
The Secure Shell protocol operates by establishing a secure connection between a client (your local machine) and a remote server.
First, the client initiates the connection by specifying the server's address (IP or domain) and login credentials. During the authentication phase, the server verifies the identity of the client, typically using a password or, more securely, SSH keys. These are a pair consisting of a private key stored on the client and a public key on the server.
Once authenticated, SSH encrypts all data transferred between the client and the server, ensuring confidentiality and integrity. This secure channel allows the client to execute commands, transfer files, and manage the server remotely as if physically present while safeguarding the data from potential interception or tampering.
IP is responsible for addressing and routing the initial connection request from the client to the server. It ensures that the request, which includes the server's address, is sent to the correct destination.
Once the SSH connection request reaches the server, TCP establishes a reliable communication channel. It manages data transmission between the client and the server, ensuring that all packets are delivered accurately and in the correct order.
During the SSH session, TCP ensures that data packets are correctly transmitted and reassembled, while IP handles the addressing. SSH then uses this secure and reliable channel to authenticate the client, encrypt all transferred data, and maintain a secure connection. This allows remote management and file transfer with confidentiality and integrity.
How to Use SSH in Windows
Windows provides a few different ways to use SSH:
Windows PowerShell or Command Prompt
Windows comes with a built-in OpenSSH client. You can access this by opening PowerShell or Command Prompt and typing ssh This method is simple and requires no additional software.
Windows Subsystem for Linux (WSL)
You can enable Windows Subsystem for Linux to run a Linux distribution directly on your Windows PC. Many Linux distros come with OpenSSH pre-installed, allowing you to use ssh commands from the Linux terminal. This method is great if you prefer a Linux-like environment.
Third-Party SSH Clients (for example, PuTTY)
If you prefer a standalone application, tools like PuTTY offer a graphical interface to manage SSH connections. PuTTY is widely used for connecting to servers and supports advanced options like saving connection profiles.
Windows 10 and later versions come with a native OpenSSH client, which allows you to securely connect to remote systems over an SSH (Secure Shell) connection.
How to Use SSH in Windows to Connect to GitHub
If you're using Windows 10 or a later version, you can take advantage of the built-in SSH capabilities.
To get started, open your Windows Terminal or PowerShell, preferably as an administrator. In the command line interface, you can check if SSH is installed by typing the command ssh. This will confirm if the SSH client is available on your system.
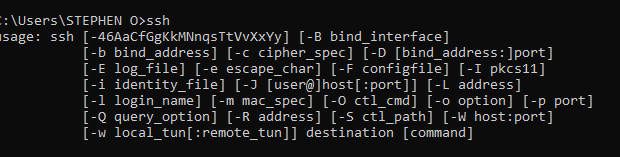
If you got the above image, it means SSH is available on your local system.
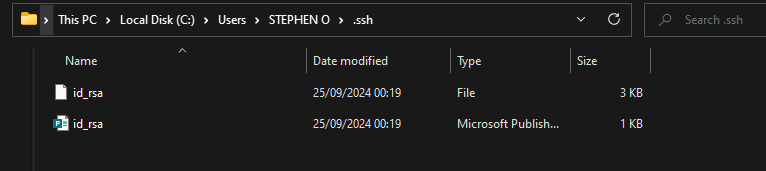
The first thing you'll need to set up an SSH connection is a pair of SSH keys – a public key and a private key. These are typically located in the .ssh directory in your home directory if generated already.
On Windows, your home directory is usually C:\Users\owner\.ssh. This is where you will find your SSH key files if they've already been generated.
You can easily install OpenSSH on your Windows system. There are a couple of ways to do this:
Install Through Windows Optional Features
Open the Windows Start menu and type "optional features" in the search bar.
Click on "Add or remove Windows optional features" to open the Optional Features window.
In the Optional Features window, scroll down and find the "OpenSSH Client" option.
Check the box next to it and click the "Install" button at the bottom to install the OpenSSH client.
Download and Install from GitHub
Visit the GitHub repository for the Win32-OpenSSH (32-bit) or Win64-OpenSSH (64-bit) release, depending on your Windows version:
Download the latest .msi installer file that matches your Windows architecture.
Run the .msi installer to install the OpenSSH client on your system.
After installing OpenSSH, you can now generate SSH keys by opening the Windows Terminal or PowerShell and running the ssh-keygen command. This will walk you through the process of creating a new public-private key pair that you can use to authenticate your SSH connections, such as to your GitHub account.
The public key can then be added to your GitHub account settings, allowing you to connect to your repositories using the SSH protocol instead of HTTPS. Remember to keep your private key safe and secure, as it provides access to your GitHub account.
By installing OpenSSH, you've set up the necessary foundation to work with SSH keys and establish secure connections to remote systems and services like GitHub.
Now you can check if the OpenSSH server is running by accessing the Windows Services utility. To do this, press the Windows key + R to open the Run dialog, then input "services.msc" and press Enter. This will open the services manager.
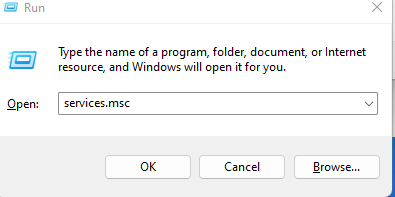
The services manager:

Scroll and look for the openSSH SSH server:
![]()
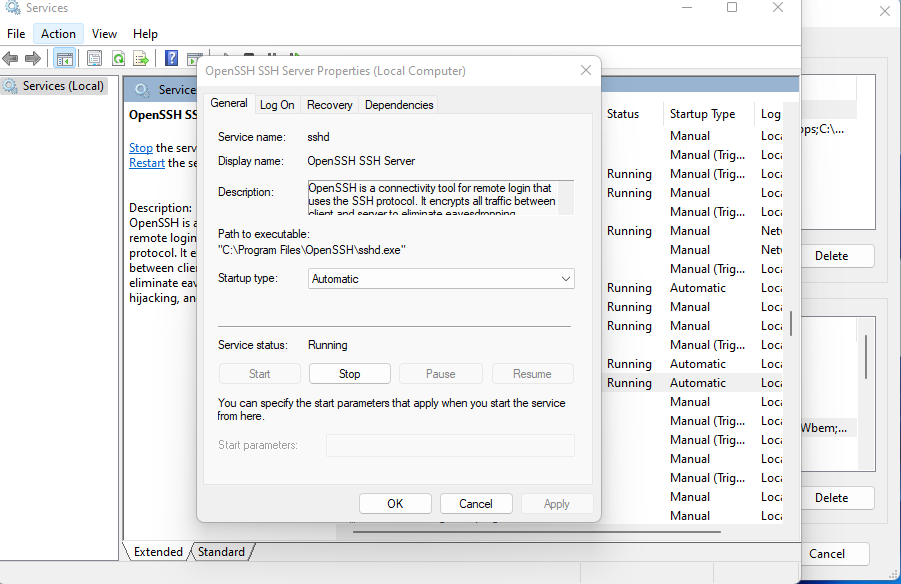
If the OpenSSH Server service is running in the Services window, it means that the OpenSSH server component is properly set up on your Windows system. This is an important first step in enabling secure SSH connections.
To ensure the OpenSSH server starts automatically whenever your PC is turned on, you can further configure the service's startup type. In the Services window, right-click on the "OpenSSH Server" service and select "Properties."
In the service properties, look for the "Startup type" dropdown and select "Automatic." This will ensure the OpenSSH Server service starts up automatically whenever your computer is powered on, rather than requiring you to manually start it each time.
By setting the OpenSSH Server service to start automatically, you can be confident that the server will be ready to accept incoming SSH connections at all times, without needing to remember to start it manually. This streamlines the process of using SSH-based authentication and remote access on your Windows machine.
Remember, having the OpenSSH Server service running and set to start automatically is just the first step. You'll still need to generate SSH keys and configure your GitHub account (or other services) to use the public key for authentication. But this initial setup of the OpenSSH server lays the foundation for seamless SSH usage going forward.
Now that you've confirmed the OpenSSH Server is running on your Windows system, the next step is to ensure it can communicate through the Windows Firewall. The easiest way to do this is by using a PowerShell command.
Open PowerShell as an administrator and run the following command:
New-NetFirewallRule -Name sshd -DisplayName 'OpenSSH SSH Server' -Enabled True -Direction Inbound -Protocol TCP -Action Allow -LocalPort 22 -Program "C:\Program Files\OpenSSH\sshd.exe"
This PowerShell command will create a new firewall rule that allows inbound TCP traffic on port 22 (the default SSH port) for the OpenSSH Server executable located at "C:\Program Files\OpenSSH\sshd.exe".
Here's a breakdown of the different parameters used in the command:
-Name sshd: Assigns the name "sshd" to the new firewall rule.-DisplayName 'OpenSSH SSH Server': Provides a descriptive display name for the rule.-Enabled True: Ensures the rule is active and enabled.-Direction Inbound: Specifies that the rule applies to inbound network traffic.-Protocol TCP: Configures the rule to allow TCP protocol connections.-Action Allow: Instructs the firewall to allow the specified traffic.-LocalPort 22: Sets the local port to 22, which is the default SSH port.-Program "C:\Program Files\OpenSSH\sshd.exe": Identifies the specific program (the OpenSSH Server executable) that the rule should apply to.
By running this PowerShell command, you're creating a dedicated firewall rule that permits the OpenSSH Server to communicate through the Windows Firewall, enabling you to establish secure SSH connections to your system.
Remember, it's always a good practice to review your firewall settings periodically, especially if you make changes to your network configuration or want to refine access to the OpenSSH Server further.
If successful, you should get this:
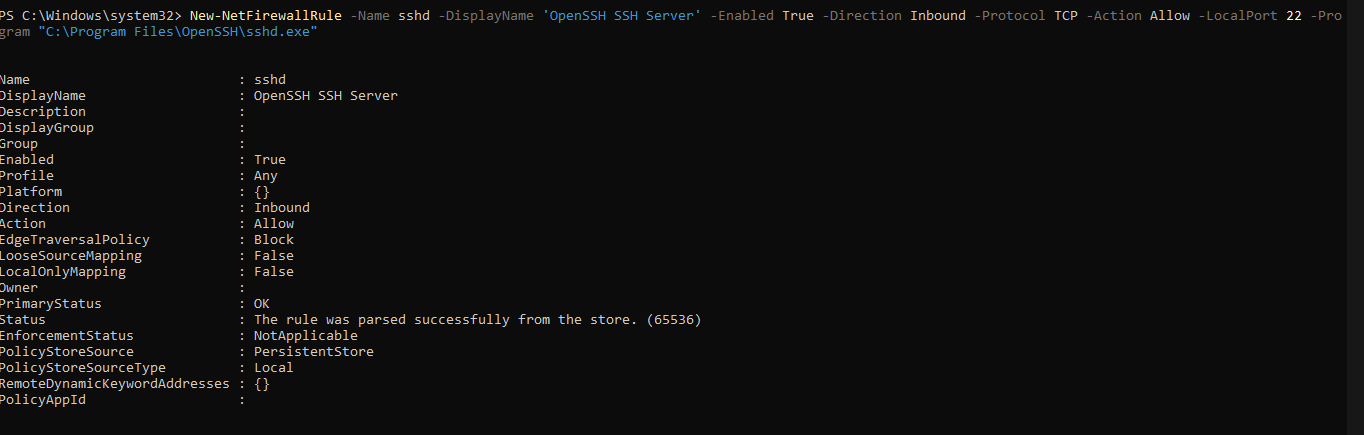
Summary of the above CLI response:
Rule Name: sshd
Display Name: OpenSSH SSH Server
Direction: Inbound
Action: Allow
Enabled: True
Profile: Any
The rule is designed to allow inbound traffic, enabling external clients to connect to the server. The "Enabled" status confirms that the rule is currently active, while the "Profile" set to "Any" indicates that it applies to all network types, including public, private, and domain.
Security Policies:
Edge Traversal Policy: Block
Loose Source Mapping: False
Local Only Mapping: False
The "EdgeTraversalPolicy" is configured to "Block," preventing traffic from traversing the network boundary, specifically disallowing connections from public networks to private ones. This helps enhance security by mitigating potential vulnerabilities.
The settings for "LooseSourceMapping" and "LocalOnlyMapping" are both set to false, ensuring that only direct connections are allowed without additional mapping.
Status and Enforcement:
Primary Status: OK
Status: The rule was parsed successfully from the store.
Enforcement Status: NotApplicable
Policy Store Source: PersistentStore
Policy Store Source Type: Local
The "Status" field confirms that the rule has been successfully parsed from the policy store, indicating no configuration issues. The "EnforcementStatus" marked as "NotApplicable" suggests there are no restrictions that would prevent the rule from being enforced.
Remember, to set up an SSH connection we need a pair of SSH keys – a public key and a private key. Let’s see how to do that now.
How to Generate SSH Keys
Open your Windows Terminal or PowerShell.
Run the command
ssh-keygento generate a new SSH key pair.Follow the prompts to specify the save location and passphrase (optional) for your keys.

You will get what you see in the above image if you’re successful.
The public key will be saved as id_rsa.pub in the .ssh directory of your user's home folder (for example, C:\Users\you\.ssh\id_rsa.pub).
How to Add the Public Key to GitHub
Log in to your GitHub account and go to your account settings.
Navigate to the "SSH and GPG keys" section.
Click on the "New SSH key" button. Give your key a descriptive title, and then copy the contents of the
id_rsa.pubfile (your public key) into the "Key" field.Click "Add SSH key" to save the new key.
Testing the SSH Connection
In your Windows Terminal or PowerShell, execute the following command to test your SSH connection to GitHub:
bashCopy codessh -T git@github.com
If prompted, enter your passphrase if you set one during the key generation process. If you did not set a passphrase, simply type "yes" when asked for a response to the handshake.

If the connection is successful, you should see a message like "Hi username! You've successfully authenticated, but GitHub does not provide shell access."
You can solve this by following the process here.
Cloning a Repository Using SSH
Navigate to one of your GitHub repositories and copy the SSH clone URL, which typically starts with git@github.com:

In your local terminal, run the command git clone git@github.com:username/repository.git to clone the repository using the SSH protocol.
Conclusion
You now have SSH working between your Windows computer and your GitHub account. This means you can work with your GitHub projects more easily and securely.
Why SSH is Cool:
It's super secure. SSH scrambles your data so others can't snoop on it.
It's convenient. No more typing passwords all the time!
It's flexible. You can use it for more than just GitHub.
You can have different "keys" for different projects.
It works well with automatic coding tools.
But it’s not perfect:
Keeping track of many SSH keys can be a headache.
If someone gets your private key, they could access your stuff.
Setting it up the first time can be tricky.
You need to remember to change your keys yourself for extra safety.
Some networks might block SSH, which can be annoying.
Remember to keep your private SSH key safe. It's like a special password for your GitHub account, so guard it well.
Even with these small downsides, SSH is still awesome for most coders. You are now all set to work on your GitHub projects more easily and safely. Have fun with your improved coding setup, and keep learning about ways to keep your work secure.