
By Navindu Jayatilake
MongoDB is a rich document-oriented NoSQL database.
If you are a complete beginner to NoSQL, I recommend you to have a quick look at my NoSQL article published previously.
Today, I wanted to share some of the basic stuff about MongoDB commands such as querying, filtering data, deleting, updating and so on.
Okay, enough of the talk, let’s get to work!
Project Configuration
In order to work with MongoDB, first you need to install MongoDB on your computer. To do this, visit the official download center and download the version for your specific OS. Here, I’ve used Windows.
After downloading MongoDB community server setup, you’ll go through a ‘next after next’ installation process. Once done, head over to the C drive in which you have installed MongoDB. Go to program files and select the MongoDB directory.
C: -> Program Files -> MongoDB -> Server -> 4.0(version) -> bin
In the bin directory, you’ll find an interesting couple of executable files.
- mongod
- mongo
Let’s talk about these two files.
mongod stands for “Mongo Daemon”. mongod is a background process used by MongoDB. The main purpose of mongod is to manage all the MongoDB server tasks. For instance, accepting requests, responding to client, and memory management.
mongo is a command line shell that can interact with the client (for example, system administrators and developers).
Now let’s see how we can get this server up and running. To do that on Windows, first you need to create a couple of directories in your C drive. Open up your command prompt inside your C drive and do the following:
C:\> mkdir data/dbC:\> cd dataC:\> mkdir db
The purpose of these directories is MongoDB requires a folder to store all data. MongoDB’s default data directory path is /data/db on the drive. Therefore, it is necessary that we provide those directories like so.
If you start the MongoDB server without those directories, you’ll probably see this following error:
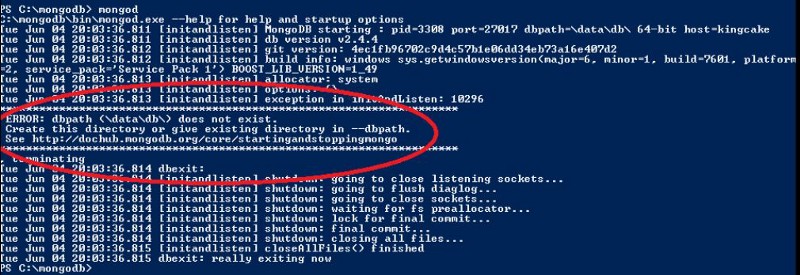
After creating those two files, head over again to the bin folder you have in your mongodb directory and open up your shell inside it. Run the following command:
mongod
Voilà! Now our MongoDB server is up and running! ?
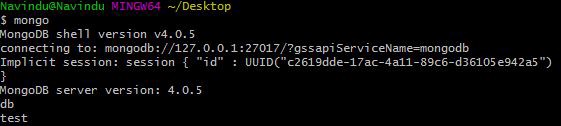
In order to work with this server, we need a mediator. So open another command window inside the bind folder and run the following command:
mongo
After running this command, navigate to the shell which we ran mongod command (which is our server). You’ll see a ‘connection accepted’ message at the end. That means our installation and configuration is successful!
Just simply run in the mongo shell:
db

How to Set Up Environment Variables
To save time, you can set up your environment variables. In Windows, this is done by following the menus below:
Advanced System Settings -> Environment Variables -> Path(Under System Variables) -> Edit
Simply copy the path of our bin folder and hit OK! In my case it’s C:\Program Files\MongoDB\Server\4.0\bin
Now you’re all set!
How to Work with MongoDB
There’s a bunch of GUIs (Graphical User Interface) to work with MongoDB server such as MongoDB Compass, Studio 3T and so on.
They provide a graphical interface so you can easily work with your database and perform queries instead of using a shell and typing queries manually.
But in this article we’ll be using command prompt to do our work.
Now it’s time for us to dive into MongoDB commands that’ll help you to use with your future projects.
Open up your command prompt and type
mongodto start the MongoDB server.Open up another shell and type
mongoto connect to MongoDB database server.
1. Find the current database you’re in
db
This command will show the current database you are in. test is the initial database that comes by default.
2. List databases
show databases
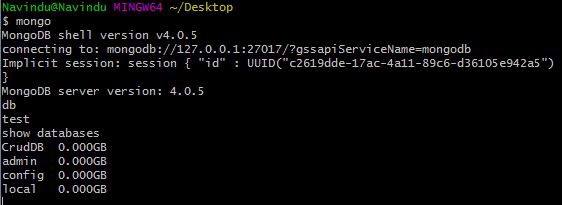
I currently have four databases. They are: CrudDB, admin, config and local.
3. Go to a particular database
use <your_db_name>
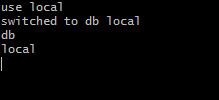
Here I’ve moved to the local database. You can check this if you try the command db to print out the current database name.
4. Create a Database
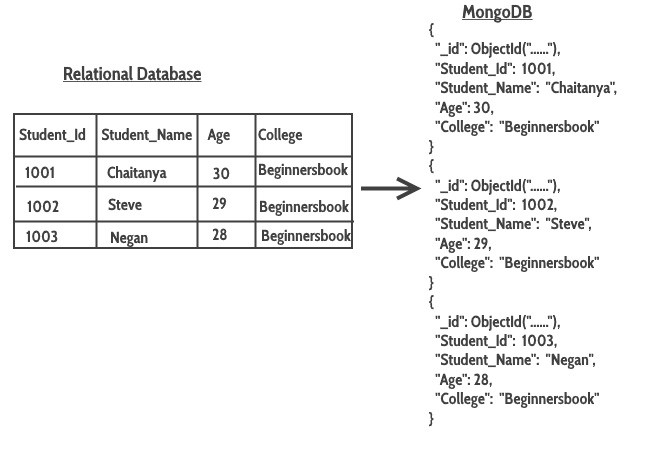
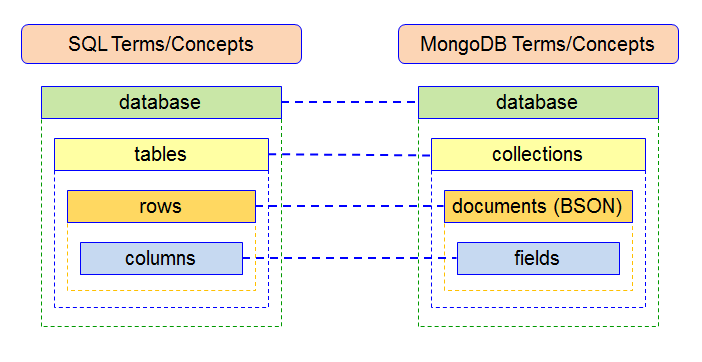
With RDBMS (Relational Database Management Systems) we have Databases, Tables, Rows and Columns.
But in NoSQL databases, such as MongoDB, data is stored in BSON format (a binary version of JSON). They are stored in structures called “collections”.
In SQL databases, these are similar to Tables.
Alright, let’s talk about how we create a database in the Mongo shell.
use <your_db_name>
Wait, we had this command before! Why am I using it again?!
In MongoDB server, if your database is present already, using that command will navigate into your database.
But if the database is not present already, then MongoDB server is going to create the database for you. Then, it will navigate into it.
After creating a new database, running the show database command will not show your newly created database. This is because, until it has any data (documents) in it, it is not going to show in your db list.
5. Create a Collection
Navigate into your newly created database with the use command.
Actually, there are two ways to create a collection. Let’s see both.
One way is to insert data into the collection:
db.myCollection.insert({"name": "john", "age" : 22, "location": "colombo"})
This is going to create your collection myCollection even if the collection does not exist. Then it will insert a document with name and age. These are non-capped collections.
The second way is shown below:
2.1 Creating a Non-Capped Collection
db.createCollection("myCollection")
2.2 Creating a Capped Collection
db.createCollection("mySecondCollection", {capped : true, size : 2, max : 2})
In this way, you’re going to create a collection without inserting data.
A “capped collection” has a maximum document count that prevents overflowing documents.
In this example, I have enabled capping, by setting its value to true.
The size : 2 means a limit of two megabytes, and max: 2 sets the maximum number of documents to two.
Now if you try to insert more than two documents to mySecondCollection and use the find command (which we will talk about soon), you’ll only see the most recently inserted documents. Keep in mind this doesn’t mean that the very first document has been deleted — it is just not showing.
6. Inserting Data
We can insert data to a new collection, or to a collection that has been created before.
There are three methods of inserting data.
insertOne()is used to insert a single document only.insertMany()is used to insert more than one document.insert()is used to insert documents as many as you want.
Below are some examples:
- insertOne()
db.myCollection.insertOne(
  {
    "name": "navindu",
    "age": 22
  }
)
- insertMany()
db.myCollection.insertMany([
  {
    "name": "navindu",
    "age": 22
  },
  {
    "name": "kavindu",
    "age": 20
  },

  {
    "name": "john doe",
    "age": 25,
    "location": "colombo"
  }
])
The insert() method is similar to the insertMany() method.
Also, notice we have inserted a new property called location on the document for John Doe. So if you use find, then you’ll see only for john doe the location property is attached.
This can be an advantage when it comes to NoSQL databases such as MongoDB. It allows for scalability.
Successfully inserted data
7. Querying Data
Here’s how you can query all data from a collection:
db.myCollection.find()

If you want to see this data in a cleaner, way just add .pretty() to the end of it. This will display document in pretty-printed JSON format.
db.myCollection.find().pretty()

Wait...In these examples did you just notice something like _id? How did that get there?
Well, whenever you insert a document, MongoDB automatically adds an _id field which uniquely identifies each document. If you do not want it to display, just simply run the following command
db.myCollection.find({}, _id: 0).pretty()
Next, we’ll look at filtering data.
If you want to display some specific document, you could specify a single detail of the document which you want to be displayed.
db.myCollection.find(
  {
    name: "john"
  }
)
result
Let’s say you want only to display people whose age is less than 25. You can use $lt to filter for this.
db.myCollection.find(
  {
    age : {$lt : 25}
  }
)
Similarly, $gt stands for greater than, $lte is “less than or equal to”, $gte is “greater than or equal to” and $ne is “not equal”.
8. Updating documents
Let’s say you want to update someone’s address or age, how you could do it? Well, see the next example:
db.myCollection.update({age : 20}, {$set: {age: 23}})
The first argument is the field of which document you want to update. Here, I specify age for the simplicity. In production environment, you could use something like the _id field.
It is always better to use something like _id to update a unique row. This is because multiple fields can have same age and name. Therefore, if you update a single row, it will affect all rows which have same name and age.

If you update a document this way with a new property, let’s say location for example, the document will be updated with the new attribute. And if you do a find, then the result will be:

If you need to remove a property from a single document, you could do something like this (let’s say you want age to be gone):
db.myCollection.update({name: "navindu"}, {$unset: age});
9. Removing a document
As I have mentioned earlier, when you update or delete a document, you just need specify the _id not just name, age, location.
db.myCollection.remove({name: "navindu"});
10. Removing a collection
db.myCollection.remove({});
Note, this is not equal to the drop() method. The difference is drop() is used to remove all the documents inside a collection, but the remove() method is used to delete all the documents along with the collection itself.
Logical Operators
MongoDB provides logical operators. The picture below summarizes the different types of logical operators.


Let’s say you want to display people whose age is less than 25, and also whose location is Colombo. What we could do?
We can use the $and operator!
db.myCollection.find({$and:[{age : {$lt : 25}}, {location: "colombo"}]});
Last but not least, let’s talk about aggregation.
Aggregation
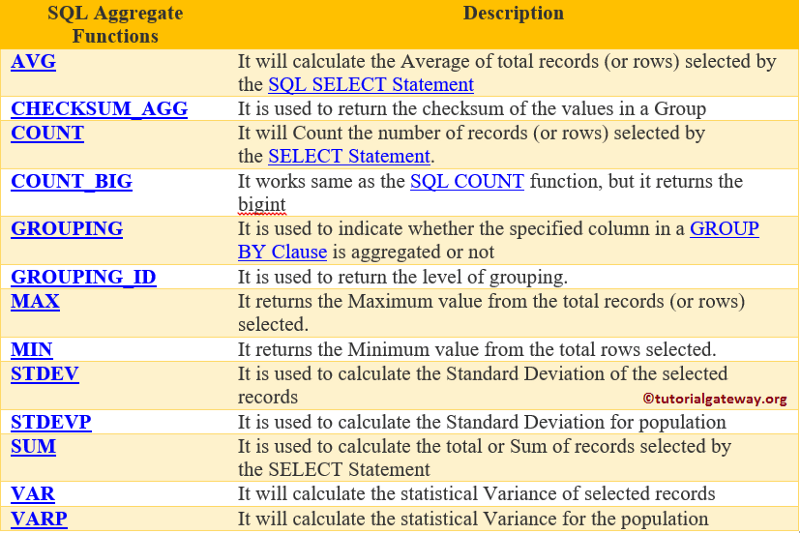
A quick reminder on what we learned about aggregation functions in SQL databases:
Simply put, aggregation groups values from multiple documents and summarizes them in some way.
Imagine if we had male and female students in a recordBook collection and we want a total count on each of them. In order to get the sum of males and females, we could use the $group aggregate function.
db.recordBook.aggregate([
  {
    $group : {_id : "$gender", result: {$sum: 1}}
  }
]);

Wrapping up
So, we have discussed the basics of MongoDB that you might need in the future to build an application. I hope you enjoyed this article – thanks for reading!
If you have any queries regarding this tutorial, feel free to comment out in the comment section below or contact me on Facebook or Twitter or Instagram.
See you guys in the next article! ❤️ ✌?
Link to my previous article: NoSQL