
By Adam Kelly
Hello! Welcome, welcome, it’s great to have you here! Today we’re going to be building a really simple JavaScript module bundler.
Before we start, I want to give a few acknowledgements. This article draws heavily on the following resources:
- Unbundling the JavaScript module bundler - Luciano Mammino
- Minipack - Ronen Amiel
Okay, lets get started with what a module bundler actually is.
What’s A Module Bundler?
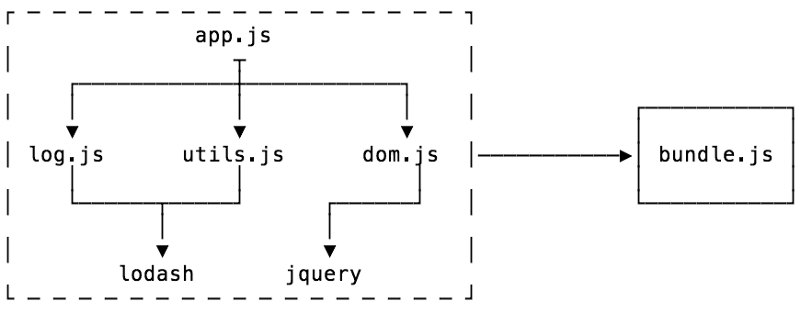
A module bundler is a tool that takes pieces of JavaScript and their dependencies and bundles them into a single file, usually for use in the browser. You may have used tools such as Browserify, Webpack, Rollup or one of many others.
It usually starts with an entry file, and from there it bundles up all of the code needed for that entry file.
There are two main stages of a bundler:
- Dependency resolution
- Packing
Starting from an entry point (such as app.js above), the goal of dependency resolution is to look for all of the dependencies of your code (other pieces of code that it needs to function) and construct a graph (called a dependency graph).
Once this is done, you can then pack or convert your dependency graph into a single file that the application can use.
Let’s start out our code with some imports (I’ll elaborate on the reason later).
Dependency Resolution
The first thing we have to do is think up how we want to represent a module during the dependency resolution phase.
Module Representation
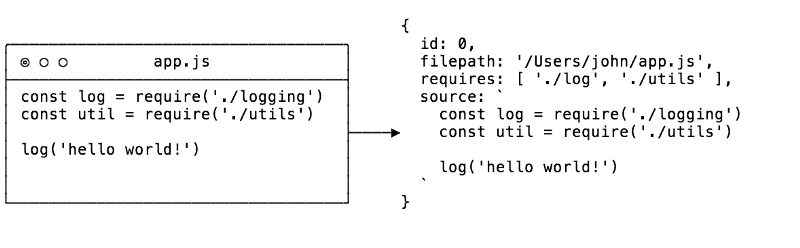
We are going to need four things:
- The name and an identifier of the file
- Where the file came from (in the file system)
- The code in the file
- What dependencies that file needs
The graph structure gets built up through recursively checking for dependencies within each file.
In JavaScript, the easiest way to represent such a set of data would be an object.
Looking at the createModuleObject function above, the notable part is the call to a function called detective.
Detective is a library that can _“find all calls to require() no matter how deeply nested”_, and using it means we can avoid doing our own AST traversal!
One thing to note (and this is the same in almost all module bundlers) is that if you try to do something weird like:
const libName = 'lodash'const lib = require(libName)
It will not be able to find it (because that would mean executing the code).
So what does running this function from the path of a module give?
Whats next? Dependency resolution.
Okay, not quite yet. First, I want to talk about a thing called a module map.
Module Map
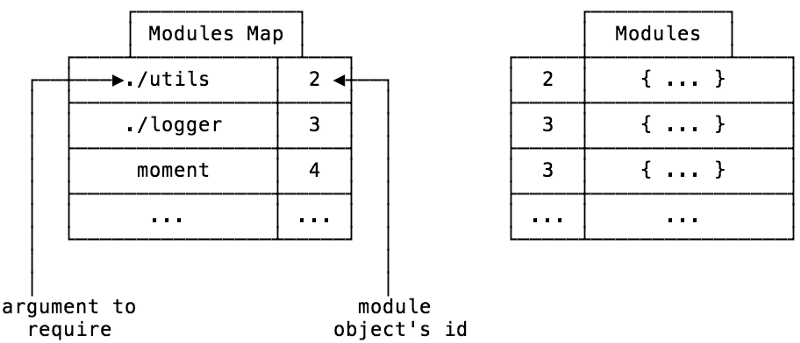
When you import modules in Node, you can do relative imports, like require('./utils'). So when your code calls this, how does the bundler know what is the right ./utils file when everything is packaged?
That is the problem the module map solves.
Our module object has a unique id key which will be our ‘source of truth’. So when we are doing our dependency resolution, for each module, we will keep a list of the names of what is being required along with their id. This way, we can get the correct module at run-time.
This also means that we can store all of the modules in a non-nested object, using the id as a key.
Dependency Resolution
Okay, so there is a fair amount going on in the getModules function. Its main purpose is to start at the root/entry module, and look for and resolve dependencies recursively.
What do I mean by ‘resolve dependencies’? In Node there is a thing called the require.resolve, and it’s how Node figures out where the file that you are requiring is. This is because we can import relatively or from a node_modules folder.
Lucky for us, there’s an npm module named resolve which implements this algorithm for us. We just have to pass in the dependency and base URL arguments, and it will do all the hard work for us.
We need to carry out this resolution for each dependency of each module in the project.
We are also creating the module map named map that I mentioned earlier.
At the end of the function, we are left with an array named modules which will contain module objects for every module/dependency in our project.
Now that we have that, we can move on to the final step: packing!
Packing
In the browser, there is no such thing as modules (kind of). But this means that there is no require function, and no module.exports. So even though we have all of our dependencies, we currently have no way to use them as modules.
Module Factory Function
Enter the factory function.
A factory function is a function (that’s not a constructor) which returns an object. It is a pattern from object oriented programming, and one of its uses is to do encapsulation and dependency injection.
Sound good?
Using a factory function, we can both inject our own require function and module.exports object that can be used in our bundled code and give the module its own scope.
Packing
The following is the pack function that is used for packing.
Most of that is just template literals of JavaScript, so let’s discuss what it’s doing.
First up is modulesSource. Here, we are going through each of the modules and transforming them into a string of sources.
So what is the output like for a module object?

Now it’s a little hard to read, but you can see that the source is encapsulated. We are providing modules and require using the factory function as I mentioned before.
We are also including the modules map that we constructed during the dependency resolution.
Next in the function, we join all of these to create a big object of all the dependencies.
The next string of code is an IIFE, which means that when you run that code in the browser (or anywhere else), the function will run immediately. IIFE is another pattern for encapsulating scope, and is used here so we don’t pollute the global scope with our require and modules.
You can see that we are defining two require functions, require and localRequire.
Require accepts the id of a module object, but of course the source code isn’t written using ids. Instead, we are using the other function localRequire to take any arguments to require by the modules and convert them to the correct id. This is using those module maps.
After this, we are defining a module object that the module can populate, and passing both functions into the factory, after which we return module.exports.
Lastly, we call require(0) to require the module with an id of 0, which is our entry file.
And that’s it! Our module bundler is 100% complete!
Congratulations! ?
So we now have a working module bundler.
This probably shouldn’t be used in production, because it’s missing loads of features (like managing circular dependencies, making sure each file gets only parsed once, es-modules, and so on) but this has hopefully given you a good idea of how module bundlers actually work.
In fact, this one works in about 60 lines if you remove all of the source code.
Thanks for reading, and I hope you have enjoyed a look into the workings of our simple module bundler. If you did, make sure to clap ? and share.
This article was originally posted on my blog.
Check out the source https://github.com/adamisntdead/wbpck-bundler