

In this tutorial, you'll learn how the React compiler can help you write more optimized React applications.
React is a user interface library that has been doing its job quite well for over a decade. The component architecture, uni-directional data flow, and declarative nature stand out in helping devs building production-ready, scalable software applications.
Over the releases (even up until the latest stable release of v18.x), React has provided various techniques and methodologies to improve application performance.
For example, the entire memoization paradigm has been supported using the React.memo() higher-order component, or with hooks like useMemo() and useCallback().
In programming, memoization is an optimization technique that makes your programs execute faster by caching the result of expensive computations.
Although React's memoization techniques are great for applying optimizations, as Uncle Ben (remember, Spiderman's uncle?) once said, "With great power comes great responsibility". So we as developers need to be a little more responsible in applying them. Optimization is great, but over-optimization can be a killer for the application's performance.
With React 19, the developer community has received a list of enhancements and features to boast about:
An experimental open-source compiler. We will be focusing primarily on it in this article.
React Server Components.
Server Actions.
Easier and more organic way of handling the document metadata.
Enhanced hooks and APIs.
refcan be passed as props.Improvements in asset loading for styles, images, and fonts.
A much smoother integration with Web Components.
If these are exciting to you, I recommend watching this video that explains how each feature will impact you as a React developer. I hope you like it 😊.
The introduction of a compiler with React 19 is set to be a game-changer. From now on, we can let the compiler handle the optimization headache rather than keeping it on us.
Does this mean we do not have to use memo, useMemo(), useCallback, and so on anymore? No – we mostly don't. The compiler can take care of these things automatically if you understand and follow the Rules of React for components and hooks.
How will it do this? Well, we'll get to it. But before that, let's understand what a compiler is and whether it's justified to call this new optimizer for React code the React Compiler.
If you like to learn from video tutorials as well, this article is also available as a video tutorial here:
Table of Contents
What is a Compiler, Traditionally?
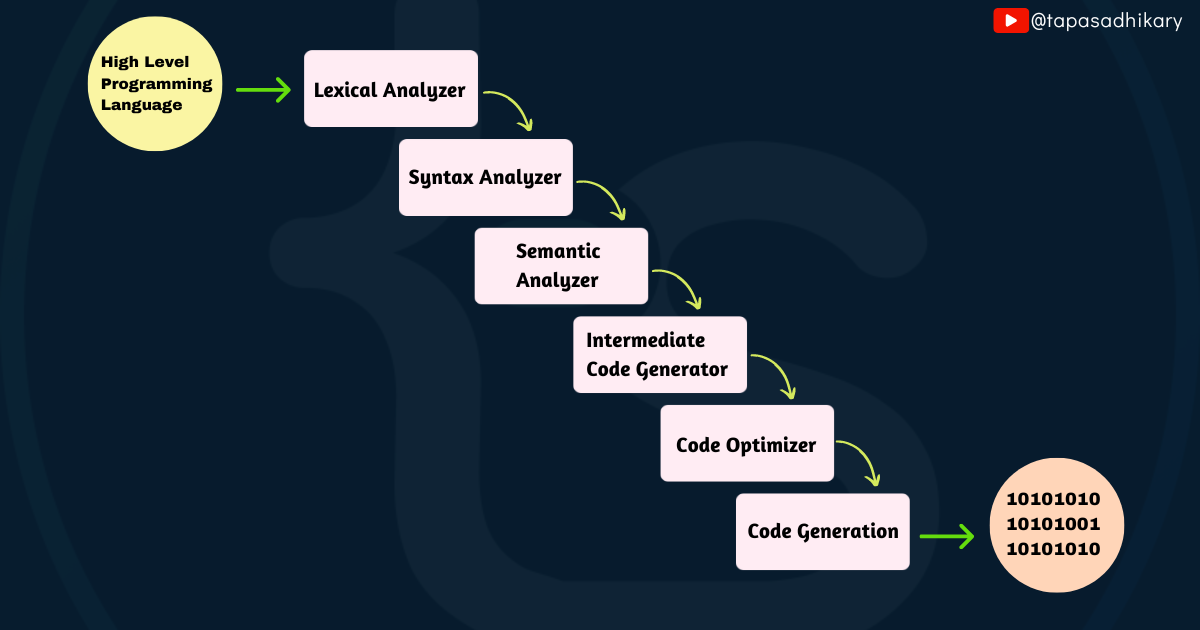
Simply put, a compiler is a software program/tool that translates high-level programming language code (source code) into machine code. There are several steps to follow to compile source code and generate machine code:
The
lexical analyzertokenizes the source code and generates tokens.The
Syntax Analyzercreates an abstract syntax tree (AST) to structure the source code tokens logically.The
Semantic Analyzervalidates the semantic (or syntactic) correctness of the code.After all three types of analysis by the respective analyzers, some
intermediate codegets generated. It is also known as the IR code.Then
optimizationis performed on the IR code.Finally, the
machine codeis generated by the compiler from the optimized IR code.
Now that you understand the basics of how a compiler works, let's learn about the React Compiler and understand how it works.
React Compiler Architecture
React compiler is a build-time tool that you need to configure with your React 19 project explicitly using the configuration options provided by the React tools ecosystem.
For example, if you are using Vite to create your React application, the compiler configuration will take place in the vite.config.js file.
React compiler has three primary components:
Babel Plugin: helps transform the code during the compilation process.ESLint Plugin: helps catch and report any violations of the Rules of React.Compiler Core: the core compiler logic that performs the code analysis and optimizations. Both Babel and ESLint plugins use the core compiler logic.
The compilation flow goes like this:
The
Babel Pluginidentifies which functions (components or hooks) to compile. We will see some configurations later to learn how to opt in and out of the compilation process. The plugin calls the core compiler logic for each of the functions and finally creates the Abstract Syntax Tree.Then the compiler core converts the Babel AST into IR code, analyzes it, and runs various validations to ensure none of the rules are broken.
Next, it tries to reduce the amount of code to be optimized by performing various passes to eliminate dead code. The code gets further optimized using memoization.
Finally, in the code generation stage, the transformed AST is converted back to the optimized JavaScript code.
React Compiler in Action
Now that you know how React Compiler works, let's now dive into configuring it with a React 19 project so you can start learning about the various optimizations.
Understanding the problem: Without the React Compiler
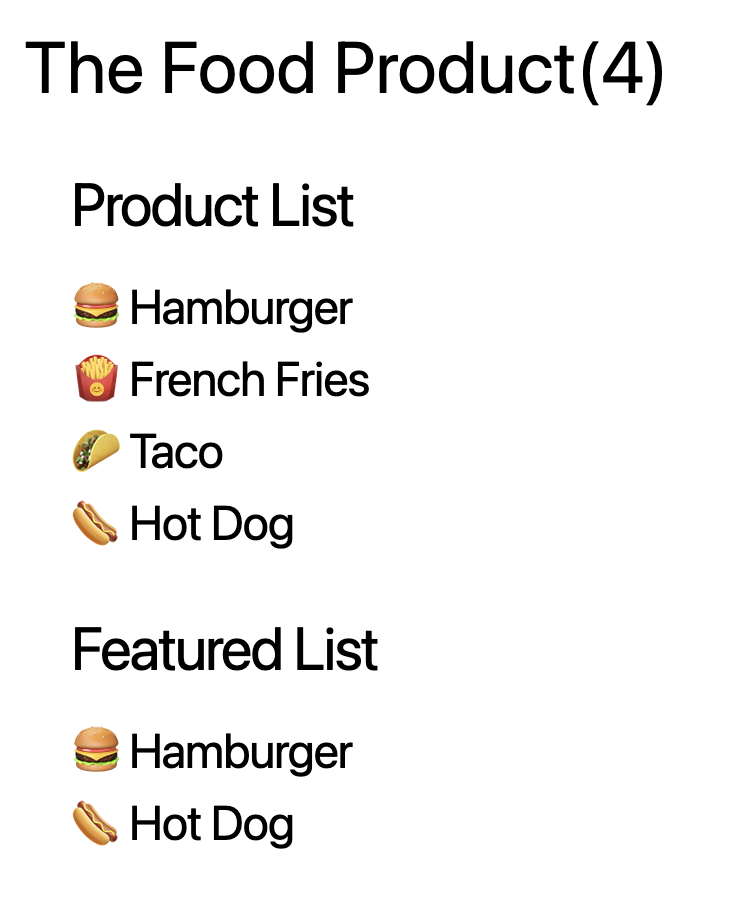
Let's create a simple product page with React. The product page shows a heading with the number of products on the page, a list of products, and the featured products.
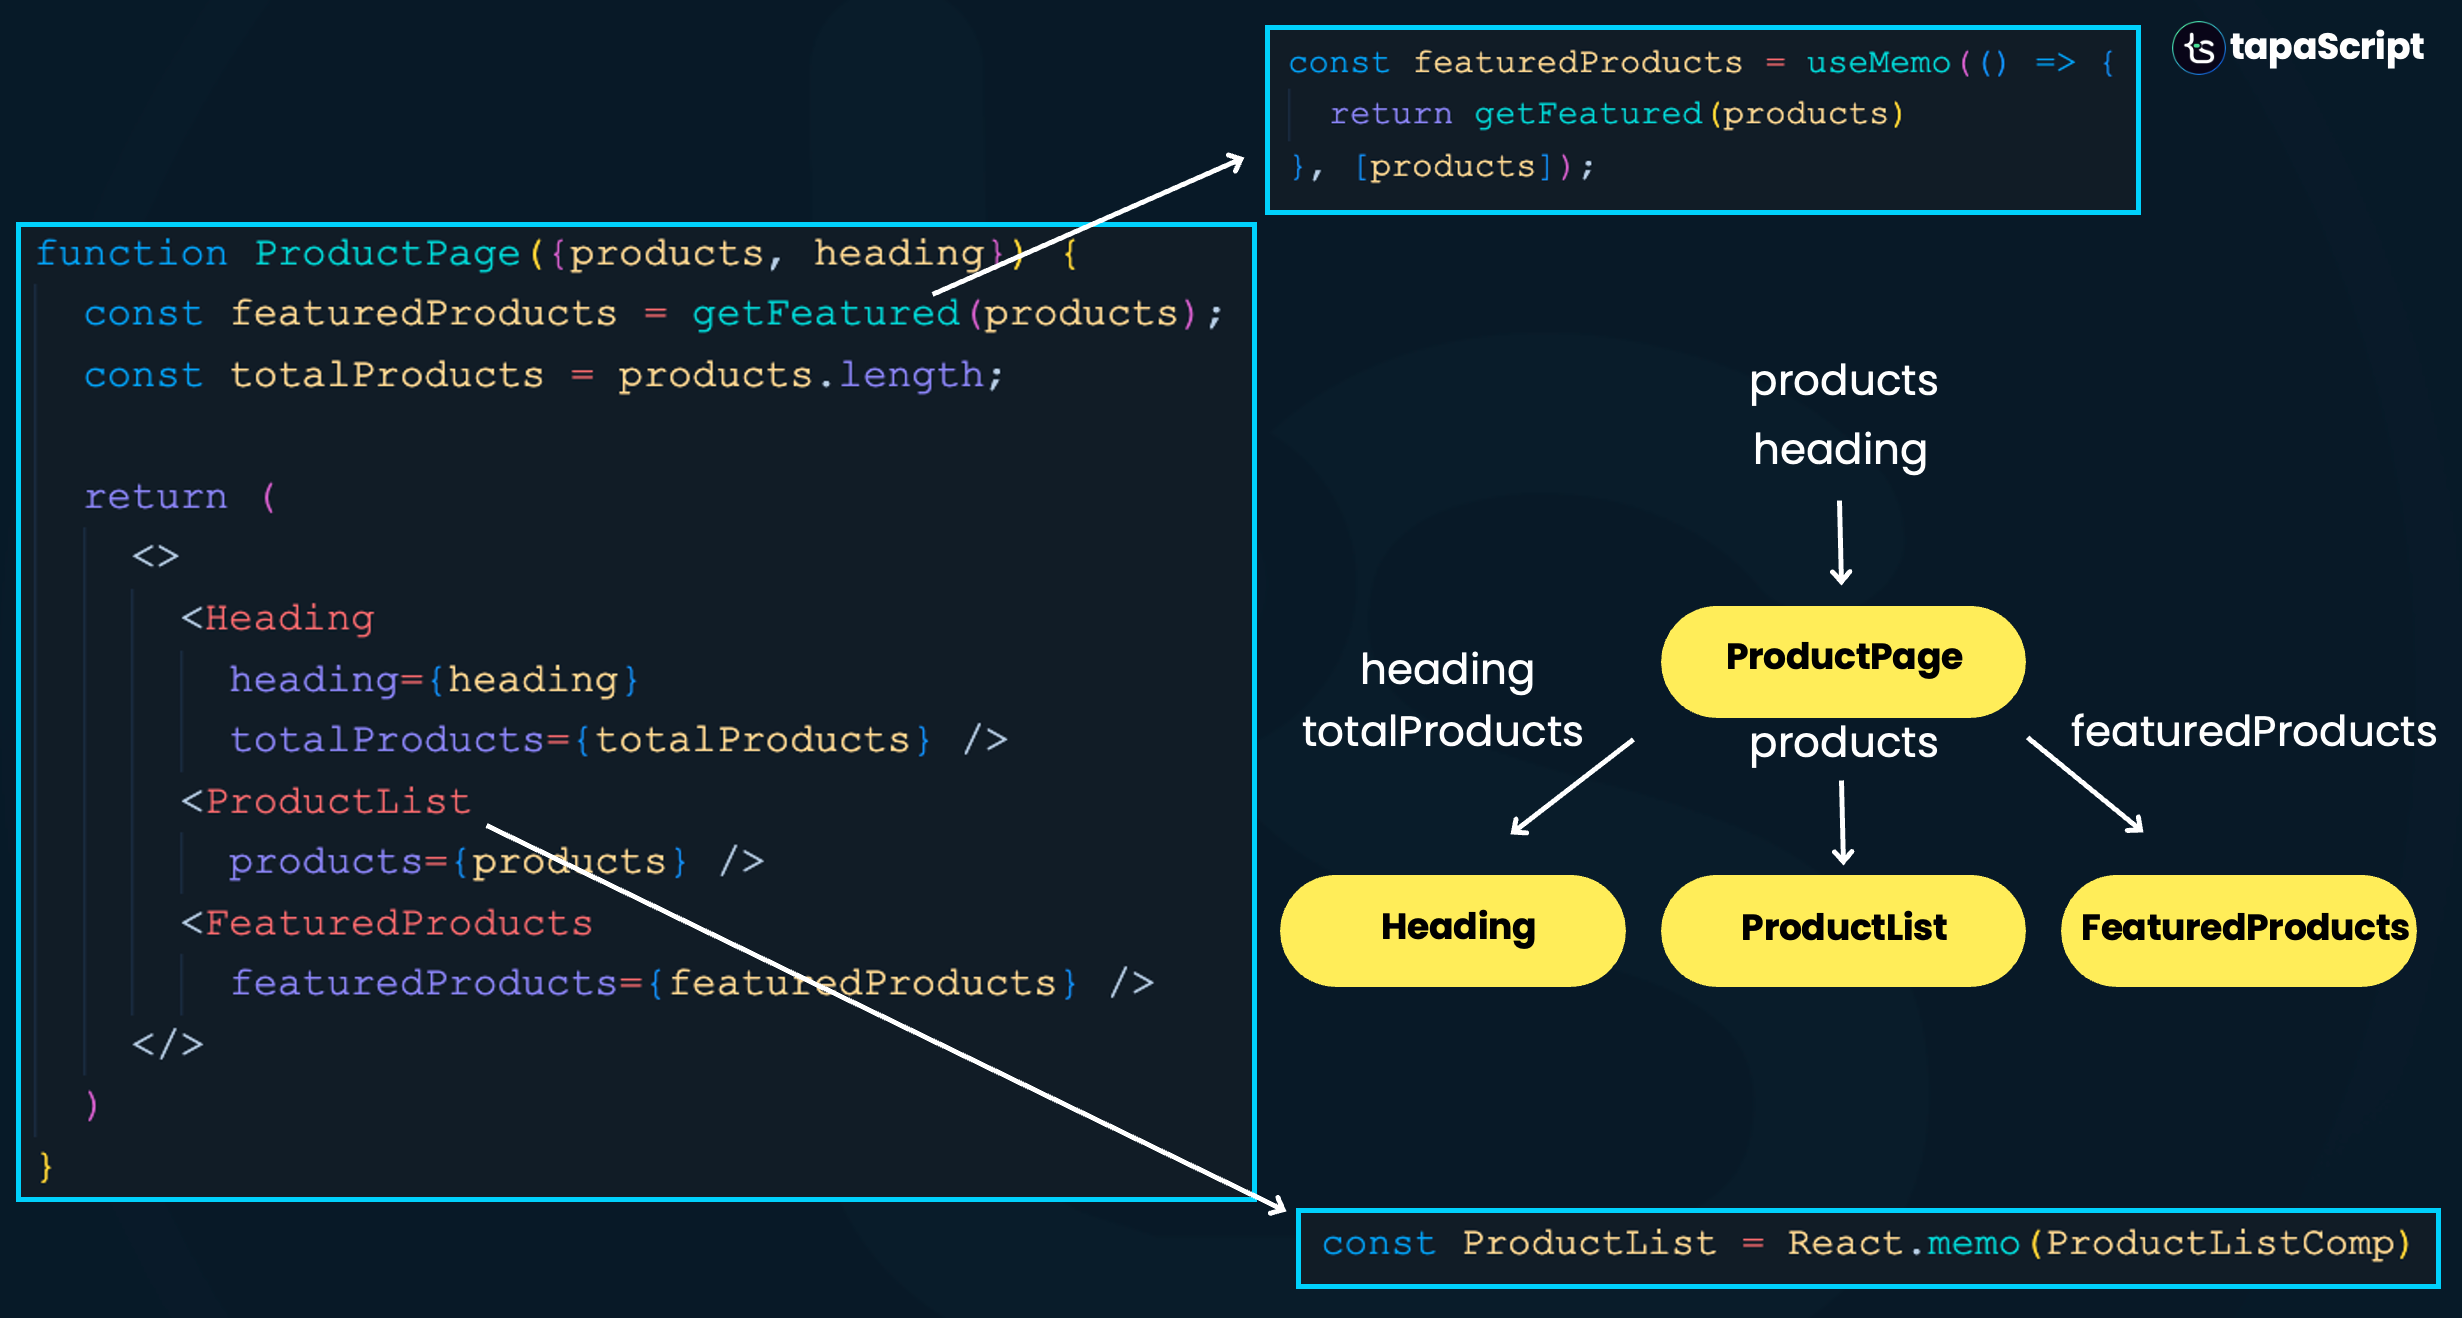
The component hierarchy and the data passing between the components look like this:
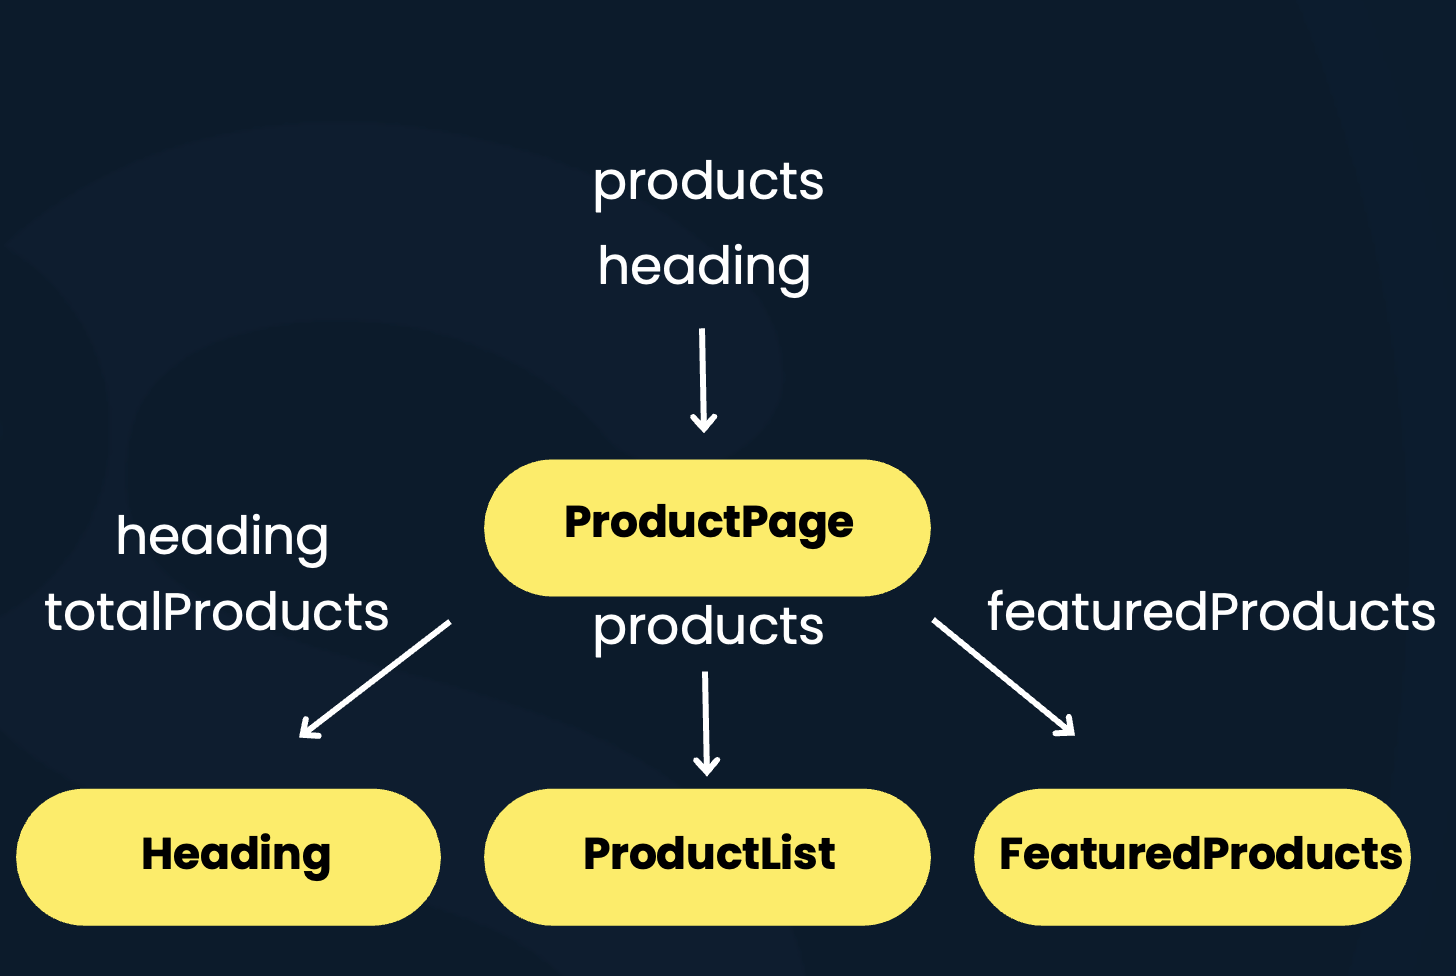
As you can see in the image above,
The
ProductPagecomponent has three child components,Heading,ProductList, andFeaturedProducts.The
ProductPagecomponent receives two props,productsand theheading.The
ProductPagecomponent computes the total number of products and passes the value along with the heading text value to theHeadingcomponent.The
ProductPagecomponent passes down theproductsprop to theProductListchild component.Similarly, it computes the featured products and passes the
featuredProductsprop to theFeaturedProductschild component.
Here is how the source code of the ProductPage component may look:
import React from 'react'

import Heading from './Heading';
import FeaturedProducts from './FeaturedProducts';
import ProductList from './ProductList';

const ProductPage = ({products, heading}) => {
  const featuredProducts = products.filter(product => product.featured);
  const totalProducts = products.length;

  return (
    <div className="m-2">
      <Heading
        heading={heading}
        totalProducts={totalProducts} />

      <ProductList
        products={products} />

      <FeaturedProducts
        featuredProducts={featuredProducts} />

    </div>
  )
}

export default ProductPage
Also, assume we use the ProductPage component in the App.js file like this:
import ProductPage from "./components/compiler/ProductPage";

function App() {

  // A list of food products
  const foodProducts = [
    {
      "id": "001",
      "name": "Hamburger",
      "image": "🍔",
      "featured": true
    },
    {
      "id": "002",
      "name": "French Fries",
      "image": "🍟",
      "featured": false
    },
    {
      "id": "003",
      "name": "Taco",
      "image": "🌮",
      "featured": false
    },
    {
      "id": "004",
      "name": "Hot Dog",
      "image": "🌭",
      "featured": true
    }
  ];

  return (
      <ProductPage
            products={foodProducts}
            heading="The Food Product" />
  );
}

export default App;
That's all good – so where is the problem? The problem is that React proactively re-renders the child component when the parent component re-renders. An unnecessary rendering requires optimizations. Let's understand the problem fully first.
We'll add the current timestamp in each of the child components. Now the rendered user interface will look like this:
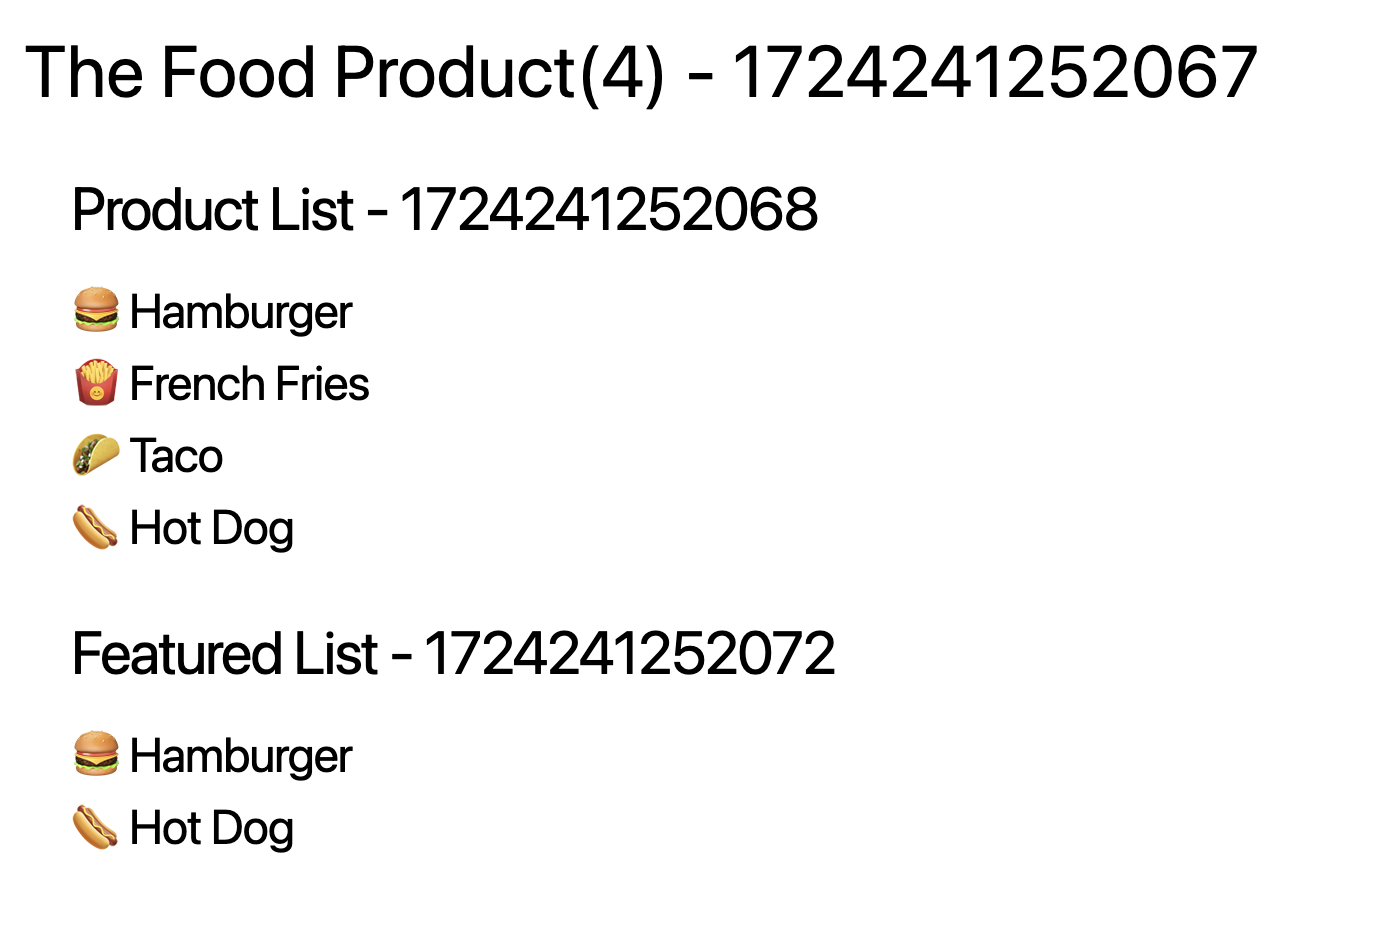
The big number you see beside the headings is the timestamp (using the simple Date.now() function from the JavaScript Date API) we have added to the component code. Now what happens if we change the value of the heading prop of the ProductPage component?
Before:
<ProductPage
   products={foodProducts}
   heading="The Food Product" />
And after (notice that we have made it plural for products by adding an s at the end of the heading value):
<ProductPage
   products={foodProducts}
   heading="The Food Products" />
Now you will notice an immediate change in the user interface. All three timestamps got updated. This is because all three components were re-rendered when the parent component was re-rendered due to the props change.
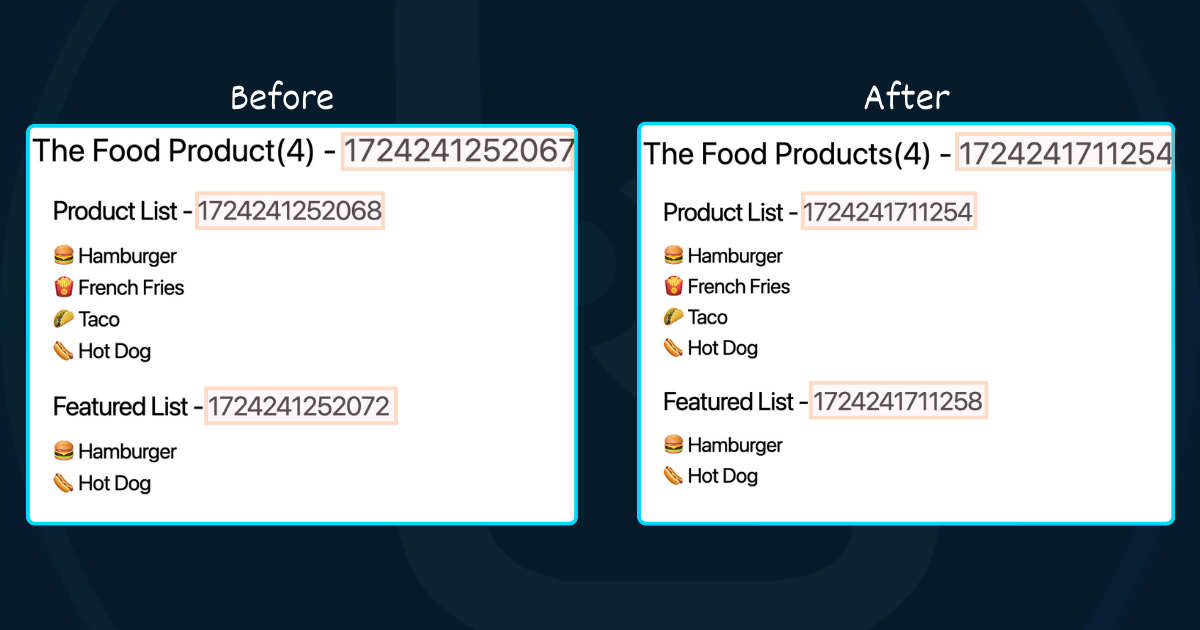
If you notice, the heading prop was passed only to the Heading component, and even then the other two child components re-rendered. This is where we need the optimizations.
Fixing the Problem: Without the React Compiler
As discussed before, React provides us with various hooks and APIs for memoization. We can use React.memo() or useMemo() to safeguard the components that are re-rendering unnecessarily.
For example, we can use React.memo() to memoize the ProductList component to ensure that unless the products prop is changed, the ProductList component will not be re-rendered.
We can use the useMemo() hook to memoize the computation for the featured products. Both implementations are indicated in the image below.
But again, recollecting the wise words of great Uncle Ben, over the last few years we have started over-using these optimization techniques. These over-optimizations can negatively impact the performance of your applications. So, the availability of the compiler is a boon for React developers as it lets them delegate many such optimizations to the compiler.
Let's now fix the problem using the React compiler.
Fixing the problem: Using the React Compiler
Again, React compiler is an opt-in build-time tool. It doesn't come bundled with React 19 RC. You need to install the required dependencies and configure the compiler with your React 19 project.
Before configuring the compiler, you can check if your codebase is compatible by executing this command on your project directory:
npx react-compiler-healthcheck@experimental
It will check and report:
How many components can be optimized by the compiler
If the Rules of React are followed.
If there are any incompatible libraries.

If you find that things are compatible, it's time to install the ESLint plugin powered by the React compiler. This plugin will help you catch any violation of the rules of React in your code. Violating code will be skipped by the React compiler and no optimizations will be performed on it.
npm install eslint-plugin-react-compiler@experimental
Then open the ESLint configuration file (for example, .eslintrc.cjs for Vite) and add these configurations:
module.exports = {
  plugins: [
    'eslint-plugin-react-compiler',
  ],
  rules: {
    'react-compiler/react-compiler': "error",
  },
}
Next, you'll use the Babel plugin for the React compiler to enable the compiler for your entire project. If you're starting a new project with React 19, I recommend that you enable the React compiler for the entire project. Let's install the Babel plugin for the React compiler:
npm install babel-plugin-react-compiler@experimental
Once installed, you need to complete the configuration by adding the options in the Babel config file. As we're using Vite, open the vite.config.js file and replace the content with the following code snippet:
import { defineConfig } from 'vite'
import react from '@vitejs/plugin-react'

const ReactCompilerConfig = {/* ... */ };

// https://vitejs.dev/config/
export default defineConfig({
  plugins: [react({
    babel: {
      plugins: [
        [
          "babel-plugin-react-compiler",
           ReactCompilerConfig
          ]
        ],
    },
  })],
})
Here, you've added the babel-plugin-react-compiler to the configuration. The ReactCompilerConfig is required to provide any advanced configuration like if you want to provide any custom runtime module or any other configurations. In this case, it's an empty object without any advanced configurations.
That's it. You are done configuring the React compiler with your code base to utilize its power. From now on, the React compiler will look into every component and hook in your project to try and apply optimizations to it.
If you want to configure the React compiler with Next.js, Remix, Webpack, and so on, you can follow this guide.
Optimized React App with React Compiler
Now you should have an optimized React app with the inclusion of the React compiler. So, let's run the same tests you did before. Again, change the value of the heading prop of the ProductPage component.
This time, you will not see the child components re-rendering. So the timestamp will not be updated either. But you will see the portion of the component where the data changed, as it will reflect the changes alone. Also, you won't have to use memo, useMemo(), or useCallback() in your code anymore.
You can see it working visually from here.
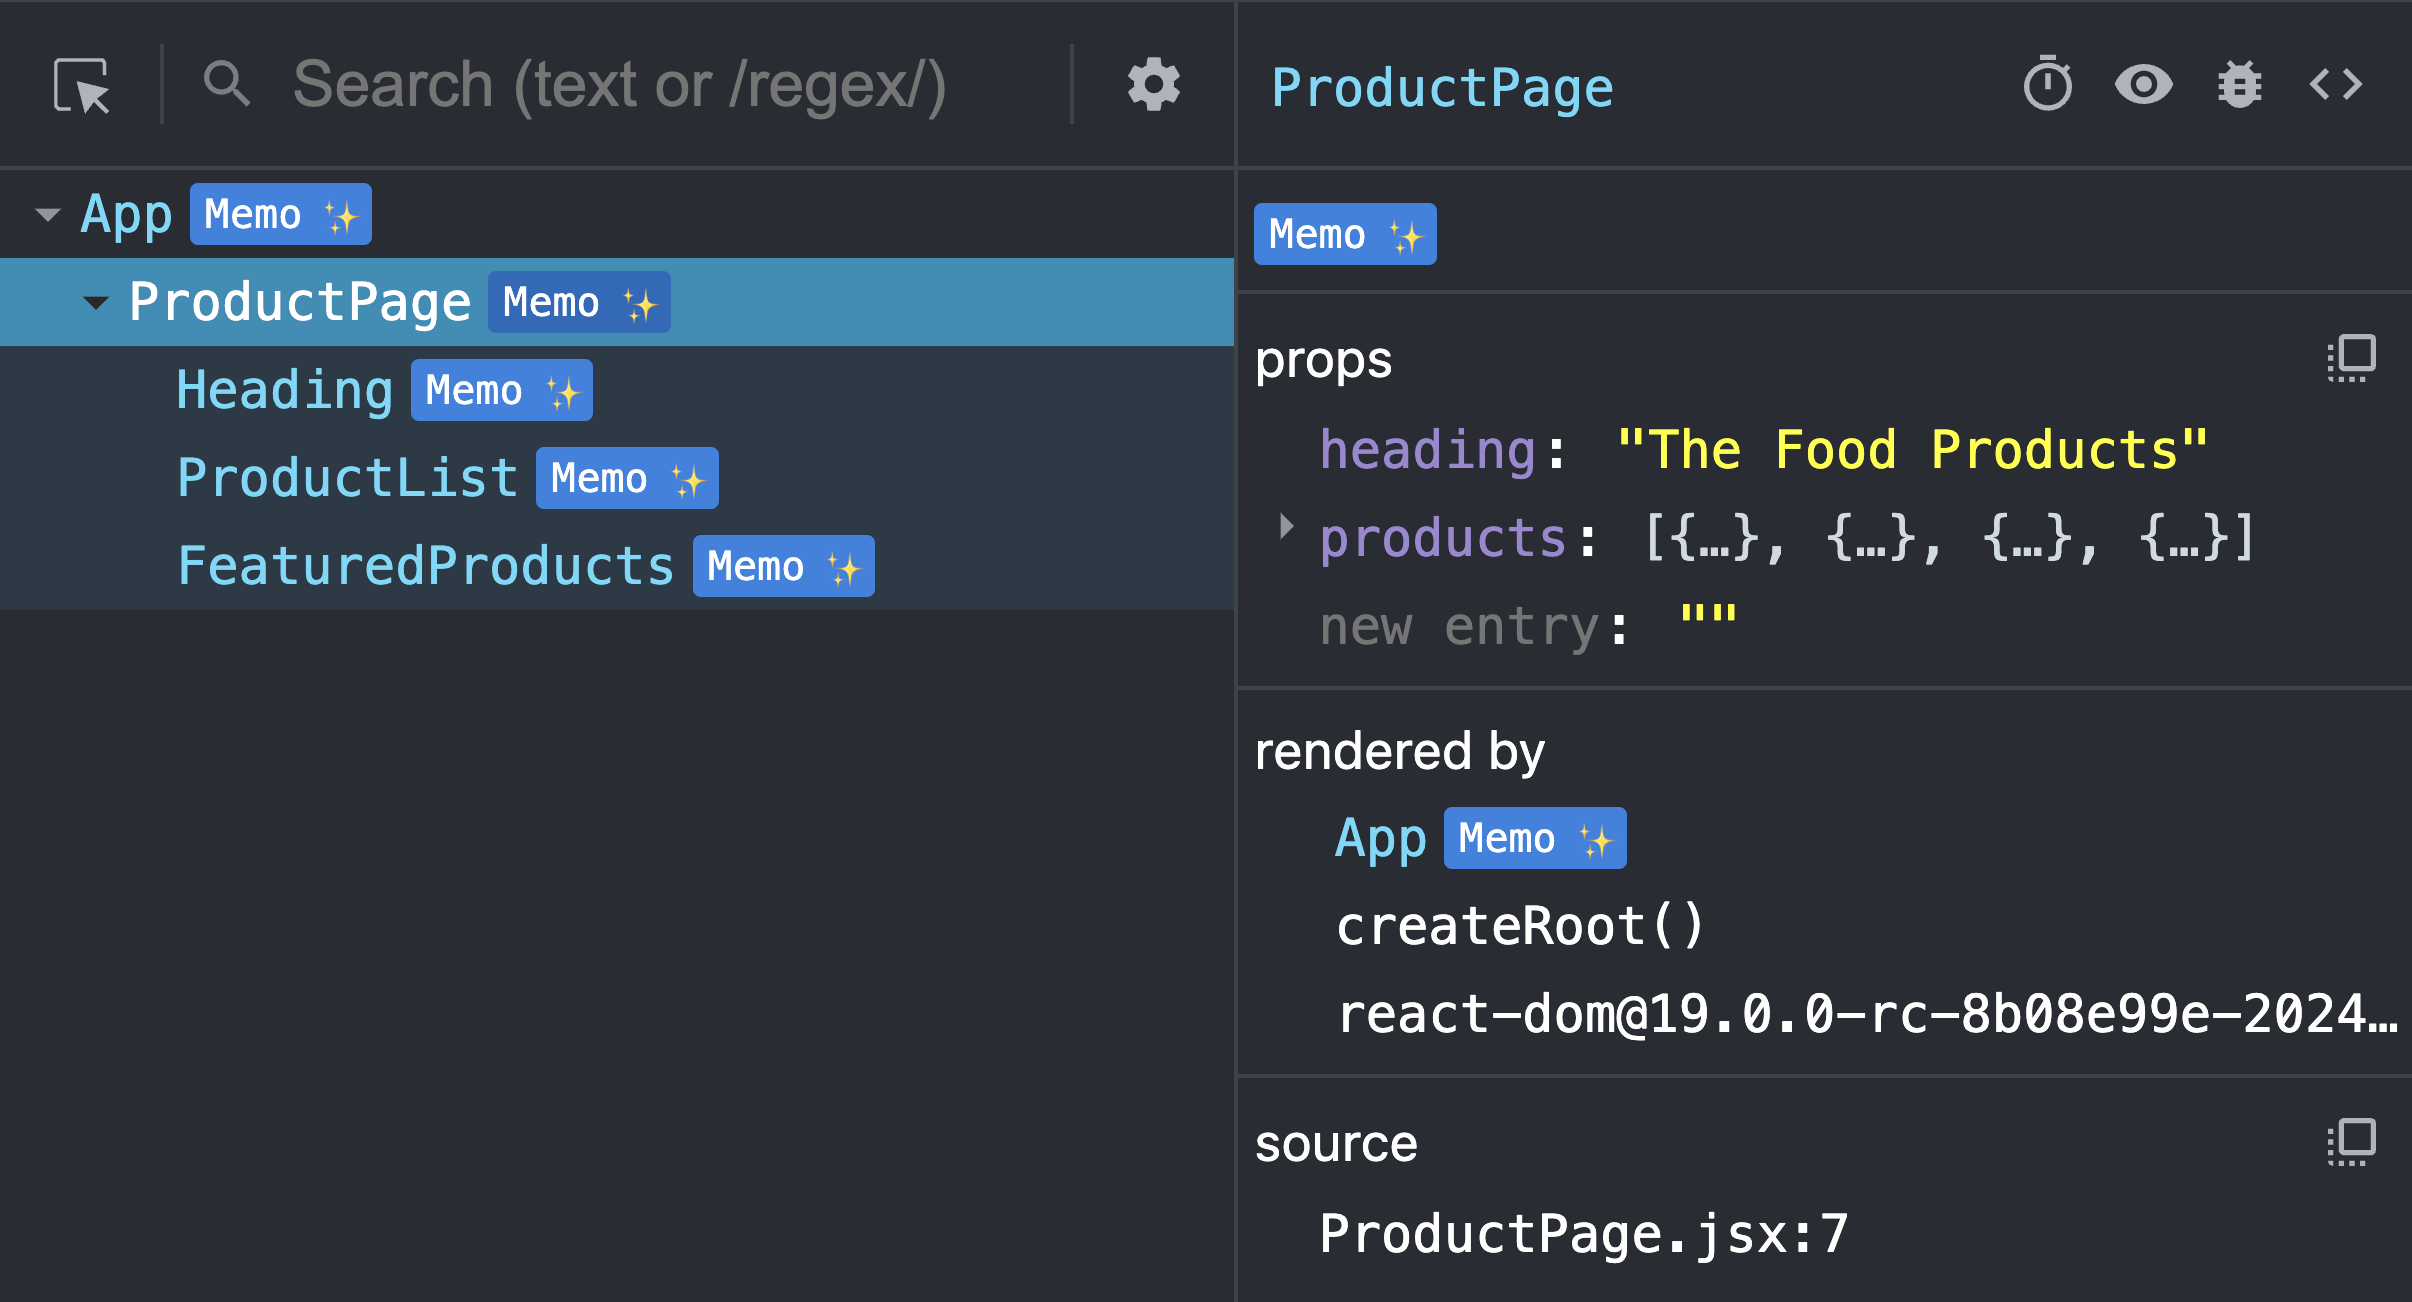
React Compiler in React DevTools
React DevTools version 5.0+ has built-in support for the React compiler. You will see a badge with the text Memo ✨ beside the components optimized by the React compiler. This is fantastic!
Diving Deep – How Does the React Compiler Work?
Now that you've seen how the React compiler works on React 19 code, let's deep dive into understanding what's happening in the background. We will use the React Compiler Playground to explore the translated code and the optimization steps.
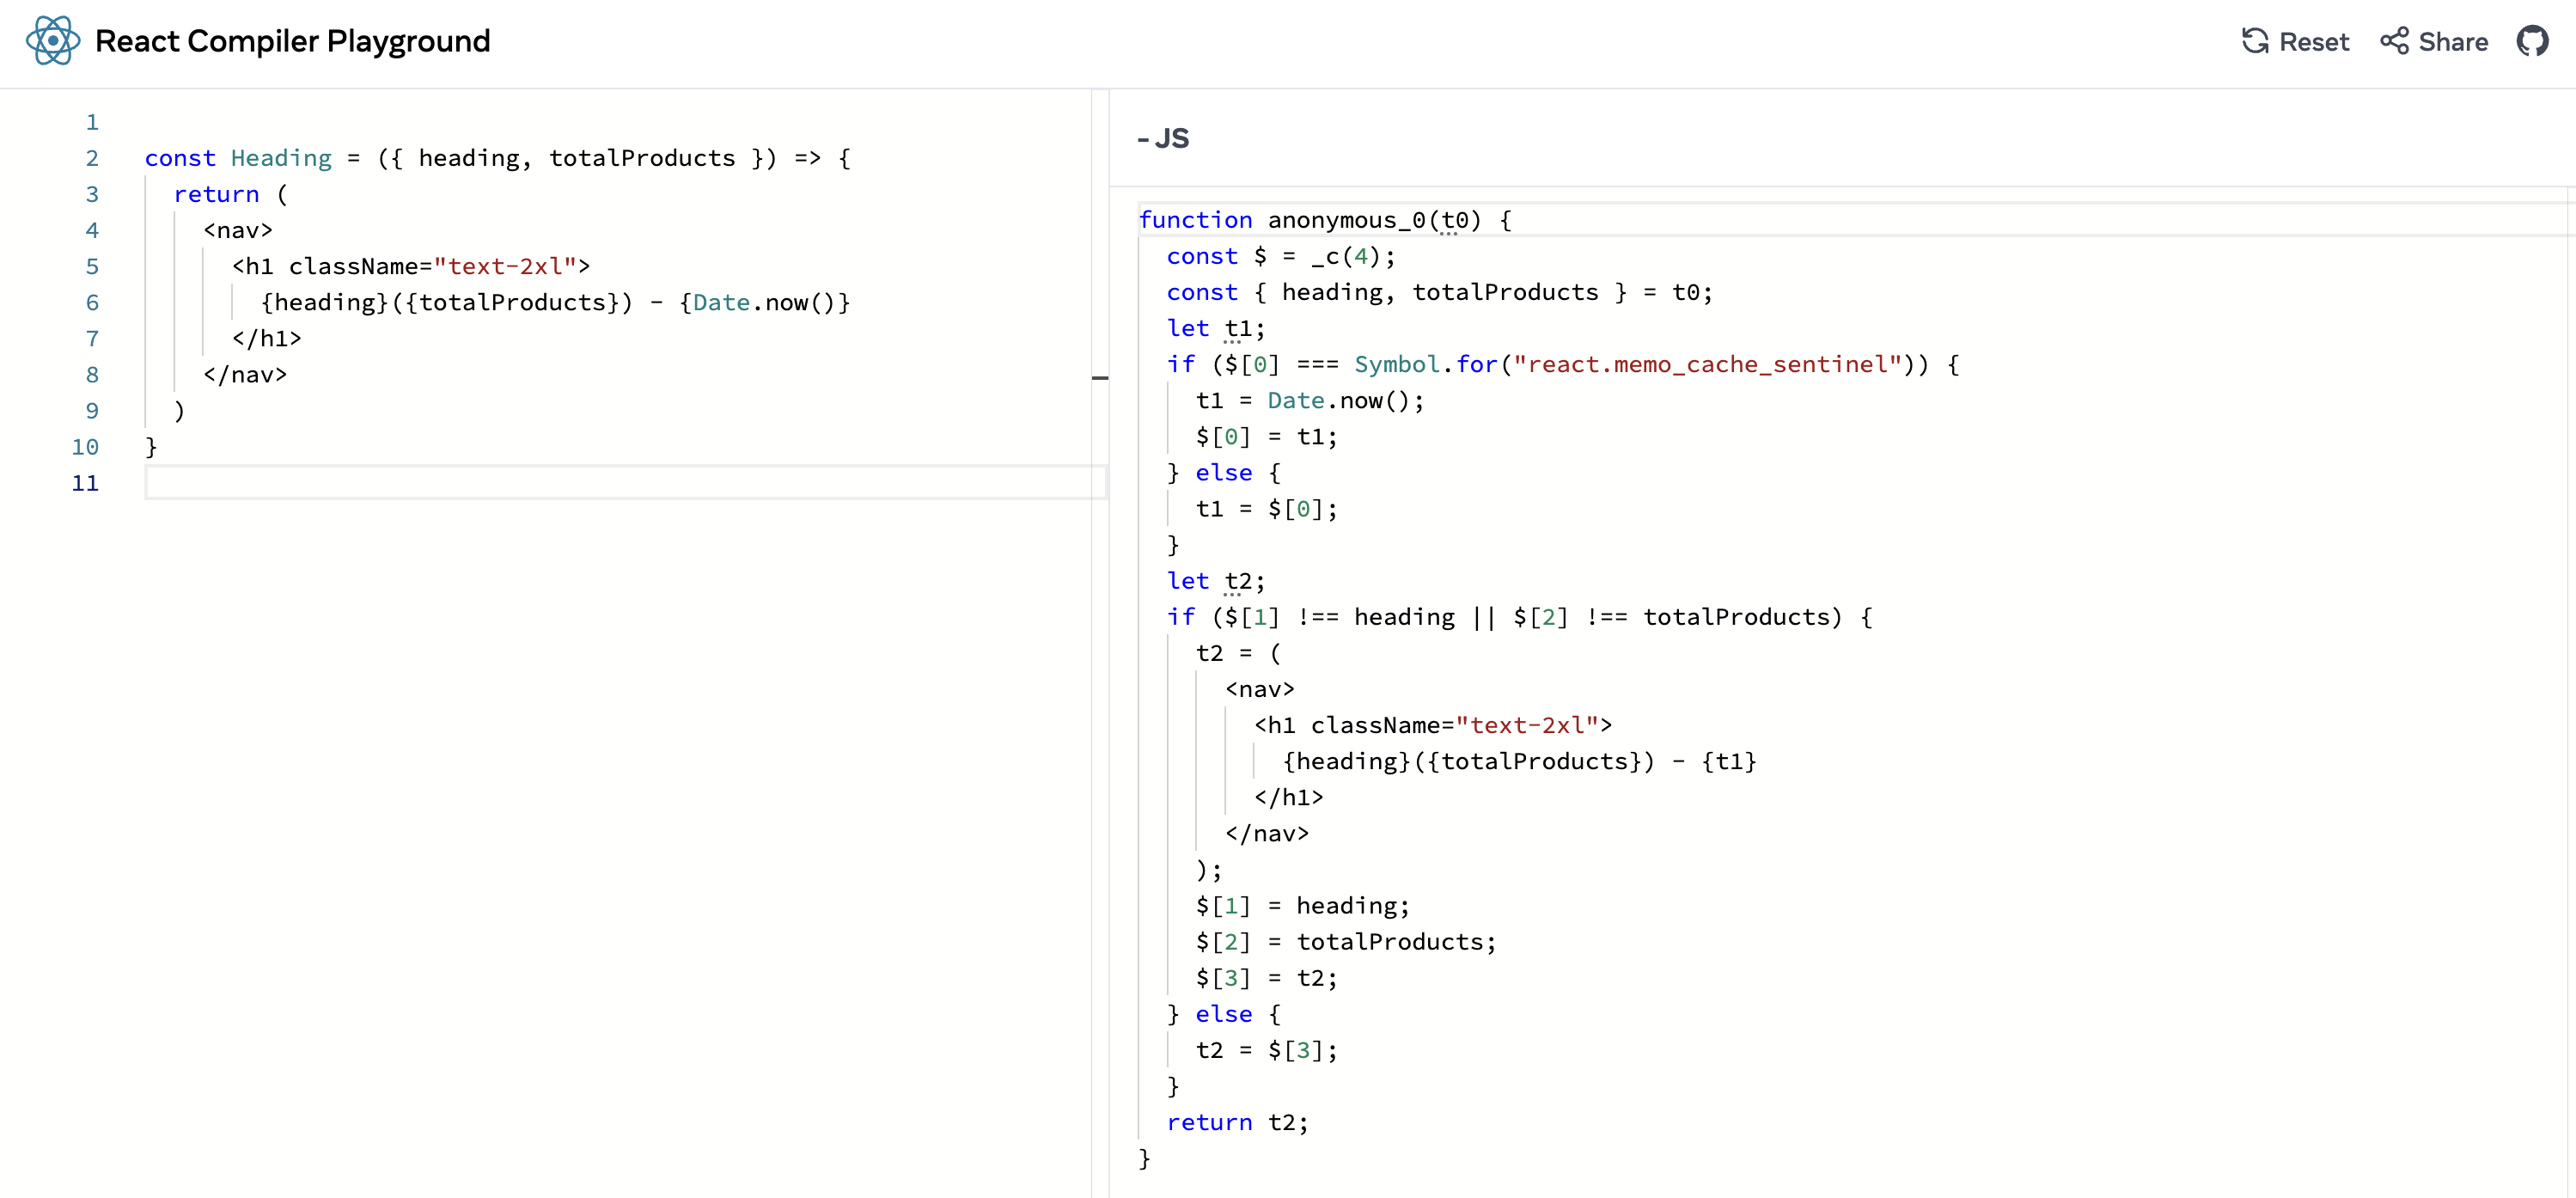
We'll use the Heading component as an example. Copy and paste the following code inside the leftmost section of the playground:
const Heading = ({ heading, totalProducts }) => {
  return (
    <nav>
      <h1 className="text-2xl">
          {heading}({totalProducts}) - {Date.now()}
      </h1>
    </nav>
  )
}
You will see that some JavaScript code is generated immediately inside the _JS tab of the playground. The React compiler generates this JavaScript code as part of the compilation process. Let's go over it step-by-step:
function anonymous_0(t0) {
  const $ = _c(4);
  const { heading, totalProducts } = t0;
  let t1;
  if ($[0] === Symbol.for("react.memo_cache_sentinel")) {
    t1 = Date.now();
    $[0] = t1;
  } else {
    t1 = $[0];
  }
  let t2;
  if ($[1] !== heading || $[2] !== totalProducts) {
    t2 = (
      <nav>
        <h1 className="text-2xl">
          {heading}({totalProducts}) - {t1}
        </h1>
      </nav>
    );
    $[1] = heading;
    $[2] = totalProducts;
    $[3] = t2;
  } else {
    t2 = $[3];
  }
  return t2;
}
The compiler uses a hook called _c() to create an array of items to cache. In the code above, an array of four elements has been created to cache four items.
const $ = _c(4);
But, what are the things to cache?
The component takes two props,
headingandtotalProducts. The compiler needs to cache them. So, it needs two elements in the array of cacheable items.The
Date.now()part in the header should be cached.The JSX itself should be cached. There is no point in computing JSX unless either of the above changes.
So there are a total of four items to cache.
The compiler creates memoization blocks using the if-block. The final return value from the compiler is the JSX which depends on three dependencies:
The
Date.now()value.Two props, a
headingandtotalProducts
The output JSX needs re-computation when any of the above changes. This means that the compiler needs to create two memoization blocks for each of the above.
The first memoization block looks like this:
if ($[0] === Symbol.for("react.memo_cache_sentinel")) {
    t1 = Date.now();
    $[0] = t1;
} else {
    t1 = $[0];
}
The if-block stores the value of the Date.now() into the first index of the cacheable array. It re-uses the same every time unless it is changed.
Similarly, in the second memoization block:
if ($[1] !== heading || $[2] !== totalProducts) {
    t2 = (
      <nav>
        <h1 className="text-2xl">
          {heading}({totalProducts}) - {t1}
        </h1>
      </nav>
    );
    $[1] = heading;
    $[2] = totalProducts;
    $[3] = t2;
  } else {
    t2 = $[3];
  }
Here, the check is for the value changes for either heading or totalProducts props. If either of these changes, the JSX needs to be recomputed. All the values are then stored in the cacheable array. If there are no changes in the value, the previously computed JSX is returned from the cache.
You can now paste any other component source code into the left side and look into the generated JavaScript code to help you understand what's going on as we did above. This will help you to get a better grip on how the compiler performs the memoization techniques in the compilation process.
How Do You Opt in and Out of the React Compiler?
Once you've configured the React compiler the way we have done with our Vite project here, it's enabled for all the compilers and hooks of the project.
But in some cases, you may want to selectively opt-in for the React compiler. In that case, you can run the compiler in “opt-in” mode using the compilationMode: "annotation" option.
// Specify the option in the ReactCompilerConfig
const ReactCompilerConfig = {
  compilationMode: "annotation",
};
Then annotate the components and hooks you want to opt-in for compilation with the "use memo" directive.
// src/ProductPage.jsx
export default function ProductPage() {
  "use memo";
  // ...
}
Note that there is a "use no memo" directive as well. There might be some rare cases where your component may not be working as expected after compilation, and you want to opt out of the compilation temporarily until the issue is identified and fixed. In that case, you can use this directive:
function AComponent() {
  "use no memo";
  // ...
}
Can We Use the React Compiler with React 18.x?
It is recommended to use the React compiler with React 19 as there are required compatibilities. If you can't upgrade your application to React 19, you'll need to have a custom implementation of the cache function. You can go over this thread describing the workaround.
Repositories to Look Into
All the source code used in this article is in this repository.
If you want to start coding with React 19 and its features, here is a template repository configured with React 19 RC, Vite, and TailwindCSS. You may want to try it out.
What's Next?
To learn further,
Check out the official documentation of React Compiler from here.
Check out the discussions in the Working Group.
Up next, if you are willing to learn React and its ecosystem-like Next.js with both fundamental concepts and projects, I have great news for you: you can check out this playlist on my YouTube channel with 22+ video tutorials and 12+ hours of engaging content so far, for free. I hope you like them as well.
That's all for now. Did you enjoy reading this article and have you learned something new? If so, I would love to know if the content was helpful.
Subscribe to my YouTube Channel.
Follow me on X (Twitter) or LinkedIn if you don't want to miss the daily dose of up-skilling tips.
Check out and follow my Open Source work on GitHub.
I regularly publish meaningful posts on my GreenRoots Blog, you may find them helpful, too.
See you soon with my next article. Until then, please take care of yourself, and keep learning.