By Rajesh Pillai
Get into the details of implementing drag and drop features in React from scratch.
 So, easy even your dog can drag it :)
Let’s first see the result of what we will be building. I am trying out .gif — hopefully it works everywhere as expected. I’ve used Camtasia with a personal license.
 Ignore the UI/Styles please!
The key learning points are to:
- make an element draggable by adding the “draggable” attribute
- make an area droppable by implementing the “dragover” event
- capture the drag data by implementing the “dragstart” event
- capture the drop by implementing the “drop” event
- implement the “drag” event that is fired as the element is being dragged
- store the intermediate data in the dataTransfer object
For visual learners, head over to the video below.
Step 1 — create the root app for the demo
All the code for drag and drop will go into AppDragDropDemo.js component.
import React from 'react';import ReactDOM from 'react-dom';import '.index.css';import AppDragDropDemo from './AppDragDropDemo';
ReactDOM.render(<AppDragDropDemo />, document.getElementById("root"));
The entry point for the AppDragDropDemo looks like the code below.
import React, { Component } from 'react';
export default class AppDragDropDemo extends Component { render () { return ( <div className="container-drag"> DRAG & DROP DEMO </div> ); }}
If you now run the application, you will be presented with this awesome screen (pun intended)

Step 2 — create the state object to store some tasks
Let’s create some tasks to simulate a simple application. What we intend to do is to drag and drop these tasks into different categories like wip, complete , and so on.
export default class AppDragDropDemo extends Component { state = { tasks: [{name:"Learn Angular", category:"wip", bgcolor: "yellow"}, {name:"React", category:"wip", bgcolor:"pink"}, {name:"Vue", category:"complete", bgcolor:"skyblue"} ]}
render () { return ( <div className="container-drag"> DRAG & DROP DEMO </div> ); }}
Step 3 — organize our data into categories
Let’s implement the below code in the render method, to group tasks into their respective categories, wip and complete. Feel free to add more categories and play with the code.

You can copy-paste the code above from the below snippet.
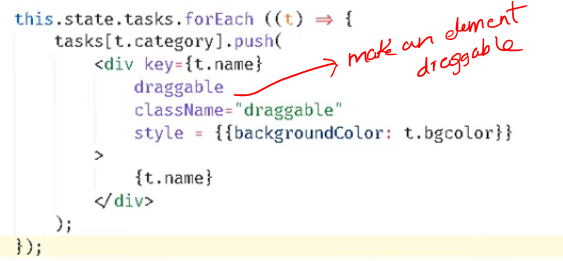
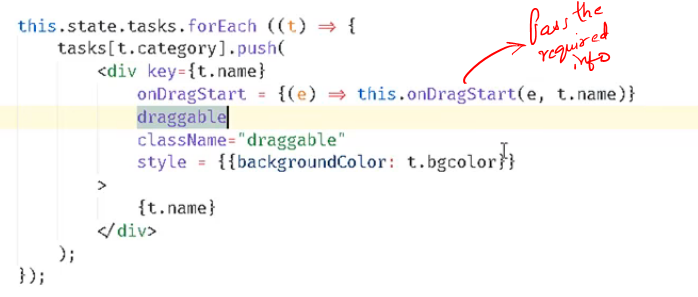
render() { var tasks = { wip: [], complete: [] } this.state.tasks.forEach ((t) => { tasks[t.category].push(<div key={t.name} onDragStart={(e)=>this.onDragStart(e, t.name)} draggable className="draggable" style={{backgroundColor: t.bgcolor}}> {t.name} </div>); });
In the above code, we are looping through all tasks and creating a div for every task item and storing it in the respective categories.
So, the wip[] contains all tasks in the wip category and complete[] contains all the completed tasks.
Step 4 — make the task item draggable
Add the draggable attribute to the
Step 5 — create a droppable container
To create a droppable container, implement the dragover event. Now, since we want to disable the default dragover event, we simple call the event.preventDefault() from the dragover event.
We will also render {tasks.wip} and {tasks.complete} in their corresponding div elements.
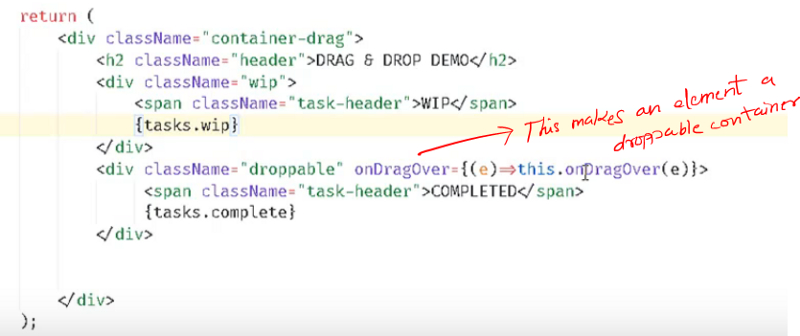
return (<div className="container-drag"> <h2 className="header">DRAG & DROP DEMO</h2> <div className="wip" onDragOver={(e)=>this.onDragOver(e)} onDrop={(e)=>{this.onDrop(e, "wip")}}> <span className="task-header">WIP</span> {tasks.wip} </div> <div className="droppable" onDragOver={(e)=>this.onDragOver(e)} onDrop={(e)=>this.onDrop(e, "complete")}> <span className="task-header">COMPLETED</span> {tasks.complete} </div> </div>);
Let us now implement the onDragOver() event handler.

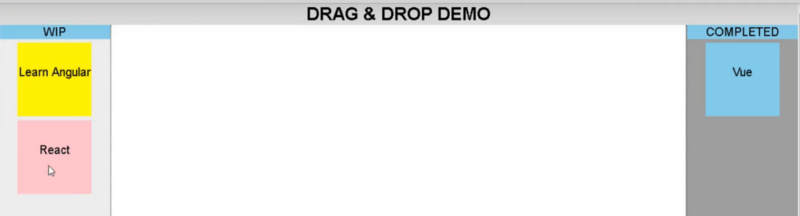
The output so far will look like the below figure.
Step 6 — capture the state of the element being dragged
Let’s modify the code where we are creating the category for each task. Add an eventhandler ondragstart and pass the id/name or any information you need to persist while the drag/drop is happening.
I am using name as a unique value to identify the task. Feel free to use ID or whatever unique key you have.
Let’s now implement the onDragStart event handler.
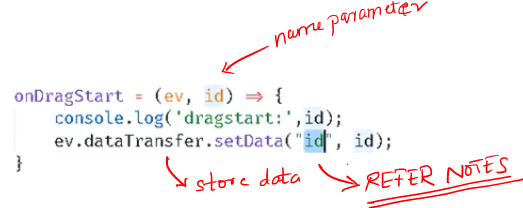
In the onDragStart handler, we grab the parameter and store that within the dataTransfer object. (Don’t get confused by the parameter naming, as I guess I was in a different naming world while coding this :) .)
IE note: this may not work with IE. For IE, the better practice is to give the format as the key as shown below.
Instead of
ev.dataTransfer.setData("id", id)
USE
ev.dataTransfer.setData(“text/plain”,id)
The above handler will ensure that the element being dragged is stored in the event object and is available for use when required. It may be required while dropping on a target.
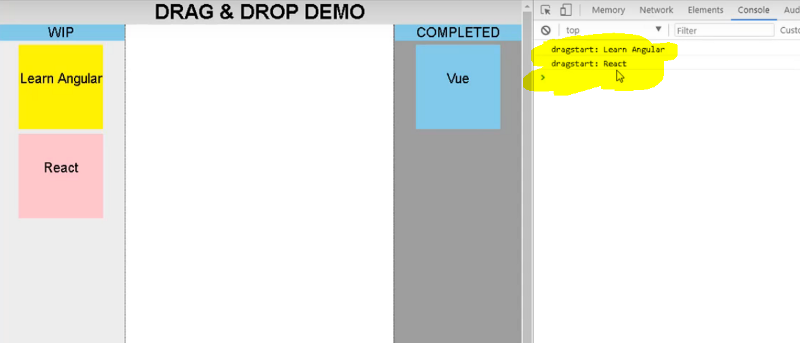
Now if you run the application and drag the elements, the following logs will be output.
Step 7 — handle the drop event.
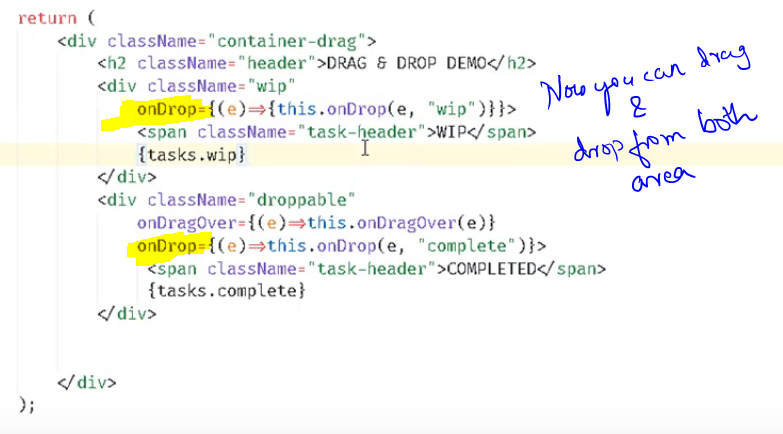
Let’s open up the render method and add the onDrop event to the div with a className of droppable.
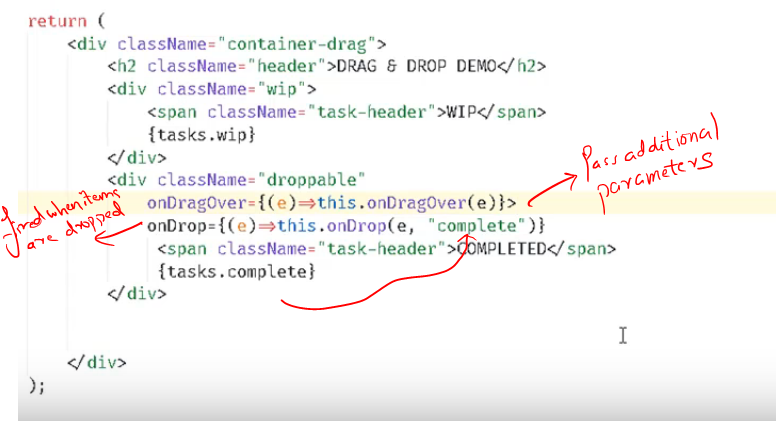
In the above code, we add the drop event handler, and pass the required category complete as an argument. This indicates we are dropping the element from the wip state to the complete state (category). Please feel free to change the names, as required.
Let’s now implement the onDrop() event handler.
Here’s the code you can copy/paste:
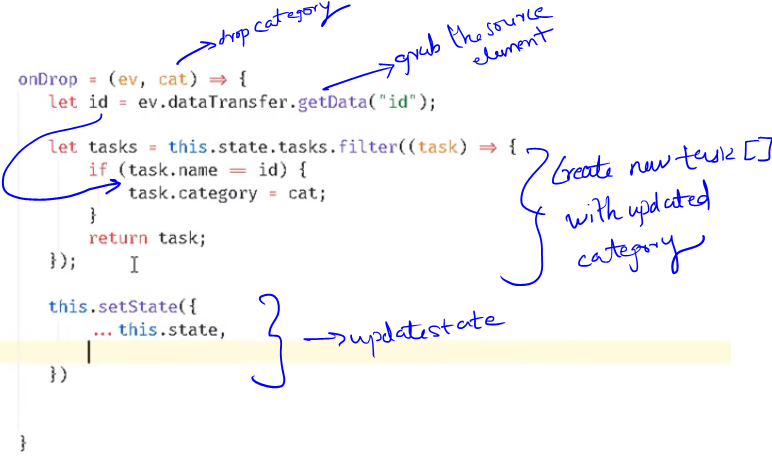
onDrop = (ev, cat) => { let id = ev.dataTransfer.getData("id"); let tasks = this.state.tasks.filter((task) => { if (task.name == id) { task.category = cat; } return task; }); this.setState({ ...this.state, tasks }); }
In the onDrop event handler, we grab the task being dragged by using getData method on the event’s dataTransfer object.
We then create a new tasks array by using the filter method, and change the category of the task being dragged.
setState() will trigger render, and the tasks will be rendered in the right areas.
IE note: To make it work in IE, use the below getData method.
Instead of
var id = ev.dataTransfer.getData(“id”)
use
var id = ev.dataTransfer.getData(“text”)
Step 8 — to implement drop from “complete” to “wip,” add the onDrop handler
The onDrop() handler remains the same as earlier.
Finally, run the code and marvel at your creation :) and have fun while coding.
You can grab the source code from here.
Note: for this to work cross browser, change the setData type to string.
for example, to set data, use **ev.dataTransfer.setData(“text/plain”,id)**. To read data, use **var id = ev.dataTransfer.getData(“text”)**
Since my aim was to demonstrate the core drag and drop features, the code has not been optimized for factors such as design and naming conventions.
Learn with me @Learner + Fullstack Coach (@rajeshpillai): https://twitter.com/rajeshpillai
Promotion: Special 10$ coupon for Medium readers for my upcoming live ReactJS-Beyond the basics course on Udemy in case you wish to support our open source curriculum Mastering frontend engineering in 12 to 20 weeks.
Just published my early access course Javascript Deep Dive — Code your own React