
In this article, we're going to talk about multi-library projects in Android. It's not something ordinary, but not something out of the ordinary either.
You may have come across multi-library projects in your line of work, or you may be looking into converting your library into sub-modules for better structure and organization. No matter the case, you should be well aware of what lies in front of you before diving in.
Writing your own library in Android is neat. You get a chance to write some code that can help other developers (or even yourself).
Since libraries can’t be a standalone project by themselves, they are usually always paired in a project with an application. This allows developing the library to be a simple process where you add a feature/fix a bug and then you can test it directly with the application you have in the project. Thus, simulating (in a local way) how a developer will integrate your library.
But, what if your library relies on another library you are developing?
If you are not aware of it, you should know that a library (read aar) cannot contain another local library within it. It can rely on libraries remotely (via dependencies), but not on something local.
This is not supported in Android, and while some solutions popped up during the years (FatAar), these didn’t always solve the problem and are not up to date. There is even a Google Issue Tracker requesting this feature that has been open for quite some time and is receiving plenty of attention from the community. But let’s identify which walls we can break and which we cannot.
Imagine your project hierarchy looks like this:
-- App
|
 -- OuterLib
   |
--- InnerLibSo, since InnerLib can’t be part of your original project, where can it reside? And also how would you be able to work locally while developing features inside InnerLib?
We are going to answer these questions in this article.
Git Submodule
For most technical problems, there isn’t always just one solution. Usually, there are more, but each solution has its drawbacks. It's all a question of which drawbacks you are more comfortable living with at the end of the day.
To answer our first question, where can InnerLib reside, we have several options:
- Make InnerLib a submodule of our original project
- Make InnerLib a remote dependency of its own
If you are not aware of submodules in Git, Git’s documentation is a good place to familiarize yourself with them. Quoting from it (the first paragraph):
It often happens that while working on one project, you need to use another project from within it. 👉 Perhaps it’s a library that a third party developed or that you’re developing separately and using in multiple parent projects. 👈 A common issue arises in these scenarios: you want to be able to treat the two projects as separate yet still be able to use one from within the other.
This paragraph shows us that this is exactly our use case. Using a submodule has its benefits. All your code is in one place, is easy to manage, and is easy to develop locally.
But submodules have some weaknesses. One is the fact that you must always be aware of which branch your submodule is pointing to. Imagine a scenario where you are on a release branch in your main repository and your sub-module is on a feature branch. If you don’t notice, you release a version of your code with something that is not ready for production. Whoops.
Now think about this within a team of developers. One careless mistake can be costly.
If the first option sounds problematic for you, then hosting your library in another repository is your second choice. Setting up the repository is pretty simple, but how do you work locally now?
Working Locally
Now that we've gotten our project set up properly, we will probably have a line similar to this in our OuterLib build.gradle file:
dependencies {
  implementation 'url_to_remote_inner_lib_repository'
} How can we make the development cycle efficient and easy to work with? If we develop some feature in InnerLib, how do we test things out in OuterLib? Or in our application?
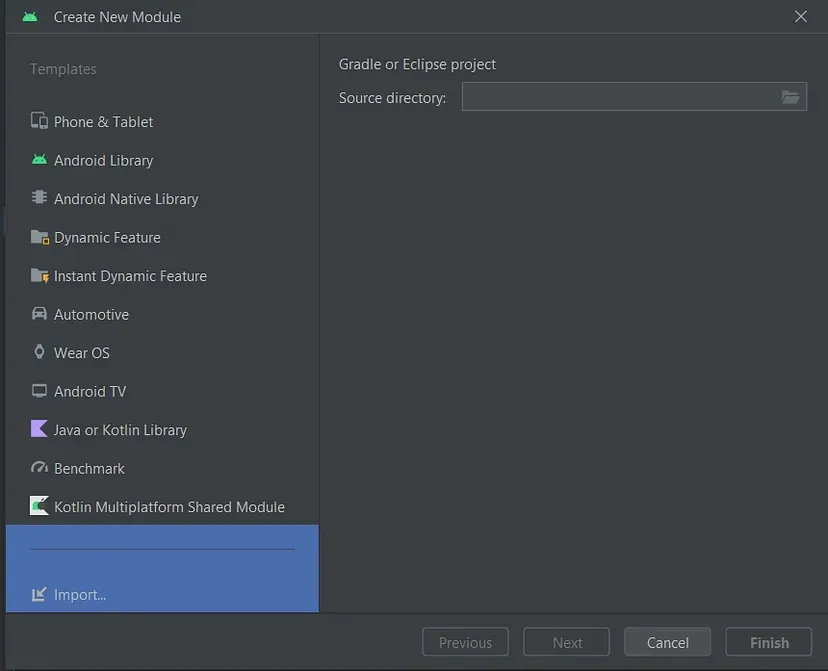
One solution that might come up is to import our InnerLib locally to our OuterLib project, while having InnerLib .gitignored in our OuterLib project. You can do so easily by right clicking on the name of the project in the left hand side menu in Android Studio and going to New → Module.

Then in the window that opens up, you can choose the Import option at the bottom left:
That sounds easy and simple so far, but what’s the catch?
Each time you modify a file that belongs to InnerLib, the changes won’t be reflected inside InnerLib since it is ignored. So, each change you want to make has to happen inside of InnerLib and then you have to import it again inside OuterLib to see the changes.
This doesn’t seem right. There must be a better way of doing this.
With just a few lines in our settings.gradle file, we can make sure our files stay in sync when we make changes in InnerLib.
When we imported InnerLib into our project, Android Studio made a copy of InnerLib and cached it. That is why we needed to re-import the library for every change we made inside of it. We can tell Android Studio where to reference the files from using the projectDir attribute.
Our settings.gradle might look something like this:
include ':outerLib', ':innerLib', ':app'To reference our InnerLib locally, we would have to change settings.gradle into this:
include ':outerLib', ':innerLib', ':app'
project('innerLib').projectDir = new File('PATH_TO_INNER_LIB')
Using this approach, our InnerLib files will be linked to our working directory, so every change we make will be reflected immediately.
But, we would like flexibility when working locally on OuterLib with a remote version of InnerLib. What we wrote above inside the settings.gradle file will only allow us to work locally and surely we don’t want to commit that as it is.
Maven Local
If the approach above doesn’t sit quite right with you, there is a different one you can take. Just like you would publish your library publicly with maven, you can do the same thing locally with maven local. Maven local is a set of repositories that sit locally on your machine.
Below are the paths for mavenLocal depending on the operating system of your machine:
- Mac → /Users/YOUR_USERNAME/.m2
- Linux → /home/YOUR_USERNAME/.m2
- Windows → C:\Users\YOUR_USERNAME\.m2
In essence you can publish your library locally and then link to it in your project. Doing it this way, we can link our project to InnerLib.
In order to allow this configuration in our project, we need to do the following things:
- Add mavenLocal() as a repository inside our repositories clause. This is to allow our project the ability to search for repositories locally
buildscript {
    repositories {
        mavenLocal()
    }
}

...

allprojects {
    repositories {
        mavenLocal()
    }
}
2. Change our implementation line inside our dependencies clause to reference our InnerLib as if it we are referencing it remotely
3. To publish InnerLib locally, we will create a file called publishingLocally.gradle that will contain the following:
apply plugin: 'maven-publish'

project.afterEvaluate {
    publishing {
      publications {
            library(MavenPublication) {
                    setGroupId groupId          //your library package
                    setArtifactId artifactId
                    version versionName         //I.E. 1.0

                    artifact bundleDebugAar

                    pom.withXml {
                        def dependenciesNode = asNode().appendNode('dependencies')
                        def dependencyNode = dependenciesNode.appendNode('dependency')
                        dependencyNode.appendNode('groupId', 'your_group_id')
                        dependencyNode.appendNode('artifactId', 'your_artificat_id')
                        dependencyNode.appendNode('version', 'your_version')
                    }
                }
            }
        }
}
4. Inside your application level build.gradle file, add the line:
apply from: '/.publishingLocally.gradleIf this option seems a bit too good to be true, it is. While on one hand, we can develop things locally seamlessly just as if we were working with a remote library. On the other, if we make any change inside InnerLib while working locally, it is required to publish it locally again. While this isn’t a costly task, it does create a need to perform tedious tasks over and over.
A Solution for Working Locally and Remotely
We want to avoid the constant need to re-publish our InnerLib package whenever we make a change locally. We need to figure out a way to make our project be aware of those changes.
In the Working Locally section, we found out how to do that, but we had an issue with committing the settings.gradle file. To solve this problem so we can work both locally and remotely with our InnerLib, we will use a parameter we will define in our gradle.properties file.
The gradle.properties file is a place where you can store project level settings that configure your development environment. This helps make sure that all the developers on a team have a consistent development environment.
Some settings you might be familiar with that are found inside this file are AndroidX support (android.useAndroidX=true) or the JVM arguments (org.gradle.jvmargs=-Xmx1536m).
To help us solve our situation, we can add a parameter here to indicate whether we want to work locally or not. Something along the lines of:
workingLocally = falseThis parameter will grant us the ability to distinguish between which settings we are working with, either locally or with production code. First, let’s alter what we have in our settings.gradle file by wrapping it in a condition that checks if our parameter is true:
include ':outerLib', ':innerLib', ':app'
if (workingLocally.booleanValue()) {
  project('innerLib').projectDir = new File('PATH_TO_INNER_LIB')
}
This way, we indicate to the project to get the files for our InnerLib locally from our machine.
Another place where we need to change our logic is in our build.gradle file. Here, instead of getting the code to our library remotely in our dependencies block, we can indicate whether we are depending on it locally or not.
dependencies {
   if (workingLocally.booleanValue()) {
      implementation 'innerLib'
   } else {
     implementation 'url_to_remote_repository'
  }
}
⚠️ Word of warning: You should never commit the gradle.properties file when working locally.
The journey was long and may have seemed quite exhausting. But now we have a full-proof setup for working locally and remotely on a multiple library project.
If you encounter any issues or would like to give your take on this, feel free to leave a comment.